Hyundai Matrix (2007 year). Instruction - part 11
2 DRIVING YOUR HYUNDAI
24
C190D01A-GAT
C190E01FC-GAT
Safety Chains
Trailer Weight Limit
Should the hitch connection between
your car and the trailer or vehicle you
are towing fail, the trailer or vehicle
could wander dangerously across other
lanes of traffic and ultimately collide
with another vehicle. To eliminate this
potentially dangerous situation, safety
GROSS AXLE
WEIGHT
chains, attached between your car and
GROSS VEHICLE
the trailer or towed vehicle, are re-
WEIGHT
C190E02L
quired in most provinces.
TONGUE LOAD
TOTAL TRAILER
WEIGHT
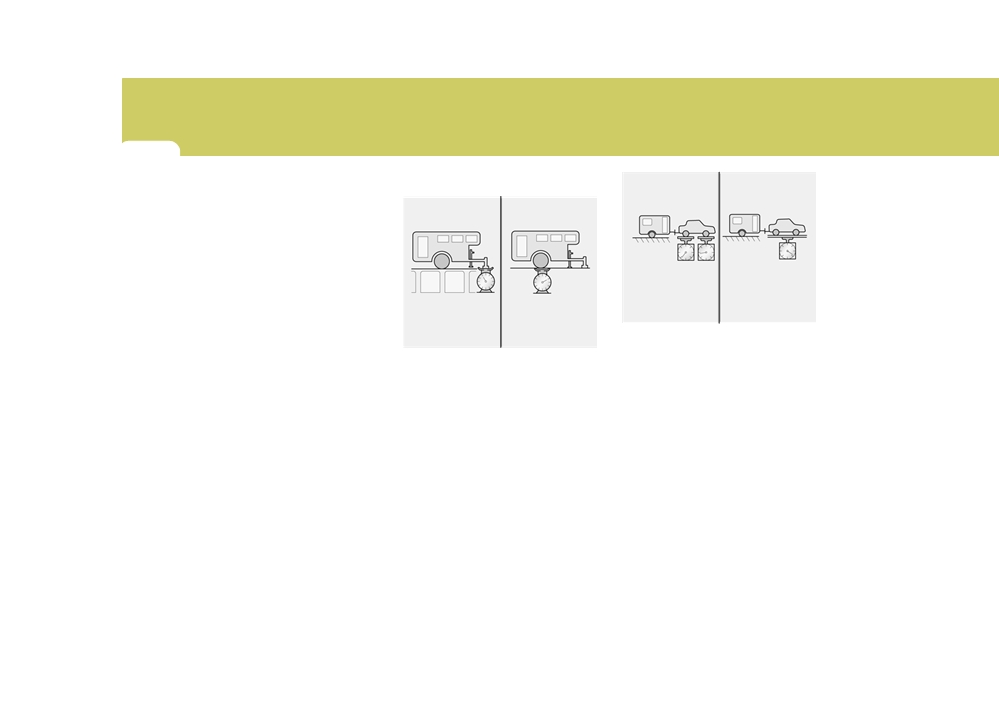
2. The total gross vehicle weight with
C190E01L
trailer must not exceed the Gross
Tongue loads can be increased or
Vehicle Weight Rating (GVWR)
decreased by redistributing the load in
shown on the vehicle identifica-
the trailer. This can be verified by
tion plate (see page 8-2). The total
checking the total weight of the loaded
gross vehicle weight is the com-
trailer and then checking the load on
bined weight of the vehicle, driver,
the tongue.
all passengers and their luggage,
cargo, hitch, trailer tongue load
NOTE:
and other optional equipment.
1. Never load the trailer with more
3. The front or rear axle weight must
weight in the back than in the
not exceed the Gross Axle Weight
front. About 60% of the trailer
Rating (GAWR) shown on the
load should be in the front half
vehicle identification plate (see
on the trailer and the remaining
page 8-2). It is possible that your
40% in the rear.
towing package does not exceed
the GVWR but exceeds the
GAWR.
Improper trailer loading and/or too

DRIVING YOUR HYUNDAI
2
25
much luggage in the trunk can
C190F02A-GAT
overload the rear axle. Redistrib-
Trailer or Vehicle Towing Tips
Thefollowing specifications are rec-
ute the load and check the axle
1.
Before towing, check hitch and
ommended when towing a trailer.
weight again.
safety chain connections as well as
The loaded trailer weigh cannot safely
4. The maximum permissible static
proper operation of the trailer run-
exceed the values in the following
vertical load on the coupling de-
ning lights, brake lights, and turn
chart.
vice ; 52kg
signals.
5. The maximum permissible over-
2.
Always drive your vehicle at a mod-
WARNING:
erate speed (Less than 100 km/h).
3.
Trailer towing requires more fuel
kg (Lbs)
than normal conditions.
Maximum Towable
4.
To maintain engine braking effi-
Weight
ciency and electrical charging per-
Trailer
Tongue
formance, do not use fifth gear
1,300
(manual transaxle) or overdrive (au-
1.5 Diesel
MANUAL
With
COUPLING
(2,865)
tomatic transaxle).
1.6/1.8 L
TRANSAXLE
Brake
5.
Always secure items in the trailer to
POINT
AUTO
1,100
52
Type
1.6/1.8 L
prevent load shift while driving.
TRANSAXLE
(2,424)
(115)
6.
Check the condition and air pres-
C190E01FC
Without Brake Type
550 (1,212)
sure of all tires on the trailer and
hang of the coupling point : 760
your vehicle. Low tire pressure can
mm
seriously affect the handling. Also
check the spare tire.
Improperly loading your car and
CAUTION:
7.
The vehicle/trailer combination is
trailer can serious affect its steering
more affected by crosswind and
and braking performance causing a
buffeting. When being passed by a
crash in which could cause serious
large vehicle, keep a constant speed
injury or death.
and steer straight ahead. If there is
too much wind buffeting, slow down
to get out of the other vehicle's air
turbulence.

2 DRIVING YOUR HYUNDAI
26
8. When parking your vehicle and
14.When going down a hill, shift into a
trailer, especially on a hill, be sure to
lower gear and use the engine brak-
!
follow all the normal precautions.
ing effect.
CAUTION:
Turn your front wheel into the curb,
When ascending a long grade,
If overheating should occur when
set the parking brake firmly, and put
downshift the transaxle to a lower
towing, (temperature gauge reads
the transaxle in
1st or Reverse
gear and reduce speed to reduce
near the red zone), taking the follow-
(manual) or Park (automatic). In
chances of engine overloading and/
ing actions may reduce or eliminate
addition, place wheel chocks at
or overheating.
the problem.
each of the trailer's tires.
15.If you have to stop while going
9. If the trailer has electric brakes,
uphill, do not hold the vehicle in
1. Turn off the air conditioner.
start your vehicle and trailer mov-
place by pressing on the accelera-
2. Reduce highway speed.
ing, and then apply the trailer brake
tor. This can cause the automatic
3. Select a lower gear when going
controller by hand to be sure the
transaxle to overheat. Use the park-
uphill.
brakes are working. This lets you
ing brake or footbrake.
4. While in stop and go traffic, place
check your electrical connection at
the gear selection in park or neu-
the same time.
NOTE:
tral and idle the engine at a higher
10.During your trip, check occasion-
When towing check transaxle fluid
speed.
ally to be sure that the load is
more frequently.
secure, and that the lights and any
trailer brakes are still working.
11.Avoid jerky starts, sudden accel-
eration or sudden stops.
12.Avoid sharp turns and rapid lane
changes.
13.Avoid holding the brake pedal down
too long or too frequently. This could
cause the brakes to overheat, re-
sulting in reduced braking efficiency.

WHAT TO DO IN AN EMERGENCY
If the Engine Will not Start
3-2
Jump Starting
3-3
If the Engine Overheats
3-4
Spare Tire
3-6
If You Have a Flat Tire
3-7
3
Changing A Flat Tire
3-7
If Your vehicle Must Be Towed
3-12
Emergency Towing
3-14
If You Lose Your Keys
3-15
3

3 WHAT TO DO IN AN EMERGENCY
IF THE ENGINE WILL NOT START
2
D010A01A-AAT
D010B02A-AAT
D010C02A-AAT
If Engine Doesn't Turn Over or
If Engine Turns Over Normally
Turns Over Slowly
but Does Not Start
!
WARNING:
If the engine will not start, do not
push or pull the car to start it. This
could result in a collision or cause
other damage. In addition, push or
pull starting may cause the cata-
lytic converter to be overloaded and
create a fire hazard.
D010B01FC
SSA3020C
1. If your car has an automatic
1. Check fuel level.
transaxle, be sure the gear selector
2. With the key in the "OFF" position,
lever is in "N" or "P" and the emer-
check all connectors at ignition coils
gency brake is set.
and spark plugs(For Gasoline En-
2. Check the battery connections to be
gine) or check all connectors at
sure they are clean and tight.
glow plug and glow plug relay(For
3. Turn on the interior light. If the light
Diesel Engine). Reconnect any that
dims or goes out when you operate
may be disconnected or loose.
the starter, the battery is discharged.
3. Check the fuel line in the engine
4. Check the starter connections to be
room.
sure they are securely tightened.
4. If engine still refuses to start, call a
5. Do not push or pull the vehicle to
Hyundai dealer or seek other quali-
start it. See instructions for "Jump
fied assistance.
Starting".

WHAT TO DO IN AN EMERGENCY
3
JUMP STARTING
3
D010D01A-AAT
D020A03A-AAT
o
If you should accidentally get acid on
If the Engine Stalls While
your skin or in your eyes, immedi-
Driving
ately remove any contaminated cloth-
ing and flush the area with clean
1. Reduce your speed gradually, keep-
water for at least 15 minutes. Then
ing a straight line. Move cautiously
Discharged
promptly obtain medical attention. If
off the road to a safe place.
battery
you must be transported to an emer-
2. Turn on your emergency flashers.
gency facility, continue to apply wa-
3. Try to start the engine again. If your
ter to the affected area with a sponge
vehicle will not start, contact a
or cloth.
Hyundai dealer or seek other quali-
Booster
o
The gas produced by the battery
fied assistance.
battery
during the jump-start operation is
HFC4002
highly explosive. Do not smoke or
allow a spark or an open flame in the
vicinity.
!
WARNING:
o
The battery being used to provide
The gas produced by the battery
the jump start must be 12-volt. If you
during the jump-start operation is
cannot determine that it is a 12-volt
highly explosive. If these instruc-
battery, do not attempt to use it for
tions are not followed exactly, seri-
the jump start.
ous personal injury and damage to
o
To jump start a car with a discharged
the vehicle may occur! If you are
battery, follow this procedure ex-
not sure how to follow this proce-
actly:
dure, seek qualified assistance.
Automobile batteries contain sul-
1. If the booster battery is installed in
furic acid. This is poisonous and
another vehicle, be sure the two
highly corrosive. When jump start-
vehicles are not touching.
ing, wear protective glasses and be
2. Turn off all unnecessary lights and
careful not to get acid on yourself,
acces-sories in both vehicles.
your clothing or on the car.
3 WHAT TO DO IN AN EMERGENCY
IF THE ENGINE OVERHEATS
4
3. Attach the clamps of the jumper
6. Carefully remove the jumper cables
D030A02A-AAT
cable in the exact location shown.
in the reverse order of attachment.
If your temperature gauge indicates
First, attach one clamp of the jumper
overheating, you experience a loss of
cable to the positive (+) post or
If you do not know why your battery
power, or hear loud pinging or knock-
cable of the discharged battery. Then
became discharged (because the lights
ing, the engine is probably too hot. If
attach the other end of the same
were left on, etc.), have the charging
this happens to you, you should:
cable to the positive (+) post or
system checked by your Hyundai
cable of the booster battery. Next,
dealer.
1. Pull off the road and stop as soon as
using the other cable, attach one
it is safe to do so.
clamp to the negative (-) post or
2. Place the gear selector lever in "P"
cable of the booster battery. Then
(automatic) or neutral
(manual
attach the other end of that cable to
transaxle) and set the parking brake.
a solid metal part of the engine
If the air conditioning is on, turn it
away from the battery. Do not con-
off.
nect the cable to any moving part.
3. If engine coolant is running out un-
4. Start the engine in the car with the
der the car or steam is coming out
booster battery and let it run for a
from the hood, stop the engine. Do
few minutes. This will help to as-
not open the hood until the engine
sure that the booster battery is fully
coolant has stopped running or the
charged. During the jumping opera-
steaming has stopped. If there is no
tion, run the engine in this vehicle at
visible loss of engine coolant and no
about 2,000 rpm.
steam, leave the engine running
5. Start the engine in the car with the
and check to be sure the engine
discharged battery using the nor-
cooling fan is operating. If the fan is
mal starting procedure. After the
not running, turn the engine off.
engine starts, leave the jumper
4. Check to see if the water pump drive
cables connected and let the engine
belt is missing. If it is not missing,
run at fast idle or about 2,000 rpm
check to see that it is tight. If the
for several minutes.
drive belt seems to be satisfactory,

WHAT TO DO IN AN EMERGENCY
3
5
check for coolant leaking from the
7. Proceed with caution, keeping alert
room while engine is running, since
radiator, hoses or under the car. (If
for further signs of overheating. If
the high currents in the Common
the air conditioning had been in use,
overheating happens again, call a
Rail system produce considerable
it is normal for cold water to be
Hyundai dealer for assistance.
magnetic fields.
draining from it when you stop).
!
5. If the water pump drive belt is bro-
CAUTION:
!
WARNING:
ken or coolant is leaking out, stop
Serious loss of engine coolant indi-
While the engine is running, keep
the engine immediately and call the
cates there is a leak in the cooling
hair, hands, and clothing away from
nearest Hyundai dealer for assis-
system and this should be checked
moving parts such as the fan and
tance.
as soon as possible by a Hyundai
drive belts to prevent injury.
dealer.
!
WARNING:
!
WARNING (Diesel only):
Do not remove the radiator cap when
Never work on injection system with
the engine is hot. This can allow
engine running or within 30 sec-
coolant to be blown out of the open-
onds after shutting off engine. High
ing and cause serious burns.
pressure pump, rail, injectors and
high pressure pipes are subject to
6. If you cannot find the cause of the
high pressure even after the engine
overheating, wait until the engine
stopped. The fuel jet produced by
temperature has returned to nor-
fuel leaks may cause serious in-
mal. Then, if the engine coolant has
jury, if it touch the body. People
been lost, carefully add coolant to
using pacemakers should not move
the reservoir (page 6-14) to bring
than 30cm closer to the ECU or
the fluid level in the reservoir up to
wiring harness within the engine
the halfway mark.

3 WHAT TO DO IN AN EMERGENCY
SPARE TIRE
6
D040A01FC-GAT
5. The temporary spare tire should not
D040B01FC-GAT
TEMPORARY SPARE TIRE
be used on any other wheels, nor
FULL SIZE SPARE TIRE
should standard tires, snow tires,
(If Installed)
The following instructions for the tem-
wheel covers or trim rings be used
porary spare tire should be observed:
The following instructions for the FULL
with the temporary spare wheel. If
SIZE spare tire should be observed:
such use is attempted, damage to
1. Check inflation pressure as soon as
these items or other car compo-
possible after installing the spare
Check inflation pressure as soon as
nents may occur.
tire, and adjust to the specified pres-
practical after installing the spare tire,
6. The temporary spare tire pressure
sure. The tire pressure should be
and adjust to the specified pressure.
should be checked once a month
periodically checked and maintained
The tire pressure should be periodi-
while the tire is stored.
at the specified pressure while the
cally checked and maintained at the
tire is stored.
specified pressure while the tire is
Spare Tire Pressure
stored.
!
CAUTION:
Spare Tire Pressure
Tire Size
T115/70R(D)15
o Do not use snow chains with
Inflation Pressure
420 kPa (60 psi)
your temporary spare tire.
Tire Size
Full Size
o Do not use more than one tempo-
Inflation Pressure
210 kPa (30 psi)
2. The spare tire should only be used
rary spare tire at a time.
temporarily and should be returned
to the luggage compartment as soon
as the original tire can be repaired or
replaced.
3. Continuous use at speeds of over
80 km/h (50 mph) is not recom-
mended.
4. As the temporary spare tire is spe-
cifically designed for your car, it
should not be used on any other
vehicle.

WHAT TO DO IN AN EMERGENCY
3
IF YOU HAVE A FLAT TIRE
CHANGING A FLAT TIRE
7
D040B01A-AAT
D050A01A-AAT
D060A01A-AAT
Handling the Spare Tire
If a tire goes flat while you are driving:
1. Take your foot off the accelerator
pedal and let the car slow down
while driving straight ahead. Do not
apply the brakes immediately or at-
tempt to pull off the road as this may
cause a loss of control. When the
vehicle has slowed to such a speed
that it is safe to do so, brake carefully
and pull off the road. Drive off the
D060A02FC
road as far as possible and park on
HFC4014
The procedure described on the fol-
firm, level ground. If you are on a
Remove the installation bolt to remove
lowing pages can be used to rotate
divided highway, do not park in the
the spare tire. To replace the spare tire
tires as well as to change a flat tire.
median area between the two traffic
in its storage compartment, tighten the
When preparing to change a flat tire,
lanes.
bolt firmly with your fingers until there
check to be sure the gear selector
2. When the vehicle is stopped, turn on
is no more play in the spare tire.
lever is in "P" (automatic transaxle) or
your emergency hazard flashers, set
reverse gear (manual transaxle) and
the parking brake and put the
that the parking brake is set, then:
transaxle in "P" (automatic transaxle)
or reverse (manual transaxle).
3. Have all passengers get out of the
vehicle. Be sure they all get out on
the side of the car that is away from
traffic.
4. Change the tire following the in-
structions provided on the following
pages.

3 WHAT TO DO IN AN EMERGENCY
8
D060K01FC-GAT
D060B01FC-GAT
Wheel Cap (If installed)
Groove
1. Obtain Spare Tire and Tool
Boss
Groove
HFC4024
4. Reinstall the wheel cap by fitting the
HFC4023
D060B01FC
boss of the wheel cap in the groove
1. Wrap a piece of cloth around the tip
Remove the spare tire and take out the
of the wheel, hitting the center of the
of the screw driver to avoid scratch-
jack and tool bag from the luggage
wheel cap with your hand.
ing.
room.
2. Insert the screw driver into the
groove of the wheel cap and pry
NOTE:
gently to remove the wheel cap.
The jack is located beneath the lug-
3. Change the flat tire.
gage mat in the vehicle.

WHAT TO DO IN AN EMERGENCY
3
9
D060C01A-AAT
D060D01A-AAT
D060E01A-AAT
2. Block the Wheel
3. Loosen Wheel Nuts
4. Put the Jack in Place
Flat tire
D060C02FC
D060D02FC
D060E02FC
Block the wheel that is diagonally op-
The wheel nuts should be loosened
The base of the jack should be placed
posite from the flat to keep the vehicle
slightly before raising the car. To loosen
on firm, level ground. The jack should
from rolling when the vehicle is raised
the nuts, turn the wheel nut wrench
be positioned as shown in the drawing.
on the jack.
handle counterclockwise. When doing
this, be sure that the socket is seated
completely over the nut so it cannot
slip off. For maximum leverage, posi-
tion the wrench so the handle is to the
right as shown in the drawing. Then,
while holding the wrench near the end
of the handle, pull up on it with steady
pressure. Do not remove the nuts at
this time. Just loosen them about one-
half turn.

3 WHAT TO DO IN AN EMERGENCY
10
D060F02E-AAT
D060G01Y-AAT
5. Raising the Vehicle
6. Changing Wheels
!
WARNING:
Do not get under the car when it is
supported by the jack! This is very
dangerous as the vehicle could fall
Wrench bar
and cause serious injury or death.
No one should stay in the car while
the jack is being used.
Wheel nut wrench
HFC4022
D060G02FC
After inserting a wrench bar into the
Loosen the wheel nuts and remove
wheel nut wrench, install the wrench
them with your fingers. Slide the wheel
bar into the jack as shown in the draw-
off the studs and lay it flat so it cannot
ing. To raise the vehicle, turn the wheel
roll away. To put the wheel on the hub,
nut wrench clockwise. As the jack be-
pick up the spare tire, line up the holes
gins to raise the vehicle, double check
with the studs and slide the wheel onto
that it is properly positioned and will
them. If this is difficult, tip the wheel
not slip. If the jack is on soft ground or
slightly and get the top hole in the
sand, place a board, brick, flat stone or
wheel lined up with the top stud. Then
other object under the base of the jack
jiggle the wheel back and forth until the
to keep it from sinking.
wheel can be slid over the other studs.
Raise the car high enough so that the
fully inflated spare tire can be installed.
To do this, you will need more ground
clearance than is required to remove
the flat tire.

WHAT TO DO IN AN EMERGENCY
3
11
D060I01E-GAT
wheel. Loss of a wheel may result in
8. Lower Vehicle and Tighten
loss of control of the vehicle. This
Nuts
may cause serious injury or death.
D060H02A-AAT
7. Re-install Wheel Nuts
D060G02E
!
D060I02FC
WARNING:
Lower the car to the ground by turning
Wheel and wheel covers may have
the wheel nut wrench counterclock-
sharp edges. Handle them carefully
wise. Then position the wrench as
to avoid possible severe injury.
shown in the drawing and tighten the
Before putting the wheel into place,
wheel nuts. Be sure the socket is
D060H02FC
be sure that there is nothing on the
seated completely over the nut. Do not
hub or wheel (such as mud, tar,
To reinstall the wheel cover, hold it on
stand on the wrench handle or use an
gravel, etc.) that interferes with the
the studs, put the wheel nuts on the
extension pipe over the wrench handle.
wheel from fitting solidly against
studs and tighten them finger tight.
Go around the wheel tightening every
the hub. If there is, remove it. If
The nuts should be installed with their
other nut until they are all tight. Then
there is not good contact on the
small diameter ends directed inward.
double-check each nut for tightness.
mounting surface between the
Jiggle the tire to be sure it is completely
After changing wheels, have a techni-
wheel and hub, the wheel nuts could
seated, then tighten the nuts as much
cian tighten the wheel nuts to their
loosen and cause the loss of a
as possible with your fingers again.
proper torque as soon as possible.

3 WHAT TO DO IN AN EMERGENCY
IF YOUR VEHICLE MUST BE
12
TOWED
Wheel nut tightening torque:
air may leak from the tire. If you lose a
D080A01O-GAT
If your vehicle has to be towed, it
valve cap, buy another and install it as
Steel wheel & aluminium alloy wheel:
should be done by your Hyundai dealer
soon as possible.
900-1,100 kg.cm (65-80 lb.ft)
or a commercial tow truck service.
After you have changed wheels, al-
This will help assure that your vehicle
ways secure the flat tire in its place in
is not damaged in towing. Also, profes-
the luggage room and return the jack
sionals are generally aware of local
and tools to their proper storage loca-
D060J01FC-GAT
laws governing towing. In any case,
tions.
After Changing Wheels
rather than risk damage to your car, it
is suggested that you show this infor-
mation to the tow truck operator. Be
sure that a safety chain system is used
and that all local laws are observed.
It is recommended that your vehicle
be towed with a wheel lift and dollies or
flatbed equipment with all the wheels
off the ground.
!
CAUTION:
HFC502
o Your vehicle can be damaged if
If you have a tire gauge, remove the
towed incorrectly!
valve cap and check the air pressure.
o Be sure the transaxle is in neu-
If the pressure is lower than recom-
tral.
mended, drive slowly to the nearest
o When the engine will not start, be
service station and inflate to the cor-
sure the steering is unlocked by
rect pressure. If it is too high, adjust it
placing the key in the "ACC" po-
until it is correct. Always reinstall the
sition.
valve cap after checking or adjusting
tire pressure. If the cap is not replaced,

WHAT TO DO IN AN EMERGENCY
3
13
D080B01O-GAT
1) If the vehicle is being towed with the
Towing the Vehicle
rear wheels on the ground, be sure
!
CAUTION:
the parking brake is released.
1)
o When towing the vehicle, take care
not to cause damage to the bumper
NOTE:
or underbody of the vehicle.
Before towing, check the level of
the automatic transaxle fluid. If it is
below the "HOT" range on the dip-
stick, add fluid. If you cannot add
2)
fluid, a towing dolly must be used.
2) If any of the loaded wheels or sus-
pension components are damaged
or the vehicle is being towed with
the front wheels on the ground, use
dolly
3)
a towing dolly under the front wheels.
o Manual Transaxle:
HFC004
If you do not use a towing dolly,
o Do not tow with sling type truck as
place the ignition key in the "ACC"
this may cause damage to the
position and put the transaxle in "N
bumper or underbody of the ve-
(Neutral)".
HFC005
hicle.
Your vehicle can be towed by wheel lift
type truck (1), (2) or flatbed equipment
!
CAUTION:
(3).
Do not tow with the key removed or
in the "LOCK" position when tow-
ing from the rear without a towing
dolly.

3 WHAT TO DO IN AN EMERGENCY
EMERGENCY TOWING
14
o Automatic Transaxle:
D080D04A-AAT
NOTE:
Be sure to use a towing dolly under
Before towing, check the level of the
the front wheels.
automatic transaxle fluid. If it is be-
low the "HOT" range on the dipstick,
Front
add fluid. If you cannot add fluid, a
!
towing dolly must be used.
CAUTION:
Rear
!
CAUTION:
If the car is being towed with all four
D080D04FC
wheels on the ground, it can be
towed only from the front. Be sure
For emergency towing when no com-
that the transaxle is in neutral. Do
mercial tow vehicle is available, attach
not tow at speeds greater than 50
a tow cable, chain or strap to one of the
km/h (30 mph) and for more than 25
towing hooks under the front/rear of
km (15 miles).
your vehicle. Do not attempt to tow your
HFC006
Be sure the steering is unlocked by
vehicle in this manner on any unpaved
placing the key in the "ACC" posi-
A vehicle with an automatic transaxle
surface. This could result in serious
tion. A driver must be in the towed
should never be towed from the rear
damage to your vehicle.
vehicle to operate the steering and
with the front wheels on the ground.
Nor should towing be attempted if the
brakes.
This can cause serious damage to
wheels, drive train, axles, steering or
the transaxle.
brakes are damaged. Before towing,
be sure the transaxle is in neutral and
the key is in "ACC" (with the engine off)
3) It is recommended that your vehicle
or in the "ON" position (with the engine
be towed with all the wheels off the
running). A driver must be in the towed
ground.
vehicle to steer it and operate the brakes.