Honda Odyssey 2004. Manual - part 455


  Index      Honda     Honda Odyssey 2004 - service repair manual 2004 year


Search            


Content   ..  453  454  455  456   ..


Honda Odyssey 2004. Manual - part 455


01

02

S0X4A00J32323335061FEAT01

01

S0X4A00J32300058311FEAT02

22-148

22-148

Interior Lights

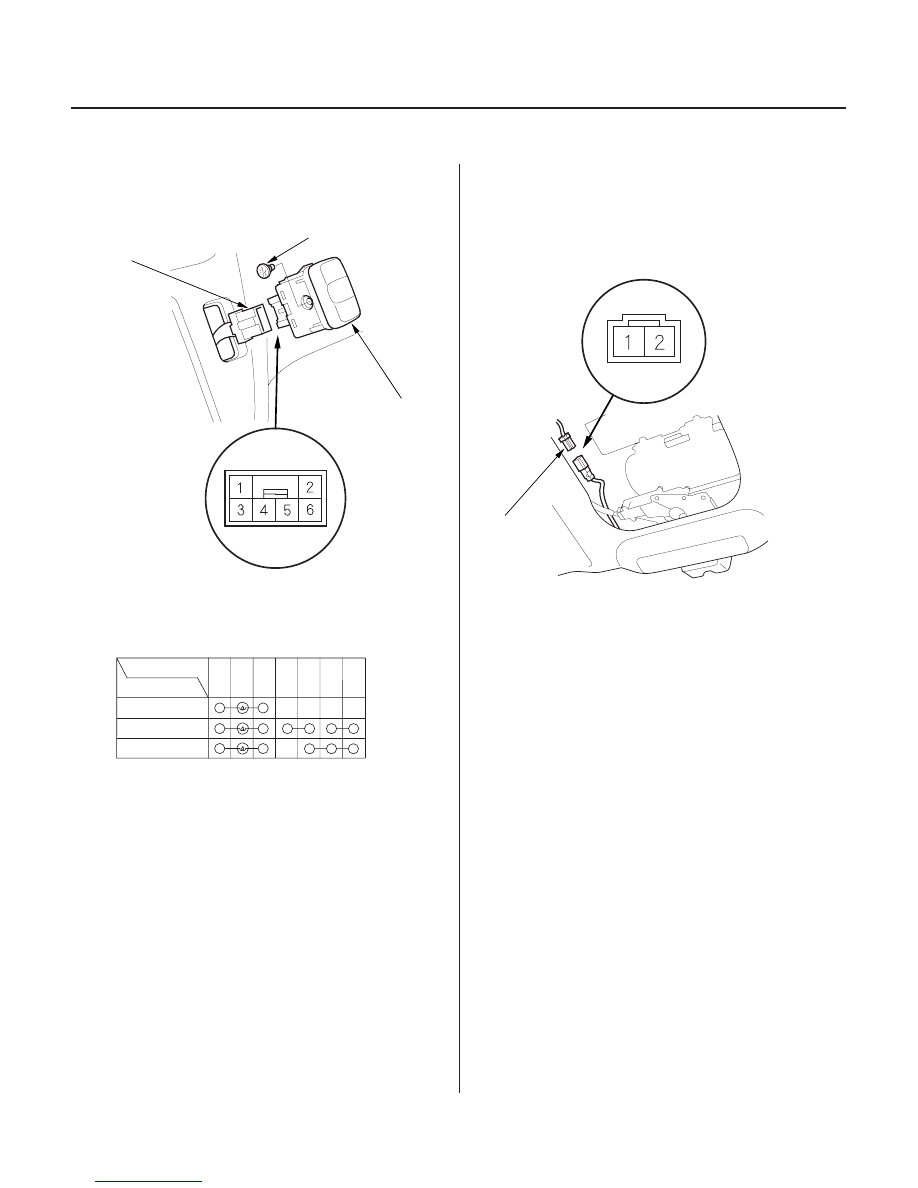
Interior Light Switch Test

Tailgate Latch Switch Test

A

C

B

A

Terminal

Position

MIDDLE

OFF

6

1

2

3

5

4

ON

1. Remove the center panel (see page 20-70).

2. Push the switch (A) out from the center panel.

3. Disconnect the 6P connector (B) from the switch.

4. Check for continuity between the terminals in each

switch position according to the table.

5. If the continuity is not as specified, replace the bulb

(C) or the switch.

1. Open the tailgate.

2. Remove the tailgate lower trim (see page 20-61).

3. Disconnect the 2P connector (A) from the latch

switch.

4. Check for continuity between the No. 1 and No. 2

terminals.

• With the tailgate open, there should be continuity.
• With the tailgate closed, there should be no

continuity.

5. If the continuity is not as specified, replace the

tailgate latch switch.

Terminal side of
male terminals

03/07/29 10:21:37 61S0X050_220_0150

11

12

13

S0X4A00J32300039851FEAT10

FRONT MAP LIGHT BULB: 6.2 W

22-149

Front Individual Map Light Test

D

C

B

A

Terminal

Position

OFF

1

2

3

ON

LEFT

RIGHT

OFF

ON

1. Carefully pry off the lens (A) with a small

screwdriver.

2. Remove the four mounting screws (B).

3. Disconnect the 3P connector (C) from the housing

(D).

4. Check for continuity between the terminals in each

switch position according to the table.

5. If the continuity is not as specified, check the

bulb(s). If the bulb(s) are OK, replace the light.

03/07/29 10:22:27 61S0X050_220_0151

21

22

23

S0X4A00J32300039851FEAT20

REAR MAP LIGHT BULB: 10 W

22-150

Interior Lights

Rear Individual Map Light Test

A

B

D

C

Terminal

Position

OFF

1

2

3

ON

LEFT

RIGHT

OFF

ON

1. Carefully pry off the lens (A) with a small

screwdriver.

2. Remove the mounting screw (B).

3. Disconnect the 3P connector (C) from the housing

(D).

4. Check for continuity between the terminals in each

switch position according to the table.

5. If the continuity is not as specified check the bulb. If

the bulb is OK, replace the light.

03/07/29 10:22:28 61S0X050_220_0152

01

02

01

S0X4A00J32323316151FEAT00

CARGO AREA LIGHT BULB:

8 W

22-151

Cargo Area Light Test

D

C

B

A

3

3’

4

1’

2

1

Terminal

Position

MIDDLE

OFF

2

ON

1 or 1’ 3 or 3’

4

1. Turn the light switch OFF.

2. Carefully pry off the lens (A) with a small

screwdriver.

3. Remove the two mounting screws (B) and the

housing (C).

4. Disconnect the 3P connector (D) from the housing.

5. Check for continuity between the terminals in each

switch position according to the table.

6. If the continuity is not as specified check the bulb. If

the bulb is OK, replace the light.

03/07/29 10:22:28 61S0X050_220_0153


Content   ..  453  454  455  456   ..