Honda Odyssey 2004. Manual - part 372


  Index      Honda     Honda Odyssey 2004 - service repair manual 2004 year


Search            


Content   ..  370  371  372  373   ..


Honda Odyssey 2004. Manual - part 372


01

S0X4A00J18513415012KDAT00

20-130

Bumpers

Rear Bumper Removal/Installation
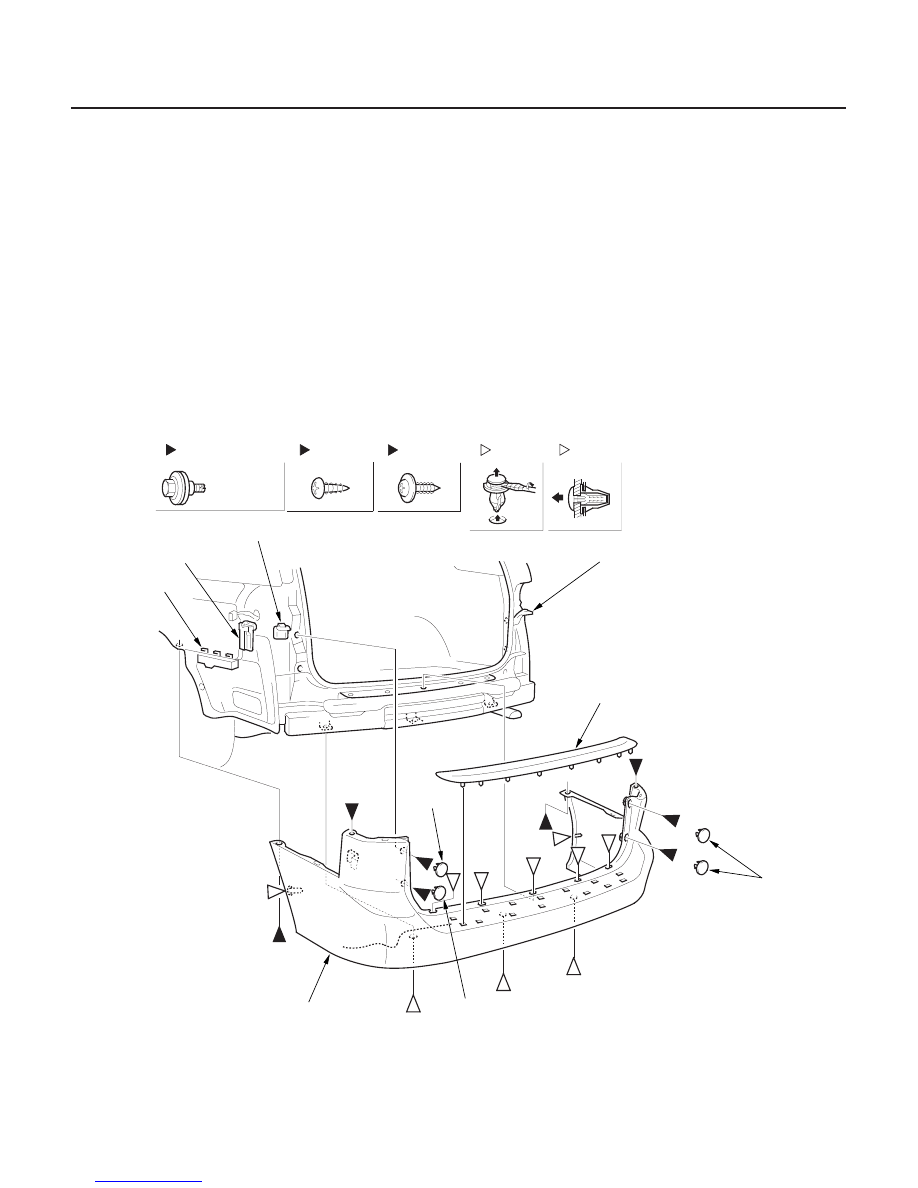
Fastener Locations

: Screw, 2

G

I

: Clip, 8

: Clip, 2

: Screw, 2

D

F

: Bolt, 4

C

6 x 1.0 mm
9.8 N·m
(1.0 kgf·m,
7.2 lbf·ft)

J

E

H

J

F

A

G

B

G

G

B

C

C

D

G

G

G

G

G

C

C

B

F

K

D

I

I

NOTE:

• Have an assistant help you when removing the rear bumper.
• Take care not to scratch the rear bumper and body.
• Put on gloves to protect your hands.

1. Remove the taillights (see page 22-132).

2. Remove the rear bumper (A):

–1 Pry out the caps (B), and remove the bolts (C) from each side.
–2 Remove the screws (D) securing the rear bumper and rear clip (E) from each side.
–3 Remove the screws (F) and clips (G) securing the bumper to the body.
–4 With the help of an assistant, pull both side wheel arch portions of the bumper outward to detach the side

clips (H), and pull them forward to detach the clips (I).

–5 Remove the rear bumper from the hooks (J) and rear clips (E) by pu lling it rearward.

3. If necessary, detach the rear bumper step (K).

03/07/29 10:03:33 61S0X050_200_0132

*01

20-131

: Nut, 2

10 x 1.25 mm
38 N·m
(3.9 kgf·m,
28 lbf·ft)

Fastener Locations

12 x 1.25 mm
54 N·m
(5.5 kgf·m,
40 lbf·ft)

: Bolt, 2

A

B

D

C

B

B

A

A

4. Remove the nuts (A) and bolts (B), then remove the rear bumper beam (C). If necessary, remove the absorber (D).

5. Install the rear bumper in the reverse order of removal, and note these items:

• Make sure the rear bumper engages the side clips and the hooks (under the taillight) on each side securely.
• Replace any damaged clips.
• Push the clips into place securely.

03/07/29 10:03:33 61S0X050_200_0133

01

S0X4A00J18533200000KBAT00

20-132

Hood

Replacement

CLIPS

HOOD

WINDSHIELD WASHER NOZZLES

CLIP

HOOD HINGE

WINDSHIELD WASHER TUBES

: Bolt, 4

Fastener Locations

6 x 1.0 mm
9.8 N·m
(1.0 kgf·m,
7.2 lbf·ft)

NOTE:

• Have an assistant help you when removing and installing the hood.
• Take care not to damage the hood and body.

1. Remove the hood as shown. For ’02-04 models, remove the hood insulator, as necessary (see page 20-134).

2. Install the hood in the reverse order of removal, and note these items:

• Make sure the windshield washer tubes are connected properly.
• Make sure the hood opens properly and locks securely.
• Adjust the hood alignment.

03/07/29 10:03:34 61S0X050_200_0134

01

S0X4A00J18533200000MBAT00

20-133

Adjustment

B

A

6 x 1.0 mm
9.8 N·m
(1.0 kgf·m, 7.2 lbf·ft)

6 x 1.0 mm
9.8 N·m
(1.0 kgf·m, 7.2 lbf·ft)

Forward

D

C

C

1. Slightly loosen each hood hinge bolt.

2. Adjust the hood alignment in this sequence:

• Adjust the hood right and left, as well as forward and rearward, by using the elongated holes on the hood hinge

(A).

• Turn the hood edge cushions (B), as necessary, to make the hood fit flush with the body at front and side edges.

3. Adjust the hood latch (C) to obtain the proper height at the forward edge, and move the hood latch right or left

until the striker (D) is centered in the hood latch.

(cont’d)

03/07/29 10:03:34 61S0X050_200_0135


Content   ..  370  371  372  373   ..