Mercury Montego (2007 year). Manual - part 5


  Index      Mercury     Mercury Montego (2007 year) - manual in english


Search            copyright infringement  


Content      ..     3      4      5      6     ..


Mercury Montego (2007 year). Manual - part 5


Do not hold the lighter in with your hand while it is heating, this will
damage the lighter element and socket. The lighter will be released from
its heating position when it is ready to be used.

Improper use of the lighter can cause damage not covered by your
warranty.

POWER WINDOWS

Do not leave children unattended in the vehicle and do not let
children play with the power windows. They may seriously injure

themselves.

When closing the power windows, you should verify they are free
of obstructions and ensure that children and/or pets are not in

the proximity of the window openings.

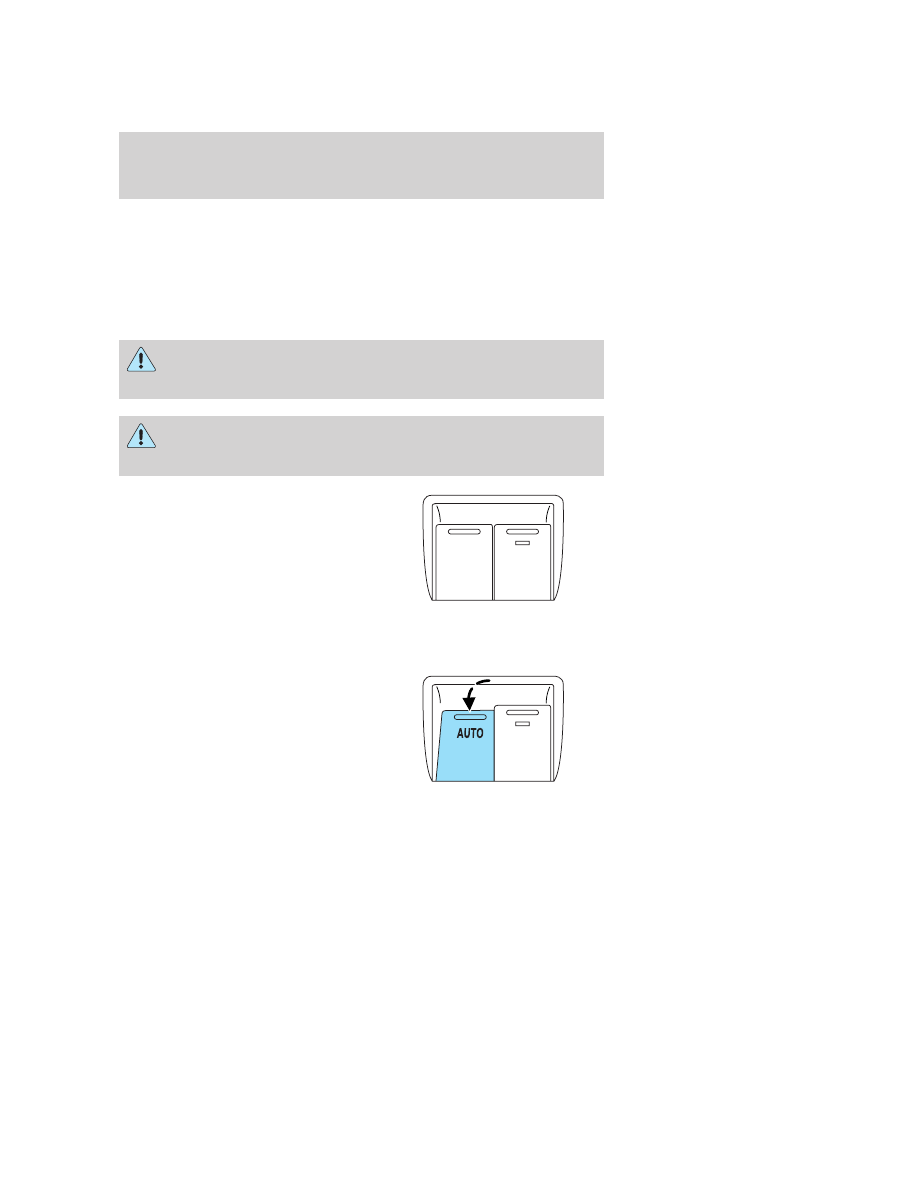
Press and pull the window switches
to open and close windows.
• Push down (to the first detent)

and hold the switch to open.

• Pull up (to the first detent) and

hold the switch to close.

One touch up or down

This feature is present on the driver’s window only.

To operate ONE TOUCH DOWN:
• Press the switch completely down

to the second detent and release
quickly. The driver’s window will
open fully. Momentarily press the
switch to any position to stop the
window operation.

If the switch is pressed and held to
the normal close or ONE TOUCH UP position during a ONE TOUCH
DOWN event, the window will stop. If, after 1/2 second the switch is still
held, the window will perform a normal close or ONE TOUCH UP.

AUTO

2007 Montego (mgo)
Owners Guide (post-2002-fmt)
USA 
(fus)

Driver Controls

65

To operate ONE TOUCH UP:
• Pull the switch completely up to

the second detent and release
quickly. The driver’s window will
close fully. Momentarily press the
switch to any position to stop the
one touch up.

If the switch is pressed and held to
the normal open or ONE TOUCH DOWN position during a ONE TOUCH
UP event, the window will stop. If, after 1/2 second the switch is still
held, the window will perform a normal open or ONE TOUCH DOWN.

Window lock

The window lock feature allows only
the driver to operate the power
windows.

To lock out all the window controls
except for the driver’s press the
right side of the control. Press the
left side to restore the window
controls.

Bounce-Back (Driver’s window only)

When an obstacle has been detected in the window opening as the
window is moving upward, the window will automatically reverse
direction and move down. This is known as “bounce-back”. If the ignition
is turned OFF (without accessory delay being active) during
bounce-back, the window will move down until the bounce back position
is reached.

Security Override

If during a bounce-back condition, the switch is released to the neutral
position, then held in the one touch up position within two seconds after
the window reaches the bounce-back position, the window will travel
up with no bounce-back protection. 
If the switch is released before
the window reaches fully closed or the ignition is turned OFF (without
accessory delay being active), the window will stop. Security override
can be used if the window movement is restricted in some way, for
example, if there is ice on the window or seals.

2007 Montego (mgo)
Owners Guide (post-2002-fmt)
USA 
(fus)

Driver Controls

66

Accessory delay

With accessory delay, the radio, Family Entertainment DVD System (if
equipped), power windows, and moonroof (if equipped) operate for up
to ten minutes after the ignition switch is turned from the ON to the
OFF position or until one of the front doors are opened.

AUTOMATIC DIMMING INSIDE REAR VIEW MIRROR (IF EQUIPPED)

Your vehicle may be equipped with
an inside rear view mirror with an
auto-dimming function. The
electronic day/night mirror will
change from the normal (high
reflective) state to the non-glare
(darkened) state when bright lights
(glare) reach the mirror. When the mirror detects bright light from
behind the vehicle, it will automatically adjust (darken) to minimize
glare.

The mirror will automatically return to the normal state whenever the
vehicle is placed in R (Reverse) to ensure a bright clear view when
backing up.

Do not block the sensor on the backside of the inside rear view mirror
since this may impair proper mirror performance.

EXTERIOR MIRRORS

Power side view mirrors

To adjust your mirrors:

1. Rotate the control clockwise to
adjust the right mirror and rotate
the control counterclockwise to
adjust the left mirror.

2. Move the control in the direction
you wish to tilt the mirror.

3. Return to the center position to
lock mirrors in place.

2007 Montego (mgo)
Owners Guide (post-2002-fmt)
USA 
(fus)

Driver Controls

67

Fold-away mirrors

Pull the side mirrors in carefully
when driving through a narrow
space, like an automatic car wash.

Heated outside mirrors

(if equipped)

Both mirrors are heated
automatically to remove ice, mist
and fog when the rear window
defrost is activated.

Do not remove ice from the
mirrors with a scraper or
attempt to readjust the mirror
glass if it is frozen in place.
These actions could cause
damage to the glass and mirrors.

POWER ADJUSTABLE FOOT PEDALS (IF EQUIPPED)

The accelerator and brake pedal
should only be adjusted when the
vehicle is stopped and the gearshift
lever is in the P (Park) position.

Press and hold the rocker control
(located on the instrument panel) to
adjust accelerator and brake pedal.
• Press the top of the control to

adjust the pedals away from you.

• Press the bottom of the control to adjust the pedals towards you.
The adjustment allows for approximately 2.8 inches (71 mm) of
maximum travel.

Never adjust the accelerator and brake pedal with feet on the
pedals while the vehicle is moving.

2007 Montego (mgo)
Owners Guide (post-2002-fmt)
USA 
(fus)

Driver Controls

68

Memory feature (if equipped)

The accelerator and brake pedal positions are saved when doing a
memory set function and can be recalled along with the vehicle
personality features when a memory position is selected through the
remote entry transmitter, keyless entry keypad or memory switch on the
driver’s door (if equipped with memory feature). Refer to Memory
seats/mirrors/adjustable pedals 
in the Seating and Safety Restraints
chapter.

SPEED CONTROL

With speed control set, you can maintain a speed of 30 mph (48 km/h)
or more without keeping your foot on the accelerator pedal. Speed
control does not work at speeds below 30 mph (48 km/h).

Do not use the speed control in heavy traffic or on roads that
are winding, slippery or unpaved.

Setting speed control

The controls for using your speed
control are located on the steering
wheel for your convenience.

1. Press the ON control and release
it.

2. Accelerate to the desired speed.

3. Press the SET + control and
release it.

4. Take your foot off the accelerator
pedal.

5. The indicator

light on the

instrument cluster will turn on.

SET

SET

RSM

CNCL

ON

OFF

SET

SET

RSM

CNCL

ON

OFF

2007 Montego (mgo)
Owners Guide (post-2002-fmt)
USA 
(fus)

Driver Controls

69

Note:
• Vehicle speed may vary momentarily when driving up and down a

steep hill.

• If the vehicle speed increases above the set speed on a downhill, you

may want to apply the brakes to reduce the speed.

• If the vehicle speed decreases more than 10 mph (16 km/h) below

your set speed on an uphill, your speed control will disengage.

Disengaging speed control

To disengage the speed control:
• Depress the brake pedal or press CNCL (Cancel).
Disengaging the speed control will not erase previous set speed.

Resuming a set speed

Press the RES control and release
it. This will automatically return the
vehicle to the previously set speed.
The RES control will not work if the
vehicle speed is not faster than 30
mph (48 km/h).

Increasing speed while using speed control

There are two ways to set a higher
speed:
• Press and hold the SET + control

until you get to the desired
speed, then release the control.
You can also use the SET +
control to operate the Tap-Up
function. Press and release this
control to increase the vehicle set
speed in small amounts by 1 mph
(1.6 km/h).

• Use the accelerator pedal to get to the desired speed. When the

vehicle reaches that speed press and release the SET + control.

SET

SET

RSM

CNCL

ON

OFF

SET

SET

RSM

CNCL

ON

OFF

2007 Montego (mgo)
Owners Guide (post-2002-fmt)
USA 
(fus)

Driver Controls

70

Reducing speed while using speed control

There are two ways to reduce a set
speed:
• Press and hold the SET - control

until you get to the desired
speed, then release the control.
You can also use the SET -
control to operate the Tap-Down
function. Press and release this
control to decrease the vehicle
set speed in small amounts by 1
mph (1.6 km/h).

• Depress the brake pedal or press

CNCL (Cancel) until the desired
vehicle speed is reached, press
the SET + control.

Turning off speed control

There are two ways to turn off the speed control:
• Depress the brake pedal or press

CNCL (Cancel). This will not
erase your vehicle’s previously set
speed.

• Press the speed control OFF

control.

Note: When you turn off the speed
control or the ignition, your speed
control set speed memory is erased.

SET

SET

RSM

CNCL

ON

OFF

SET

SET

RSM

CNCL

ON

OFF

SET

SET

RSM

CNCL

ON

OFF

2007 Montego (mgo)
Owners Guide (post-2002-fmt)
USA 
(fus)

Driver Controls

71

STEERING WHEEL CONTROLS
Radio control features
• Press MEDIA to select AM, FM1,

FM2, or CD (if equipped).

In Radio mode:
• Press SEEK to access the

next/previous strong station.

In CD mode:
• Press SEEK to listen to the next

track on the disc.

In any mode:
• Press VOL up or down to adjust

the volume.

• Press MUTE to mute the volume.

MOON ROOF (IF EQUIPPED)
You can move the glass panel of the moon roof back to open or tilt up to
ventilate the vehicle.

Do not let children play with the moon roof or leave children
unattended in the vehicle. They may seriously hurt themselves.

MUTE

MEDIA

SEEK

VOL

MUTE

MEDIA

SEEK

VOL

2007 Montego (mgo)
Owners Guide (post-2002-fmt)
USA 
(fus)

Driver Controls

72

To open the moon roof:

The moon roof is equipped with an
automatic, one-touch, express
opening and closing feature. To stop
motion at any time during the
one-touch operation, press the
control a second time.

To open the moon roof, press and release the rear portion of the control.

When closing the moon roof, you should verify that it is free of
obstructions and ensure that children and/or pets are not in the

proximity of the moon roof opening.

To close the moon roof:

To close, press and release the front portion of the control.

Bounce back:

When an obstacle has been detected in the moon roof opening as the
moon roof is closing, the moon roof will automatically open and stop at a
prescribed position.

Bounce back override:

To override bounce back, press and hold the front portion of the control.
For example: Bounce back can be used to overcome the resistance of ice
on the moon roof or seals.

To vent:

To tilt the moon roof into the vent position (when the glass panel is
closed), press and hold the middle portion of the control. To close the
moon roof from the vent position, press and hold the front portion of the
control until the glass panel stops moving.

The moon roof has a sliding shade that can be opened or closed when
the glass panel is shut. To close the shade, pull it toward the front of the
vehicle

2007 Montego (mgo)
Owners Guide (post-2002-fmt)
USA 
(fus)

Driver Controls

73

HOMELINK

姞 WIRELESS CONTROL SYSTEM (IF EQUIPPED)

The HomeLink

威 Wireless Control

System, located on the driver’s visor,
provides a convenient way to
replace up to three hand-held
transmitters with a single built-in
device. This feature will learn the
radio frequency codes of most
transmitters to operate garage
doors, entry gate operators, security systems, entry door locks, and
home or office lighting.

When programming your HomeLink

威 Wireless Control System to

a garage door or gate, be sure that people and objects are out of

the way to prevent potential harm or damage.

Do not use the HomeLink

威 Wireless Control System with any garage

door opener that lacks safety stop and reverse features as required by
U.S. federal safety standards (this includes any garage door opener
model manufactured before April 1, 1982). A garage door which cannot
detect an object, signaling the door to stop and reverse, does not meet
current U.S. federal safety standards. For more information, contact
HomeLink

威 at: www.homelink.com or 1–800–355–3515.

Retain the original transmitter for use in other vehicles as well as for
future programming procedures (i.e. new HomeLink

威 equipped vehicle

purchase). It is also suggested that upon the sale of the vehicle, the
programmed Homelink

威 buttons be erased for security purposes, refer to

Programming in this section.

Programming

Do not program HomeLink

威 with the vehicle parked in the garage.

Note: Your vehicle may require the ignition switch to be turned to the
ACC position for programming and/or operation of the HomeLink

威. It is

also recommended that a new battery be placed in the hand-held
transmitter of the device being programmed to HomeLink

威 for quicker

training and accurate transmission of the radio-frequency signal.

2007 Montego (mgo)
Owners Guide (post-2002-fmt)
USA 
(fus)

Driver Controls

74

1. Press and hold the two outside
buttons releasing only when the
indicator light begins to flash after
20 seconds. Do not repeat Step 1
to program additional hand-held
transmitters to the remaining two
HomeLink

威 buttons. This will erase

previously programmed hand-held
transmitter signals into HomeLink

威.

2. Position the end of your
hand-held transmitter 1–3 inches (2–8 cm) away from the HomeLink

button you wish to program (located on your visor) while keeping the
indicator light in view.

3. Simultaneously press and hold
both the HomeLink

威 and hand-held

transmitter button. Do not release
the buttons until Step 4 has
been completed.

Some entry gates and garage door
openers may require you to replace
Step 3 with procedures noted in the
“Gate Operator and Canadian Programming” in this section for Canadian
residents.

4. The indicator light will flash slowly and then rapidly. Release both
buttons when the indicator light flashes rapidly. (The rapid flashing light
indicates acceptance of the hand-held transmitters’ radio frequency
signals.)

5. Press and hold the just-trained HomeLink

威 button and observe the

indicator light. If the light is constant, programming is complete and your
device should activate when the HomeLink

威 button is pressed and

released. Note: To program the remaining two HomeLink

威 buttons,

begin with Step 2 in the “Programming” section — do not repeat Step 1.

Note: If the indicator light blinks rapidly for two seconds and then turns
to a continuous red, proceed with Steps 6 through 8 to complete
programming of a rolling code equipped device.

6. At the garage door opener receiver (motor-head unit) in the garage,
locate the “learn” or “smart” button (usually near where the hanging
antenna wire is attached to the unit).

7. Press and release the “learn” or “smart” button. (The name and color
of the button may vary by manufacturer.)

2007 Montego (mgo)
Owners Guide (post-2002-fmt)
USA 
(fus)

Driver Controls

75

Note: There are 30 seconds in which to initiate Step 8.

8. Return to the vehicle and firmly press, hold for two seconds and
release the HomeLink

威 button. Repeat the press/hold/release sequence

again, and, depending on the brand of the garage door opener (or other
rolling code equipped device), repeat this sequence a third time to
complete the programming.

HomeLink

威 should now activate your rolling code equipped device. To

program additional HomeLink

威 buttons begin with Step 2 in the

“Programming” section. For questions or comments, please contact
HomeLink at www.homelink.com or 1–800–355–3515.

Gate Operator & Canadian Programming

During programming, your
hand-held transmitter may
automatically stop transmitting —
not allowing enough time for
HomeLink

威 to accept the signal

from the hand-held transmitter.

After completing Steps 1 and 2
outlined in the “Programming”
section, replace Step 3 with the following:

Note: If programming a garage door opener or gate operator, it is
advised to unplug the device during the “cycling” process to prevent
overheating.
• Continue to press and hold the HomeLink威 button (note Step 3 in the

“Programming” section) while you press and release — every two
seconds 
(“cycle”) your hand-held transmitter until the frequency
signal has been accepted by the HomeLink

威. The indicator light will

flash slowly and then rapidly after HomeLink

威 accepts the radio

frequency signal.

• Proceed with Step 4 in the “Programming” section.

2007 Montego (mgo)
Owners Guide (post-2002-fmt)
USA 
(fus)

Driver Controls

76

Operating the HomeLink

姞 Wireless Control System

To operate, simply press and release
the appropriate HomeLink

威 button.

Activation will now occur for the
trained product (garage door, gate
operator, security system, entry
door lock, or home or office lighting
etc.). For convenience, the
hand-held transmitter of the device
may also be used at any time. In the event that there are still
programming difficulties, contact HomeLink

威 at www.homelink.com or

1–800–355–3515.

Erasing HomeLink

姞 buttons

To erase the three programmed
buttons (individual buttons cannot
be erased):
• Press and hold the two outer

HomeLink

威 buttons until the

indicator light begins to
flash-after 20 seconds. Release
both buttons. Do not hold for
longer that 30 seconds.

HomeLink

威 is now in the train (or

learning) mode and can be programmed at any time beginning with Step
2 in the “Programming” section.

Reprogramming a single HomeLink

姞 button

To program a device to HomeLink

威 using a HomeLink威 button previously

trained, follow these steps:

1. Press and hold the desired HomeLink

威 button. Do NOT release the

button.

2. The indicator light will begin to flash after 20 seconds. Without
releasing the HomeLink

威 button, follow Step 2 in the “Programming”

section.

For questions or comments, contact HomeLink

威 at www.homelink.com

or 1–800–355–3515.

2007 Montego (mgo)
Owners Guide (post-2002-fmt)
USA 
(fus)

Driver Controls

77

MESSAGE CENTER

With the ignition in the ON position,
the message center, located on your
instrument cluster, displays
important vehicle information
through a constant monitor of
vehicle systems. 
You may select
display features on the message center for a display of status. The
system will also notify you of potential vehicle problems with a display of
system warnings followed by a long indicator chime.

Selectable features

Reset

Press this control to select and reset functions shown in the INFO menu
and SETUP menu.

Info menu

This control displays the following
control displays:
• Odometer
• Distance to Empty
• Average Fuel Economy
• Trip Odometer
• Fuel Used
• Trip Elapsed Drive Time
• Compass
Odometer/Trip odometer

Refer to Gauges in the Instrument Cluster chapter.

Distance to empty (DTE)

Selecting this function from the
INFO menu estimates approximately
how far you can drive with the fuel
remaining in your tank under
normal driving conditions.
Remember to turn the ignition OFF
when refueling to allow this feature to correctly detect the added fuel.

2007 Montego (mgo)
Owners Guide (post-2002-fmt)
USA 
(fus)

Driver Controls

78

The DTE function will display LOW FUEL LEVEL and a single tone
when you have approximately 50 miles (80 km) to empty. If you RESET
this warning message, this display and tone will return within 10
minutes.

DTE is calculated using a running average fuel economy, which is based
on your recent driving history of 500 miles (800 km). This value is not
the same as the average fuel economy display. The running average fuel
economy is reinitialized to a factory default value if the battery is
disconnected.

Average fuel economy (AFE)

Select this function from the INFO
menu to display your average fuel
economy in miles/gallon or liters/100
km.

If you calculate your average fuel
economy by dividing gallons of fuel
used by 100 miles traveled (kilometers traveled by liters used), your
figure may be different than displayed for the following reasons:
• Your vehicle was not perfectly level during fill-up
• Differences in the automatic shut-off points on the fuel pumps at

service stations

• Variations in top-off procedure from one fill-up to another
• Rounding of the displayed values to the nearest 0.1 gallon (liter)
1. Drive the vehicle at least 5 miles (8 km) with the speed control
system engaged to display a stabilized average.

2. Record the highway fuel economy for future reference.

It is important to press the RESET control after setting the speed
control to get accurate highway fuel economy readings.

For more information refer to Fuel Information in the Maintenance
and Specifications 
chapter.

Fuel Used

Selecting this function from the
INFO menu, XX.X G USED will
display the fuel used since last
reset. The information displayed will
be in gallons or liters, depending on
English/metric mode state. Press
and hold RESET to reset mode.

2007 Montego (mgo)
Owners Guide (post-2002-fmt)
USA 
(fus)

Driver Controls

79

Trip elapsed drive time

Select this function from the INFO
menu to display a timer.

To operate the Trip Elapsed Drive
Time perform the following:

1. Press and release RESET in order
to start the timer.

2. Press and release RESET to pause the timer.

3. Press and hold RESET for 2 seconds in order to reset the timer.

Compass display

Select this function from the INFO menu. Press the INFO button
repeatedly until the Compass and Odometer are displayed. (Do not
select Trip, DTE, or AFE. The top of the message center must be blank).

The compass reading may be affected when you drive near large
buildings, bridges, power lines and powerful broadcast antenna. Magnetic
or metallic objects placed in, on or near the vehicle may also affect
compass accuracy.

Usually, when something affects the compass readings, the compass will
correct itself after a few days of operating your vehicle in normal
conditions. If the compass still appears to be inaccurate, a manual
calibration may be necessary. Refer to Compass zone/calibration
adjustment.

Most geographic areas (zones) have a magnetic north compass point that
varies slightly from the northerly direction on maps. This variation is four
degrees between adjacent zones and will become noticeable as the
vehicle crosses multiple zones. A correct zone setting will eliminate this
error. Refer to Compass zone/calibration adjustment.

Compass zone adjustment

Perform the following steps on an open area free from steel structures
and high voltage lines. For optimum calibration, turn off all electrical
accessories (heater / air conditioning, wipers, etc.) and make sure all
vehicle doors are shut.

1. Turn ignition to the ON position.

2. Start the engine.

3. Press the INFO button repeatedly until the Compass and Odometer
are displayed. (Do not select Trip, DTE, or AFE. The top of the message
center must be blank).

2007 Montego (mgo)
Owners Guide (post-2002-fmt)
USA 
(fus)

Driver Controls

80


Content      ..     3      4      5      6     ..