Ford F150 Pickup. Instruction - part 1834


  Index      Ford     Ford F150 Pickup - service and repair instruction 2003 year


Search            copyright infringement  


Content   ..  1832  1833  1834  1835   ..


Ford F150 Pickup. Instruction - part 1834


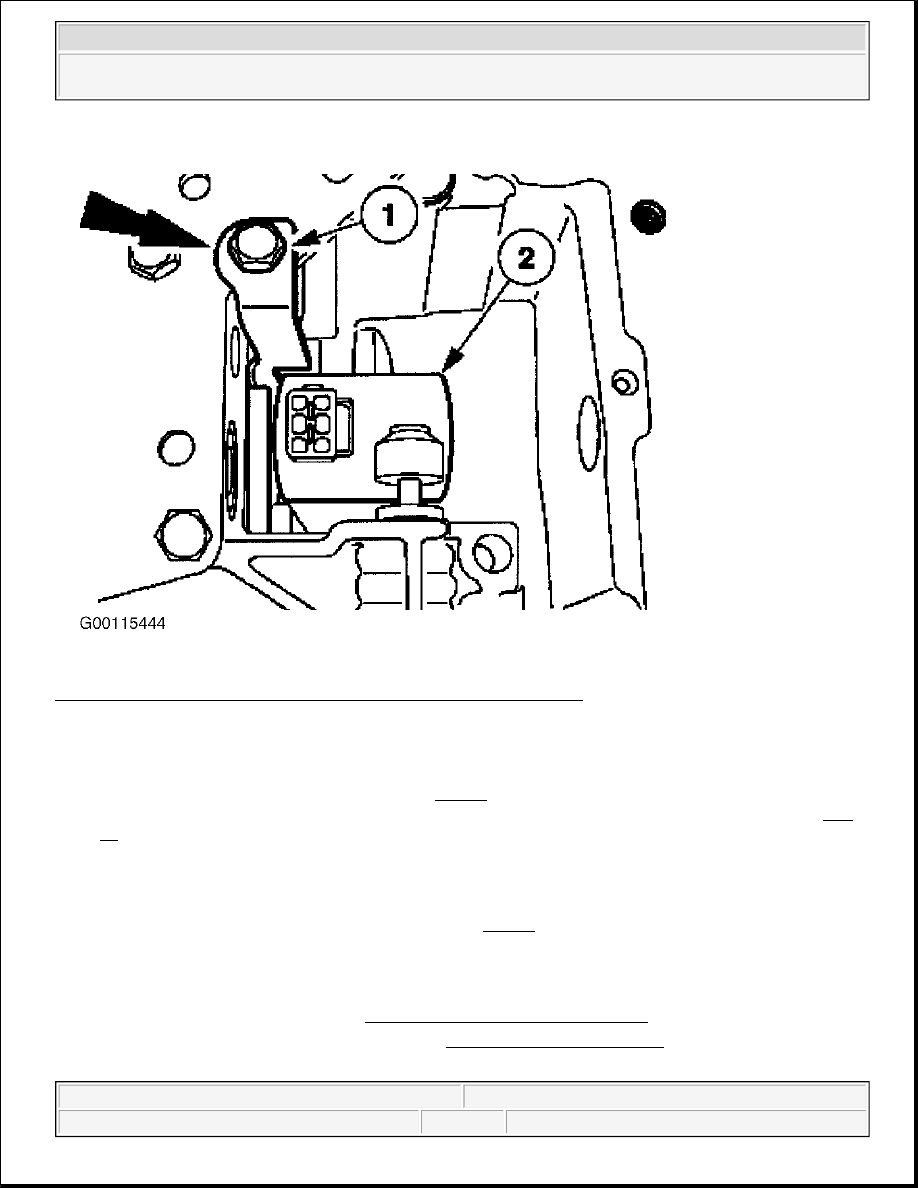
Fig. 15: Removing & Installing Electronic Pressure Control Solenoid 
Courtesy of FORD MOTOR CO. 

Installation 

1. Install the EPC solenoid bracket and bolt. See Fig. 15 . Inspect the lead frame for damage. Using the 

Transmission Solenoid Connector Gauge (307-426), check all lead frame solenoid connections. See Fig. 
14
 .  

2. The gauge should fit tightly and not fall out after being inserted. If the transmission solenoid connector 

gauge passes through any lead frame connector pins or does not feel like it makes a good contact, install a 
new lead frame.  

3. Connect the molded lead frame to the solenoids. See Fig. 14 . Connect the bulkhead inter-connector by 

pressing it in place by hand and fully seating the connector in place.  

4. Connect the EPC, TCC and shift solenoids "A" and "B" by pressing them in place by hand and fully 

seating the connector in place. Ensure that the terminals pass fully through the connector slots.  

5. Install the instruction control lever. See MANUAL LEVER SHAFT & SEAL .  

6. Install the transmission fluid pan and filter. See DRAINING & REFILLING under LUBRICATION.  

7. Lower vehicle. Fill the transmission with appropriate fluid to proper level and check for correct 


2003 Ford Pickup F150 

2003 AUTOMATIC TRANSMISSIONS Servicing - Blackwood, Econoline, Excursion, Expedition, "F" Series Pickup & 

Navigator


transmission operation. See LUBRICATION 

EXTENSION HOUSING GASKET 

Removal 

1. Raise and support vehicle. Drain transmission fluid. See DRAINING & REFILLING under 

LUBRICATION.  

2. Mark driveshaft yoke and axle companion flange for reassembly reference. See Fig. 16 . Slide drive shaft 

rearward and remove driveshaft. Disconnect the Output Shaft Speed (OSS) sensor. See Fig. 17 .  

3. Remove exhaust system components as necessary for access. Position transmission jack under 

transmission, and remove transmission mount-to-crossmember bolts. Remove transmission mount-to-
transmission retaining bolts.  

4. Remove extension housing bolts. See Fig. 18 . Slide housing off of output shaft. Remove extension 

housing and discard gasket.  

CAUTION: DO NOT raise transmission so that case contacts underbody. Raising 

transmission too high, so that it contacts underbody of vehicle, may cause 
damage to TSS or OSS sensors.

NOTE:

For 4WD vehicles, transfer case must be removed. See appropriate REMOVAL & 
INSTALLATION article in TRANSFER CASES.


2003 Ford Pickup F150 

2003 AUTOMATIC TRANSMISSIONS Servicing - Blackwood, Econoline, Excursion, Expedition, "F" Series Pickup & 

Navigator


Fig. 16: View Of Driveshaft Mark 
Courtesy of FORD MOTOR CO. 


2003 Ford Pickup F150 

2003 AUTOMATIC TRANSMISSIONS Servicing - Blackwood, Econoline, Excursion, Expedition, "F" Series Pickup & 

Navigator


Fig. 17: Locating Output Shaft Speed Sensor Harness Connector 
Courtesy of FORD MOTOR CO. 


2003 Ford Pickup F150 

2003 AUTOMATIC TRANSMISSIONS Servicing - Blackwood, Econoline, Excursion, Expedition, "F" Series Pickup & 

Navigator


Content   ..  1832  1833  1834  1835   ..