Lincoln MKX (2018 year). Manual - part 21


  Index      Lincoln     Lincoln MKX (2018 year) - manual in english


Search            copyright infringement  


Content      ..     19      20      21      22     ..


Lincoln MKX (2018 year). Manual - part 21


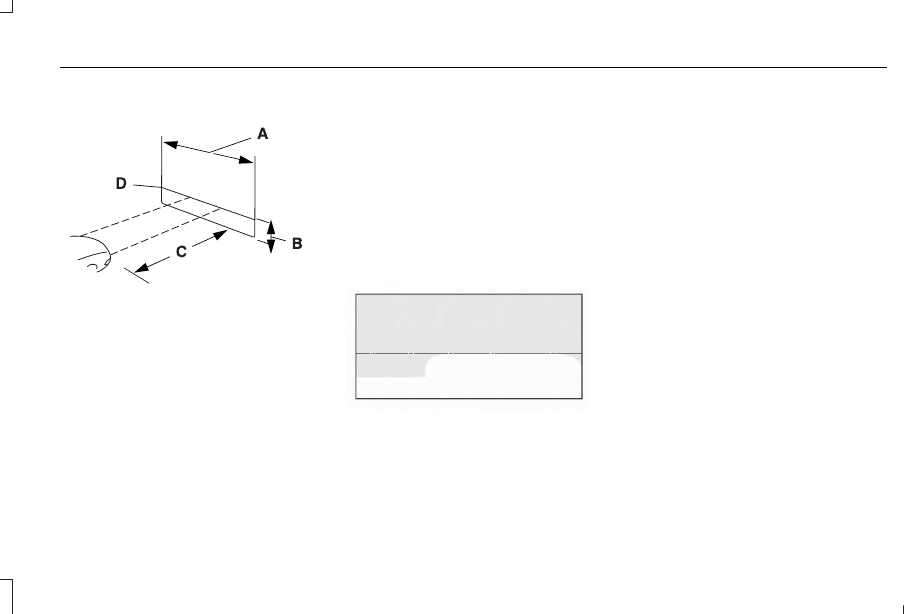
Headlamp Aiming Target

E142592

8 feet (2.4 meters).

A

Center height of lamp to ground.

B

25 feet (7.6 meters).

C

Horizontal reference line.

D

Vertical Aim Adjustment Procedure

1. Park the vehicle directly in front of a wall

or screen on a level surface,
approximately 25 ft (7.6 m) away.

2. Measure the height of the headlamp bulb

center from the ground and mark an 8 ft
(2.4 m) horizontal reference line on the
vertical wall or screen at this height.

Note: To see a clearer light pattern for
adjusting, you may want to block the light
from one headlamp while adjusting the
other.

3. Turn on the low beam headlamps to

illuminate the wall or screen and open
the hood.

E142465

4. On the wall or screen you will observe a

flat zone of high intensity light located at
the top of the right hand portion of the
beam pattern. If the top edge of the high
intensity light zone is not at the horizontal
reference line, the headlamp will need
to be adjusted.

327

MKX (CD9) Canada/United States of America, enUSA, Edition date: 201707, Second Printing

Maintenance

-------------------------------------------------------------------------------------------------------------------------------------------------------------

E194757

5. Locate the vertical adjuster on each

headlamp.  Using a Phillips #2
screwdriver, turn the adjuster either
clockwise or counterclockwise in order
to adjust the vertical aim of the
headlamp.  The horizontal edge of the
brighter light should touch the horizontal
reference line.

6. Close the hood and turn off the lamps.

CHANGING A BULB

WARNINGS

Switch all of the lamps and the ignition
off. Failure to follow this warning could

result in serious personal injury.

Bulbs become hot when in use. Let
them cool down before you remove

them.

Use the correct specification bulb.

See Bulb Specification Chart (page 329).

Install in the reverse order unless otherwise
stated.

Headlamp

E201500

A

B

Headlamp low and high beam -
vehicles with high-intensity
discharge headlamps.

A

Front direction indicator.

B

Note: Vehicles with LED headlamps do not
contain servicable bulbs. See an
authorized dealer if they fail.

Front Direction Indicator

1. Turn the bulb holder counterclockwise

and remove it.

328

MKX (CD9) Canada/United States of America, enUSA, Edition date: 201707, Second Printing

Maintenance

-------------------------------------------------------------------------------------------------------------------------------------------------------------

2. Remove the bulb by pulling it straight out.

High-Intensity Discharge Headlamps

These lamps operate at a high voltage. See
an authorized dealer if they fail.

LED Lamps

LED lamps are not serviceable items. See an
authorized dealer if they fail.

The following lamps are LED:

Front parking lamps.

Front side marker lamps.

Front signature lamps.

Daytime running lamps.

Side direction indicators.

Rear side marker lamps.

Brake and rear lamps.

Central high mounted brake lamp.

Rear direction indicators.

Reversing lamps.

License plate lamp.

BULB SPECIFICATION CHART

Replacement bulbs are specified in the chart
below. Headlamp bulbs must be marked with
an authorized D.O.T. marking for North
America to make sure they have the proper
lamp performance, light brightness, light
pattern, and safe visibility. The correct bulbs
will not damage the lamp assembly or void
the lamp assembly warranty and will provide
quality bulb illumination time.

Exterior Lamps

Power (Watt)

Specification

Lamp

LED

LED

Front parking lamp.

LED

LED

Front side marker lamp.

21

T20

Front direction indicator.

LED

LED

Daytime running lamps.

LED

LED

Front signature lamp.

HID

D3S

High-intensity discharge headlamps.

329

MKX (CD9) Canada/United States of America, enUSA, Edition date: 201707, Second Printing

Maintenance

-------------------------------------------------------------------------------------------------------------------------------------------------------------

Power (Watt)

Specification

Lamp

LED

LED

Side direction indicator.

LED

LED

Rear side marker lamp.

LED

LED

Brake and rear lamp.

LED

LED

Central high mounted brake lamp.

LED

LED

Rear direction indicator.

LED

LED

Reversing lamps.

LED

LED

License plate lamp.

Note: LED lamps are not serviceable. See an authorized dealer if they fail.

Interior Lamps

Power (Watt)

Specification

Lamp

LED

LED

Interior lamp.

LED

LED

Luggage compartment lamp.

Note: LED lamps are not serviceable. See an authorized dealer if they fail.

330

MKX (CD9) Canada/United States of America, enUSA, Edition date: 201707, Second Printing

Maintenance

-------------------------------------------------------------------------------------------------------------------------------------------------------------

CHANGING THE ENGINE AIR
FILTER

WARNING

To reduce the risk of vehicle damage
and personal burn injuries, do not start

your engine with the air cleaner removed
and do not remove it while the engine is
running.

When changing the air filter element, use
only the air filter element listed.  See
Capacities and Specifications (page 380).

For turbocharged equipped vehicles: When
servicing the air cleaner, it is important that
no foreign material enter the air induction
system.  The engine and turbocharger are
susceptible to damage from even small
particles.

Change the air filter element at the proper
interval.  See Scheduled Maintenance (page
517).

Note:  Failure to use the correct air filter
element may result in severe engine
damage.  The customer warranty may be
void for any damage to the engine if the
correct air filter element is not used.

E144365

1. Release the clamps that secure the air

filter housing cover.

2. Carefully lift the air filter housing cover.
3. Remove the air filter element from the air

filter housing.

4. Wipe any dirt or debris from the air filter

housing and cover to make sure no dirt
gets in the engine and to make sure you
have a good seal.

5. Install a new air filter element. Be careful

not to crimp the filter element edges
between the air filter housing and cover.
This could cause filter damage and allow
unfiltered air to enter the engine if not
properly seated.

6. Install the air filter housing cover.
7. Engage the clamps to secure the air filter

housing cover to the air filter housing.

331

MKX (CD9) Canada/United States of America, enUSA, Edition date: 201707, Second Printing

Maintenance

-------------------------------------------------------------------------------------------------------------------------------------------------------------

GENERAL INFORMATION

Your dealer has many quality products
available to clean your vehicle and protect
its finishes.

CLEANING PRODUCTS

Materials

For best results, use the following products
or products of equivalent quality:

Specification

Name

Motorcraft® Bug and Tar Remover, ZC-42 (U.S. & Canada)

ESR-M5B194-B

Motorcraft® Custom Bright Metal Cleaner, ZC-15 (U.S. & Canada)

ESR-M14P4-A

Motorcraft® Detail Wash, ZC-3-A (U.S. & Canada)

ESR-M14P3-A

Motorcraft® Engine Shampoo and Degreaser, ZC-20 (U.S.)

Motorcraft® Engine Shampoo, CXC-66-A (Canada)

WSS-M99P43-B

Motorcraft® Premium Leather and Vinyl Cleaner, ZC-56 (U.S. & Canada)

Motorcraft® Multi-Purpose Cleaner, CXC-101 (Canada)

WSS-M14P19-A

Motorcraft® Premium Windshield Wash Concentrate with Bitterant, ZC-32-B2 (U.S.)

WSS-M14P19-A

Motorcraft® Premium Quality Windshield Washer Fluid, CXC-37-A/B/D/F (Canada)

Motorcraft® Professional Strength Carpet & Upholstery Cleaner, ZC-54 (U.S. & Canada)

ESR-M14P5-A

Motorcraft® Premium Glass Cleaner, CXC-100 (Canada)

332

MKX (CD9) Canada/United States of America, enUSA, Edition date: 201707, Second Printing

Vehicle Care

-------------------------------------------------------------------------------------------------------------------------------------------------------------

Specification

Name

Motorcraft® Spot and Stain Remover, ZC-14 (U.S.)

ESR-M14P5-A

Motorcraft® Ultra-Clear Spray Glass Cleaner, ZC-23 (U.S.)

Motorcraft® Wheel and Tire Cleaner, ZC-37-A (U.S. & Canada)

CLEANING THE EXTERIOR

Wash your vehicle regularly with cool or
lukewarm water and a neutral pH shampoo,
we recommend Motorcraft Detail Wash.

Never use strong household detergents
or soap, for example dish washing or
laundry liquid. These products can
discolor and spot painted surfaces.

Never wash your vehicle when it is hot
to the touch, or during strong or direct
sunlight.

Dry your vehicle with a chamois or soft
terry cloth towel to eliminate water
spotting.

Immediately remove fuel spillages, bird
droppings, insect deposits and road tar.
These may cause damage to your
vehicle’s paintwork or trim over time. We
recommend Motorcraft Bug and Tar
Remover.

Remove any exterior accessories, for
example antennas, before entering a car
wash.

When filling with AdBlue®, remove any
residue on painted surfaces immediately.

Note: Suntan lotions and insect repellents
can damage painted surfaces. If these
substances come in contact with your
vehicle, wash the affected area as soon as
possible.

Cleaning the Headlamps

Note: Do not scrape the headlamp lenses
or use abrasives, alcoholic solvents or
chemical solvents to clean them.

Note: Do not wipe the headlamps when they
are dry.

333

MKX (CD9) Canada/United States of America, enUSA, Edition date: 201707, Second Printing

Vehicle Care

-------------------------------------------------------------------------------------------------------------------------------------------------------------

Exterior Chrome Parts

Apply a high quality-cleaning product to
bumpers and other chrome parts. Follow
the manufacturer’s instructions. We
recommend Motorcraft Custom Bright
Metal Cleaner.

Do not apply the cleaning product to hot
surfaces. Do not leave the cleaning
product on chrome surfaces longer than
the time recommended.

Using non-recommended cleaners can
result in severe and permanent cosmetic
damage.

Note: Never use abrasive materials, for
example steel wool or plastic pads as they
can scratch the chrome surface.

Note: Do not use chrome cleaner, metal
cleaner or polish on wheels or wheel covers.

Exterior Plastic Parts

For routine cleaning we recommend
Motorcraft Detail Wash. If tar or grease spots
are present, we recommend Motorcraft Bug
and Tar Remover.

Stripes or Graphics

 (If Equipped)

Hand washing your vehicle is preferred
however, pressure washing may be used
under the following conditions:

Do not use water pressure higher than
2,000 psi (14,000 kPa).

Do not use water hotter than 179°F (82°C).

Use a spray with a 40° wide spray angle
pattern.

Keep the nozzle at a 12 in (305 mm)
distance and 90° angle to your vehicle's
surface.

Note: Holding the pressure washer nozzle
at an angle to the vehicle's surface may
damage graphics and cause the edges to
peel away from the vehicle's surface.

Underbody

Regularly clean the underside of your vehicle
using water. Keep body and door drain holes
free of debris or foreign material.

Under Hood

For removing black rubber marks from under
the hood we recommend Motorcraft Wheel
and Tire Cleaner or Motorcraft Bug and Tar
Remover.

WAXING

Regular waxing is necessary to protect your
car's paint from the elements. We
recommend that you wash and wax the
painted surface once or twice a year.

When washing and waxing, park your vehicle
in a shaded area out of direct sunlight.
Always wash your vehicle before applying
wax.

Use a quality wax that does not contain
abrasives.

Follow the manufacturer’s instructions to
apply and remove the wax.

Apply a small amount of wax in a
back-and-forth motion, not in circles.

334

MKX (CD9) Canada/United States of America, enUSA, Edition date: 201707, Second Printing

Vehicle Care

-------------------------------------------------------------------------------------------------------------------------------------------------------------

Do not allow wax to come in contact with
any non-body (low-gloss black) colored
trim. The wax will discolor or stain the
parts over time.

Roof racks.

Bumpers.

Grained door handles.

Side moldings.

Mirror housings.

Windshield cowl area.

Do not apply wax to glass areas.

After waxing, your car's paint should feel
smooth, and be free of streaks and
smudges.

CLEANING THE ENGINE

Engines are more efficient when they are
clean because grease and dirt buildup keep
the engine warmer than normal.

When washing:

Take care when using a power washer
to clean the engine. The high-pressure
fluid could penetrate the sealed parts
and cause damage.

Do not spray a hot engine with cold water
to avoid cracking the engine block or
other engine components.

Spray Motorcraft Engine Shampoo and
Degreaser on all parts that require
cleaning and pressure rinse clean. In
Canada, use Motorcraft Engine Shampoo.

Never wash or rinse the engine while it
is hot or running; water in the running
engine may cause internal damage.

Never wash or rinse any ignition coil,
spark plug wire or spark plug well, or the
area in and around these locations.

Cover the battery, power distribution box,
and air filter assembly to prevent water
damage when cleaning the engine.

CLEANING THE WINDOWS AND
WIPER BLADES

Car wash chemicals and environmental
fallout can result in windshield and wiper
blade contamination. Dirty windshield and
wipers will result in poor windshield wiper
operation. Keep the windshield and wiper
blades clean to maintain windshield wiper
performance.

To clean the windshield and wiper blades:

Clean the windshield with a non-abrasive
glass cleaner. When cleaning the interior
of the windshield, avoid getting any glass
cleaner on the instrument panel or door
panels. Wipe any glass cleaner off these
surfaces immediately.

For windshields contaminated with tree
sap, chemicals, wax or bugs, clean the
entire windshield using steel wool (no
greater than 0000 grade) in a circular
motion and rinse with water.

Clean the wiper blades with isopropyl
rubbing alcohol or windshield washer
concentrate.

335

MKX (CD9) Canada/United States of America, enUSA, Edition date: 201707, Second Printing

Vehicle Care

-------------------------------------------------------------------------------------------------------------------------------------------------------------

Note:  Do not use razor blades or other
sharp objects to clean or remove decals from
the inside of the heated rear window.  The
vehicle warranty does not cover damage
caused to the heated rear window grid lines.

CLEANING THE INTERIOR

WARNINGS

Do not use cleaning solvents, bleach
or dye on the vehicle's seatbelts, as

these actions may weaken the belt webbing.

On vehicles equipped with
seat-mounted airbags, do not use

chemical solvents or strong detergents. Such
products could contaminate the side airbag
system and affect performance of the side
airbag in a crash.

Note: Follow the same procedure for
cleaning leather seats when cleaning leather
interior.  See Cleaning Leather Seats (page
338).

Note: Do not use household cleaning
products or glass cleaners, which can stain
and discolor the fabric and affect the flame
retardant abilities of the seat materials.

For fabric, carpets, cloth seats, safety belts
and seats equipped with side airbags:

Remove dust and loose dirt with a
vacuum cleaner.

Remove light stains and soil with
Motorcraft® Professional Strength Carpet
& Upholstery Cleaner.

For grease or tar stains:

Spot clean the area with Motorcraft® Spot
and Stain Remover. In Canada, use
Motorcraft® Multi-Purpose Cleaner.

If a ring forms on the fabric after spot
cleaning, clean the entire area
immediately, but do not oversaturate or
the ring will set.

Cleaning Black Label or Presidential
Interior

 (If Equipped)

Note: Alcantara microfiber cloth fabric is
made of polyester microfiber with
micro-porous polyurethane. Using
commercially available fabric cleaners can
cause permanent damage.

Note: Do not use commercially available
leather and vinyl cleaning products on
Alcantara microfiber cloth fabric.

Note: Lincoln Black Label or Presidential
vehicles may have Alcantara microfiber cloth
fabric on the seats, headliner, floor mats and
door panels.

Depending on the type of stain, use water,
lemon juice or pure ethyl alcohol when
cleaning. For cleaning Alcantara microfiber
cloth, refer to the following chart:

336

MKX (CD9) Canada/United States of America, enUSA, Edition date: 201707, Second Printing

Vehicle Care

-------------------------------------------------------------------------------------------------------------------------------------------------------------

Cleaning Procedure

Type of Stain

Use lukewarm water and rinse by dabbing with clean water.

Fruit juice, jam, jelly, syrup or ketchup.

Use cold water and rinse by dabbing with clean water. Avoid warm
water because it makes these substances coagulate.

Blood, egg, excrement or urine.

Use lukewarm water. If the color remains, treat with lemon juice and
then rinse.

Liquor, alcoholic beverages, wine, beer, cola and tea.

Use lukewarm water and rinse by dabbing with clean water.

Indelible pencil, cocoa, chocolate, pastry with cream or chocolate, ice
cream or mustard.

Use lemon juice, wipe with lukewarm water and rinse by dabbing with
clean water.

Vinegar, hair gel, tomato sauce or coffee with sugar.

Use ethyl alcohol, then dab with water.

Dye transfer and all other stains.

337

MKX (CD9) Canada/United States of America, enUSA, Edition date: 201707, Second Printing

Vehicle Care

-------------------------------------------------------------------------------------------------------------------------------------------------------------

CLEANING THE INSTRUMENT
PANEL AND INSTRUMENT
CLUSTER LENS

WARNING

Do not use chemical solvents or strong
detergents when cleaning the steering

wheel or instrument panel to avoid
contamination of the airbag system.

Note: Follow the same procedure as
cleaning leather seats for cleaning leather
instrument panels and leather interior trim
surfaces.  See Cleaning Leather Seats (page
338).

Clean the instrument panel and cluster lens
with a clean, damp and soft cloth, then use
a clean, dry and soft cloth to dry these areas.

Avoid cleaners or polishes that increase
the gloss of the upper portion of the
instrument panel. The dull finish in this
area helps protect you from undesirable
windshield reflection.

Do not use any household cleaning
products or glass cleaners as these may
damage the finish of the instrument
panel, interior trim and cluster lens.

Wash or wipe your hands clean if you
have been in contact with certain
products such as insect repellent and
suntan lotion to avoid possible damage
to the interior painted surfaces.

Do not allow air fresheners and hand
sanitizers to spill onto interior surfaces.
If a spill occurs, wipe off immediately.
Your warranty may not cover these
damages.

If a staining liquid like coffee or juice has
been spilled on the instrument panel or on
interior trim surfaces:

1. Wipe up spilled liquid using a clean, soft

cloth as quickly as possible.

2. Use Motorcraft Premium Leather and

Vinyl Cleaner or a commercially available
leather cleaning product for automotive
interiors. Test any cleaner or stain
remover on an inconspicuous area.

3. Alternatively, wipe the surface with a

clean, soft cloth and a mild soap and
water solution. Dry the area with a clean,
soft cloth.

4. If necessary, apply more soap and water

solution or cleaning product to a clean,
soft cloth and press it onto the soiled
area. Allow this to set at room
temperature for 30 minutes.

5. Remove the soaked cloth, then with a

clean, damp cloth, use a rubbing motion
for 60 seconds on the soiled area.

6. Dry the area with a clean, soft cloth.

CLEANING LEATHER SEATS

Note: Follow the same procedure as
cleaning leather seats for cleaning leather
instrument panels and leather interior trim
surfaces.

338

MKX (CD9) Canada/United States of America, enUSA, Edition date: 201707, Second Printing

Vehicle Care

-------------------------------------------------------------------------------------------------------------------------------------------------------------

For routine cleaning, wipe the surface with
a soft, damp cloth and a mild soap and water
solution.  Dry the area with a clean, soft cloth.

Note: Test any cleaner or stain remover on
an inconspicuous area.

You should:

Remove dust and loose dirt with a
vacuum cleaner.

Clean and treat spills and stains as soon
as possible.

Do not use the following products as these
may damage the leather:

Oil and petroleum or silicone-based
leather conditioners.

Household cleaners.

Alcohol solutions.

Solvents or cleaners intended specifically
for rubber, vinyl and plastics.

REPAIRING MINOR PAINT
DAMAGE

Authorized dealers have touch-up paint to
match your vehicle’s color. Your vehicle color
code is printed on a sticker on the front,
left-hand side door jamb. Take your color
code to your authorized dealer to make sure
you get the correct color.

Before repairing minor paint damage, use a
cleaner such as Motorcraft Bug and Tar
Remover to remove particles such as bird
droppings, tree sap, insect deposits, tar
spots, road salt and industrial fallout.

Always read the instructions before using
cleaning products.

CLEANING THE WHEELS

1. Regularly clean them with a wheel

cleaner. We recommend that you use
Ford approved wheel cleaner if available.

2. Remove dirt and brake dust with a

sponge.

3. Remove tar and grease with a bug and

tar remover. We recommend that you use
Ford approved bug and tar remover if
available.

4. Thoroughly rinse the wheels with water

after cleaning.

If you intend on parking your vehicle for an
extended period after cleaning the wheels
with a wheel cleaner, drive your vehicle for
a few minutes before doing so. This reduces
the risk of corrosion of the brake discs, brake
pads and linings.

Do not clean the wheels when they are hot.

Note:  Some car washes could damage
wheel rims and covers.

Note:  Using non-recommended cleaners,
harsh cleaning products, chrome wheel
cleaners or abrasive materials could
damage wheel rims and covers.

339

MKX (CD9) Canada/United States of America, enUSA, Edition date: 201707, Second Printing

Vehicle Care

-------------------------------------------------------------------------------------------------------------------------------------------------------------

VEHICLE STORAGE

If you plan on storing your vehicle for 30
days or more, read the following
maintenance recommendations to make sure
your vehicle stays in good operating
condition.

We engineer and test all motor vehicles and
their components for reliable, regular driving.
Under various conditions, long-term storage
may lead to degraded engine performance
or failure unless you use specific precautions
to preserve engine components.

General

Store all vehicles in a dry, ventilated
place.

Protect from sunlight, if possible.

If vehicles are stored outside, they
require regular maintenance to protect
against rust and damage.

Body

Wash your vehicle thoroughly to remove
dirt, grease, oil, tar or mud from exterior
surfaces, rear-wheel housing and the
underside of front fenders.

Periodically wash your vehicle if it is
stored in exposed locations.

Touch-up exposed or primed metal to
prevent rust.

Cover chrome and stainless steel parts
with a thick coat of auto wax to prevent
discoloration. Re-wax as necessary when
you wash your vehicle.

Lubricate all hood, door and luggage
compartment hinges and latches with a
light grade oil.

Cover interior trim to prevent fading.

Keep all rubber parts free from oil and
solvents.

Engine

Change the engine oil and filter prior to
storage because used engine oil contains
contaminates which may cause engine
damage.

Start the engine every 15 days for a
minimum of 15 minutes. Run at fast idle
with the climate controls set to defrost
until the engine reaches normal
operating temperature.

With your foot on the brake, shift through
all the gears while the engine is running.

We recommend that you change the
engine oil before you use your vehicle
again.

Fuel system

Fill the fuel tank with high-quality fuel
until the first automatic shutoff of the fuel
pump nozzle.

340

MKX (CD9) Canada/United States of America, enUSA, Edition date: 201707, Second Printing

Vehicle Care

-------------------------------------------------------------------------------------------------------------------------------------------------------------

Cooling system

Protect against freezing temperatures.

When removing your vehicle from
storage, check coolant fluid level.
Confirm that there are no cooling system
leaks and that fluid is at the
recommended level.

Battery

Check and recharge as necessary. Keep
connections clean.

If storing your vehicle for more than 30
days without recharging the battery, we
recommend that you disconnect the
battery cables to maintain battery charge
for quick starting.

Note: It is necessary to reset memory
features if battery cables are disconnected.

Brakes

Make sure the brakes and parking brake
release fully.

Tires

Maintain recommended air pressure.

Miscellaneous

Make sure all linkages, cables, levers and
pins under your vehicle are covered with
grease to prevent rust.

Move vehicles at least 25 ft (7.5 m) every
15 days to lubricate working parts and
prevent corrosion.

Removing Vehicle From Storage

When your vehicle is ready to come out of
storage, do the following:

Wash your vehicle to remove any dirt or
grease film build-up on window surfaces.

Check windshield wipers for any
deterioration.

Check under the hood for any foreign
material that may have collected during
storage such as mice or squirrel nests.

Check the exhaust for any foreign
material that may have collected during
storage.

Check tire pressures and set tire inflation
per the Tire Label.

Check brake pedal operation. Drive your
vehicle 15 ft (4.5 m) back and forth to
remove rust build-up.

Check fluid levels (including coolant, oil
and gas) to make sure there are no leaks,
and fluids are at recommended levels.

If you remove the battery, clean the
battery cable ends and check for
damage.

Contact an authorized dealer if you have any
concerns or issues.

BODY STYLING KITS

The distance between the underside of your
vehicle and the ground is less than that of
other models.  Drive with extreme care to
avoid damage to your vehicle.

341

MKX (CD9) Canada/United States of America, enUSA, Edition date: 201707, Second Printing

Vehicle Care

-------------------------------------------------------------------------------------------------------------------------------------------------------------

GENERAL INFORMATION

The recommended tire inflation pressures
are found on the Tire Label which is located
on the B-pillar or the edge of the driver door.
This information can also be found on the
Safety Compliance Certification Label, affixed
to either the door hinge pillar, door-latch
post, or the door edge that meets the
door-latch post; next to the driver’s seating
position.

We strongly recommend maintaining these
tire pressures at all times. Failure to follow
the tire pressure recommendations can
cause uneven treadwear patterns, reduced
fuel economy, and adversely affect the way
your vehicle handles.

Note: Check and set the tire pressure at the
ambient temperature in which you are
intending to drive your vehicle and when the
tires are cold.

Note: Check your tire pressures at least once
per month.

If your vehicle has a spare tire, set the
pressure to the highest value given for your
vehicle and tire size combination.

Use only approved wheels and tire sizes,
using other sizes could damage your vehicle.

If you change the diameter of the factory
installed tires, the speedometer may not
display the correct speed. Take your vehicle
to an authorized dealer and have the engine
management system reprogrammed.

If you intend to change the size of the factory
installed tires, check the suitability with an
authorized dealer.

Additional information related to the
functionality and maintenance of your tires
can be found in the Wheels and Tire section.
See Tire Care (page 352).

Notice to utility vehicle and truck
owners

WARNINGS

Vehicles with a higher center of gravity
(utility and four-wheel drive vehicles)

handle differently than vehicles with a lower
center of gravity (passenger cars). Avoid
sharp turns, excessive speed and abrupt
steering in these vehicles. Failure to drive
cautiously increases the risk of losing control
of your vehicle, vehicle rollover, personal
injury and death.

In a rollover crash, an unbelted person
is significantly more likely to die than

a person wearing a seatbelt.

342

MKX (CD9) Canada/United States of America, enUSA, Edition date: 201707, Second Printing

Wheels and Tires

-------------------------------------------------------------------------------------------------------------------------------------------------------------


Content      ..     19      20      21      22     ..