Lincoln Blackwood (2002 year). Manual - part 4


  Index      Lincoln     Lincoln Blackwood (2002 year) - manual in english


Search            copyright infringement  


Content      ..     2      3      4      5     ..


Lincoln Blackwood (2002 year). Manual - part 4


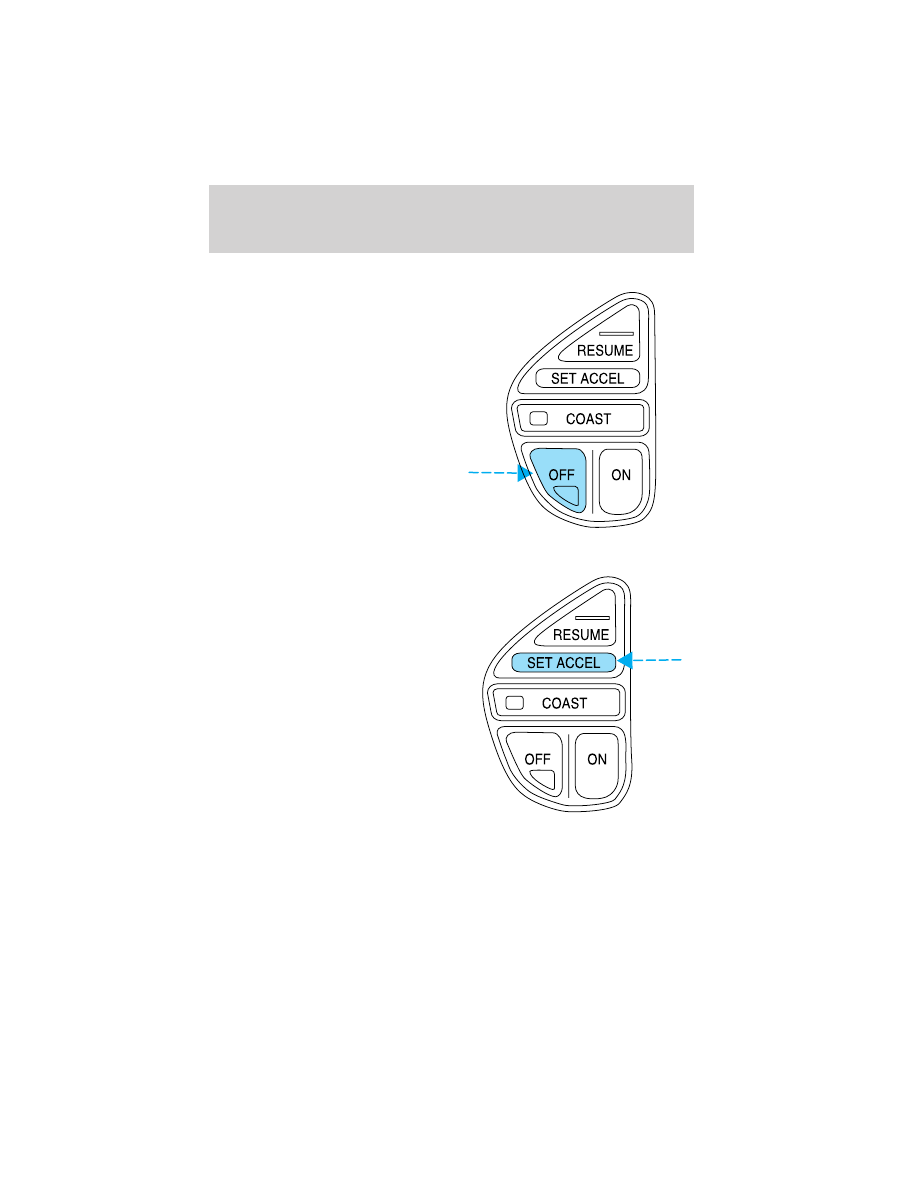
To turn speed control off
• Press OFF or
• Turn off the vehicle ignition.
Once speed control is switched off,
the previously programmed set
speed will be erased.

To set a speed
• Press SET ACCEL. For speed

control to operate, the speed
control must be ON and the
vehicle speed must be greater
than 48 km/h (30 mph).

If you drive up or down a steep hill, your vehicle speed may vary
momentarily slower or faster than the set speed. This is normal.

Speed control cannot reduce the vehicle speed if it increases above the
set speed on a downhill. If your vehicle speed is faster than the set
speed while driving on a downhill, you may want to shift to the next
lower gear or apply the brakes to reduce your vehicle speed.

Controls and features

51

-------------------------------------------------------------------------------------------------------------------------------------------------------------

If your vehicle slows down more than 16 km/h (10 mph) below your set
speed on an uphill, your speed control will disengage. This is normal.
Pressing RES will re-engage it.

Do not use the speed control in heavy traffic or on roads that
are winding, slippery, or unpaved.

To set a higher set speed
• Press and hold SET ACCEL.

Release the control when the
desired vehicle speed is reached
or

• Press and release SET ACCEL to

operate the Tap-Up function.
Each press will increase the set
speed by 1.6 km/h (1 mph) or

• Accelerate with your accelerator

pedal. When the desired vehicle
speed is reached, press and
release SET ACCEL.

You can accelerate with the
accelerator pedal at any time during
speed control usage. Releasing the
accelerator pedal will return your vehicle to the previously programmed
set speed.

Controls and features

52

-------------------------------------------------------------------------------------------------------------------------------------------------------------

To set a lower set speed
• Press and hold COAST. Release

the control when the desired
speed is reached or

• Press and release COAST to

operate the Tap-Down function.
Each press will decrease the set
speed by 1.6 km/h (1 mph) or

• Depress the brake pedal. When

the desired vehicle speed is
reached, press SET ACCEL.

Controls and features

53

-------------------------------------------------------------------------------------------------------------------------------------------------------------

To disengage speed control
• Depress the brake pedal.
Disengaging the speed control will
not erase the previously
programmed set speed.

Pressing OFF will erase the
previously programmed set speed.

Controls and features

54

-------------------------------------------------------------------------------------------------------------------------------------------------------------

To return to a previously set speed
• Press RESUME. For RESUME to

operate, the vehicle speed must
be faster than 48 km/h (30 mph).

STEERING WHEEL CONTROLS

These controls allow you to operate some radio and climate control
features.

Radio control features
• Press BAND/MODE to select AM,

FM1, FM2, TAPE or CD (if
equipped).

In Radio mode:
• Press MEM/NEXT to select a

preset station from memory.

In Tape mode:
• Press MEM/NEXT to listen to the

next selection on the tape.

In CD mode:
• Press MEM/NEXT to listen to the

next track on the disc.

In any mode:
• Press VOL up or down to adjust the volume.

NEXT

MODE

Controls and features

55

-------------------------------------------------------------------------------------------------------------------------------------------------------------

Climate control features

• Press TEMP up or down to adjust temperature.
• Press FAN up or down to adjust fan speed.

TILT STEERING

Pull the tilt steering control toward
you to move the steering wheel up
or down. Hold the control while
adjusting the wheel to the desired
position, then release the control.

Never adjust the steering wheel when the vehicle is moving.

HAZARD FLASHER

For information on the hazard flasher control, refer to Hazard flasher in
the Roadside emergencies chapter.

WINDSHIELD WIPER/WASHER CONTROLS

Rotate the windshield wiper control
to the desired interval, low or high
speed position.

The bars of varying length are for
intermittent wipers. When in this
position rotate the control upward
for fast intervals and downward for
slow intervals.

Controls and features

56

-------------------------------------------------------------------------------------------------------------------------------------------------------------

Push (tap) the end of the stalk
briefly for a single swipe (no wash).
Push and hold for three swipes with
wash. Push and hold for a longer
wash (up to ten seconds).

Speed dependent wipers
When the windshield wiper control is set on the intermittent settings,
speed-sensitive front wipers automatically adjust as the vehicle’s speed
changes.
OVERDRIVE CONTROL

Activating overdrive

(Overdrive) is the normal drive position for the best fuel economy.

The overdrive function allows automatic upshifts and downshifts through
all available gears.
Deactivating overdrive

Press the Transmission Control
Switch (TCS) located on the end of
the gearshift lever. The
Transmission Control Indicator Light
(TCIL) (the word OFF) will
illuminate on the end of the gearshift lever. The transmission will operate
in all gears except overdrive.

To return to normal overdrive mode,
press the Transmission Control
Switch again. The TCIL (the word
OFF) will no longer be illuminated.
When you shut off and re-start your vehicle, the transmission will
automatically return to normal

(Overdrive) mode.

For additional information about the gearshift lever and the transmission
control switch operation refer to the Automatic Transmission
Operation 
section of the Driving chapter.

OVERHEAD CONSOLE
The overhead console displays your trip computer and electric compass
features.
Trip computer
The trip computer tells you about the condition of your vehicle through
a constant monitor of vehicle systems. You may select display features on
the trip computer for a display of status.

OVERDRIVE

OVERDRIVE

OFF

Controls and features

57

-------------------------------------------------------------------------------------------------------------------------------------------------------------

The trip computer only works when the ignition is in the ON position.
Trip computer features follow:

Selectable features

English/metric display

Press this control to change the trip
computer display from metric to
English units. Press again to change
from English to metric units.

Mode control

Each press of the MODE control will
display a different feature as follows:

Fuel range. This displays the
approximate number of kilometers
(miles) left to drive before the fuel
tank is empty. The indicated
distance to empty may be
inaccurate:
• with sustained, drastic changes in

fuel economy (such as trailer
towing), but will eventually recover.

• if the vehicle is started while parked on an incline.
• if less than 27 liters (6 gallons) of fuel is added to the fuel tank.
The fuel range function will flash for 5 seconds when you have
approximately the following distance you can drive before the fuel tank
is empty:
• 80 km (50 miles)
• 40 km (25 miles)
• 16 km (10 miles)
Average fuel economy. The display will indicate the vehicle’s average
fuel economy in liters/100 km (or miles/gallon) since last reset.

Controls and features

58

-------------------------------------------------------------------------------------------------------------------------------------------------------------

• To reset the average fuel

economy:

1. Press the MODE control
repeatedly until AVG F/ECON is
displayed (no other display is
resettable).

2. Press the E/M and MODE
controls simultaneously.

Off. In this mode the display will go blank indicating the system is off.

Compass zone adjustment

The compass in the mirror is set in
ZONE eight at the factory. It may be
necessary to adjust the compass if
you live outside zone eight or during
a long distance trip.

1. Determine which magnetic zone
you are in for your geographic
location by referring to the zone
map.

2. Locate the compass module
mounted at the base of the mirror.

3. Turn ignition to the ON position.

4. Press and hold the button on the
upper left hand corner of the
compass module for 1 to 2 seconds
until ZONE and the current zone
setting is displayed on the trip
computer.

5. Release the button, then slowly
press down again. Press the button repeatedly until the correct zone
setting for your geographic location is displayed on the trip computer.

6. To exit the zone setting mode, release pressure from the switch for
greater that two seconds.

1

2

3

4

5

6

7 8 9 1011

12

13

14

15

Controls and features

59

-------------------------------------------------------------------------------------------------------------------------------------------------------------

Compass calibration adjustment

The compass may need calibration adjustment if:
• the compass ZONE is set correctly and the trip computer display

window is not showing the correct heading

• “CAL” is displayed in the trip computer display window
Perform this adjustment in an open area free from steel structures and
high voltage lines.

For optimum calibration, turn off all electrical accessories (heater/air
conditioning, wipers, etc.) and make sure all vehicle doors are shut.

1. Locate the compass module
mounted at the base of the mirror.

2. Start the vehicle.

3. Press and hold the button on the
upper left hand corner of the
compass module for 2 to 4 seconds,
until “CAL” and a direction are
displayed on the trip computer. (To
exit CAL mode before performing a
compass adjustment, turn the
ignition OFF.)

4. Release pressure from the button.

5. Drive the vehicle slowly (less than 5 km/h [3 mph]) in circles until the
“CAL” indicator turns off. This will take three to five circles to complete
calibration.

6. The compass is now calibrated.

Controls and features

60

-------------------------------------------------------------------------------------------------------------------------------------------------------------

One-touch moon roof

You can move the glass panel of the moon roof back to open or tilt up to
ventilate the vehicle.

To open the moon roof:

The moon roof is equipped with an
automatic, one-touch, express
opening feature. Press the rear
portion of the control. To stop
motion at any time during the
one-touch opening, press the control
a second time.

To close the moon roof:

Press and hold the front portion of
the control until the glass panel
stops moving. Once fully closed, the
rear of the glass panel will appear
higher than the front edge.

To vent:

To tilt the moon roof into the vent position (when the glass panel is
closed), press and hold the front portion of the control. To close the
moon roof from the vent position, press and hold the rear portion of the
control until the glass panel stops moving.

If the battery is disconnected, discharged, or a new battery is installed,
the moon roof needs to be opened to the vent position to reset the moon
roof positions.

The moon roof has a sliding shade that can be opened or closed when
the glass panel is shut. To close the shade, pull it toward the front of the
vehicle.

Do not let children play with the moon roof. They may seriously
hurt themselves.

ROOF

Controls and features

61

-------------------------------------------------------------------------------------------------------------------------------------------------------------

Power tonneau cover controls

The operation of the left and right
tonneau cover controls are identical.

Press the

portion of the control

to fully open the power tonneau
cover.

Press the

portion of the control

to fully close the power tonneau.

To disable the tonneau cover
controls when using your valet key,
lock the key switch in the center
console with your master key.

Courtesy/map lamps

The courtesy lamp lights when:
• any door or the tonneau cover is

opened.

• the instrument panel dimmer

switch is held up until the
courtesy lamps come on.

• the remote entry controls are

pressed and the ignition is OFF.

To turn on the map lamps, press the
control next to each lamp.

ROOF

ROOF

Controls and features

62

-------------------------------------------------------------------------------------------------------------------------------------------------------------

Rear door lamps

The rear door lamps light when:
• any door or tonneau cover is

opened.

• the instrument panel dimmer

switch is held up until the
courtesy lamps come on.

• the remote entry controls are

pressed and the ignition is OFF.

The rear door lamps can be turned on by pressing the rocker controls
next to each lamp.

AUTOMATIC DIMMING REAR VIEW MIRROR

Your vehicle is equipped with an inside rear view mirror with an
auto-dimming function. The electronic day/night mirror will change from
the normal state to the non-glare state when bright lights (glare) reach
the inside rear view mirror. When the inside rear view mirror detects
bright light from in front of or behind the vehicle, the inside rear view
mirror will automatically adjust (darken) to minimize glare.

Do not block the sensor on the backside of the inside rear view mirror
since this may impair proper system performance.

Press the control to turn the mirror
on or off.

The mirror will automatically return
to the normal state whenever the
vehicle is placed in R
(Reverse)(when the mirror is on) to ensure a bright clear view when
backing up.

OFF

AUTO

Controls and features

63

-------------------------------------------------------------------------------------------------------------------------------------------------------------

ILLUMINATED VISOR MIRROR

Lift the mirror cover to turn on the
visor mirror lamps.

HOMELINK

姞 UNIVERSAL TRANSCEIVER

The HomeLink

威 Universal Transceiver, located on the driver’s visor,

provides a convenient way to replace up to three hand-held transmitters
with a single built-in device. This feature will learn the radio frequency
codes of most current transmitters to operate garage doors, entry gate
operators, security systems, entry door locks, and home or office lighting.

When programming your HomeLink

威 Universal Transceiver to a

garage door or gate, be sure that people and objects are out of

the way to prevent potential harm or damage.

Do not use the HomeLink

威 Universal Transceiver with any garage door

opener that lacks safety stop and reverse features as required by U.S.
federal safety standards (this includes any garage door opener model
manufactured before April 1, 1982). A garage door which cannot detect
an object, signaling the door to stop and reverse, does not meet current
U.S. federal safety standards. For more information, contact HomeLink

at: www.homelink.com or 1–800–355–3515.

Retain the original transmitter for use in other vehicles as well as for
future programming procedures (i.e. new HomeLink

威 equipped vehicle

purchase). It is also suggested that upon the sale of the vehicle, the
programmed Homelink

威 Universal Transceiver buttons be erased for

security purposes, refer to Programming in this section.

Programming

Do not program the HomeLink

威 Universal Transceiver with the

vehicle parked in the garage.

Note: Your vehicle may require the ignition switch to be turned to the
ACC position for programming and/or operation of the HomeLink

威. It is

Controls and features

64

-------------------------------------------------------------------------------------------------------------------------------------------------------------

also recommended that a new battery be placed in the hand-held
transmitter of the device being programmed to HomeLink

威 for quicker

training and accurate transmission of the radio-frequency signal.

1. Press and hold the two outside
buttons releasing only when the red
light begins to flash after 20
seconds. Do not repeat step one to
program additional hand-held
transmitters to the remaining two
HomeLink

威 buttons. This will erase

previously programmed hand-held
transmitter signals into HomeLink

威.

2. Position the end of your
hand-held transmitter 2–8 cm (1–3 inches) away from the HomeLink

Universal Transceiver surface (located on your visor) while keeping the
red light in view.

3. Simultaneously press and hold
both the HomeLink

威 and hand-held

transmitter button. Do not release
the buttons until step 4 has been
completed.

Some entry gates and garage door
openers may require you to replace
step 3 with procedures noted in the
“Gate Operator and Canadian Programming” section for Canadian
residents.

4. The red light will flash slowly and then rapidly. Release both buttons
when the red light flashes rapidly. (The rapid flashing light indicates
acceptance of the hand-held transmitters’ radio frequency signals.)

5. Press and hold the just-trained HomeLink

威 button and observe the red

light. If the light is a constant red, programming is complete and your
device should activate when the HomeLink

威 button is pressed and

released. Note: To program the remaining two HomeLink

威 buttons,

begin with step 2 in the “Programming” section — do not repeat step 1.
If the red light blinks rapidly for two seconds and then turns to a
continuous red, proceed with steps 6 through 8 to complete
programming of a rolling code equipped device.

6. At the garage door opener receiver (motor-head unit) in the garage,
locate the “learn” or “smart” button (usually near where the hanging
antenna wire is attached to the unit).

Controls and features

65

-------------------------------------------------------------------------------------------------------------------------------------------------------------

7. Press and release the “learn” or “smart” button. (The name and color
of the button may vary by manufacturer.)

Note: There are 30 seconds in which to initiate step eight.

8. Return to the vehicle and firmly press, hold for two seconds and
release the HomeLink

威 button. Repeat the press/hold/release sequence

again, and, depending on the brand of the garage door opener (or other
rolling code equipped device), repeat this sequence a third time to
complete the programming.

HomeLink

威 should now activate your rolling code equipped device. To

program additional HomeLink

威 buttons begin with step 2 in the

“Programming” section. For questions or comments, please contact
HomeLink at www.homelink.com or 1–800–355–3515.

Operating the HomeLink

姞 Universal Transceiver

To operate, simply press and release
the appropriate HomeLink

威 button.

Activation will now occur for the
trained product (garage door, gate
operator, security system, entry
door lock, or home or office lighting
etc.). For convenience, the
hand-held transmitter of the device
may also be used at any time. In the event that there are still
programming difficulties, contact Homelink

威 at www.homelink.com or

1–800–355–3515.

Erasing HomeLink

姞 buttons

To erase the three programmed
buttons (individual buttons cannot
be erased):
• Press and hold the two outer

HomeLink

威 buttons until the red

indicator light begins to
flash-after 20 seconds. Release
both buttons. Do not hold for
longer that 30 seconds.

HomeLink

威 is now in the train (or

learning) mode and can be programmed at any time beginning with step
2 in the “Programming” section.

Controls and features

66

-------------------------------------------------------------------------------------------------------------------------------------------------------------


Content      ..     2      3      4      5     ..