Dodge Grand Caravan (2019 year). Manual - part 26
 

  Index      Dodge     Dodge Grand Caravan (2019 year) - manual in english


Search            copyright infringement  


Content      ..     24      25      26      27     ..


Dodge Grand Caravan (2019 year). Manual - part 26


Using The Touchscreen Radio Controls

1. Push the MENU button on the radio faceplate.

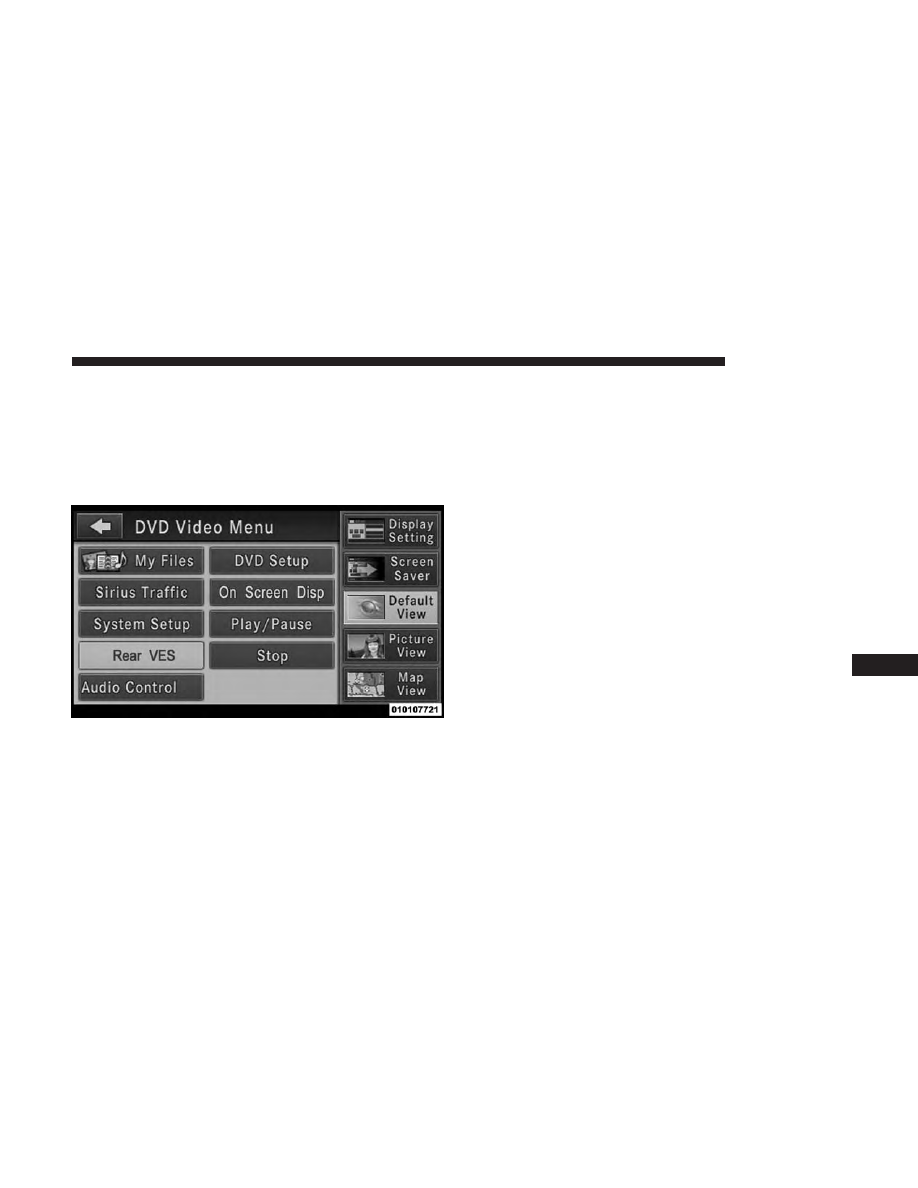
2. Press the Rear VES button on the touchscreen to display

the Rear VES Controls. If a channel list is displayed,
press the HIDE LIST button on the touchscreen to
display the Rear VES Controls screen.

3. Press the 1 button on the touchscreen and then press

either AUX 1 or AUX 2 in the VES column (depending
which AUX input is used). To exit press the back arrow
button at the top of the touchscreen.

Play A DVD Using The Touchscreen Radio

NOTE:

Headunit DVD player does not play Blu-ray Discs.

1. Push the OPEN/CLOSE or LOAD button on the radio

faceplate (Touchscreen).

2. Insert the DVD with the label facing up. The radio

automatically selects the appropriate mode after the disc
is recognized and displays the menu screen or starts
playing the first track.

Using The Remote Control

1. Push the SOURCE button on the Remote Control.

2. Highlight DISC by either pushing Up/Down/Left/

Right buttons or by repeatedly pushing the SOURCE
button, then push ENTER/OK.

NOTE:

The VES will retain the last setting when turned off.

Rear VES Button On The Touchscreen

10

MULTIMEDIA

413

Using The Touchscreen Radio Controls

1. Push the MENU button on the radio faceplate.

2. Press the Rear VES button on the touchscreen to display

the Rear VES Controls. If a channel list is displayed,
press the HIDE LIST button on the touchscreen to
display the Rear VES Controls screen.

3. Press the DISC button on the touchscreen in the MEDIA

column. To exit press the back arrow button at the top
left of the screen.

NOTE:
• To view a DVD on the radio push the RADIO/MEDIA

button on the radio faceplate, then press the DISC tab
button on the touchscreen and then the VIEW VIDEO
button on the touchscreen.

• Viewing a DVD on the Touchscreen radio screen is not

available in all states/provinces. If available, the vehicle
must be stopped and the gear selector must be in the
PARK position for vehicles with an automatic transmis-
sion. In vehicles with a manual transmission the parking
brake must be engaged.

• Pressing the screen on a Touchscreen radio while a DVD

is playing brings up basic remote control functions for
DVD play such as scene selection, Play, Pause, FF, RW,
and Stop. Pressing the X in the upper corner will turn off
the remote control screen functions.

Play A DVD Using The VES Player — If Equipped

Insert the DVD with the label facing up. The VES player
automatically selects the appropriate mode after the disc is
recognized and starts playing the DVD.

NOTE:

The VES player has basic DVD control function

such as Menu, Play, Pause, FF, RW and Stop.

Rear VES Button On The Touchscreen

414

MULTIMEDIA

Using The Remote Control

1. Push the SOURCE button on the Remote Control.

2. Highlight VES DISC by either pushing Up/Down/Left/

Right buttons or by repeatedly pushing the SOURCE
button, then push ENTER/OK on the Remote Control.

NOTE:

The VES will retain the last setting when turned off.

Using The Touchscreen Radio Controls

1. Push the MENU button on the radio faceplate.

2. Press the Rear VES button on the touchscreen to display

the Rear VES Controls. If a channel list is displayed,
press the HIDE LIST button on the touchscreen to
display the Rear VES Controls screen.

3. Press the DISC button on the touchscreen in the VES

column. To exit press the back arrow button on the
touchscreen at the top left of the screen.

Rear VES Button On The Touchscreen

10

MULTIMEDIA

415

NOTE:
• To view a DVD on the radio push the RADIO/MEDIA

button on the radio faceplate, then press the DISC tab
button on the touchscreen and then the VIEW VIDEO
button on the touchscreen.

• Viewing a DVD on the Touchscreen radio screen is not

available in all states/provinces. If available, the vehicle
must be stopped and the gear selector must be in the
PARK position for vehicles with an automatic transmis-
sion. In vehicles with a manual transmission the parking
brake must be engaged.

VES Remote Control — If Equipped

Controls And Indicators

1. Power – Turns the screen and wireless headphone

transmitter for the selected Channel on or off. To hear
audio while the screen is closed, push the Power button
to turn the headphone transmitter on.

2. Channel Selector Indicators – When a button is pushed,

the currently affected channel or channel button is
illuminated momentarily.

Select Channel/Screen 1 And DISC In The VES Column

VES Remote Control

416

MULTIMEDIA

3. Light – Turns the remote control backlighting on or off.

The remote backlighting turns off automatically after
five seconds.

4. Channel/Screen Selector Switch - Indicates which chan-

nel is being controlled by the remote control. When the
selector switch is in the Channel 1 position, the remote
controls the functionality of headphone Channel 1 (left
side of the screen). When the selector switch is in the
Channel 2, position the remote controls the functionality
of headphone Channel 2 (right side of the screen).

5.

䉴䉴 – In radio modes, push to seek the next tunable
station. In disc modes, push and hold to fast forward
through the current audio track or video chapter. In
menu modes use to navigate in the menu.

6.

䉲 / PREV – In radio modes, push to select to the
previous station. In disc modes, push to advance to the
start of the current or previous audio track or video
chapter. In menu modes, use to navigate in the menu.

7. MENU – push to return to the main menu of a DVD

disc, or select playback modes (SCAN/RANDOM for a
CD).

8.

䉴 / 㥋 (Play/Pause) – Begin/resume or pause disc play.

9.

(Stop) – Stops disc play.

10. PROG Up/Down / Rewind/skip back and fast fwd/

skip forward – When listening to a radio mode, push-
ing PROG Up selects the next preset and pushing
PROG Down selects the previous preset stored in the
radio. When listening to compressed audio on a data
disc, PROG Up selects the next directory and PROG
Down selects the previous directory. When listening to
a disc in a radio with a multiple-disc changer, PROG
Up selects the next disc and PROG Down selects the
previous disc.

11. Mute – Push to mute the headphone audio output for

the selected channel.

12. SLOW – If Equipped – Push to slow playback of a DVD

disc. Push play (

䉴) to resume normal play.

13. STATUS – If Equipped – Push to display the current

status.

14. MODE – Push to change the mode of the selected

channel. See the Mode Selection section of this manual
for details on changing modes.

10

MULTIMEDIA

417

15. SETUP – When in a video mode, push the SETUP

button to access the display settings (see the display
settings section) to access the DVD setup menu, select
the menu button on the radio. When a disc is loaded in
the DVD player (if equipped) and the VES mode is
selected and the disc is stopped, push the SETUP
button to access the DVD Setup menu. (see the DVD
Setup Menu of this manual.)

16. BACK – When navigating in menu mode, push to

return to the previous screen. When navigating a DVDs
disc menu, the operation depends on the disc’s con-
tents.

17.

䉳䉳 – In radio modes, push to seek to the previous
tunable station. In disc modes, push and hold to fast
rewind through the current audio track or video chap-
ter. In menu modes use to navigate in the menu.

18. ENTER/OK – Push to select the highlighted option in

a menu.

19.

䉱 / NEXT – In radio modes, push to select to the next
station. In disc modes, push to advance to the next
audio track or video chapter. In menu modes, use to
navigate in the menu.

Remote Control Storage

The video screen comes with a built in storage compart-
ment for the remote control which is accessible when the
screen is opened. To remove the remote, use your index
finger to pull and rotate the remote towards you. Do not try
to pull the remote straight down as it will be very difficult
to remove. To return the remote back into its storage area,
insert one long edge of the remote into the two retaining
clips first, and then rotate the remote back up into the other
two retaining clips until it snaps back into position.

VES Remote Control Storage

418

MULTIMEDIA

Locking The Remote Control

All remote control functionality can be disabled as a
parental control feature.
• To disable the Remote Control from making any

changes, push the Video Lock button on the DVD player
(if equipped). If the vehicle is not equipped with a DVD
player, follow the radio’s instructions to turn Video Lock
on. The radio and the video screen(s) indicate when
Video Lock is active.

• Pushing the Video Lock again or turning the ignition

OFF turns Video Lock OFF and allows remote control
operation of the VES.

Replacing The Remote Control Batteries

The remote control requires two AAA batteries for opera-
tion. To replace the batteries:

1. Locate the battery compartment on the back of the

remote, then slide the battery cover downward.

2. Replace the batteries, making sure to orient them ac-

cording to the polarity diagram shown.

3. Replace the battery compartment cover.

10

MULTIMEDIA

419

Headphones Operation

Front seat occupants receive some headphone audio cov-
erage to allow them to adjust the headphone volume for
the young rear seat occupants that may not be able to do so
for themselves.

If no audio is heard after increasing the volume control,
verify that the screen is turned on and in the down position
and that the channel is not muted. If audio is still not heard,
check that fully charged batteries are installed in the
headphones.

Controls

The headphone power indicator and controls are located
on the right ear cup.

NOTE:

The rear video system must be turned on before

sound can be heard from the headphones. To conserve
battery life, the headphones will automatically turn off
approximately three minutes after the rear video system is
turned off.

VES Headphones

1 — Volume Control

3 — Channel Selection Switch

2 — Power Button

4 — Power Indicator

420

MULTIMEDIA

Replacing The Headphone Batteries

Each set of headphones requires two AAA batteries for
operation. To replace the batteries:

1. Locate the battery compartment on the left ear cup of

the headphones, and then slide the battery cover down-
ward.

2. Replace the batteries, making sure to orient them ac-

cording to the polarity diagram shown.

3. Replace the battery compartment cover.

Accessibility — If Equipped

The accessibility feature announces DVD functions prior to
performing them. For example, when activated, the acces-
sibility feature will announce that the “Play” button was
pressed the first time the “Play” button is pressed, and the
second time the “Play” button is pressed it will perform the
“Play” function. The accessibility feature can be turned on
and off in the settings of the radio.

NOTE:

When the Accessibility feature is enabled, and the

remote control is used in the rear seats to control the Video
Entertainment System (VES), the DVD functions will be
announced in the headsets only. The DVD functions will be
announced through the vehicle’s sound system when the
Uconnect system is being used to control the VES system.
These announcements will be in English only.

Stereo Headphone Lifetime Limited Warranty

Who Does This Warranty Cover?

This warranty covers the

initial user or purchaser (

⬙you⬙ or ⬙your⬙) of this particular

Aptiv PLC (“Aptiv”) wireless headphone (

⬙Product⬙). The

warranty is not transferable.

How Long Does the Coverage Last?

This warranty lasts as

long as you own the Product.

What Does This Warranty Cover?

Except as specified

below, this warranty covers any Product that in normal use
is defective in workmanship or materials.

What Does This Warranty Not Cover?

This warranty does

not cover any damage or defect that results from misuse,
abuse or modification of the Product other than by Aptiv.
Foam earpieces, which will wear over time through normal
use, are specifically not covered (replacement foam is
available for a nominal charge). APTIV IS NOT LIABLE

10

MULTIMEDIA

421

FOR ANY INJURIES OR DAMAGES TO PERSONS OR
PROPERTY RESULTING FROM THE USE OF, OR ANY
FAILURE OR DEFECT IN, THE PRODUCT, NOR IS AP-
TIV LIABLE FOR ANY GENERAL, SPECIAL, DIRECT,
INDIRECT, INCIDENTAL, CONSEQUENTIAL, EXEM-
PLARY, PUNITIVE OR OTHER DAMAGES OF ANY
KIND OR NATURE WHATSOEVER. Some states and
jurisdictions may not allow the exclusion or limitation of
incidental or consequential damages, so the above limita-
tion may not apply to you. This warranty gives you specific
legal rights. You may also have other rights, which vary
from jurisdiction to jurisdiction.

What Will Aptiv Do?

Aptiv, at its option, will repair or

replace any defective Product. Aptiv reserves the right to
replace any discontinued Product with a comparable
model. THIS WARRANTY IS THE SOLE WARRANTY
FOR THIS PRODUCT, SETS FORTH YOUR EXCLUSIVE
REMEDY REGARDING DEFECTIVE PRODUCTS, AND IS
IN LIEU OF ALL OTHER WARRANTIES (EXPRESS OR
IMPLIED), INCLUDING ANY WARRANTY FOR MER-
CHANTABILITY OR FITNESS FOR A PARTICULAR PUR-
POSE.

If you have any questions or comments regarding your
Aptiv wireless headphones, or to register your wireless
headphones, please phone:

1-248-724-5900

System Information

Shared Modes

This allows the VES to output radio sources to the headphones
and the radio to output VES sources to the vehicle speakers.

If the radio functions (FM, AM, or SAT) are in the shared
mode with the VES, only the radio is able to control the
radio functions. In this case, VES can share the radio mode,
but not change stations until the radio mode is changed to
a mode that is different from the VES selected radio mode.
When shared, the radio has priority over the VES or all
radio modes (FM, AM, and SAT). The VES has the ability to
switch tuner (AM/FM), SEEK, SCAN, TUNE, and recall
presets in radio modes as long as it is not in shared mode.

When in shared disc mode both the radio and the VES have
control of the video functions. The VES has the ability to
control the following video modes:

1. CD: Ability to Fast Forward, Rewind, Scan, and Track

Up/Down.

422

MULTIMEDIA

2. CD Changer (in radio): Ability to Disk Up/Down and

program all listed CD controls (Fast Forward, Rewind,
Scan, and Track Up/Down).

The VES can even control radio modes or video modes
while the radio is turned off. The VES can access the radio
modes or disc modes by navigating to those modes on the
VES and activating a radio mode or disc mode.

Station List Menu

When listening to Satellite audio, pushing the remote
control’s POP UP/MENU button displays a list of all
available channels. Navigate this list using the remote
control’s navigation buttons (

䉱, 䉲) to find the desired

station, push the remote control’s ENTER/OK button to
tune to that station. To jump through the list more quickly,
navigate to the Page Up and Page Down icons on the
screen.

Disc Menu

When listening to a CD Audio or CD Data disc, pushing
the remote control’s POP UP/MENU button displays a list
of all commands which control playback of the disc. Using
the options you can activate or cancel Scan play and
Random play.

Display Settings

When watching a video source (DVD Video with the disc
in Play mode, Aux Video, etc.), pushing the remote con-
trol’s SETUP button activates the Display Settings menu.
These settings control the appearance of the video on the
screen. The factory default settings are already set for
optimum viewing, so there is no need to change these
settings under normal circumstances.

To change the settings, push the remote control’s naviga-
tion buttons (

䉱, 䉲) to select an item, then push the remote

control’s navigation buttons (

䉴, 䉳) to change the value for

the currently selected item. To reset all values back to the
original settings, select the Default Settings menu option
and press the remote control’s ENTER/OK button.

Disc Features control the remote DVD settings of DVD
being watched in the remote player.

Listening To Audio With The Screen Closed

To listen to only audio portion of the channel with the
screen closed:

1. Set the audio to the desired source and channel.

2. Close the video screen.

10

MULTIMEDIA

423

3. To change the current audio mode, push the remote

control’s MODE button. This will automatically select
the next available audio mode without using the
MODE/SOURCE Select menu.

If the screen is closed and there is no audio heard, verify
that the headphones are turned on (the ON indicator is
illuminated) and the headphone selector switch is on the
desired channel. If the headphones are turned on, push the
remote control’s power button to turn audio on. If audio is
still not heard, check that fully charged batteries are
installed in the headphones.

Disc Formats

The DVD player is capable of playing the following types
of discs (12 cm or 8 cm diameter):
• DVD-Video discs (MPEG-2 video compression) (see

notes about DVD Region Codes)

• DVD-Audio discs (2 channel audio output only)
• Audio Compact Discs (CDs)
• CD Data discs with MP3 and WMA compressed audio

format files

• Video CDs (MPEG-1 video compression)

DVD Region Codes

The DVD player and many DVD Discs are coded by
geographic region. These region codes must match in order
for the disc to play. If the region code for the DVD does not
match the region code for the player, the disc will stop
playing and a warning will be displayed.

DVD Audio Support

When a DVD-Audio disc is inserted in the DVD player, the
DVD-Audio title on the disc is played by default (most
DVD-Audio discs also have a Video title, but the Video title
is ignored). All multi-channel program material is auto-
matically mixed down to two channels, which may result
in a lowered apparent volume level. If you increase the
volume level to account for this change in level, remember
to lower the volume before changing the disc or to another
mode.

Recorded Discs

The DVD player will play CD-R and CD-RW discs re-
corded in CD-Audio or Video-CD format, or as a CD-ROM
containing MP3, WMA. The player will also play DVD-
Video content recorded to a DVD-R or DVD-RW disc.
DVD-ROM discs (either pressed or recorded) are not
supported.

424

MULTIMEDIA

If you record a disc using a personal computer, there may
be cases where the DVD player may not be able to play
some or the entire disc, even if it is recorded in a compat-
ible format and is playable on other players. To help avoid
playback problems, use the following guidelines when
recording discs.
• Open sessions are ignored. Only sessions that are closed

are playable.

• For multi-session CDs that contain only multiple CD-

Audio sessions, the player will renumber the tracks so
each track number is unique.

• For CD Data (or CD-ROM) discs, always use the ISO-

9660 (Level 1 or Level 2), Joliet, or Romeo format. Other
formats (such as HFS, or others) are not supported.

• The player recognizes a maximum of 512 files and 99

folders per CD-R and CD-RW disc.

• Mixed media recordable DVD formats will only play the

Video_TS portion of the disc.

If you are still having trouble writing a disc that is playable
in the DVD player, check with the disc recording software
publisher for more information about burning playable
discs.

The recommended method for labeling recordable discs
(CD-R, CD-RW, and DVD-R) is with a permanent marker.
Do not use adhesive labels as they may separate from the
disc, become stuck, and cause permanent damage to the
DVD player.

Compressed Audio Files (MP3 / WMA and ACC)

The DVD is capable of playing MP3 (MPEG-1 Audio Layer
3) and WMA (Windows Media Audio) files from a CD Data
disc (usually a CD-R or CD-RW).
• The DVD player always uses the file extension to

determine the audio format, so MP3 files must always
end with the extension

⬙.mp3⬙ or ⬙.MP3⬙ and WMA files

must always end with the extension

⬙.wma⬙ or ⬙.WMA.⬙

AAC files must always end with the extension

⬙aac⬙ or

⬙AAC.⬙ To prevent incorrect playback, do not use these
extensions for any other types of files.

• For MP3 files, only version 1 ID3 tag data (such as artist

name, track title, album, etc.) are supported.

• Any file that is copy protected (such as those down-

loaded from many online music stores) will not play. The
DVD player will automatically skip the file and begin
playing the next available file.

10

MULTIMEDIA

425

• Other compression formats such as AAC, MP3 Pro, Ogg

Vorbis, and ATRAC3 will not play. The DVD player will
automatically skip the file and begin playing the next
available file.

• If you are creating your own files, the recommended

fixed bit rate for MP3 files is between 96 and 192 Kbps
and the recommended fixed bit rate for WMA files is
between 64 and 192 Kbps. Variable bit rates are also
supported. For both formats, the recommended sample
rate is either 44.1 kHz or 48 kHz.

• To change the current file, use the DVD player’s 䉱

button to advance to the next file, or the

䉲 button to

return to the start of the current or previous file.

• To change the current directory, use the remote control’s

PROG UP and Down buttons or Rewind/skip back and
fast fwd/skip forward.

Disc Errors

If the DVD player is unable to read the disc, a

⬙Disc Error⬙

message is displayed on the Radio display and the disc is
automatically ejected. A dirty, damaged, or incompatible
disc format are all potential causes for a

⬙Disc Error⬙

message.

If a disc has a damaged track which results in audible or
visible errors that persists for 2.0 seconds, the DVD player
will attempt to continue playing the disc by skipping
forward 1.0 to 3.0 seconds at a time. If the end of the disc
is reached, the DVD player will return to the beginning of
the disc and attempt to play the start of the first track.

The DVD player may shut down during extremely hot
conditions, such as when the vehicle’s interior temperature
is above 120° F (49° C). When this occurs, the DVD Player
will display

⬙High Temp⬙ and will shut off the display until

a safe temperature is reached. This shutdown is necessary
to protect the optics of the DVD.

426

MULTIMEDIA

Display

Other Language Setup

All of the Language settings have a special

⬙Other⬙ setting

to accommodate languages other than Japanese or English.
These languages are selected using a special four-digit
code.

To enter a new language code, activate the DVD Setup
Menu. To enter DVD Setup Menu stop the DVD, enter
radio disc mode, then DVD setup and follow these addi-
tional instructions:
• Using the remote control Up and Down cursor buttons,

highlight the Language item you want to edit, and then
push the remote control ENTER/OK button.

• Using the remote control Down cursor button, select the

⬙Other⬙ setting, then push the remote control’s Right
cursor button to begin editing the setting.

• Using the remote control Up and Down cursor buttons,

select a digit for the current position. After selecting the
digit, push the remote control’s Right cursor button to
select the next digit. Repeat this digit selection sequence
for all four digits.

• When the entire four-digit code is entered, push the

remote control’s ENTER/OK button. If the language
code is not valid, the numbers all change back to

⬙夡⬙. If

the digits are visible after this step, then the language
code is valid.

Here is an abbreviated list of language codes. For more
language codes, please contact the dealer where the vehicle
was purchased.

DVD Player Language Menu

10

MULTIMEDIA

427

Language

Code

Language

Code

Dutch

2311

French

1517

German

1304

Italian

1819

Portuguese

2519

Spanish

1418

Rating And Password Setup

The Rating and Password settings work together to control
the types of DVDs that your family watches. Most DVD-
Video discs have a rating (from 1 to 8) assigned to them
where lower numbers are designated for all audiences and
higher numbers are designated for more adult audiences.

When a DVD-Video disc is loaded, its rating is compared to
the setting in the DVD player. If the rating of the disc is
higher than the setting in the player, a Password screen is
displayed. In order to watch the disc, the rear passenger
must enter the correct password using the password entry
method described below.

To play all discs without requiring a password, set the
DVD player’s rating to Level 8. Setting the rating to Level
1 always requires the password to play any DVD disc. Not
all DVD discs encode a Rating, so it is still possible that
discs designed for adult audiences can still play without
requiring a password.

The default rating is Level 8 (play all discs without a
password) and the default password is 0000.

DVD Password Entry

428

MULTIMEDIA


Content      ..     24      25      26      27     ..