Dodge Diesel (2004 year). Manual - part 14


  Index      Dodge     Dodge Diesel (2004 year) - manual in english


Search            copyright infringement  


Content      ..     12      13      14      15     ..


Dodge Diesel (2004 year). Manual - part 14


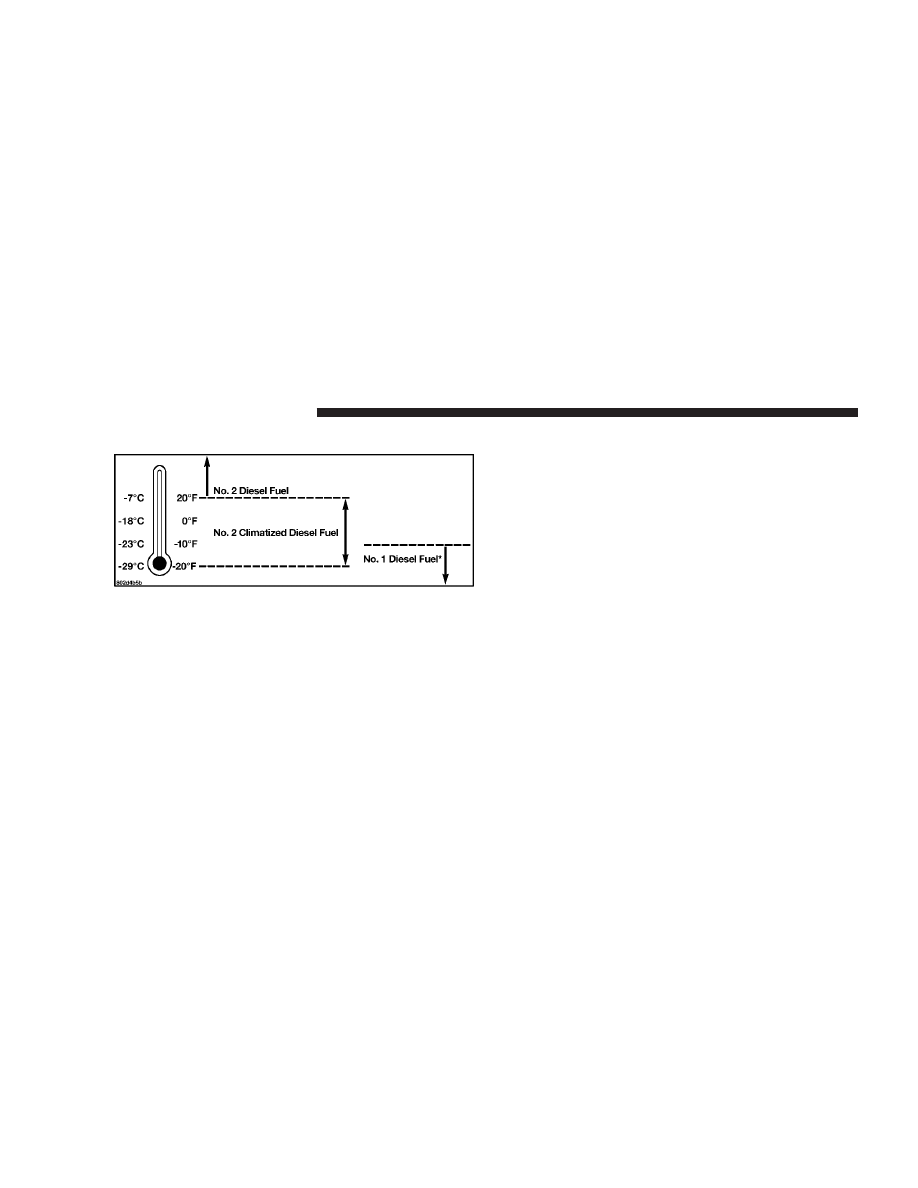
Fuel Operating Range

*No. 1 diesel fuel should only be used where extended
arctic conditions (-10°F/-23°C) exist.

NOTE:

• Use of Climatized Diesel Fuel or Number 1 Diesel Fuel

results in a noticeable decrease in fuel economy.

• Climatized Diesel Fuel is a blend of Number 2 and

Number 1 Diesel Fuels which reduces the temperature
at which wax crystals form in fuel.

NOTE:

Refer to Fuel Requirements in this section for

further details on fuel recommendations.

Engine Block Heater
The engine block heater warms engine coolant and
permits quicker starts in cold weather. Connect the heater
cord to a ground–fault interrupter protected 110–115 volt
AC electrical outlet with a grounded, three-wire exten-
sion cord.

The engine block heater cord is routed under the hood to
the right side and can be located just behind the grille
near the headlamp.

NOTE:

The engine block heater cord is a factory in-

stalled option. If your vehicle is not equipped, heater
cords are available from your authorized Mopar

t dealer.

The block heater must be plugged in at least one hour to
have an adequate warming effect on the coolant.

212

STARTING AND OPERATING

WARNING!

Remember to disconnect the cord before driving.
Damage to the 110–115 volt electrical cord could
cause electrocution.

NOTE:

The block heater will require 110 Volts AC and

6.5 Amps to activate the heater element.

Block Heater Usage

A. Temperatures below 0°F (-18°C)

• Block Heater Required for 15W-40
• Block Heater Recommended for 5W-40

B. Temperatures below - 20°F (-29°C)

• Block Heater Required for 5W-40

Winter Front Usage
If a winter front or cold weather cover is to be used, a
percentage of the total grille opening area must be left
uncovered to provide sufficient air flow to the charge air
cooler and automatic transmission oil cooler. The per-
centage of opening must be increased with the increasing
ambient air temperature and/or engine load. If the
cooling fan can be heard cycling frequently, increase the
size of the opening in the winter front. A suitable cold
weather cover is available from your Mopar

t dealer.

Battery Blanket Usage
A battery loses 60% of its cranking power as the battery
temperature decreases to 0°F (-18°). For the same de-
crease in temperature, the engine requires twice as much
power to crank at the same RPM. The use of 120 VAC
powered battery blankets will greatly increase starting
capability at low temperatures. Suitable battery blankets
are available from your authorized Mopar

t dealer.

STARTING AND OPERATING

213

5

Arctic Operation
Where there are no provisions to keep the engine warm
when it is operating in ambient temperatures consistently
below (-10°F/-23°C), use 5W-40 synthetic engine oil and
fuel that meets the requirements in Section 7, “Mainte-
nance Procedures,” Engine Oil Selection.

Engine Warm-Up
Avoid full throttle operation when the engine is cold.
When starting a cold engine, bring the engine up to
operating speed slowly to allow the oil pressure to
stabilize as the engine warms up.

NOTE:

High-speed, no-load running of a cold engine

can result in excessive white smoke and poor engine
performance. No-load engine speeds should be kept
under 1,200 rpm during the warm-up period, especially
in cold ambient temperature conditions.

If temperatures are below 32°F (0°C), operate the engine
at moderate speeds for 5 minutes before full loads are
applied.

Engine Idling — In Cold Weather

Avoid prolonged idling. Long periods of idling may be
harmful to your engine because combustion chamber
temperatures can drop so low that the fuel may not burn
completely. Incomplete combustion allows carbon and
varnish to form on piston rings and injector nozzles.
Also, the unburned fuel can enter the crankcase, diluting
the oil and causing rapid wear to the engine.

NOTE:

• If ambient temperatures are low and the coolant

temperature is below 200°F (93°C), the engine idle
speed will slowly increase to 1000 RPM after 2 minutes
of idle, if the following conditions are met:

• foot is off brake pedal and throttle pedal

214

STARTING AND OPERATING

• automatic transmission is in Park (P)
• vehicle speed is zero
• Applying the throttle will cancel fast idle
• If the engine is equipped with an aftermarket exhaust

brake (manual transmissions only), operating the ex-
haust brake at idle will greatly improve warm up rate
and will help keep the engine close to operating
temperature during extended idle.

Stopping The Engine

Idle the engine a few minutes before routine shutdown.
After full load operation, idle the engine 3 to 5 minutes
before shutting it down. This idle period will allow the
lubricating oil and coolant to carry excess heat away from
the combustion chamber, bearings, internal components,
and turbocharger. This is especially important for turbo-
charged, charge air cooled engines, like your Turbo Ram.

Driving

Condition

Load

Turbo-

charger

Temperature

Idle Time

(min.) Be-

fore Engine

Shutdown

Stop and

Go

Empty

Cool

Less than

One

Stop and

Go

Medium

One

Highway

Speeds

Medium

Warm

Two

City Traffic

Maximum

GCWR

Three

Highway

Speeds

Maximum

GCWR

Four

Uphill

Grade

Maximum

GCWR

Hot

Five

STARTING AND OPERATING

215

5

Engine Speed Control

CAUTION!

Prevent overspeeding the engine going down hill.
When descending steep grades, use a combination of
gears and service brakes to control vehicle/engine
speed. Overspeed can cause severe engine damage.

Operating Precautions

Avoid Overheating The Engine
The temperature of the coolant (a mixture of 50%
ethylene-glycol and 50% water) must not exceed the
normal range of the temperature gauge (240°F/116°C)
with a 16 psi (110 kPa) radiator cap.

Usually the coolant temperature indicated during opera-
tion will be to the left of center in the normal range of the
gauge.

Avoid Low Coolant Temperature Operation
Continual operation at low coolant temperature below
the normal range on the gauge (140°F/60°C) can be
harmful to the engine. Low coolant temperature can
cause incomplete combustion which allows carbon and
varnish to form on piston rings and injector nozzles.
Also, the unburned fuel can enter the crankcase, diluting
the lubricating oil and causing rapid wear to the engine.

Cooling System Tips — Automatic Transmission

To reduce potential for engine and transmission over-
heating in high ambient temperature conditions, take the
following actions:

• City Driving —
when stopped, put transmission in neutral and increase
engine idle speed.

NOTE:

The engine speed will automatically increase to

1000 RPM at elevated coolant temperature to improve
engine cooling.

216

STARTING AND OPERATING

• Highway Driving —
reduce your speed.

• Up Steep Hills —
select a lower transmission gear, but try and keep the
torque converter locked.

• Air Conditioning —
turn it off temporarily.

Do Not Operate The Engine With Low Oil
Pressure
When the engine is at normal operating temperature, the
minimum oil pressures required are:

Idle 700 to 800 RPM . . . . . . . . . . . . . . . 10 psi (69 kPa)
Full speed and load . . . . . . . . . . . . . . 30 psi (207 kPa)

CAUTION!

If oil pressure falls to less than normal readings, shut
the engine off immediately. Failure to do so could
result in immediate and severe engine damage.

Do Not Operate The Engine With Failed Parts
Practically all failures give some warning before the parts
fail. Be on the alert for changes in performance, sounds,
and visual evidence that the engine requires service.
Some important clues are:

• engine misfiring or vibrating severely
• sudden loss of power
• unusual engine noises
• fuel, oil or coolant leaks

STARTING AND OPERATING

217

5

• sudden change, outside the normal operating range, in

the engine operating temperature

• excessive smoke
• oil pressure drop

TRANSMISSION SHIFTING

Four-Speed Overdrive Automatic Transmission —
If Equipped

The gear shift selector display, located in the instrument
panel cluster, indicates the transmission gear range (the
selector is illuminated for night driving). The selector
lever is mounted on the right side of the steering column.
You must depress the brake pedal, to pull the selector
lever out of park (P) position (Brake Interlock System). To
drive, move the selector lever from Park or Neutral to the
desired drive position. Pull the selector lever toward you
when shifting into Reverse, Second, First or Park, or
when shifting out of Park.

Gear Ranges
DO NOT race the engine when shifting from Park or
Neutral position into another gear range.

“P” Park
This gear position supplements the parking brake by
locking the transmission. The engine can be started in
this range. Never use Park while the vehicle is in motion.
Apply the parking brake when leaving the vehicle in this
range. Always apply parking brake first, then place the
selector in Park position. On 4-wheel drive vehicles be
sure that the transfer case is in a drive position!

WARNING!

Your vehicle could move and injure you and others if
it is not completely in P (Park). Check by trying to
move the gearshift lever back and forth without first
pulling it toward you after you have set it in P. Make
sure it is in Park before leaving the vehicle.

218

STARTING AND OPERATING

WARNING!

It is dangerous to shift the selector lever out of “P” or
“N” if the engine speed is higher than idle speed. If
your foot is not firmly on the brake pedal, the
vehicle could accelerate quickly forward or in re-
verse. You could lose control of the vehicle and hit
someone or something. Only shift into gear when
the engine is idling normally and when your right
foot is firmly on the brake pedal.

“R” Reverse
Use this range only after the vehicle has come to a
complete stop.

“N” Neutral
Shift to Neutral when the vehicle is standing for pro-
longed periods with the engine running. The engine may
be started in this range. Set the parking brake if you must
leave the vehicle.

“D” Drive
This position provides all forward gears, including 3rd
gear direct and 4th gear overdrive (see Overdrive Opera-
tion). Use this range for most city and highway driving.

“2” Second
Use this position for driving slowly in heavy city traffic
or on mountain roads where more precise speed control
is desirable. Use it also when climbing long grades, and
for engine braking when descending moderately steep
grades. To prevent excessive engine speed do not exceed
45 mph (72 km/h) in this range.

STARTING AND OPERATING

219

5

“1” First
Use this position for driving up very steep hills and for
engine braking at low speeds 20 mph (32 km/h) or less
when going downhill. To prevent excessive engine speed,
do not exceed 25 mph (40 km/h) in this range.

NOTE:

Use caution when operating a heavily loaded

vehicle in “2” Second or “1” First gear selections in high
ambients as torque converter slip can impose significant
additional heat load on the cooling system.

WARNING!

Never use Park position on an automatic transmis-
sion as a substitute for the parking brake. Always
apply parking brake fully when parked to guard
against vehicle movement and possible injury or
damage.

Overdrive Operation
The four-speed overdrive automatic transmission con-
tains an electronically controlled fourth speed (Over-
drive). The transmission will automatically shift from
Drive to Overdrive if the following conditions are
present:

• the transmission selector is in Drive;

220

STARTING AND OPERATING

• the engine coolant has reached normal operating tem-

perature;

• vehicle speed is above approximately 30 mph (48

km/h);

• the “TOW/HAUL” switch has not been activated;
• transmission has reached normal operating tempera-

ture.

The transmission will downshift from Overdrive to Drive
if the accelerator pedal is fully depressed at vehicle
speeds above approximately 35 mph (56 km/h).

Overdrive can be locked out by pressing the “TOW/
HAUL” button located on the selector lever. The “TOW/
HAUL” light will illuminate in the instrument cluster to
indicate that the switch has been activated. Pressing the
switch a second time restores the Overdrive function. If
the “TOW/HAUL” feature is desired, the“TOW/HAUL”
button must be pressed each time the engine is started.

NOTE:

If the vehicle is started in extremely cold tem-

peratures, the transmission may not shift into Overdrive
and will automatically select the most desirable gear for
operation at this temperature. Normal operation will
resume when the transmission fluid temperature has
risen to a suitable temperature. Refer also to the Note
under torque converter clutch, later in this section.

If the transmission temperature gets extremely hot, the
transmission will automatically select the most desirable
gear for operation at this temperature. If the transmission
temperature becomes hot enough the “TOW/HAUL”
and/or TRANS TEMP light(s) may illuminate and the
transmission may downshift out of Overdrive until the
transmission cools down. After cooldown, the transmis-
sion will resume normal operation.

When To Lock Out Overdrive
When driving in hilly areas, towing a trailer, carrying a
heavy load, etc., and frequent 4–3–4 transmission shifting

STARTING AND OPERATING

221

5

occurs, press the “TOW/HAUL” button. This will im-
prove performance and reduce the potential for transmis-
sion overheating or failure due to excessive shifting.

Torque Converter Clutch
A feature, designed to improve fuel economy, has been
included in the automatic transmission on your vehicle.
A clutch within the torque converter engages automati-
cally at calibrated speeds. This may result in a slightly
different feeling or response during normal operation in
high gear. When the vehicle speed drops or during
acceleration when the transmission downshifts to second
gear, the clutch automatically disengages.

NOTE:

The torque converter clutch will not engage

until the transmission fluid and engine coolant are warm
[usually after 1-3 miles (1.6 – 4.8 km) of driving]. Because
the engine speed is higher when the torque converter
clutch is not engaged, it may seem as if the transmission
is not shifting into Overdrive when cold. This is normal.

Pressing the “TOW/HAUL” button, when the transmis-
sion is sufficiently warm, will demonstrate that the
transmission is able to shift into and out of overdrive.

NOTE:

If the vehicle has not been driven in several

days, the first few seconds of operation after shifting the
transmission into gear may seem sluggish. This is due to
the fluid partially draining from the torque converter into
the transmission. This condition is normal and will not
cause damage to the transmission. The torque converter
will refill within five seconds of shifting from Park into
any other gear position.

Manual Transmission – 5–Speed (NV- 4500) — If
Equipped

NOTE:

The parking brake should be engaged before

leaving the vehicle, especially on an incline.

222

STARTING AND OPERATING

Truck models with manual transmission are equipped
with a clutch interlocking ignition system. The clutch
pedal must be fully depressed to start the vehicle.

Fully depress the clutch pedal before shifting gears. As
you release the clutch pedal, lightly depress the accelera-
tor pedal. When launching a stationary vehicle, keep the
engine speed low until the clutch is fully engaged.

Damage to the clutch can result from
starting in 2nd or 3rd gear. Use each
gear in numerical order – do not skip a
gear.

For improved clutch life, all five forward gears should be
used for all load conditions. For steady highway driving
with light acceleration, 5th gear is recommended. To shift
into 5th gear, move the shift lever to the right beyond the
spring pressure point and push it forward. When shifting

from 5th to 4th, pull the lever down toward you in one
motion. Do not pull the lever sharply left as you may
shift accidentally into 2nd gear and damage the trans-
mission and engine.

To shift into Reverse, come to a complete stop. Depress
the clutch and pause briefly to allow the gear train to
stop. Move the shift lever from the Neutral position
straight across and back into Reverse.

Never drive with your foot resting on the clutch pedal, or
attempt to hold the vehicle on a hill with the clutch pedal
partially engaged, as this will cause abnormal wear on
the clutch.

Downshifting
Moving from a high gear down to a lower gear is
recommended to preserve brakes when driving down
steep hills. In addition, downshifting at the right time
provides better acceleration when you desire to resume
speed. Downshifting progressively. Do not skip gears to

STARTING AND OPERATING

223

5

avoid overspeeding the engine and clutch. For accelera-
tion at speeds less than 15 mph (25 km/h), 2nd gear is
recommended.

CAUTION!

When descending a hill, be very careful to downshift
one gear at a time to prevent overspeeding the
engine which can cause valve damage.

Manual Transmission — 6-Speed (NV-5600) — If
Equipped

NOTE:

The parking brake should be engaged before

leaving the vehicle, especially on an incline.

Truck models with manual transmission are equipped
with a clutch interlocking ignition system. The clutch
pedal must be fully depressed to start the vehicle.

Fully depress the clutch pedal before shifting gears. As
you release the clutch pedal, lightly depress the accelera-
tor pedal. When launching a stationary vehicle, keep the
engine speed low until the clutch is fully engaged.

Damage to the clutch can re-
sult from starting in 2nd or
3rd gear with a loaded ve-
hicle. Use each gear in nu-
merical order – do not skip a
gear.

This six-speed manual transmission has the same gear
ratios for 1st gear and the two highest gears as appear in
the five-speed transmission. The advantage is that the
middle gears (2nd, 3rd and 4th) have ratios that are closer

224

STARTING AND OPERATING

together and the overall close ratios enable the driver to
optimize available engine power with road speed.

For improved clutch life, all six forward gears should be
used. For steady highway driving with light acceleration,
6th gear is recommended. When shifting from 4th to 5th
gear, apply side effort away and forward without push-
ing hard enough to engage Reverse gear. Shifting from
5th to 6th requires the same side effort or the lever will
return to center resulting in a shift into 4th gear and
damage the transmission, clutch, or engine.

You should use low gear when starting from a standing
position if under a heavy load.

To shift into Reverse, come to a complete stop. Depress
the clutch and pause briefly to allow the gear train to
stop. Move the shift lever from the Neutral position
straight across and up into Reverse.

Never drive with your foot resting on the clutch pedal, or
attempt to hold the vehicle on a hill with the clutch pedal
partially engaged, as this will cause abnormal wear on
the clutch.

Downshifting
Moving from a high gear down to a lower gear is
recommended to preserve brakes when driving down
steep hills. In addition, downshifting at the right time
provides better acceleration when you desire to resume
speed. Downshifting progressively. Do not skip gears to
avoid overspeeding the engine and clutch. For accelera-
tion at speeds less than 15 mph (25 km/h), 2nd gear is
recommended.

STARTING AND OPERATING

225

5

CAUTION!

When descending a hill, be very careful to downshift
one gear at a time to prevent overspeeding the
engine which can cause valve damage.

FOUR-WHEEL- DRIVE OPERATION — IF
EQUIPPED

• Four-Wheel-Drive Dodge Ram Trucks are equipped

with either a Manually Shifted transfer case or an
Electronically Shifted transfer case. See the operating
instructions for your transfer case, located within this
section.

Manually Shifted Transfer Case Operating
Information/Precautions

The transfer case provides 4 mode positions - 2 (rear)-
wheel-drive high range, 4-wheel-drive high range, neu-
tral, and 4-wheel-drive low range.

This transfer case is intended to be driven in the 2-wheel-
drive position (2H) for normal street and highway con-
ditions such as dry hard surfaced roads.

When additional traction is required the transfer case 4H
and 4L positions can be used to lock the front and rear
driveshafts together and force the front and rear wheels
to rotate at the same speed. This is accomplished by
simply moving the shift lever to the desired positions.
The 4H and 4L positions are intended for loose, slippery
road surfaces only. Driving in the 4H and 4L positions on
dry hard surfaced roads may cause increased tire wear
and damage to the driveline components.

226

STARTING AND OPERATING

The 4-wheel-drive light (4WD), located in the instrument
cluster, alerts the driver that the vehicle is in 4-wheel
drive and that the front and rear driveshafts are locked
together. This light illuminates when the transfer case is
shifted to either the 4H or 4L positions. There is no light
for the 2H or N (Neutral) positions.

When operating your vehicle in 4L, the engine speed is
approximately three times that of the 2H or 4H positions
at a given road speed. Take care not to overspeed the
engine and do not exceed 25 mph (40 km/h).

Proper operation of 4-wheel-drive vehicles depends on
tires of equal size, type and circumference on each wheel.
Any difference will adversely affect shifting and can
cause damage to the transfer case.

NOTE:

Do not attempt to make a shift while only the

front or rear wheels are spinning. The transfer case is not
equipped with a synchronizer and therefore the front and
rear driveshaft speeds must be equal for the shift to take
place. Shifting while only the front or rear wheels are
spinning can cause damage to the transfer case.

Because 4-wheel drive provides improved traction, there
is a tendency to exceed safe turning and stopping speeds.
Do not go faster than road conditions permit.

NOTE:

Delayed shifts out of four-wheel drive may be

experienced due to uneven tire wear, low or uneven tire
pressures, excessive vehicle loading, or cold tempera-
tures.

STARTING AND OPERATING

227

5


Content      ..     12      13      14      15     ..