Dodge Diesel (2004 year). Manual - part 12


  Index      Dodge     Dodge Diesel (2004 year) - manual in english


Search            copyright infringement  


Content      ..     10      11      12      13     ..


Dodge Diesel (2004 year). Manual - part 12


PTY (Program Type) Button
Pressing this button once will turn on the PTY mode for
5 seconds. If no action is taken during the 5 second time
out the PTY icon will turn off. Pressing the PTY button
within 5 seconds will allow the program format type to
be selected. Many radio stations do not currently broad-
cast PTY information.

Toggle the PTY button to select the following format types:
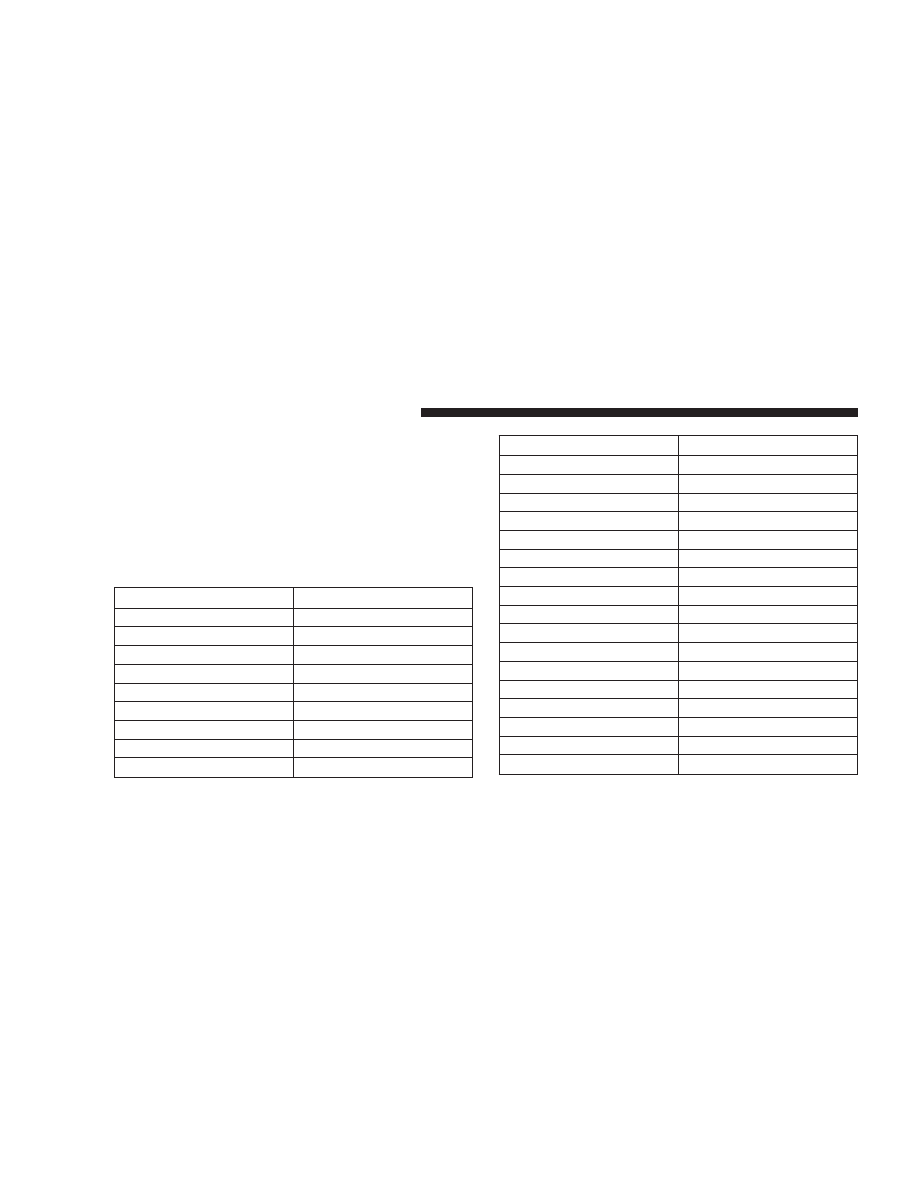
Program Type

Radio Display

Adult Hits

Adlt Hit

Classical

Classicl

Classic Rock

Cls Rock

College

College

Country

Country

Emergency

ALERT!

Emergency Test

Test

Information

Inform

Jazz

Jazz

Program Type

Radio Display

Foreign Language

Language

News

News

Nostalgia

Nostalga

Oldies

Oldies

Personality

Persnlty

Public

Public

Rhythm and Blues

R & B

Religious Music

Rel Musc

Religious Talk

Rel Talk

Rock

Rock

Soft

Soft

Soft Rock

Soft Rck

Soft Rhythm and Blues

Soft R&B

Sports

Sports

Talk

Talk

Top 40

Top 40

Weather

Weather

180

UNDERSTANDING YOUR INSTRUMENT PANEL

By pressing the SEEK button when the PTY icon is
displayed, the radio will be tuned to the next frequency
station with the same selected PTY name. The PTY
function only operates when in the FM mode.

The radio display will flash “SEEK” and the selected PTY
program type when searching for the next PTY station. If
no station is found with the selected PTY program type,
the radio will return to the last station.

If a preset button is activated while in the PTY (Program
Type) mode, the PTY mode will be exited and the radio
will tune to the preset station.

By pressing the SCAN button when the PTY icon is
displayed, the radio will stop at every PTY station on the
band and list each corresponding program type in the
radio display.

Time
Press the TIME button to change the display from
elapsed CD playing time to time of day.

REMOTE SOUND SYSTEM CONTROLS — IF
EQUIPPED

The remote sound system controls are located on the rear
surface of the steering wheel. Reach behind the wheel to
access the switches.

The right hand control is a rocker type switch with a
button in the center. Pressing the top of the switch will

UNDERSTANDING YOUR INSTRUMENT PANEL

181

4

increase the volume and pressing the bottom of the
switch will decrease the volume. The center button of the
right hand control will allow you to change the mode.

The left hand control is a rocker type switch with a push
button in the center. The function of the left hand control
is different depending on which mode you are in.

The following describes the left hand control operation in
each mode.

Radio Operation

Pressing the top of the left side switch will SEEK up for
the next listenable station and pressing the bottom of the
switch will SEEK down for the next listenable station.

The button located in the center of the left hand control
will tune to the next pre-set station that you have
programmed in the radio pre-set push-buttons.

Tape Player

Pressing the top of the switch once will go to the next
selection on the cassette. Pressing the bottom of the
switch once will go to the beginning of the current
selection or to the beginning of the previous selection if it
is within the first 5 seconds of the current selection.

If you press the switch up or down twice it plays the
second selection, three times, it will play the third, etc.

The button in the center of the left hand switch has no
function in this mode.

CD Player

Pressing the top of the switch once will go to the next
track on the CD. Pressing the bottom of the switch once
will go to the beginning of the current track or to the
beginning of the previous track if it is within one second
after the current track begins to play.

182

UNDERSTANDING YOUR INSTRUMENT PANEL

If you press the switch up or down twice it plays the
second track, three times, it will play the third, etc.

The button in the center of the left hand switch has no
function in this mode.

CASSETTE TAPE AND PLAYER MAINTENANCE

To keep the cassette tapes and player in good condition,
take the following precautions:

1. Do not use cassette tapes longer than C-90; otherwise,
sound quality and tape durability will be greatly dimin-
ished.

2. Keep the cassette tape in its case to protect from
slackness and dust when it is not in use.

3. Keep the cassette tape away from direct sunlight, heat
and magnetic fields such as the radio speakers.

4. Before inserting a tape, make sure that the label is
adhering flatly to the cassette.

5. A loose tape should be corrected before use. To rewind
a loose tape, insert the eraser end of a pencil into the tape
drive gear and twist the pencil in the required directions.

Maintain your cassette tape player. The head and capstan
shaft in the cassette player can pick up dirt or tape
deposits each time a cassette is played. The result of
deposits on the capstan shaft may cause the tape to wrap
around and become lodged in the tape transport. The
other adverse condition is low or “muddy” sound from
one or both channels, as if the treble tone control were
turned all the way down. To prevent this, you should
periodically clean the head with a commercially available
WET cleaning cassette.

As preventive maintenance, clean the head about every
30 hours of use. If you wait until the head becomes very
dirty (noticeably poor sound), it may not be possible to
remove all deposits with a simple WET cleaning cassette.

UNDERSTANDING YOUR INSTRUMENT PANEL

183

4

COMPACT DISC MAINTENANCE

To keep the compact discs in good condition, take the
following precautions:

1. Handle the disc by its edge; avoid touching the
surface.

2. If the disc is stained, clean the surface with a soft cloth,
wiping from center to edge.

3. Do not apply paper or tape to the disc; avoid scratch-
ing the disc.

4. Do not use solvents such as benzene, thinner, cleaners,
or antistatic sprays.

5. Store the disc in its case after playing.

6. Do not expose the disc to direct sunlight.

7. Do not store the disc where temperatures may become
too high.

NOTE:

If you experience difficulty in playing a particu-

lar disc, it may be damaged, oversized, or have theft
protection encoding. Try a known good disc before
considering disc player service.

RADIO OPERATION AND CELLULAR PHONES

Under certain conditions, the operation of a cellular
phone in your vehicle can cause erratic or noisy perfor-
mance from your radio. This condition may be lessened
or eliminated by relocating the cellular phone antenna.
This condition is not harmful to the radio. If your radio
performance does not satisfactorily “clear” by the repo-
sitioning of the antenna, it is recommended that the radio
volume be turned down or off during cellular phone
operation.

184

UNDERSTANDING YOUR INSTRUMENT PANEL

CLIMATE CONTROLS

The controls for the heating and ventilation system in this
vehicle consist of a series of rotary knobs. These comfort
controls can be set to obtain desired interior conditions.

Heater Only — Fleet Vehicles

The mode control (at the right of the
control panel) can be set in any of the
following positions:

UNDERSTANDING YOUR INSTRUMENT PANEL

185

4

NOTE:

To improve your selection choices, the system

allows you to operate at intermediate positions between
the major modes. These intermediate positions are iden-
tified by the small dots.

Panel

Outside air flows through the outlets located in the
instrument panel.

Recirculation Modes (Panel or Bi-Level )

Select the recirculation modes when
the outside air contains smoke or
odors. This feature allows for recircu-
lation of interior air only. Air flows
through the panel outlets in this mode.

Bi-Level

Outside air flows through the outlets located in the
instrument panel and at the floor.

Mix

Outside air flows in equal proportions through the
floor and defroster outlets.

Defrost

Outside air is primarily directed to the windshield
through the defroster outlets located at the base of

the windshield, and the demister outlets located at the
edge of each side of the instrument panel.

Blower Control

The rotary knob on the left of
the control panel is the
blower control. Turn the knob
clockwise to one of the four
positions to obtain the blower
speed you desire. To turn the
blower off, turn the knob to
the far left position.

186

UNDERSTANDING YOUR INSTRUMENT PANEL

Temperature Control

The rotary knob at the center
of the control panel controls
the temperature of the inte-
rior air. You can choose your
degree of comfort by rotating
the knob. The coldest tem-
perature setting is to the ex-
treme left (blue region) and
the warmest setting is to the
extreme right (red region) of
the rotation.

Air Conditioning—If Equipped

Air Conditioning Operation

To turn on the Air Conditioning, set the fan
control at any speed and press the snowflake
button located at the right of the control panel.
Conditioned air will be directed through the

outlets selected by the mode control. A light in the

UNDERSTANDING YOUR INSTRUMENT PANEL

187

4

snowflake button shows that the air conditioning is on.
Press the button a second time to turn the air condition-
ing off.

Slight changes in engine speed or power may be noticed
when the air conditioning compressor is on. This is a
normal occurrence as the compressor will cycle on and
off to maintain comfort and increase fuel economy.

The mode control (at the right of the
control panel) can be set in any of the
following positions:

NOTE:

To improve your selection choices, the system

allows you to operate at intermediate positions between
the major modes. These intermediate positions are iden-
tified by the small dots.

Recirculation Modes (Panel or Bi-Level )

Select the recirculation modes when
the outside air contains smoke, odors,
high humidity, or if rapid cooling is
desired. This feature allows for recir-
culation of interior air only. Air flows
through the panel outlets in this mode.

NOTE:

Selecting a “Recirculation Mode” mode does not

necessarily consume more fuel than normal A/C mode.

Panel

Outside air flows through the outlets located in the
instrument panel.

Bi-Level

Outside air flows through the outlets located in the
instrument panel and at the floor.

188

UNDERSTANDING YOUR INSTRUMENT PANEL

Floor

Outside air flows primarily through the floor out-
lets located under the instrument panel.

Mix

Outside air flows in equal proportions through the
floor and defroster outlets, and the air conditioning
may be on.

Defrost

Outside air is primarily directed to the windshield
through the defroster outlets located at the base of

the windshield, and the demister outlets located at the
edge of each side of the instrument panel, and the air
conditioning may be on.

Blower Control

The rotary knob on the left of
the control panel is the
blower control. Turn the knob
clockwise to one of the four
positions to obtain the blower
speed you desire. To turn the
blower off, turn the knob to
the far left position.

UNDERSTANDING YOUR INSTRUMENT PANEL

189

4

Temperature Control

The rotary knob at the center
of the control panel controls
the temperature of the inte-
rior air. You can choose your
degree of comfort by rotating
the knob. The coldest tem-
perature setting is to the ex-
treme left (blue region) and
the warmest setting is to the
extreme right (red region) of
the rotation.

Circulation
The cab is designed with features to promote outside air
circulation. There are grilles in the cab back panel. These
are air exhausters that provide the means for regular
exchange of cab air.

Side window demisters direct air flow specifically to the
window glass to help prevent interior fogging of the
glass. They are located in the extreme outside upper
edges of the instrument panel. The demisters also pro-
vide extra air ducts for circulation. They are in operation
whenever the Floor, Mix or Defrost modes are in use. To
remove frost from the side windows, it is best to use the
full defrost mode.

NOTE:

When you turn off the engine you may hear a

hissing sound from under the hood for a short period of
time. This is a normal condition that occurs if the air
conditioning system has been on. It is not an indication of
a problem with the air conditioning system.

190

UNDERSTANDING YOUR INSTRUMENT PANEL

Electric Rear Window Defroster and Heated
Sideview Mirrors — If Equipped

The Electric Rear Window Defroster and Heated
side view mirrors are activated by pressing the

heated grid button, located on the Climate Control panel,
with the ignition On. Turning Off the ignition will
deactivate the Electric Rear Window Defroster and
Heated side view mirrors feature. These features also
turn off after activation, when 15 minutes have elapsed.
To reactivate, simply press the button again.

Air Conditioning with Dual Zone Temperature
Control — If Equipped

With the Dual Zone Temperature Control System, each
front seat occupant can independently control the tem-
perature of air coming from the outlets on their side of
the vehicle.

UNDERSTANDING YOUR INSTRUMENT PANEL

191

4

Air Conditioning Operation
To turn on the Air Conditioning, set the fan control at any
speed and press the snowflake button located on the
control panel. Conditioned air will be directed through
the outlets selected by the mode control. A light in the

snowflake button shows that the air conditioning is on.
Press the button a second time to turn the air condition-
ing off.

A/C Pushbutton

With the fan control in the ON posi-
tion, pushing the A/C button turns on
the air conditioning compressor. An
indicator light on the button shows
that the Air Conditioning compressor
is on. Conditioned air is now directed
through the mode outlets selected.

Pushing the button a second time turns the compressor
OFF.

192

UNDERSTANDING YOUR INSTRUMENT PANEL

Recirculation Pushbutton

Pushing the Recirculation button al-
lows interior air to recirculate continu-
ously in any position except defrost
and defrost/floor mode for rapid cool
down of the interior. See “Fast
Cooldown” later in this section.

Mode Control

The mode control allows you to
choose from several patterns of air
distribution.

NOTE:

To improve your selection choices, the system

allows you to operate at intermediate positions between

the major modes. These intermediate positions are iden-
tified by the small dots and give an even blend of both
modes.

Panel

Outside air flows through the outlets located in the
instrument panel. These outlets can be adjusted to

direct the airflow.

Bi-Level

Air flows through the outlets located in the instru-
ment panel and those located on the floor.

NOTE:

There is a difference in temperature between the

upper and lower outlets for added comfort. The warmer
air goes to the floor outlets. This feature gives improved
comfort during sunny but cool conditions.

Heat

Outside air flows primarily through the floor out-
lets located under the instrument panel.

UNDERSTANDING YOUR INSTRUMENT PANEL

193

4

Mix

Outside air flows in equal proportions through the
floor and defroster outlets.

Defrost

Outside air is primarily directed to the windshield
through the defroster outlets located at the base of

the windshield and side window demist outlets.

NOTE:

The air conditioning compressor operates in

both Mix and Defrost or a blend of these modes, even if
the A/C button has not been pressed. This dehumidifies
the air to help dry the windshield.

Blower Control

The rotary knob on the left of
the control panel is the
blower control. Turn the knob
clockwise to one of the four
positions to obtain the blower
speed you desire. To turn the
blower off, turn the knob to
the far left position.

194

UNDERSTANDING YOUR INSTRUMENT PANEL

Dual Zone Temperature Control

Use this control to regulate the temperature of the air
inside the passenger compartment. This is accomplished
by having separate temperature control slides for both
the driver and front passenger. The blue area of the scale
indicates cooler temperatures while the red area indicates
warmer temperatures.

Electric Rear Window Defroster and Heated
Sideview Mirrors — If Equipped

The Electric Rear Window Defroster and Heated
side view mirrors are activated by pressing the

heated grid button, located on the Climate Control panel,
with the ignition On. Turning Off the ignition will
deactivate the Electric Rear Window Defroster and
Heated side view mirrors feature. These features also
turn off after activation, when 15 minutes have elapsed.
To reactivate, simply press the button again.

Circulation
The cab is designed with features to promote outside air
circulation. There are grilles in the cab back panel. These
are air exhausters that provide the means for regular
exchange of cab air.

Side window demisters direct air flow specifically to the
window glass to help prevent interior fogging of the
glass. They are located in the extreme outside upper

UNDERSTANDING YOUR INSTRUMENT PANEL

195

4


Content      ..     10      11      12      13     ..