Dodge Caliber. Manual - part 1105


  Index      Dodge     Dodge Caliber - service repair manual 2007 year


Search            


Content   ..  1103  1104  1105  1106   ..


Dodge Caliber. Manual - part 1105


SPRINGS & SEALS-VALVE

REMOVAL

CYLINDER HEAD ON

1. Remove cylinder head cover (Refer to 9 - ENGINE/

CYLINDER HEAD/CYLINDER HEAD COVER(S) -
REMOVAL).

2. Remove camshafts (Refer to 9 - ENGINE/CYLIN-

DER HEAD/CAMSHAFT(S) - REMOVAL).

3. Rotate crankshaft until piston is at TDC on com-

pression.

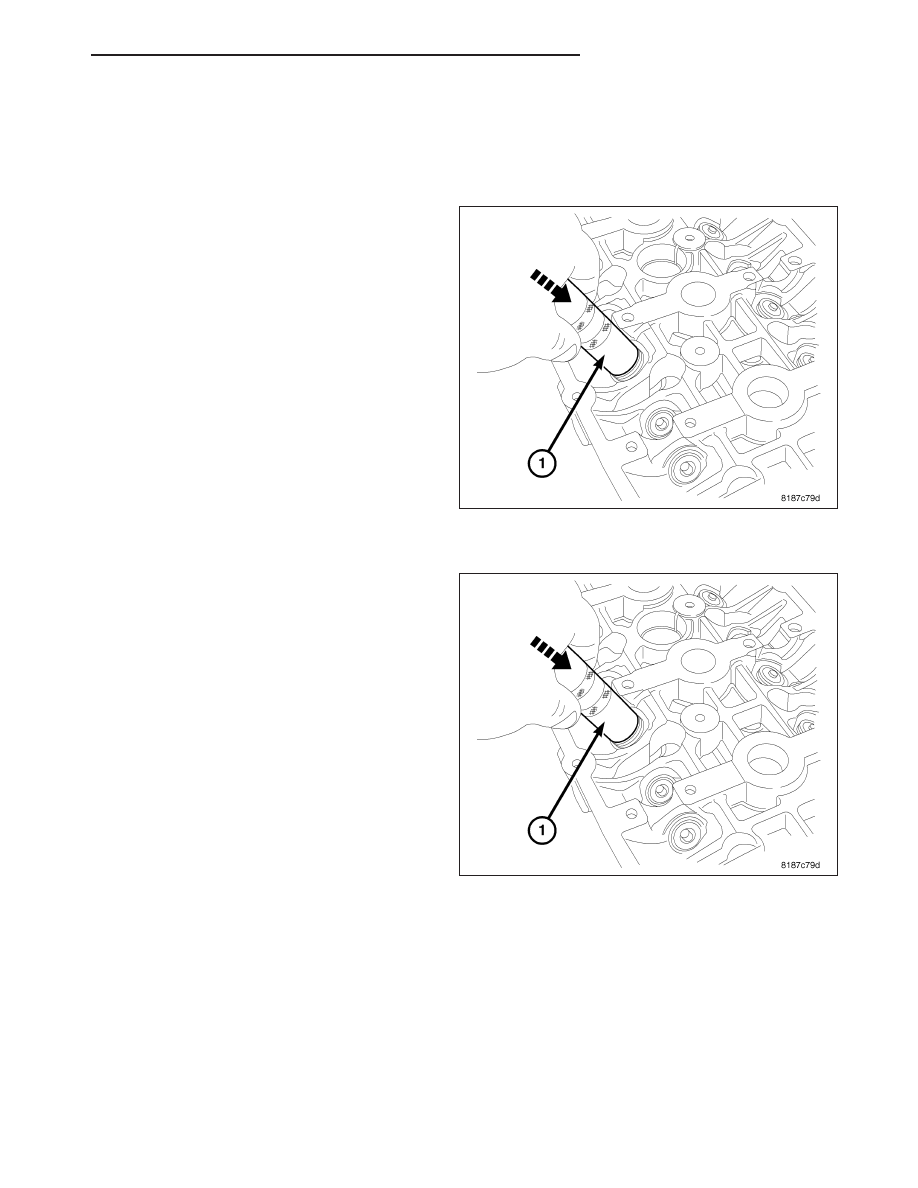
4. With air hose attached to adapter tool installed in

spark plug hole, apply 90-120 psi air pressure.

5. Using metric valve keeper remover (1), and remove

valve spring keepers and retainer.

6. Remove valve spring(s).

7. Remove valve stem seal(s) by a using valve stem

seal tool.

CYLINDER HEAD OFF

1. With cylinder head removed from cylinder block,

place a ball of rags in the combustion chamber.

2. Using Snap On metric valve keeper remover (1) or

equivalent, remove valve keepers with a downward
push.

3. Remove retainer and springs.

4. Before removing valves, remove any burrs from

valve stem lock grooves to prevent damage to
the valve guides. 
Identify valves, locks and retain-
ers to insure installation in original location.

5. Inspect the valves. (Refer to 9 - ENGINE/CYLIN-

DER HEAD/VALVE SPRINGS - INSPECTION).

INSPECTION

1. Whenever valves have been removed for inspection, reconditioning or replacement, valve springs should be

tested for correct tension. Discard the springs that do not meet specifications. The following specifications apply
to both intake and exhaust valves springs:

Valve Closed Nominal Tension—75 lbs. @ 38.0 mm (1.50 in.)

Valve Open Nominal Tension—134 lbs. @ 29.75 mm (1.17 in.)

2. Inspect each valve spring for squareness with a steel square and surface plate, test springs from both ends. If

the spring is more than 1.5 mm (1/16 inch) out of square, install a new spring.

PM

ENGINE 2.4L WORLD

9 - 1707

INSTALLATION

CYLINDER HEAD ON

1.

Install valve seal/valve spring seat (3) assembly.

Push the assembly down with appropriate size
socket to seat it onto the valve guide.

2.

Install valve spring (2) and retainer (4) with keep-

ers (1).

3. Place the valve keepers in the retainer. Using Snap

On metric valve keeper installer (2) and remover
(1) as a handle, install valve keepers with a down-
ward push.

4.

Remove air hose and install spark plugs.

5. Install camshafts (Refer to 9 - ENGINE/CYLINDER

HEAD/CAMSHAFT(S) - INSTALLATION).

6. Install cylinder head cover (Refer to 9 - ENGINE/

CYLINDER HEAD/CYLINDER HEAD COVER(S) -
INSTALLATION).

CYLINDER HEAD OFF

1.

Coat valve stems with clean engine oil and insert

in cylinder head.

2. Install new valve stem seals (3) on all valves using

an appropriate sized socket to seat the seal/spring
seat. The valve stem seals should be pushed firmly
and squarely over valve guide.

3. Install valve springs (2), retainers (4), and keepers

(1) in place.

9 - 1708

ENGINE 2.4L WORLD

PM

4. Using Snap-on metric valve keeper installer (2) and

remover (1) as a handle, push downward to install
keepers.

5. Check the valve spring installed height B after

refacing the valve and seat. Make sure measure-
ments are taken from top of spring seat to the bot-
tom surface of spring retainer. If height is greater
than 38.75 mm (1.525 in.), install a 0.762 mm
(0.030 in.) spacer under the valve spring seat to
bring spring height back within specification.

PM

ENGINE 2.4L WORLD

9 - 1709

PHASERS-CAMSHAFT

REMOVAL

1. Remove camshafts (Refer to 9 - ENGINE/CYLIN-

DER HEAD/CAMSHAFT(S) - REMOVAL).

2. Remove camshaft phaser (2) retaining bolt while

holding the camshaft in place with a wrench (1).

3. Remove phaser (2) assembly from camshaft.

INSTALLATION

CAUTION: Do not use an impact wrench to tighten
camshaft sprocket bolts. Damage to the camshaft-
to-sprocket

locating

dowel

pin

and

camshaft

phaser may occur.

1. Install phaser (2) assembly on camshaft.

2. Install phaser retaining bolt and torque while hold-

ing camshaft in place with a wrench (1).

3. Install camshafts (Refer to 9 - ENGINE/CYLINDER

HEAD/CAMSHAFT(S) - INSTALLATION).

9 - 1710

ENGINE 2.4L WORLD

PM


Content   ..  1103  1104  1105  1106   ..