Dodge Nitro. Manual - part 651


  Index      Dodge     Dodge Nitro - service repair manual 2007 year


Search            


Content   ..  649  650  651  652   ..


Dodge Nitro. Manual - part 651


INSTALLATION 

PARK BRAKE SWITCH 

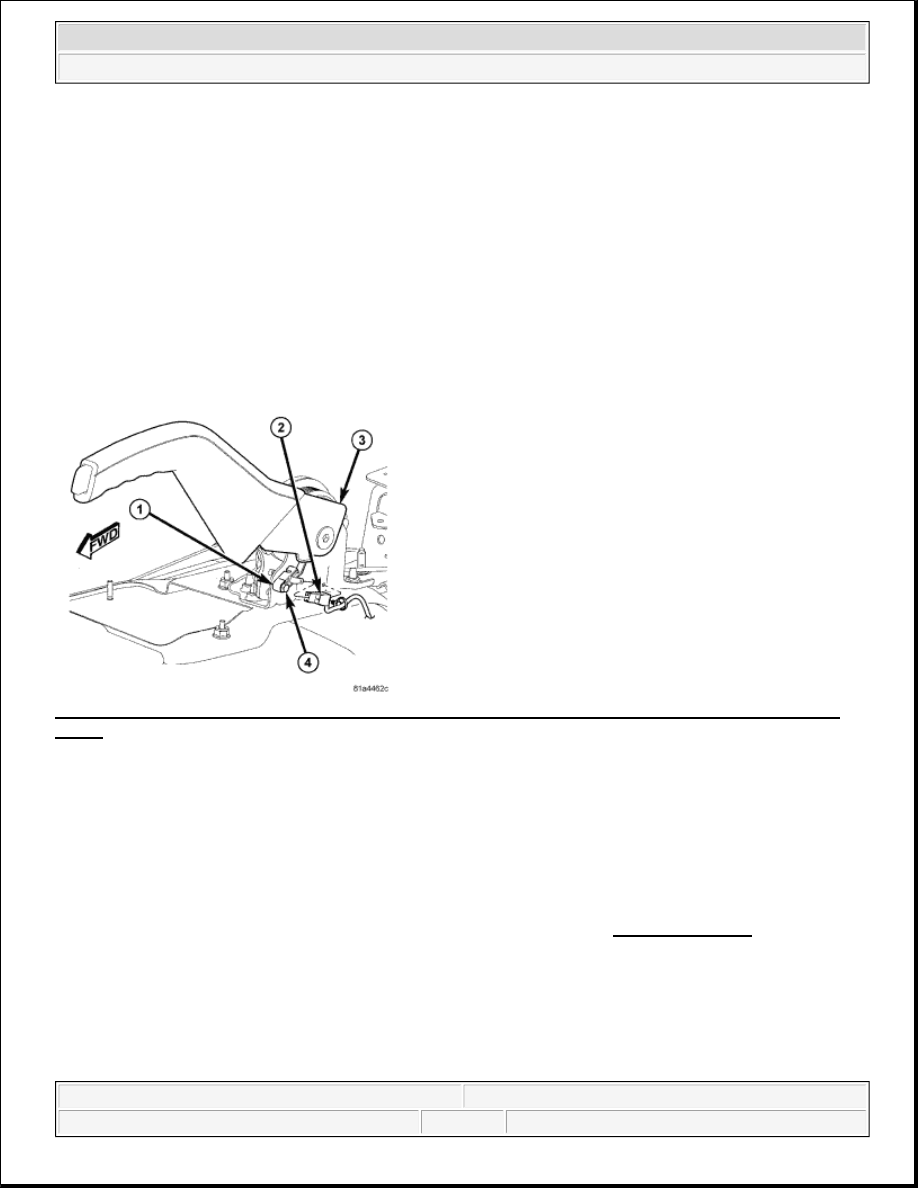
Fig. 41: Identifying Park Brake Switch, Wire Harness Connector, Parking Brake Lever Mechanism & 
Screw
 
Courtesy of CHRYSLER LLC 

1. Position park brake switch (1) onto the left side of the park brake lever mechanism (3). Be certain to 

engage the locating pin on the back of the switch insulator into the locating slot in the lever mechanism 
bracket.  

2. Install and tighten the screw (4) that secures the park brake switch to the park brake lever mechanism. 

Tighten the screw to 2.5 N.m (24 in. lbs.).  

3. Reconnect the wire harness connector (2) to the terminal of the park brake switch.  

4. Reinstall the console onto the floor panel transmission tunnel. Refer to INSTALLATION .  

5. Reconnect the battery negative cable.  

6. Turn the ignition switch to the On position and check for proper brake indicator operation with the 

parking brake applied, then release the parking brake and check that the brake indicator extinguishes.  

REAR LAMP UNIT 

WARNING:

To avoid serious or fatal injury on vehicles equipped with airbags, disable 
the Supplemental Restraint System (SRS) before attempting any steering 
wheel, steering column, airbag, Occupant Classification System (OCS), 
seat belt tensioner, impact sensor, or instrument panel component 
diagnosis or service. Disconnect and isolate the battery negative (ground) 
cable, then wait two minutes for the system capacitor to discharge before 
performing further diagnosis or service. This is the only sure way to 
disable the SRS. Failure to take the proper precautions could result in 
accidental airbag deployment.


2007 Dodge Nitro R/T 

2007 ACCESSORIES AND EQUIPMENT Lamps/Lighting - Exterior - Service Information - Nitro


REMOVAL 

REAR LAMP UNIT 

Fig. 42: Identifying Wire Harness Connector, Plastic Grommets, Plastic Push-Pin Fasteners & Rear 
Lamp Unit
 
Courtesy of CHRYSLER LLC 

1. Disconnect and isolate the battery negative cable.  

2. Open the liftgate to access and remove the two plastic push-pin fasteners (3) that secure the rear lamp unit 

(4) to the side jamb of the liftgate opening.  

3. Pull the outboard side of the rear lamp unit rearward far enough to unsnap the two ball studs on the 

outboard side of the lamp housing from the two plastic grommets (2) in the rear body sheet metal.  

4. Disconnect the wire harness connector (1) from the connector receptacle on the socket plate on the back 

of the lamp housing.  

5. Remove the lamp from the vehicle.  

6. Remove the two plastic grommets from the rear body sheet metal and discard.  

REAR LAMP UNIT BULB 


2007 Dodge Nitro R/T 

2007 ACCESSORIES AND EQUIPMENT Lamps/Lighting - Exterior - Service Information - Nitro


Fig. 43: Identifying Rear Lamp Unit, Two Screws, Socket Plate 
Courtesy of CHRYSLER LLC 

1. Disconnect and isolate the battery negative cable.  

2. Remove the rear lamp unit (1) from the rear body sheet metal. See REMOVAL.  

3. Remove the two screws (2) that secure the socket plate (3) to the back of the rear lamp unit housing.  

4. Remove the socket plate from the rear lamp.  

5. Pull the base of the bulb straight out of the socket plate.  

INSTALLATION 

REAR LAMP UNIT 

NOTE:

The rear lamp unit may contain up to four bulbs, depending upon the market for 
which the vehicle was manufactured. The service procedures for each bulb are 
the same, only the bulb sizes and types may differ.


2007 Dodge Nitro R/T 

2007 ACCESSORIES AND EQUIPMENT Lamps/Lighting - Exterior - Service Information - Nitro


Fig. 44: Identifying Wire Harness Connector, Plastic Grommets, Plastic Push-Pin Fasteners & Rear 
Lamp Unit
 
Courtesy of CHRYSLER LLC 

1. Install two new plastic grommets (2) into the rear body sheet metal.  

2. Position the rear lamp unit (4) to the lamp opening in the rear body sheet metal.  

3. Reconnect the wire harness connector (1) to the connector receptacle on the socket plate on the back of 

the lamp housing.  

4. Align the two ball studs on the outboard side of the rear lamp housing with the two plastic grommets in 

the rear body sheet metal.  

5. Using hand pressure, push firmly and evenly on the outboard side of the lamp until the two ball studs 

snap into the plastic grommets.  

6. Install the two plastic push-pin fasteners (3) that secure the inboard side of the lamp housing to the side 

jamb of the liftgate opening.  

7. Reconnect the battery negative cable.  

REAR LAMP UNIT BULB 

Fig. 45: Identifying Rear Lamp Unit, Two Screws, Socket Plate 
Courtesy of CHRYSLER LLC 

1. Align the base of the bulb with the socket in the rear lamp unit socket plate (3).  

CAUTION: Always use the correct bulb size and type for replacement. An incorrect 

bulb size or type may overheat and cause damage to the lamp, the socket 
or the lamp wiring.

NOTE:

The rear lamp unit may contain up to four bulbs, depending upon the market for 
which the vehicle was manufactured. The service procedures for each bulb are 
the same, only the bulb sizes and types may differ.


2007 Dodge Nitro R/T 

2007 ACCESSORIES AND EQUIPMENT Lamps/Lighting - Exterior - Service Information - Nitro


Content   ..  649  650  651  652   ..