Dodge Nitro. Manual - part 443


  Index      Dodge     Dodge Nitro - service repair manual 2007 year


Search            


Content   ..  441  442  443  444   ..


Dodge Nitro. Manual - part 443


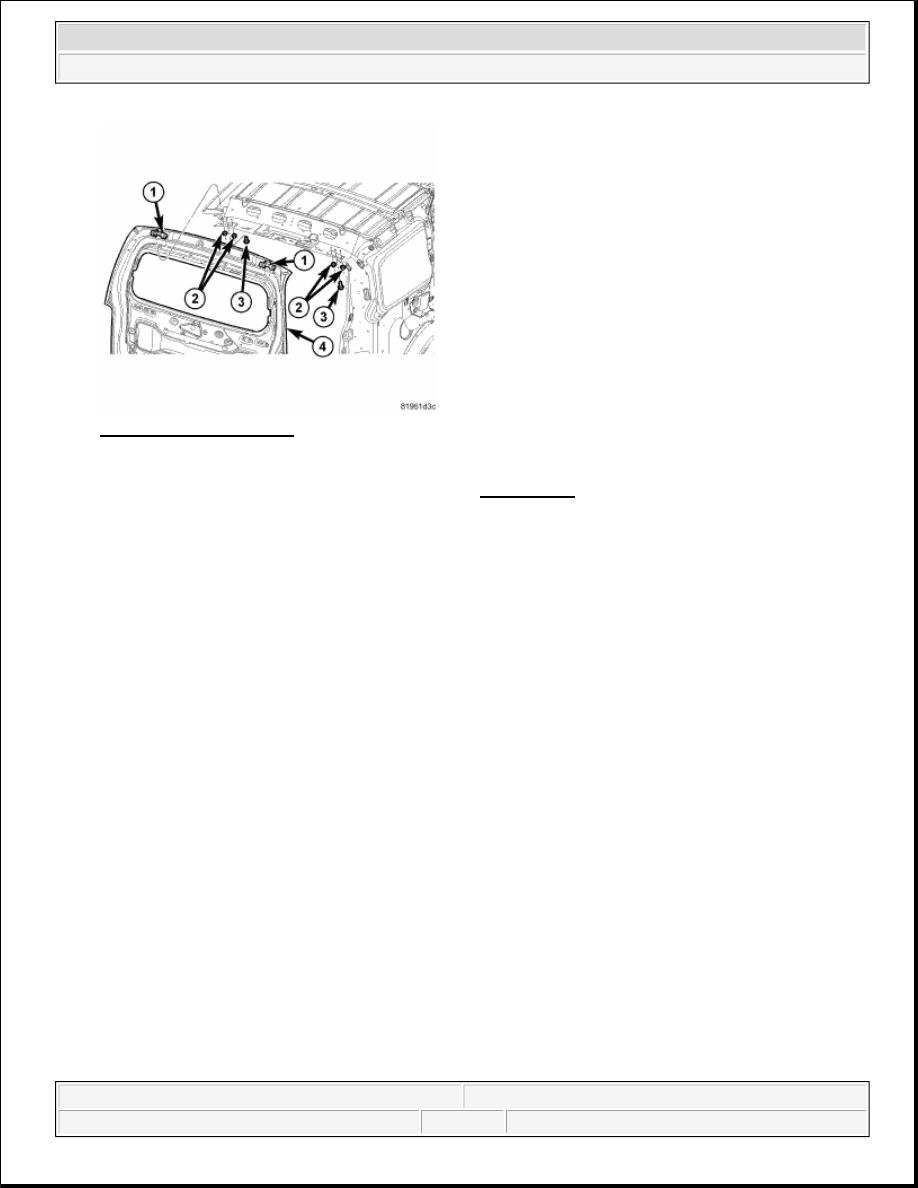
Fig. 426: Lift Gate/Hinge 
Courtesy of CHRYSLER LLC 

10. Remove the center high mounted stop lamp, refer to REMOVAL .  

11. Disconnect all electrical connectors and remove electrical harness from the lift gate. 

12. Using a grease pencil or equivalent, mark the position of the hinges (1) to aid with installation.  

13. Remove nuts (2) from the hinges (1) located on the body. 

14. Remove the bolts (3) from the hinges (1) located on the body.  

15. Remove the lift gate (4) from the vehicle.  

INSTALLATION 

LIFTGATE 

CAUTION: With assistance support the lift gate while the hinges are being 

removed.

WARNING:

Make sure assistants are prepared when removing the bolts from the 
hinges. When the bolts are removed the lift gate is no longer 
attached to the vehicle and can fall.


2007 Dodge Nitro R/T 

2007 ACCESSORIES AND EQUIPMENT Body - Nitro


Fig. 427: Lift Gate/Hinge 
Courtesy of CHRYSLER LLC 

1. With assistance, install the lift gate (4) to the vehicle.  

2. Apply body sealer on the hinge to body mating surface. Align hinges with installation reference marks 

made previously.  

3. Install the bolts (3) to the hinges (1) at the body location and tighten bolts to 28.5 N.m (21 ft. lbs.).  

4. Install the nuts (2) to the hinges (1) at the body location and tighten nuts to 28.5 N.m (21 ft. lbs.). 

5. Install electrical harness to the lift gate and connect all electrical connections. 

6. Install the electrical harness, grommet and connector to the vehicle.  

7. Install the center high mounted stop lamp, refer to INSTALLATION .  

8. Check and adjust lift gate as necessary, see ADJUSTMENTS

NOTE:

With assistance, support the lift gate while the hinges are being installed.

CAUTION: With assistance, support the lift gate while the hinges are being 

removed.

NOTE:

Use a soapy water solution or equivalent to lubricate the grommet.


2007 Dodge Nitro R/T 

2007 ACCESSORIES AND EQUIPMENT Body - Nitro


Fig. 428: Lift Gate Support Cylinder & Lift Gate Support Tool 
Courtesy of CHRYSLER LLC 

9. Install the support cylinders (2) to the lift gate and body. 

Fig. 429: Liftgate Trim Panel 
Courtesy of CHRYSLER LLC 

10. Align and install the trim panel (3) to the left gate (1), use hand pressure to seat all of the fasteners around 

the trim panel (3).  

11. Install the two bolts (2) to the lower trim panel (3) and tighten to 7 N.m (65 in. lbs.). 


2007 Dodge Nitro R/T 

2007 ACCESSORIES AND EQUIPMENT Body - Nitro


Fig. 430: Headliner Molding 
Courtesy of CHRYSLER LLC 

12. Install the headliner molding (3) to the body by sliding the tab (1) on the right side into the quarter trim 

molding.  

13. Pull down at the center of the headliner molding (3) only enough to allow the tab (2) to be slide into the 

other side of the quarter trim molding.  

14. Using hand pressure snap the remaining clips (4) into place.  

15. Close the lift gate.  

ADJUSTMENTS 

LIFTGATE 

In/out 

Fig. 431: Lift Gate/Hinge 
Courtesy of CHRYSLER LLC 


2007 Dodge Nitro R/T 

2007 ACCESSORIES AND EQUIPMENT Body - Nitro


Content   ..  441  442  443  444   ..