Dodge Durango (DN). Manual - part 272


  Index      Dodge     Dodge Durango (DN) - service repair manual 2000 year


Search            


Content   ..  270  271  272  273   ..


Dodge Durango (DN). Manual - part 272


OPERATION

Engine speed and crankshaft position are provided

through the crankshaft position sensor. The sensor
generates pulses that are the input sent to the pow-
ertrain control module (PCM). The PCM interprets
the sensor input to determine the crankshaft posi-
tion. The PCM then uses this position, along with
other inputs, to determine injector sequence and igni-
tion timing.

The sensor is a hall effect device combined with an

internal magnet. It is also sensitive to steel within a
certain distance from it.

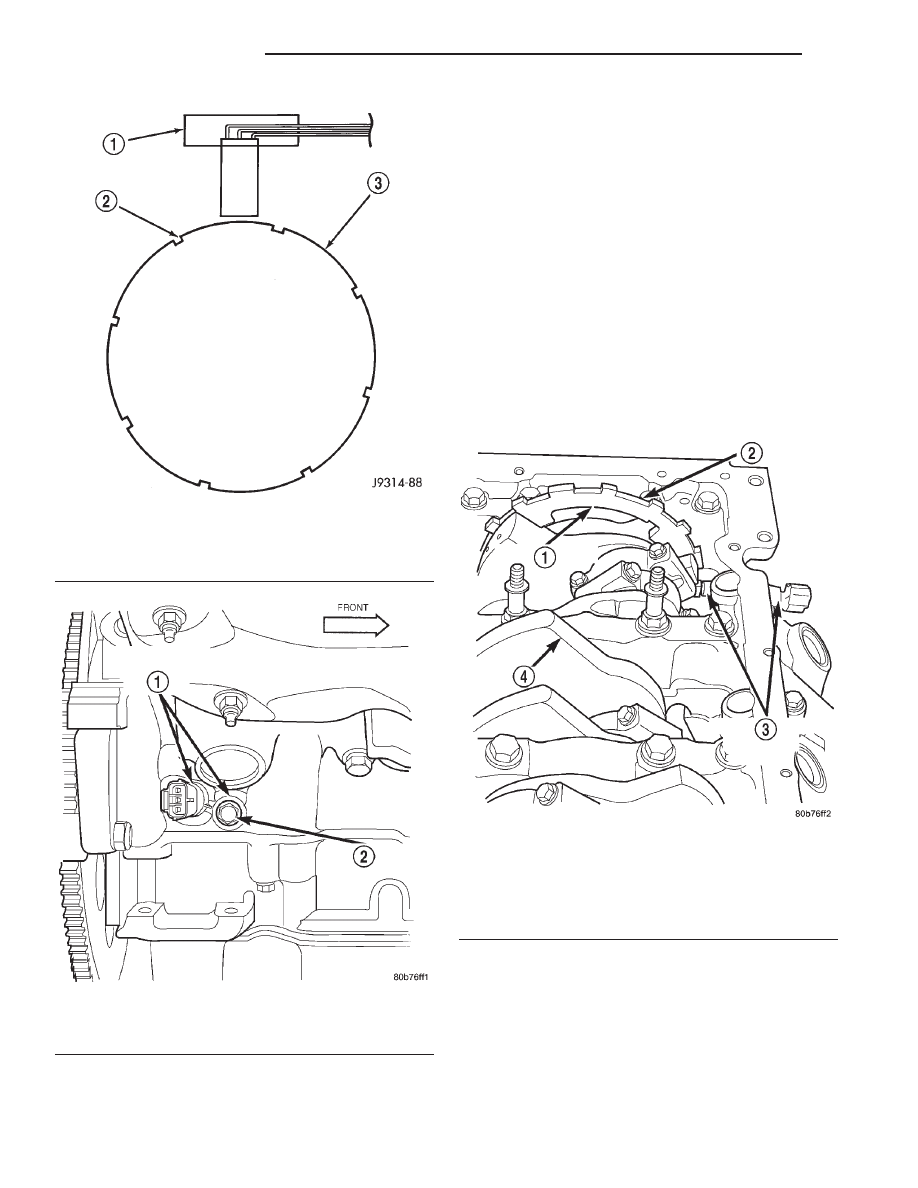
On the 4.7L V–8 engine, a tonewheel is bolted to

the engine crankshaft (Fig. 6). This tonewheel has
sets of notches at its outer edge (Fig. 6).

The notches cause a pulse to be generated when

they pass under the sensor. The pulses are the input
to the PCM.

CAMSHAFT POSITION SENSOR

DESCRIPTION

The Camshaft Position (CMP) sensor is located in

the distributor.

OPERATION

The sensor contains a hall effect device called a

sync signal generator to generate a fuel sync signal.

Fig. 4 CKP Sensor Operation—5.2L/5.9L Engine

1 – CRANKSHAFT POSITION SENSOR
2 – NOTCHES
3 – FLYWHEEL

Fig. 5 CKP Sensor Location—4.7L V–8 Engine

1 – CRANKSHAFT POSITION SENSOR
2 – MOUNTING BOLT

Fig. 6 CKP Sensor Operation and Tonewheel—4.7L

V–8 Engine

1 – TONEWHEEL
2 – NOTCHES
3 – CRANKSHAFT POSITION SENSOR
4 – CRANKSHAFT

8D - 4

IGNITION SYSTEM

DN

DESCRIPTION AND OPERATION (Continued)

This sync signal generator detects a rotating pulse
ring (shutter) on the distributor shaft. The pulse ring
rotates 180 degrees through the sync signal genera-
tor. Its signal is used in conjunction with the Crank-
shaft Position (CKP) sensor to differentiate between
fuel injection and spark events. It is also used to syn-
chronize the fuel injectors with their respective cylin-
ders.

When the leading edge of the pulse ring (shutter)

enters the sync signal generator, the following occurs:
The interruption of magnetic field causes the voltage
to switch high resulting in a sync signal of approxi-
mately 5 volts.

When the trailing edge of the pulse ring (shutter)

leaves the sync signal generator, the following occurs:
The change of the magnetic field causes the sync sig-
nal voltage to switch low to 0 volts.

CAMSHAFT POSITION SENSOR—4.7L ENGINE

DESCRIPTION

The Camshaft Position Sensor (CMP) on the 4.7L

V–8 engine is bolted to the front/top of the right cyl-
inder head (Fig. 7).

OPERATION

The CMP sensor contains a hall effect device called

a sync signal generator to generate a fuel sync sig-
nal. This sync signal generator detects notches

located on a tonewheel. The tonewheel is located at
the front of the camshaft for the right cylinder head
(Fig. 8). As the tonewheel rotates, the notches pass
through the sync signal generator. The pattern of the
notches (viewed counter-clockwise from front of
engine) is: 1 notch, 2 notches, 3 notches, 3 notches, 2
notches 1 notch, 3 notches and 1 notch. The signal
from the CMP sensor is used in conjunction with the
crankshaft position sensor to differentiate between
fuel injection and spark events. It is also used to syn-
chronize the fuel injectors with their respective cylin-
ders.

IGNITION SWITCH AND KEY LOCK CYLINDER

DESCRIPTION

The electrical ignition switch is located on the

steering column. It is used as the main on/off switch-
ing device for most electrical components. The
mechanical key lock cylinder is used to engage/disen-
gage the electrical ignition switch.

OPERATION

Vehicles equipped with an automatic trans-

mission and a floor mounted shifter: a cable is
used to connect the interlock device in the steering
column assembly, to the transmission floor shift
lever. This interlock device is used to lock the trans-
mission shifter in the PARK position when the key

Fig. 7 CMP Location—4.7L Engine

1 – RIGHT CYLINDER HEAD
2 – CAMSHAFT POSITION SENSOR
3 – MOUNTING BOLT
4 – ELEC. CONNECTOR

Fig. 8 CMP Sensor and Tonewheel—4.7L Engine

1 – NOTCHES
2 – RIGHT CYLINDER HEAD
3 – CAMSHAFT POSITION SENSOR
4 – TONEWHEEL

DN

IGNITION SYSTEM

8D - 5

DESCRIPTION AND OPERATION (Continued)

lock cylinder is rotated to the LOCKED or ACCES-
SORY position. The interlock device within the steer-
ing column is not serviceable. If repair is necessary,
the steering column assembly must be replaced.
Refer to Group 19, Steering for procedures.

If the ignition key is difficult to rotate to or from

the LOCK or ACCESSORY position, it may not be
the fault of the key cylinder or the steering column
components. The brake transmission shift interlock
cable may be out of adjustment. Refer to Brake
Transmission Shift Interlock Cable Adjustment in
Group 21, Transmissions for adjustment procedures.

Vehicles equipped with an automatic trans-

mission and a steering column mounted shifter:
an interlock device is located within the steering col-
umn. This interlock device is used to lock the trans-
mission shifter in the PARK position when the key
lock cylinder is in the LOCKED or ACCESSORY
position. If it is difficult to rotate the key to or from
the LOCK or ACCESSORY position, the interlock
device within the steering column may be defective.
This device is not serviceable. If repair is necessary,
the steering column assembly must be replaced.
Refer to Group 19, Steering for procedures.

Vehicles equipped with a manual transmis-

sion, a floor mounted shifter, and a LEVER
below the ignition key: 
A lever is located on the
steering column behind the ignition key lock cylinder.
The lever must be manually operated to allow rota-
tion of the ignition key lock cylinder to the LOCK or
ACCESSORY position. If it is difficult to rotate the
key to the LOCK or ACCESSORY position, the lever
mechanism may be defective. This mechanism is not
serviceable. If repair is necessary, the steering col-
umn assembly must be replaced. Refer to Group 19,
Steering for procedures.

Vehicles equipped with a manual transmis-

sion, a floor mounted shifter, and NO LEVER
below the ignition key: 
The ignition key cylinder
must be depressed to allow it to be rotated into the
LOCK or ACCESSORY position. If it is difficult to
rotate the key to the LOCK or ACCESSORY position,
the lock mechanism within the steering column may
be defective. This mechanism is not serviceable. If
repair is necessary, the steering column assembly
must be replaced. Refer to Group 19, Steering for
procedures.

DIAGNOSIS AND TESTING

DISTRIBUTOR CAP

Remove the distributor cap and wipe it clean with

a dry lint free cloth. Visually inspect the cap for
cracks, carbon paths, broken towers or damaged
rotor button (Fig. 9) or (Fig. 10). Also check for white
deposits on the inside (caused by condensation enter-

ing the cap through cracks). Replace any cap that
displays charred or eroded terminals. The machined
surface of a terminal end (faces toward rotor) will
indicate some evidence of erosion from normal oper-
ation. Examine the terminal ends for evidence of
mechanical interference with the rotor tip.

DISTRIBUTOR ROTOR

Visually inspect the rotor (Fig. 11) for cracks, evi-

dence of corrosion or the effects of arcing on the
metal tip. Also check for evidence of mechanical
interference with the cap. Some charring is normal

Fig. 9 Cap Inspection—External—Typical

1 – BROKEN TOWER
2 – DISTRIBUTOR CAP
3 – CARBON PATH
4 – CRACK

Fig. 10 Cap Inspection—Internal—Typical

1 – CHARRED OR ERODED TERMINALS
2 – WORN OR DAMAGED ROTOR BUTTON
3 – CARBON PATH

8D - 6

IGNITION SYSTEM

DN

DESCRIPTION AND OPERATION (Continued)

on the end of the metal tip. The silicone-dielectric-
varnish-compound applied to the rotor tip for radio
interference noise suppression, will appear charred.
This is normal. Do not remove the charred com-
pound. 
Test the spring for insufficient tension.
Replace a rotor that displays any of these adverse
conditions.

SPARK PLUG CABLES

Check the spark plug cable connections for good

contact at the coil(s), distributor cap towers, and
spark plugs. Terminals should be fully seated. The
insulators should be in good condition and should fit
tightly on the coil, distributor and spark plugs. Spark
plug cables with insulators that are cracked or torn
must be replaced.

Clean high voltage ignition cables with a cloth

moistened with a non-flammable solvent. Wipe the
cables dry. Check for brittle or cracked insulation.

On 3.9L V-6 and 5.2/5.9L V-8 engines, spark plug

cable heat shields are pressed into the cylinder head
to surround each spark plug cable boot and spark
plug (Fig. 12). These shields protect the spark plug
boots from damage (due to intense engine heat gen-
erated by the exhaust manifolds) and should not be
removed. After the spark plug cable has been
installed, the lip of the cable boot should have a
small air gap to the top of the heat shield (Fig. 12).

TESTING

When testing secondary cables for damage with an

oscilloscope, follow the instructions of the equipment
manufacturer.

If an oscilloscope is not available, spark plug cables

may be tested as follows:

CAUTION: Do not leave any one spark plug cable
disconnected for longer than necessary during test-
ing. This may cause possible heat damage to the
catalytic converter. Total test time must not exceed
ten minutes.

With the engine running, remove spark plug cable

from spark plug (one at a time) and hold next to a
good engine ground. If the cable and spark plug are
in good condition, the engine rpm should drop and
the engine will run poorly. If engine rpm does not
drop, the cable and/or spark plug may not be operat-
ing properly and should be replaced. Also check
engine cylinder compression.

With the engine not running, connect one end of a

test probe to a good ground. Start the engine and run
the other end of the test probe along the entire
length of all spark plug cables. If cables are cracked
or punctured, there will be a noticeable spark jump
from the damaged area to the test probe. The cable
running from the ignition coil to the distributor cap
can be checked in the same manner. Cracked, dam-
aged or faulty cables should be replaced with resis-
tance type cable. This can be identified by the words
ELECTRONIC SUPPRESSION printed on the cable
jacket.

Use an ohmmeter to test for open circuits, exces-

sive resistance or loose terminals. If equipped,
remove the distributor cap from the distributor. Do

Fig. 11 Rotor Inspection—Typical

1 – INSUFFICIENT SPRING TENSION
2 – CRACKS
3 – EVIDENCE OF PHYSICAL CONTACT WITH CAP
4 – ROTOR TIP CORRODED

Fig. 12 Heat Shields—3.9/5.2/5.9L Engines

1 – AIR GAP
2 – SPARK PLUG BOOT HEAT SHIELD

DN

IGNITION SYSTEM

8D - 7

DIAGNOSIS AND TESTING (Continued)


Content   ..  270  271  272  273   ..