DAF CF65, CF75, CF85 Series . Manual - part 477


  Index      DAF     DAF CF65, CF75, CF85 Series - service repair manual


Search            


Content   ..  475  476  477  478   ..


DAF CF65, CF75, CF85 Series . Manual - part 477


©

 200324

3-1

Inspection and adjustment

XE ENGINE INLET/EXHAUST SYSTEM

CF65/75/85 series

4

9

3. INSPECTION AND ADJUSTMENT

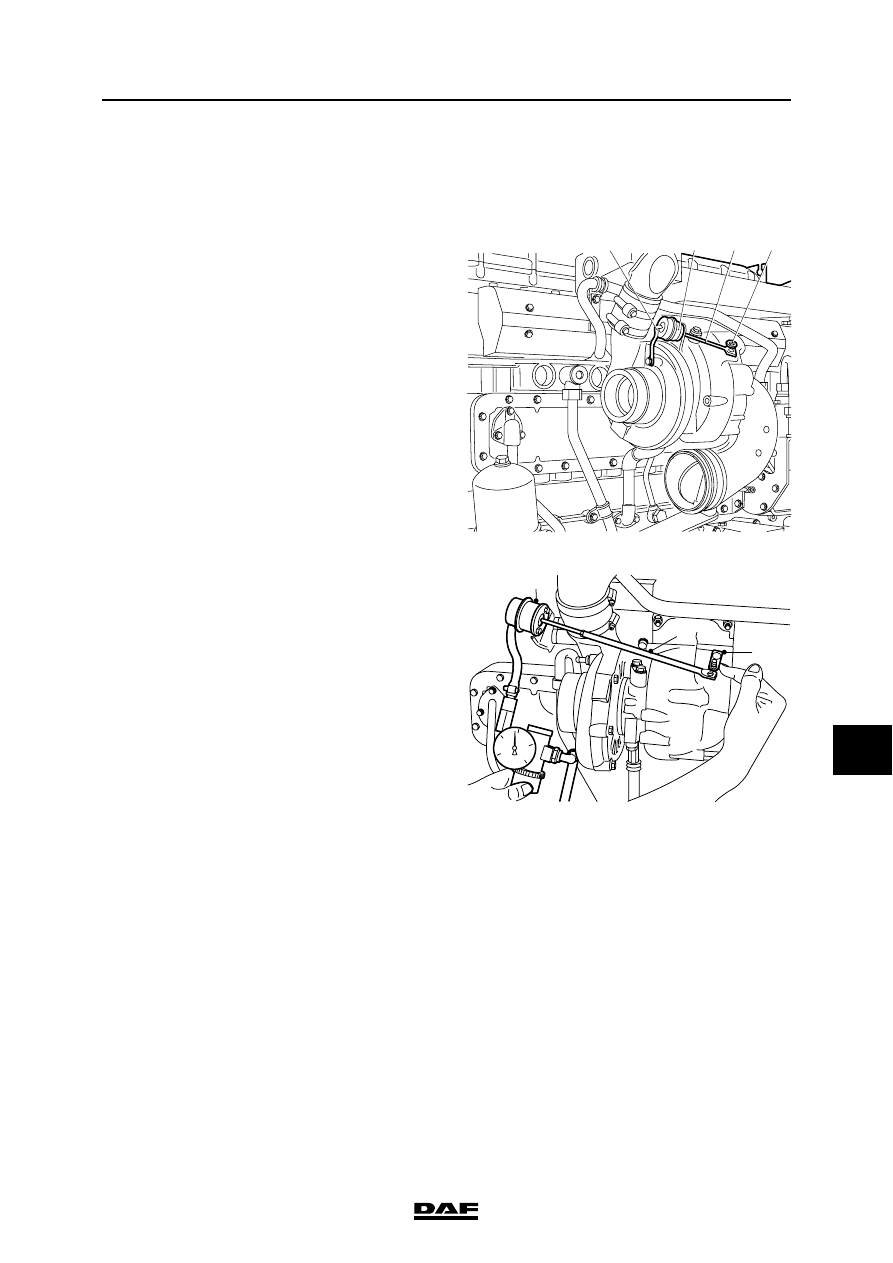
3.1 INSPECTING AND ADJUSTING TURBOCHARGER WASTEGATE

1.

Remove the heat shield from the 

turbocharger.

2.

Remove the air supply connector (1) from 

the diaphragm housing (2).

3.

Remove the retaining clip (3) and remove the 

control rod (4) from the wastegate lever.

4.

Using a reducer valve, apply the specified 

adjusting pressure to the connection with the 

diaphragm housing (see "Technical data").

5.

Push the wastegate lever (5) fully to the left 

to close the wastegate valve.

6.

Adjust the length of the control rod (4), 

making sure it fits exactly onto the lever at 

the set pressure.

7.

Inspect the adjustment of the wastegate 

using the specified pressure. See "Technical 

data".

8.

Fit the retaining clip (3).

I400532

3

1

4

2

i 400214

4

3

2

1

0

5

4

2

XE ENGINE INLET/EXHAUST SYSTEM

3-2

©

 200324

Inspection and adjustment

9

CF65/75/85 series

4

3.2 CHECKING EXHAUST GAS BACK PRESSURE

Checking exhaust gas back pressure
1.

Remove the plug from the exhaust bracket 

and install a suitable coupling with a pipe. 

The first part of the pipe must be made of 

metal, to withstand the high temperatures.

2.

Connect a pressure gauge to the pipe, with a 

range of at least 0.1 - 0.2 bar (10 - 20 kPa).

Note:

Use an attenuated gauge to prevent 

excessive shaking of the gauge needle.

The engine brake must not be used during 

measurements.

This is to protect the pressure gauge.

3.

Measure the exhaust gas back pressure at 

full-load engine speed and compare the 

measurement to the specified value; see 

"Technical data".

i 400180

©

 200324

3-3

Inspection and adjustment

XE ENGINE INLET/EXHAUST SYSTEM

CF65/75/85 series

4

9

3.3 INSPECTION AND PRESSURE TESTING, AIR INLET SYSTEM

}

When pressure testing the air intake 

system, the plugs may spring off if 

they are not properly secured.

Check the condition and mounting of the air inlet 

channels/pipes of the air intake system.

In case of doubt as to the proper sealing of the air 

intake system, which is indicated by the following:

1.

loss of power

2.

high fuel consumption

3.

unusual noises

carry out a pressure test to check the air inlet 

system for leaks.

1.

Remove the front engine encapsulation.

2.

Remove the air inlet hose between the air 

cooler and the inlet manifold.

3.

Connect the inlet pipe, fitted with the special 

tool (DAF no. 0694831) slightly turned, to the 

air cooler.

4.

Remove the air intake pipe between the air 

filter housing and the turbocharger intake 

port.

5.

Install special tools (DAF no. 1329310) and 

(DAF no. 1329311) on the turbocharger 

intake port.

6.

Connect an air pipe with reducer valve to the 

sealing plug (A), and charge the system to 

approx. 1 bar.

7.

Use a soapy solution to check the whole inlet 

system for air leaks. Also check whether the 

pressure gauge of the reducer valve drops.

i 400203

i 400204

A

XE ENGINE INLET/EXHAUST SYSTEM

3-4

©

 200324

Inspection and adjustment

9

CF65/75/85 series

4

3.4 CHECKING INLET UNDERPRESSURE

1.

Remove the underpressure indicator 

connection (A) from the air intake pipe 

between the air filter housing and 

turbocharger.

2.

Connect a pressure gauge with a maximum 

rating of -100 mbar (-10 kPa) to the 

connection of the underpressure indicator.

3.

Measure the inlet underpressure at full-load 

engine speed and compare the 

measurement to the specified value. See 

"Technical data".

3.5 CHECKING THE GLOW PLUG

Checking the glow plug
1.

Remove the electrical connections on the 

glow plug.

2.

Using a multimeter, determine the resistance 

of the glow plug. See "Technical data".

3.

Remove the connecting hose between the 

inlet pipe and the air cooler.

4.

Check whether the glow plug is damaged.

i400377

A


Content   ..  475  476  477  478   ..