Citroen C2 (2008 year). Instruction - part 11


  Index      Citroen     Citroen C2 - instruction 2008 year in english


Search            


Content   ..  9  10  11  12   ..


Citroen C2 (2008 year). Instruction - part 11


ODB 2

ODB

ODB 1

33

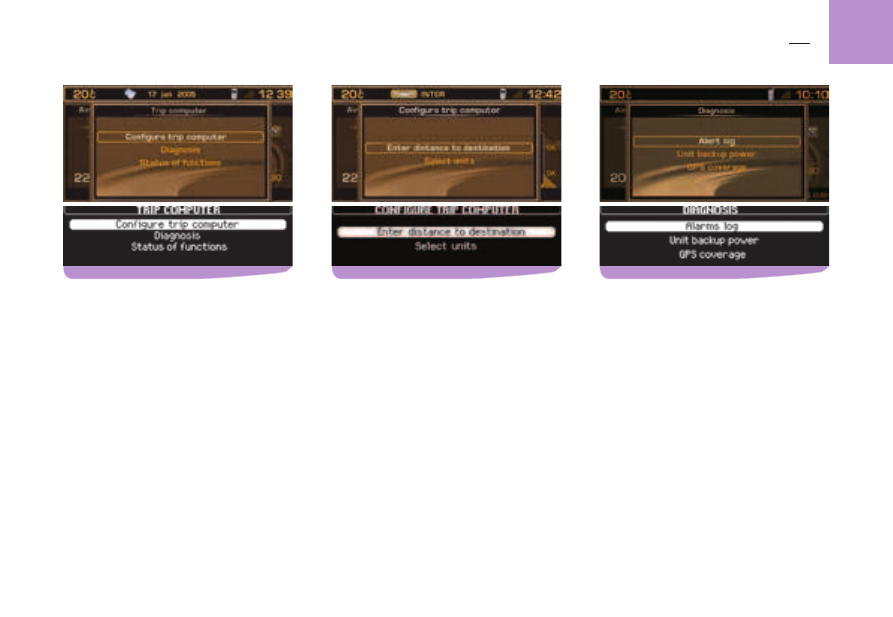
T R I P   C O M P U T E R

D

IAGNOSIS

This menu allows you to :

Display the log of alerts. This gives you 
a list of the most recent alerts which have 
been signalled to you by a message on 
the multifunction screen, whether or not 
accompanied by the lighting of one of the 
alert warning lamps.
Display the level of charge of the sys-
tem back-up battery
. The latter enables 
you  to  make  an  emergency  call  should 
there be a disconnection of the vehicle's 
main battery.
Display the status of the GPS coverage. 
This enables you to see how many satel-
lites are available, as well as the status 
of the location of your vehicle.

Remark :
The back-up battery has a life of 4 years. It 
must be disposed of by a specialist operator, 
never thrown into the public refuse.
National  regulations  should  be  consulted 
and complied with.

T

RIP

 C

OMPUTER


MAIN


MENU

press on P, then on the control G select the 
Trip  Computer  icon  and  validate  to  have 
access to the following choices :

Trip computer confi guration.
Diagnosis.
Status of functions.

C

ONTEXTUAL


MENU

When you see one of the types of trip compu-
ter information displayed on the multifunction 
screen, press on the control G so as to be 
able to access the functions :

Log of alerts.
Distance to destination.
Status of functions.


T

RIP


COMPUTER


CONFIGURATION

This menu allows you to :

Enter a distance to destination, if no 
guidance is active (otherwise this informa-
tion is given by the navigation system).
Modify the units, °C or °F, km and litres 
or miles and gallons.

REP 1

REP 2

34

D I R E C T O R Y

The directory can contain up to 396 fi les 

spread  over 4  independent  sub - direc-
tories  (“User 1”,  “User 2”,  “User 3”  and 
User 4”).
On delivery of the system, the current direc-
tory is by default the directory “User 4”.

One fi le can contain :

An address.
Five telephone nos..
Five e-mails.
A note.
A  voice  label  for  use  in  voice  com-
mands.

The address is entered by inputting the town 
and the street.
Note :
If you enter the address in the absence of 
the navigation CD-ROM, you will not be able 
to use this address for navigation.


M

AIN


DIRECTORY


MENU

Press  on P  then,  using  control G,  select 
the DIRECTORY icon and validate to have 
access to the following choices :

Directory fi le management, to consult, 

modify, add a fi le, or to delete one fi le 

or all fi les.
Directory  configuration  to  select  a 

directory, defi ne the start directory (current 

directory ) and to name the directories.
File transfer, this allows you: :

To move, by infrared, fi les in Navid-

rive Vcard format to and from nomad 
equipment.
To exchange information with a SIM 
card inserted in the Navidrive.

-

-

M

ANAGING


DIRECTORY


FILES

This menu allows you to :

Consult or modify a fi le, to select the 

fi le you wish to consult or edit.

Add a fi le, to enter the name for the new 

fi le, select on the fi le the short version 

you wish to use, then validate and enter 
the information.

Delete a fi le, to select the fi le you wish 

to delete.

Delete all the fi les in a directory.

Tip :

To be able to use the content of a fi le in 

navigation, create this fi le by entering the 

address, or the stored information, via the 
Navigation function.

REP 3. b

REP 3. a

a

a

35

D I R E C T O R Y

E

XCHANGE


WITH


THE

 SIM 

CARD

This menu allows you :

To send all the fi les to the SIM card, from 

the current directory of your NaviDrive.

To send a fi le to the SIM card, from the 

current directory of your NaviDrive.

To receive all the fi les from the SIM 

card  into  the  current  directory  of  your 
NaviDrive.

To receive one fi le from the SIM card into 

the current directory of your NaviDrive.

Reminder :

When you transfer a fi le from the NaviDrive 

to the SIM card, only the fi rst number on the 

fi le is recorded.
Remark :
The SIM  card  represents  an  independent 
source of information: the telephone nos. can 
be consulted in the current directory.

When they are created, the fi les are stored 

in  the  current  directory,  notably  for  use  in 
voice commands.

V

OICE


LABEL

You can record a voice label linked to a fi le 

by selecting and validating the icon a, then 
pronouncing the voice label twice.
Next, the voice label can be used in voice 
commands for the telephone (say “call” then 
the voice label) or for navigation (say “guide 
to
” then the voice label), provided that the 

address entered in the fi le has been entered 

in conjunction with the navigation CD-ROM 
and is in the current directory.

T

RANSFER


FILES

This menu allows you :

Exchange  by  infrared  between  the 
NaviDrive  and  nomad  equipment  by 
means of an infrared port, of all or some 

of the fi les in the current directory.
E xc h ang e  b et we en  t h e S I M  c ard 
(inser ted  in  the  NaviDrive)  and  the 

NaviDrive, of all or only one of the fi les 

it contains.

E

XCHANGE


OF


A


FILE


BY


INFRARED

After selection of the menu “File transfer” 
and of the direction of this transfer, you must 
initiate the exchange by showing simultane-
ously in front of the infrared port the nomad 
equipment  on  which  you  have  started  the 
transfer  (refer  to  the  instructions  for  this 

equipment). A message confi rms to you that 

the exchange can gone through correctly.

36

If you have a twin card it is necessary, 

on fi rst installation or when updating your 

directory,  to  insert  the 

SIM

  card  from 

your  mobile  telephone,  then  to  transfer 
the  information  on  it  into  the  NaviDrive 
directory.  See  the  Main  Menu  for  the 
Directory.

E

NTER


THE

 PIN 

CODE

NaviDrive  can  definitively  memorise  the 
PIN code of a SIM card. This memorisation 
having been accepted, your PIN code will be 

required only once, at the fi rst entry.
Enter your PIN code using the buttons on 
the  keypad W,  then  validate  by  pressing 
the  control G  or  alternatively  button #  on 
the keypad W.
Remark :
After three errors in trying to enter the code, 
your  telephone  will  be  blocked.  You  will 
then  have  to  enter  your  deblocking  code 
(PUK code).
The  PUK  code  is  supplied  with  your  SIM 
card by your service provider. The PUK code 
tolerates 10 successive errors. After this the 
SIM card will be un-usable.
Remark :
All the essential types of information asso-
ciated  with  a  “mobile  telephone”  can  be 
viewed on the multifunction screen..

W

HAT


IS


THE


TELEPHONE


FUNCTION

The telephone function consists of a GSM 
telephone incorporated in NaviDrive.
The GSM  telephone  has  a  “hands  free” 
function, provided by a microphone located 
in the front interior lamp, and controls at the 
steering wheel giving you access to most of 
the functions.
Remark :
As with any mobile telephone, your vehicle 
telephone operates on the existing cellular 
and terrestrial networks, and so a connection 
cannot be guaranteed on every occasion.
Priority on safety :
Do not allow yourself to be distracted while 
you are driving. Observe the national leg-
islation currently in force. We recommend 
the driver to stop the vehicle to continue a 
telephone conversation or to perform cer-
tain actions (selecting a number manually, 
for example).

I

NSERTING


AND


REMOVING


THE

 SIM 

CARD

Open the slot L by pressing with the point 
of a pencil, or similar, on the opening just 
above it L’. Next, insert your SIM card into 
the aperture (as indicated on the card) then 

reclose the fl ap.
Remarks :

You  should  only  remove  the SIM  card 
after  NaviDrive  has  stopped  (key  in 
position S (Steering lock) and the display 
switched off.

T E L E P H O N E   A N D   T E L E M AT I C   S E R V I C E S

M

ULTIFUNCTION


SCREEN


DISPLAY

When you are not engaged on a telephone 
call, the display tells you if you have voice 
messages or text messages (SMS) incoming, 
the length of connection since the last reset 
to zero and the status of your telephone.
During a telephone call, it tells you the time 
that has elapsed since the start of the call, as 
well as the number (if this option and service 
is available) or the name (if recorded in the 
directory)  of  the  person  you  are  speaking 
with, and the status of your telephone.

TEL

37

U

SING


THE


KEYPAD

Each  press  on  one  of  the  buttons  of  the 
keypad W lets you :

Select  a  name  commencing  with  the 
letter chosen, either in the directory or in 
the SIM card.
Scroll down the characters, until you reach 
the one you need.

[1]  1 or space with a short press in text entry 

(SMS)

[2]  2 or A B C 2 or a b c 2
[3]  3 or D E F 3 or d e f 3
[4]  4 or G H I 4 or g h i 4
[5]  5 or J K L or j k l 5
[6]  6 or M N O 6 or m n o 6
[7]  7 or P Q R S 7 or p q r s 7
[8]  8 or T U V 8 or t u v 8
[9]  9 or W X Y Z 9 or w x y z 9
[0]  In text entry (SMS)

Short press : Space then 0
Long press : Space


In dialling

Short press : 0
Long press : +

[#]  In dialling

Short press : #

[*]  In text entry (SMS)

Short  press :  Deletion  of  the  last 
character
Long press : Progressive deletion of 
the complete line


In dialling

Short press : *
Long  press :  Deletion  of  the  last 
character

T E L E P H O N E   A N D   T E L E M AT I C   S E R V I C E S

M

AIN


MENU


FOR


TELEPHONE


AND


TELEMATIC


SERVICES

Press on P then use the control G to select 
the TELEPHONE AND TELEMATIC SERV-
ICES icon and validate to have access to the 
following choices :

Call.
Services,  for  access  to  NaviDrive  and 
CITROËN services.

,  for  access

Telephone functions, to adjust all your 
telephone functions.
Text  messages  (SMS),  to  enable  you 
to manage all the text messaging func-
tions (SMS).


C

ONTEXTUAL


MENU

Making a call
Press on button D to display the telephone 
contextual menu.
This menu allows you to :

Access the calls list.
Enter a number.
Access the directory.
Access your voicemail (messaging from 
your GSM operator.

Remark :
A  long  press  on  control 5  at  the  steering 
wheel  brings  up  a  contextual  menu  with 
the calls list, the current directory and the 
voicemail.


TEL 1

38

T E L E P H O N E   A N D   T E L E M AT I C   S E R V I C E S

C

ALL


A


NUMBER

To call a number, carry out one of the fol-
lowing actions :

Select “Call” in the menu Telephone and 
telematic  services,  then  compose  the 
number using the keyboard W.
Press on button D to start the dialling, or 
select the function “OK”.
Say “Call

” then the voice label from a fi le 

that includes a telephone number.
Use the current directory.
A long press on control 5 at the steering 
wheel brings up a contextual menu with 
the  calls  list,  the  current  directory  and 
the voicemail.
With Telephone and Telematic Services 
displayed,  press  on  button G  to  have 
access to the calls list.

M

A K I N G


A


C A L L


T O


A


S T O R E D


NUMBER

Select the function giving you access to your 
directory or to the calls list (the 20 most recent 

incoming or outgoing calls). These only fi gure 

in the calls list if the person calling does not 
withhold the number.
After selecting the number you wish to call, 
press  on  either  button D  or  control G  to 
connect the call.
Reminder :
In  the  directory  there  are  two  groups  of 
memorised numbers accessible, one from 
the current directory of NaviDrive and one 
from the SIM card.The numbers contained 
in the latter are preceded by a “SIM card” 
symbol.

R

ECEIVING


A


CALL

When receiving a call, announced by a ring-
ing tone, you can choose :

To accept it by pressing button D or con-
trol 5 at the steering wheel or by validat-
ing the “YES” function in the “Respond” 
menu.
To refuse the call by pressing button Q
or by selecting and validating the “NO” 
function in the “Respond” menu.

If  you  have  accepted  the  call,  when  you 

fi nish the call press button Q or control 5 at 

the steering wheel, to end the call.

TEL 2

39

NaviDrive  Services,  for  access  to  the 
list of telematic services from CITROËN 

,  for  access  to  the 

  to  the 

(e.g. Customer Service, choice of a des-
tination,  fuel  consumption  monitoring, 

sport, current affairs, fi nance, weather, 

horoscope, travel, games, etc.) depending 
on availability.
Messages received, messages relating 

to the benefi ts of your specifi c Service 

Contract.

E

MERGENCY


CALL

In  the  absence  of  a  subscription  to  the 
CITROËN  Emergency  service,  the 

In  the  absence  of  a  subscription  t

he  ab

V  but-

ton  is  configured  for  making  calls  to  the 
number 112, this being a standard number 
reserved by the European GSM network for 
emergency calls.
For  this  call,  a  valid  SIM  card  must  be 
present, permitting the sending and receiv-
ing of telephone calls and SMS messages. 
You also need to be in an area that has 
GSM
 coverage.

T

WIN

 SIM 

CARD

For better peace of mind, offers of twin SIM 
cards  (available  in  some  countries  from 
certain service operators) give you two SIM 
cards for a standard price, a single number 
and single messaging. Calls arrive as prior-
ity on your principal line. In the absence of 
a reply, calls are transferred automatically 
to the equipment that is using the second 
SIM card.

Note :

This transfer necessitates a callback (con-
sult your telephone service operator.
For optimum operation of services, it is 
recommended to insert the principal 

SIM

card into the NaviDrive.

If  you  have  a  special  Service  Contract, 
refer to the general conditions described in 
the contract.
A  green  diode  flashes  on  the  NaviDrive 
control panel as soon as you commence the 
emergency call procedure, then it comes on 
permanently when the call is picked up by 
the rescue services.

The same warning lamp fl ashes or illuminates 

permanently  in  orange  should  it  detect  a 
malfunction in the telephone's emergency 
calls function.
Remarks :

If you have a specifi c Service contract, the 

services can then be localised by means 
of GPS. You can check the activation of 
this  localisation  with  a  long  press  on P
followed by selection of “

Confi guration 

of services”. If the emergency services 
appear activated, you can then be local-
ised. Otherwise, you are not localised.
If  the  emergency  services  appear  acti-
vated but you have not subscribed to a 
Service contract and do not wish to be 
localised, make contact with your usual 
CITROËN dealer.

localised, make co

lised, 

T E L E P H O N E   A N D   T E L E M AT I C   S E R V I C E S

T

HE


SERVICES

This  menu,  depending  on  the  contracts 
subscribed to, allows you to choose one of 
the following services :

CITROËN on line, giving you direct con-
tact with the CITROËN Customer Contact 

, giving you direct con-

, giv

Centre and access to the services on offer 
(such a call will be overridden if an emer-
gency or breakdown call is made.
CITROËN Assistance, giving you direct 
contact with the Call Centre handling the 
CITROËN  breakdown  service,  for  the 

contact with the Call Centre handling the 

tact wi

fastest possible recovery.
You  have  a  few  seconds  to  cancel  this 
call once it has been made. This call can 
also be made by giving a long press on 
button E.  While  making  an  assistance 
call, it is impossible to make other calls 
apart  from  an  emergency  call.  If  you 

have subscribed to a specifi c Services 

contract, your GPS position is relayed to 
the assistance centre.

TEL 3

TEL 4

TEL 4. b

40

T E L E P H O N E   A N D   T E L E M AT I C   S E R V I C E S

T

ELEPHONE


FUNCTIONS

This menu gives you access to the following 
functions :

Network,  to  select  the  network  search 
mode  and  to  view  the  networks  avail-
able.
Length of calls, to consult the call length 
counters and the reset to zero.
Managing the SIM card, for modifying 
the PIN code and deleting the list of calls 
and text messages (SMS).
Call  options,  for  configuring  calls  by 
whether or not you withhold your number, 
for hanging up automatically after X rings, 

for defi ning ring tones and callback for 

SMS and for deleting the calls log.

T

EXT


MESSAGING

 (SMS)

This  menu  allows  you  to  read,  send,  and 
edit  SMS  messages  and  to  delete  the  list 
of them.
Normally,  your  server  centre  number  is 

confi gured automatically depending on your 

network operator.
To modify it, select the menu “Telephone and 
Telematic Services
”, then “Text messages 
(SMS)
” and “Number of server centre” for 
entering and recording the latter.
Any  text  message  composed  prior  to  the 
recording  of  this  number,  will  be  deleted 
and not sent.

S

ENDING


A


TEXT


MESSAGE

 (SMS)

In the menu “Text messages (SMS)”, vali-
date the function “Production of an SMS”, 
and enter your SMS via the keypad.
You can then :

Either record the message for later use 
by validating in the “OK” function.
Or  send  it  by  validating  in  the  “Send” 
function.

Then  compose  the  destination  number  or 
select it either in the directory or in the calls 
list. Then send it.

41

T E L E P H O N E   A N D   T E L E M AT I C   S E R V I C E S

Note :

SMS messages that have been stored or 
deferred can be consulted at any time.
To access them, press on button P, select 
Telephone  and  Telematic  Services” 
then the function “SMS text-messages” 
and  validate  the  function  “Reading  of 
SMS messages received
”. Then move in 
the list to be able to select and validate the 
message you wish to read. The number of 
SMS messages unread is indicated.
If the voice synthesiser function is active, 
as soon as the message is displayed, it will 
be read out by the voice synthesiser.

R

EPLYING


TO


AN

 SMS

After reading a text message, you can :

Reply directly to the sender by selecting 
Respond”. A screen appears automati-
cally to return your message.
Record the number of the SMS sender 
into your current directory, by selecting 
Record”.

R

ECEIVING


AN

 SMS

A sound signal (if the ringing option for SMS 
messages  is  active)  and  a  superimposed 
window tell you of the arrival of an SMS.
You can then :

Either  read  the  SMS  by  selecting  and 
validating “YES”.
Or defer reading it by selecting and vali-
dating “NO” or by pressing button J or by 
waiting for the superimposed window to 
disappear.

CFG 2

CFG

CFG 1

42

C O N F I G U R AT I O N

D

ISPLAY


CONFIGURATION

This menu enables you to access the follow-
ing functions (insert the navigation CD-ROM 
if necessary) :

Choice  of  colours  (colour  screen),  for 
choosing  one  of  the  colours  available 
for the display.
Adjust brightness, to adjust brightness 
and contrast and video display.
Sound, for adjusting the voice synthesiser 
(for  the  female/male  voice  parameter), 
activation/deactivation  of  voice  com-
mands.
International  parameters,  for  adjust-
ing the date and the time (12 or 24 hour 
format, adjustment of minutes on GPS) 
and  the  units  of  measurement  (metric 
or imperial).
Choose  language,  to  choose  the  lan-
guage  for  the  voice  synthesiser  and 
displays.

C

ONFIGURATION


MAIN


MENU

Press  on P  then  on  the  control G.  Select 

the Confi guration icon and validate to gain 

access to the following choices :

Defi ne the vehicle parameters.

Display confi guration.


D

EFINE


THE


VEHICLE


PARAMETERS

This  menu  which  depends  on  the  level  of 
equipment on your vehicle enables you to 
activate/deactivate or to adjust the following 
functions :

Screen wipe, to activate/deactivate (with 
a  press  on 

G

)  the  automatic  triggering 

of  rear  screen  wipe  when  engaging 
reverse gear.

Lighting confi guration, to activate/deac-

tivate (with a press on 

G

) the automatic 

lighting of headlamps and/or the guide-
me-home lighting.

43

M A P

M

ODE

  “S

ELECTI ON

  –  M

OV E


ON


MAP

This mode enables you :

To move on the map in all four directions : 
Nor th,  South,  East  and  West,  using 
buttons H,  IM and N. The movement can 
be speeded up by keeping the appropriate 
button pressed down.
To select a point on the map by moving 
the  latter  in  order,  after  a  press  on G
to be guided towards this point, to have 
information on it, or to memorise it.

Remarks :

In this mode, the zoom is also available 
and the map is always full screen, oriented 
to North.
In this mode, a validation on the control G
displays the Map contextual menu.
In this mode, the symbol for the nearest 
Centre of Interest is displayed.

M

ODE

 “F

OLLOW


VEHICLE


ON


MAP

This mode enables you to view the vehicle 
centred  on  the  map,  whether  or  not  guid-
ance is active.
The  map  has  a  zoom  function  which  can 
alter  the  scale  of  the  map.  To  vary  the 
scale  from 50 m / cm  to 200 km / cm,  rotate 
the control G.
Remarks :

In  this  mode,  a  validation  on  control G
brings  up  the  Navigation  contextual 
menu.
The more precise scale allows you to see 
one-way systems.

G

ENERAL

When  the  map  is  displayed,  you  can  use 
either of two functioning modes :
The mode “Follow vehicle on map”, which 
shows you the movement of the vehicle on 
the map, and the mode “Select - Move on 
map

”, which allows you to defi ne a particular 

spot by moving a pointer.
The map can be displayed either on the right 
of the screen as in the other applications, or 
full screen enlarged.
Remarks :

By  default,  the  map  displays  in  mode 
Follow vehicle on map”.
The change of the mode “Follow vehicle 
on map
” to the mode “Move on map” is 
made via the Map main menu or using 
the  Navigation  contextual  menu  with  a 
press on the control G.
The change the other way is made using 
the Contextual Menu for the mode “Move 
on map
”.

CAR

44

M A P

M

AP


MAIN


MENU

Press on P then use control G to select the 
Map icon and validate to have access to the 
following choices :

Move the map, to change to the mode  
Select - Move on map”.
Orient the map, to orient the map either 
to North or to the direction in which the 
vehicle is moving.
Centre around the vehicle, to recentre 
the  map  on  the  vehicle  if  it  no  longer 
appears on the map.
Details  of  the  map,  for  selecting  the 
points  of  interest  to  be  displayed  using 
symbols on the map (see next page).
Memorise  the  current  position,  to 
display the panel for entering a label for 
recording the vehicle's current position in 

a fi le in the current directory.

C

ONTEXTUAL


MENU

This  contextual  menu  displays  in  mode 
Select - Move on map” :

Information  on  this  location,  to  view 
the information on the point of the map 
selected by the cursor.
Choose as destination/stage, lets you 
select the location which is pinpointed as 
a destination or stage provided a guidance 
is already in progress.
Memorise  this  location,  to  memorise 

the point selected by the cursor in a fi le 

in the current directory.
Exit map mode, changes the map back 
to the mode “Follow vehicle on map”.

Tip :
Among the details of the map, you can select 
(depending on the country where the vehicle 
was marketed and on the availability of the 
service) the display of radar zones or high-
accident zones.

45

S Y M B O L S   F O R   C E N T R E S   O F   I N T E R E S T

City hall, City centre

Hospital

Universities, Colleges, Schools

Hotels

Vineyards

Restaurants

Business centre

Supermakets, Shopping malls

Sports centres and complexes

Golf courses

Parks, gardens

Winter sports

Public attractions

Culture, museums and theatres

Tourism, historic monuments

Shows, exhibitions

Cinemas

Skating, Bowling

Airports, fl ying clubs

Rail stations, bus stations

Car hire

Car parks, rest areas

Ferry terminals, port areas

Service stations, garages

Radar zones/High-accident zones (depending on the country 
of marketing and availability of the service)

CITROËN Dealer or Repairer

Casinos and night life

P

UBLIC


AUTHORITIES


AND


SECURITY

H

OTELS

RESTAURANTS

BUSINESS


AND


RETAIL


PARKS

S

PORTS


AND


OPEN


AIR


CENTRES

C

ULTURE

TOURISM

ENTERTAINMENT

T

RANSPORT


AND


MOTORING

1

1

1

1

1

2

2

3

3

          USB PLAYER

  The system puts together playlists (temporary memory) created over 
a period which depends on the capacity of the USB equipment. 
 The other sources are available during this time. 
 The playlists are updated each time the ignition is switched off or 
each time a USB stick is connected. 

 When connecting for the fi rst time, the tracks are classifi ed by folder. 

When you reconnect, the classifi cation system selected previously is 
retained.   

 Connect the stick to the port, directly 
or using a lead. If the audio equipment 

is switched on, the USB source is 
detected as soon as it is connected. Play 
begins automatically after a delay which 
depends on the capacity of the USB 
stick. 

 The fi le formats recognised are .mp3 

(mpeg1 layer 3 only), .wma (standard 9 

only), .wav and .ogg.  

  This unit consists of a USB port and a 

Jack socket. It reads audio fi le formats 

(.mp3, .ogg, .wma, .wav...) which are 
transmitted from portable equipment 
such as a digital player or a USB stick to 

your audio system, to be listened to via 
the vehicle's speakers. 

 USB stick (1.1, 1.2 and 2.0) or Ipod 

®

  of 

®

generation 5 or later: 
   -   the playlists accepted are of the type 

m3u, .pls, .wpl., 

  -   the Ipod 

®

  lead is essential, 

®

  -   navigation through the fi le base is by 

means of the steering wheel controls, 

  -   the battery of the portable equipment 

can charge automatically.  

 Other Ipod 

®

  players of earlier generations 

®

and players using the MTP protocol: 
   -   play via Jack-Jack lead only 

(not supplied), 

  -   navigation through the fi le base is from 

the portable equipment.   

  The list of compatible equipment is available from dealers.  

  USING THE USB PORT 

  CONNECTING A USB STICK 

2

3

3

4

4

1

1

5

5

2

2

  USB PLAYER

  USING THE USB PORT 

  Press LIST briefl y to display the list 
of Folders/Genres/Artists/Playlists on 
the USB equipment. 
 Navigate through the list using the 
left/right and up/down buttons. 

 Confi rm the selection by pressing OK. 

 The lists available are Artist, Genre and Playlist (as defi ned on the 
iPod 

®

 ). 

®

 Selection and Navigation are described in steps 1 to 5 above.  

  Do not connect a hard disk or USB devices other than audio 
equipment to the USB port This could damage your installation.   

  CONNECTING AN IPOD 

®

AN IPOD 

AN IPOD    VIA THE USB PORT 

®

 Press one of these buttons to gain 
access to the previous/next track on 

the classifi cation list currently being 
played. 
 Press and hold one of the buttons for 
fast forward or rewind play. 

 Press one of these buttons to gain 

access to the previous/next Genre, 

Folder, Artist or Playlist on the 

classifi cation list currently being 
played.  

  Press and hold LIST to display the 

different classifi cations. 

 Select by Folder/Artist/Genre/Playlist, 

press OK to select the classifi cation 

required, then press OK again 

to confi rm. 

   -   by Folder: all folders containing audio 

fi les recognised on the peripheral 

device, classifi ed in alphabetical order 

without following the fl ow chart. 

  -   by Artist: all of the artist names 

defi ned in the ID3 Tags, classifi ed in 
alphabetical order. 

  -   by Genre: all of the genres defi ned in 

the ID3 Tags. 

  -   by Playlist: in accordance with the 

playlists recorded on the USB device.   

OK

3

1

1

2

2

2

2

1

1

 Then adjust the volume of your audio 
equipment. 

 The auxiliary input, JACK and RCA, permits the connection of 

portable equipment (MP3 player...). 

 Connect the portable equipment (MP3 player…) 

to the JACK socket or to the audio sockets (white 

and red, RCA type) using a suitable cable (not 
supplied). 

 Press the SOURCE button several 
times in succession and select AUX.  

 USING THE AUXILIARY INPUT (AUX) 

  JACK SOCKET OR RCA SOCKET (according to vehicle) 

 ADJUSTING THE VOLUME OF THE AUXILIARY SOURCE 

 Do not connect a single piece of equipment to the USB socket and 

the JACK socket at the same time. 

 The controls are displayed and managed via the 
portable equipment. 

         USB PLAYER 


Content   ..  9  10  11  12   ..