Chrysler Sebring (2010 year). Manual - part 6


  Index      Chrysler     Chrysler Sebring (2010 year) - manual in english


Search            copyright infringement  


Content      ..     4      5      6      7     ..


Chrysler Sebring (2010 year). Manual - part 6


Outside Mirror — Passenger Side
Adjust the convex outside mirror so you can just see the
side of your vehicle in the part of the mirror closest to the
vehicle.

WARNING!

Vehicles and other objects seen in the passenger side
convex mirror will look smaller and farther away
than they really are. Relying too much on your
passenger side mirror could cause you to collide with
another vehicle or other object. Use your inside
mirror when judging the size or distance of a vehicle
seen in the passenger side mirror.

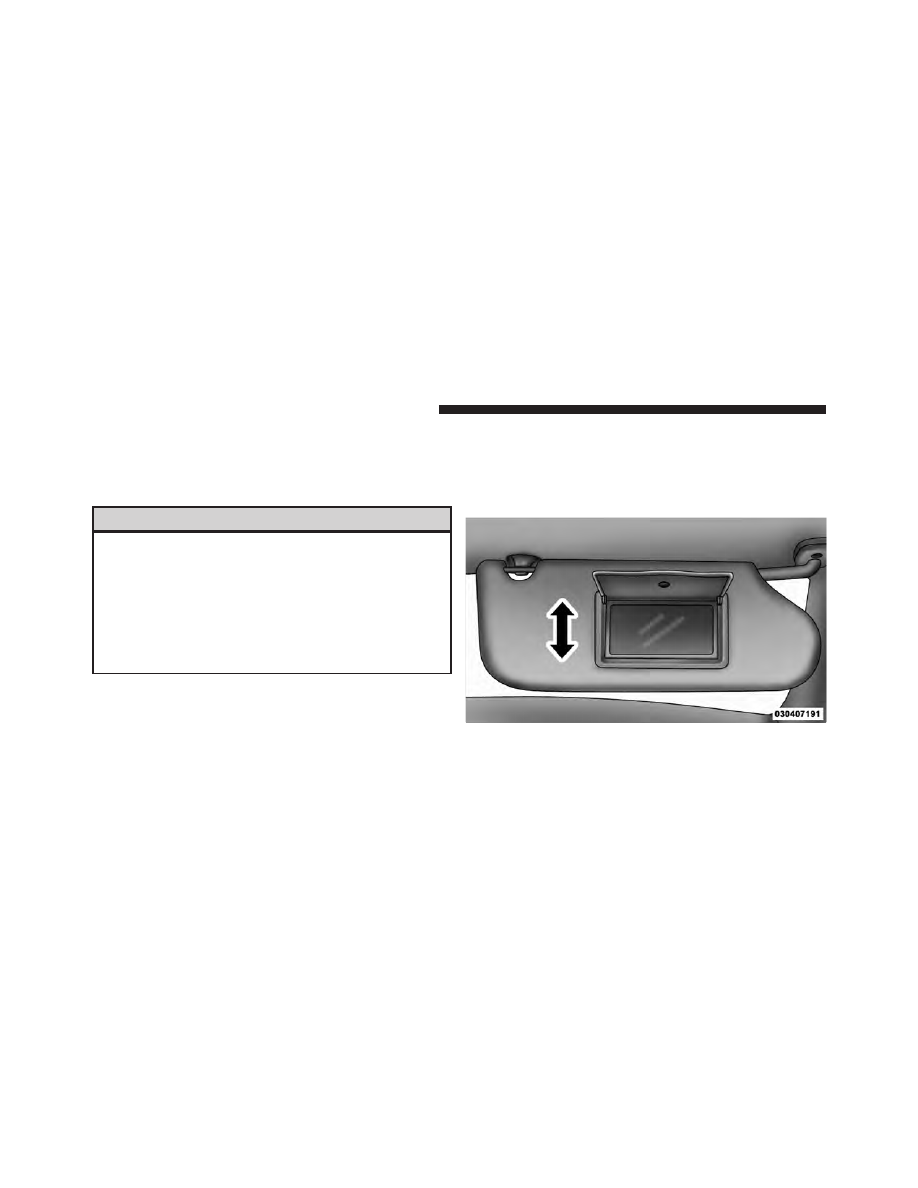
Illuminated Vanity Mirrors — If Equipped

An illuminated vanity mirror is on each sun visor. To use
the mirror, lower the sun visor and rotate the mirror
cover upward. The lights will turn on automatically.
Closing the mirror cover turns off the lights.

Illuminated Vanity Mirror

92

UNDERSTANDING THE FEATURES OF YOUR VEHICLE

-------------------------------------------------------------------------------------------------------------------------------------------------------------

Uconnect™ Phone — IF EQUIPPED

Uconnect™ Phone is a hands-free system that allows you
to use voice commands to dial a phone number stored
in your cellular phone. Press the Uconnect™ Phone
button

on the radio or steering wheel controls (if

equipped) and follow the instructions to pair the cellular
phone.

Refer to “Uconnect™ Phone” in the Uconnect™ User
Manual located on the DVD for further details.

VOICE COMMAND — IF EQUIPPED

Voice Command can be initiated by pressing the VR
button

located on the radio or steering wheel

controls (if equipped).

Refer to “Voice Command” in the Uconnect™ Phone
User Manual located on the DVD for further details.

SEATS

Seats are a primary part of the Occupant Restraint System
of the vehicle. They need to be used properly for safe
operation of the vehicle.

WARNING!

• DO NOT allow people to ride in any area of your

vehicle that is not equipped with seats and seat
belts. In a collision, people riding in these areas
are more likely to be seriously injured or killed.

• Be sure everyone in your vehicle is in a seat and

using a seat belt properly.

3

UNDERSTANDING THE FEATURES OF YOUR VEHICLE

93

-------------------------------------------------------------------------------------------------------------------------------------------------------------

Manual Front Seat Adjustment

The manual seat adjustment bar is at the front of the seat,
near the floor. Pull the bar upward to move the seat
forward or rearward. Release the bar once the seat is in
the position desired. Then, using body pressure, move
forward and rearward on the seat to be sure that the seat
adjusters have latched.

WARNING!

Adjusting a seat while the vehicle is moving is
dangerous. The sudden movement of the seat could
cause you to lose control. The seat belt might not be
properly adjusted and you could be injured. Adjust
the seat only while the vehicle is parked.

Driver Seat Manual Height Adjuster —
If Equipped

A lever style height adjustment feature enhances comfort
for petite as well as tall drivers. A lever with a ratcheting
mechanism, located on the outboard side of the seat,
raises and lowers it. Total travel is 2.2 in (56 mm).

Manual Seat Adjusting Bar

94

UNDERSTANDING THE FEATURES OF YOUR VEHICLE

-------------------------------------------------------------------------------------------------------------------------------------------------------------

Reclining Bucket Seats

The recliner control is on the side of the seat. To recline,
lean forward slightly before lifting the lever, then lean
back to the desired position and release the lever. Lean
forward and lift the lever to return the seatback to its
normal position.

Manual Seat Height Adjustment Lever

Seatback Adjustment

3

UNDERSTANDING THE FEATURES OF YOUR VEHICLE

95

-------------------------------------------------------------------------------------------------------------------------------------------------------------

WARNING!

• Adjusting a seat while the vehicle is moving is

dangerous. The sudden movement of the seat
could cause you to lose control. The seat belt might
not be properly adjusted and you could be injured.
Adjust the seat only while the vehicle is parked.

• Do not ride with the seatback reclined so that the

shoulder belt is no longer resting against your
chest. In a collision you could slide under the seat
belt and be seriously or even fatally injured. Use
the recliner only when the vehicle is parked.

Lumbar Support — If Equipped

This feature allows you to increase or decrease the
amount of lumbar support. The control lever is located
on the outboard side of the driver’s seatback. Turn the
control lever downward to increase and upward to
decrease the desired amount of lumbar support.

Lumbar Support

96

UNDERSTANDING THE FEATURES OF YOUR VEHICLE

-------------------------------------------------------------------------------------------------------------------------------------------------------------

Power Seats — If Equipped

The power seat switches are on the outboard side of the
seat near the floor. Use the bottom switch to move the
seat up, down, forward, rearward, or to tilt the seat. The
top switch controls the seatback recliner.

WARNING!

• Adjusting a seat while the vehicle is moving is

dangerous. The sudden movement of the seat
could cause you to lose control. The seat belt might
not be properly adjusted and you could be injured.
Adjust the seat only while the vehicle is parked.

• Do not ride with the seatback reclined so that the

shoulder belt is no longer resting against your
chest. In a collision you could slide under the seat
belt and be seriously or even fatally injured. Use
the recliner only when the vehicle is parked.

CAUTION!

DO NOT place any article under a power seat or impede
its ability to move as it may cause damage to the seat
controls. Seat travel may become limited if movement is
stopped by an obstruction in the seat’s path.

(Continued)

Power Seat Switches

3

UNDERSTANDING THE FEATURES OF YOUR VEHICLE

97

-------------------------------------------------------------------------------------------------------------------------------------------------------------

Adjusting Active Head Restraints

Active Head Restraints can reduce the risk of injury in
the event of a rear impact. The Active Head Restraint
should be adjusted so the top of the head restraint is
located above the top of your ear.

To raise the head restraint, pull upward on the head
restraint (on some models, you may need to press the
push button). To lower the head restraint, press the push
button, located at the base of the head restraint, and push
downward on the head restraint.

Adjusted Head Restraint

Push Button

98

UNDERSTANDING THE FEATURES OF YOUR VEHICLE

-------------------------------------------------------------------------------------------------------------------------------------------------------------

For comfort the Active Head Restraints can be tilted
forward and backward. To tilt the head restraint closer to
the back of your head, pull outward on the bottom of the
head restraint. Push rearward on the bottom of the head
restraint to move the head restraint away from your
head.

NOTE:

• The head restraints should only be removed by quali-

fied technicians, for service purposes only. If either of
the head restraints require removal, see your autho-
rized dealer.

Active Head Restraint (Normal Position)

Active Head Restraint (Tilted)

3

UNDERSTANDING THE FEATURES OF YOUR VEHICLE

99

-------------------------------------------------------------------------------------------------------------------------------------------------------------

• In the event of deployment of an Active Head Re-

straint, refer to “Occupant Restraints/Resetting Active
Head Restraints (AHR)” in “Things to Know Before
Starting Your Vehicle” for further information.

WARNING!

• Driving a vehicle with the head restraints removed

or improperly adjusted could cause serious injury
or death in the event of a collision. The head
restraints should always be checked prior to oper-
ating the vehicle and never adjusted while the
vehicle is in motion. Always adjust the head
restraints when the vehicle is in PARK.

(Continued)

WARNING! (Continued)

• Do not place items over the top of the Active Head

Restraint, such as coats, seat covers or portable
DVD players. These items may interfere with the
operation of the Active Head Restraint in the event
of an accident and could result in serious injury or
death.

• Active Head Restraints may be deployed if they

are struck by an object such as a hand, foot or loose
cargo. To avoid accidental deployment of the Ac-
tive Head Restraint ensure that all cargo is se-
cured, as loose cargo could contact the Active Head
Restraint during sudden stops. Failure to follow
this warning could cause personal injury if the
Active Head Restraint is deployed.

100

UNDERSTANDING THE FEATURES OF YOUR VEHICLE

-------------------------------------------------------------------------------------------------------------------------------------------------------------

Heated Seats — If Equipped

This feature heats leather or cloth front driver and
passenger seats. The switches for the heated seats are
located in the center console above the climate controls.

After turning the ignition ON, you can choose from High,
Low, or Off heat settings. Amber indicator lights in each
switch indicate the level of heat in use. Two indicator
lights will illuminate for High, one for Low and none for
Off.

Press the switch once to select High-level heat-
ing. Press the switch a second time to select
Low-level heating. Press the switch a third time
to shut the heating elements Off.

WARNING!

• Persons who are unable to feel pain to the skin

because of advanced age, chronic illness, diabetes,
spinal cord injury, medication, alcohol use, ex-
haustion or other physical condition must exercise
care when using the seat heater. It may cause burns
even at low temperatures, especially if used for
long periods of time.

• Do not place anything on the seat that insulates

against heat, such as a blanket or cushion. This may
cause the seat heater to overheat. Sitting in a seat
that has been overheated could cause serious burns
due to the increased surface temperature of the seat.

CAUTION!

Repeated overheating of the seat could damage the
heating element and/or degrade the material of the seat.

3

UNDERSTANDING THE FEATURES OF YOUR VEHICLE

101

-------------------------------------------------------------------------------------------------------------------------------------------------------------

Fold-Flat Passenger Seatback

The recline handle on the front passenger seat also
releases the seatback to fold forward.

The hard seatback features a work surface and a molded
rim for retaining items stored on the seatback panel.

Folding Rear Seat

To provide additional storage area, the rear seatback can
be folded forward. Pull on the loops shown in the picture
to fold down either or both seatbacks.

When returning the rear seatback to the upright position,
be sure the seatback is latched.

Seatback Adjustment

Fold-Flat Front Passenger Seat

102

UNDERSTANDING THE FEATURES OF YOUR VEHICLE

-------------------------------------------------------------------------------------------------------------------------------------------------------------

WARNING!

The rear cargo area of the vehicle (with the rear
seatbacks in the locked-up or folded down position)
should not be used as a play area by children. They
could be seriously injured in an accident. Children
should be seated and using the proper restraint system.

Folding Rear Seat Center Armrest

The rear seat is equipped with a folding armrest with
cupholders.

Folding Rear Seats

Folding Rear Seat Armrest

3

UNDERSTANDING THE FEATURES OF YOUR VEHICLE

103

-------------------------------------------------------------------------------------------------------------------------------------------------------------

TO OPEN AND CLOSE THE HOOD

To open the hood, two latches must be released.

1. Pull the hood release lever located under the left side
of the instrument panel.

2. Then lift the secondary latch located under the front
edge of the hood, near the center and raise the hood.

Use the hood prop rod to secure the hood in the open
position. Place the upper end of the prop rod in the hole
on the left underside of the hood.

Hood Release Lever

Hood Safety Catch

104

UNDERSTANDING THE FEATURES OF YOUR VEHICLE

-------------------------------------------------------------------------------------------------------------------------------------------------------------

NOTE:

Before closing the hood, make sure to stow the

prop rod in its proper location.

CAUTION!

To prevent possible damage, do not slam the hood to
close it. Use a firm downward push at the center of
the hood to ensure that both latches engage.

WARNING!

Be sure the hood is fully latched before driving your
vehicle. If the hood is not fully latched, it could open
when the vehicle is in motion and block your vision.
Failure to follow this warning could result in serious
injury or death.

LIGHTS

Multifunction Lever

The multifunction lever controls the operation of the
parking lights, headlights, headlight beam selection,

Hood Prop Rod Hole Location

3

UNDERSTANDING THE FEATURES OF YOUR VEHICLE

105

-------------------------------------------------------------------------------------------------------------------------------------------------------------

passing light, fog lights, instrument panel light dimming
and turn signals. The multifunction lever is located on
the left side of the steering column.

Headlights and Parking Lights

Turn the end of the multifunction lever to the first detent
for parking light operation. Turn to the second detent for
headlight operation.

Multifunction Lever

Headlight Switch

106

UNDERSTANDING THE FEATURES OF YOUR VEHICLE

-------------------------------------------------------------------------------------------------------------------------------------------------------------

Automatic Headlights — If Equipped

Turning the end of the multifunction lever to the third
detent (AUTO), will activate the automatic headlight
system.

With the engine running and the multifunction lever in
the AUTO position, the headlights will turn on and turn
off based on the surrounding light levels.

Headlight Time Delay

There is also a feature that delays turning off the vehicle
lights for 30, 60 or 90 seconds after the ignition switch is
turned OFF. To activate the headlight delay, the multi-
function lever must be rotated to the off position after the
ignition switch is turned OFF. Only the headlights will
illuminate during this time. Refer to “Electronic Vehicle
Information Center (EVIC)/Customer-Programmable
Features” in “Understanding Your Instrument Panel” for
further information.

Headlight Switch

3

UNDERSTANDING THE FEATURES OF YOUR VEHICLE

107

-------------------------------------------------------------------------------------------------------------------------------------------------------------


Content      ..     4      5      6      7     ..