Chrysler Sebring Coupe (2004 year). Manual - part 3


  Index      Chrysler     Chrysler Sebring Coupe (2004 year) - manual in english


Search            copyright infringement  


Content      ..     1      2      3      4      ..


Chrysler Sebring Coupe (2004 year). Manual - part 3


Inside emergency trunk release

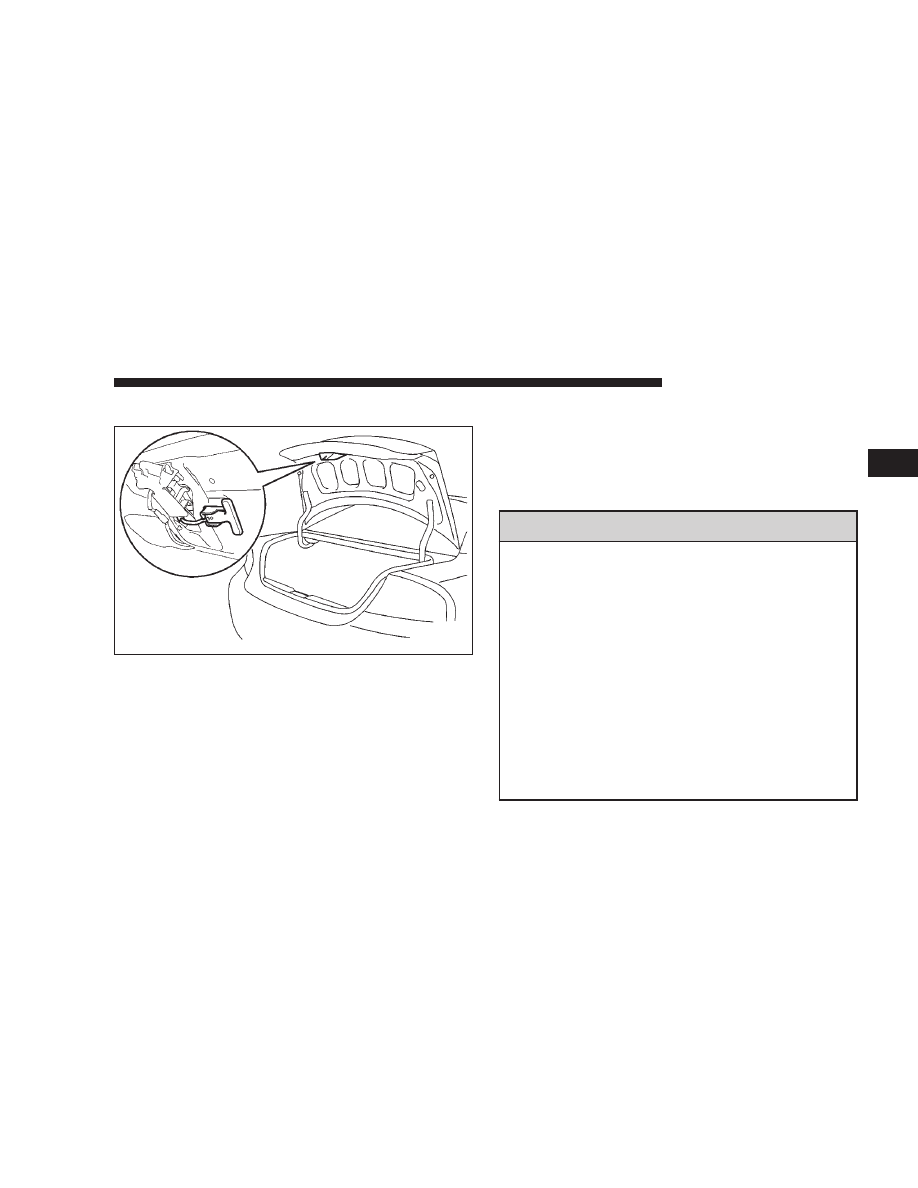
The emergency trunk release is designed to provide a way to
open the trunk lid from inside the trunk. It was developed to
help prevent death and serious heat-related injuries, includ-
ing brain damage, especially for children who might become
locked inside a vehicle trunk.
The illuminated

9T9 shaped yellow emergency trunk release

handle (see illustration) is mounted near the latch inside the
trunk lid. Velcro keeps the handle secure in its holder.

The handle glows in the dark after exposure to sunlight.
You and your family should familiarize yourselves with the
location and operation of the emergency trunk release
handle. Children should be taught not to play in or around
vehicles.

WARNING!

• Children should never be left unsupervised in or

around vehicles.

• Unsupervised children could lock themselves in

an open vehicle or trunk.

• People trapped inside a vehicle, or trunk, even if

only for a short period of time, can quickly die
from suffocation or heat stroke, especially on hot
days. Interior temperatures in vehicles can rise in
minutes.

• Keep your vehicle doors locked and the trunk

closed when not in use. Keep your vehicle keys
away from children.

F15A2350

LOCKING AND UNLOCKING

37

2

-------------------------------------------------------------------------------------------------------------------------------------------------------------

To open the trunk from inside the trunk, tear off the
illuminated

9T9 handle from its holder by pulling in the

direction of the arrow (1). Then pull the handle in the
direction of the arrow (2). Push up on the trunk to exit.

CAUTION!

• When loading objects in the trunk, position them

so that they will not contact the emergency trunk
release handle when closing the trunk. This will
prevent damage to the handle that could render it
inoperable.

• Always keep the handle in its holder when oper-

ating the vehicle to prevent trunk cargo from
moving the handle that might result in the open-
ing of the trunk lid.

F15A2180

1. Tear off

2. Pull

Handle

Holder

38

LOCKING AND UNLOCKING

-------------------------------------------------------------------------------------------------------------------------------------------------------------

FUEL FILLER

WARNING!

Turn off the engine while refueling.
Do not smoke and do not operate other ignition
sources while refueling.

The fuel filler is located on the right rear of the body.
Hook a finger behind the fuel filler door, and pull the
door toward you.

Remove the fuel tank filler tube cap slowly by turning it
counterclockwise.
To close, securely turn the fuel tank filler tube cap
clockwise until you hear clicking sounds, and gently
push the fuel filler tank door into the closed position.

C20A1160

C20A1140

Remove

Close

LOCKING AND UNLOCKING

39

2

-------------------------------------------------------------------------------------------------------------------------------------------------------------

Low fuel warning chime
If a chime sounds when the low fuel warning light is on,
that means the fuel is low.

NOTE

: If the low fuel warning light goes off, then comes

back on again, the chime will not sound.

Fuel tank capacity

61.7 L (16.3 gal)

CAUTION!

• As the fuel system may be under pressure, remove the

fuel tank filler tube cap slowly. Removing the cap
slowly relieves any pressure or vacuum that might have
built up in the fuel tank. If the cap is venting vapor or
if you hear a hissing sound, wait until it stops before
completely removing the cap. Otherwise, fuel may
spray out and injure you or others.

• If you need to replace the fuel tank filler tube cap,

use only a cap specified for your model vehicle.

• To avoid fuel spillage and overfilling, do not “top-off”

the fuel tank again and again after filling.

NOTE

: If the fuel tank filler tube cap is not tight while

driving, the “Malfunction indicator light (SERVICE EN-
GINE SOON)” may illuminate when the onboard diag-
nostic (OBD) system performs its self check.
Always tighten the fuel tank filler tube cap until you hear
clicking sounds. The indicator light will go off after
driving several times. If the indicator light does not go
off, contact your authorized dealer as soon as possible.

40

LOCKING AND UNLOCKING

-------------------------------------------------------------------------------------------------------------------------------------------------------------

ENGINE HOOD RELEASE

The engine hood release lever (located under the instru-
ment panel near the driver’s door) is used to unlock the
engine hood.
Pull the lever toward you to release the engine hood
latch.

WARNING!

• Never release the engine hood using the release

lever while the vehicle is in motion.

• Do not operate the vehicle unless the engine hood

is latched.

Release the safety lever and lift the engine hood.

F13A1480

F13A1740

LOCKING AND UNLOCKING

41

2

-------------------------------------------------------------------------------------------------------------------------------------------------------------

NOTE

: Only open the engine hood when the wipers are

at their parked position to prevent damage to the engine
hood and wipers.

Support the engine hood with the hood prop by
inserting the hood prop securely in the opening in the
hood marked with an arrow.

To close, unlatch the hood prop from the engine hood
and place the hood prop in its retainer. Slowly lower
the engine hood to about 12 inches (30 cm) from the
closed position, then release it. The hood should latch
from its own weight.

NOTE

: If this does not latch the engine hood, release it

from a slightly higher position.

F13A1710

F13A1720

42

LOCKING AND UNLOCKING

-------------------------------------------------------------------------------------------------------------------------------------------------------------

CAUTION!

Be careful that hands or fingers are not trapped
when closing the engine hood.

POWER WINDOWS

NOTE
1. The windows can be operated when the ignition key is
in the “ON ”position. The door windows can be opened

or closed for a 30-second period even after the ignition
switch is turned off. However, once the driver’s door or
the front passenger’s door is opened, the windows can-
not be operated until the ignition switch is turned on
again.

2. Never try to operate the driver switch and passenger
switch in opposing directions at the same time. Doing so
will cause the window to freeze in position.

3. Repeated operation with the engine stopped (key
“ON”) will run down the battery. Operate the window
switches while the engine is running.

WARNING!

• Before operating the power windows, make sure

that nothing can be trapped (head, hand, finger,
etc.) in the window.

• Never leave the vehicle without removing the key.
• Never leave a child in the vehicle alone.

F17A0250

Open

Close

LOCKING AND UNLOCKING

43

2

-------------------------------------------------------------------------------------------------------------------------------------------------------------

Driver switch

The main driver switch can be used to operate both door
windows.
Windows will move while the switch is being operated
and stop when the switch is released.

1. Driver’s door window switch
(To fully open the driver’s door window, it is not neces-
sary to hold the switch down for the entire time the
window is being lowered.)

2. Passenger’s door window switch

3. Window lock switch
(When this switch is pressed into lock mode, the passen-
ger switch cannot be used to open or close the door
window, and the driver switch can open or close either
window. To unlock, press the window lock switch again.)

WARNING!

Before driving with a child in the vehicle, be sure to
press the window lock switch to make the window
switches inoperative. A child may tamper with the
switch at the risk of their hands or head becoming
trapped by the window.

F17A1600

44

LOCKING AND UNLOCKING

-------------------------------------------------------------------------------------------------------------------------------------------------------------

Passenger switch

The passenger switch can be used to operate the passen-
ger door window.

SUNROOF (IF SO EQUIPPED)

The sunroof can be opened and closed with the ignition
key in the “ON” position.

To tilt up

When the sunroof switch (1) is pressed, the back of the
sunroof automatically goes up for inside ventilation.
To stop the sunroof partway, push the sunroof switch (2).

NOTE

: Before tilting the sunroof, completely open the

sunshade. Otherwise you will not have good ventilation.

F17A1610

F19A0960

LOCKING AND UNLOCKING

45

2

-------------------------------------------------------------------------------------------------------------------------------------------------------------

To tilt down

Press the sunroof switch (2).
To stop the sunroof partway, release the sunroof switch.

To open

When the sunroof switch (1) is pressed, the back of the
sunroof automatically goes up.
When the sunroof switch (1) is pressed a second time, the
sunroof automatically opens completely.
To stop the sunroof partway, press the sunroof switch (2).

To close

The sunroof closes while the sunroof switch (2) is being
pressed.
To stop the sunroof partway, release the switch.

NOTE
1. The sunroof can be operated when the ignition key is
in the “ON” position. The sunroof can be opened or
closed for a 30-second period after the ignition switch is
turned off. However, once the driver’s door or the
passenger’s door is opened, the sunroof cannot be oper-
ated until the ignition switch is turned on again.

2. If the battery cable is disconnected or the fuse is
replaced while the sunroof is open, the sunroof will not
close normally even after reconnecting the battery cable.
In this case, use the following steps.
Press the switch (2) repeatedly to close the sunroof
completely. The sunroof will resume its normal operation
after this procedure is completed.

46

LOCKING AND UNLOCKING

-------------------------------------------------------------------------------------------------------------------------------------------------------------

Sunshade

The sunshade can be opened or closed manually while
the sunroof is closed.

NOTE

: The sunshade will operate together with the

sunroof only when the sunroof is opened.

CAUTION!

Do not attempt to close the sunshade when the
sunroof is opened.

WARNING!

• When leaving the vehicle unattended, be sure to

close the sunroof and remove the ignition key.

• Before operating the sunroof, make sure that

nothing can be trapped (head, hand, finger, etc.).

• Never leave a child (or other person who is

incapable of safely operating the sunroof switch)
in the vehicle alone.

NOTE
1. Do not stick your head, hand or anything else out of
the sunroof opening.

2. After washing the vehicle or after there is rain, be sure
to wipe off any water that is on the sunroof before
operating it.

F19A0770

LOCKING AND UNLOCKING

47

2

-------------------------------------------------------------------------------------------------------------------------------------------------------------

3. Do not try to operate the sunroof if it is frozen closed
(after snowfall or during extreme cold).

4. Do not sit on or place heavy luggage on the sunroof or
roof opening edge.

5. Do not apply any force that may cause damage to the
sunroof.

6. When waxing your vehicle, be careful not to put any
wax on the weatherstrip (black rubber) around the sun-
roof opening. If stained with wax, the weatherstrip
cannot maintain a weatherproof seal with the sunroof.

7. Release the switch when the sunroof has reached a
completely open or completely closed position.

THEFT-ALARM SYSTEM

The theft-alarm system is designed to provide protection
from unauthorized entry into the vehicle. This system is
operated in three stages: the first is the “armed” stage, the
second is the “alarm” stage, and third is the “disarmed”
stage. If triggered, the system provides both audible and
visual alarm signals.

Armed stage

Park the vehicle and stop the engine. Arm the system as
described below.

1. Remove the key from the ignition switch.

2. Make sure the trunk lid is locked.

F30A0010

Arm the system and leave.

48

LOCKING AND UNLOCKING

-------------------------------------------------------------------------------------------------------------------------------------------------------------

3. Lock the driver’s and the passenger’s door by using
the key, power door lock switch, or the remote keyless
transmitter.

After completion of the steps above, the theft-alarm
indicator (located in the instrument cluster) will illumi-
nate for approximately 20 seconds and then go out,
indicating that the system is armed.

NOTE
1. The system will be armed even if the trunk lid is
opened, but when the system is set, be sure that the trunk
lid is latched.

2. The system will be disarmed if, while the theft-alarm
indicator is illuminated, the driver’s door, the passenger’s
door is unlocked by using the key or keyless transmitter.

3. The system will be disarmed if, while the theft-alarm
indicator is illuminated, the ignition key is turned to the
“ON” or “ACC”.

4. The system will not be armed if a door is not com-
pletely closed. If this happens, rearm the system as
described above.

5. The trunk lid can only be unlocked by using the key or
the remote keyless transmitter without triggering or
disarming the system even after the system has been
armed. When it is locked, the system will be rearmed.

6. The system will be armed even if the trunk lid is open,
but when the system is set, be sure that the trunk lid is
latched.

F30A0210

LOCKING AND UNLOCKING

49

2

-------------------------------------------------------------------------------------------------------------------------------------------------------------

7. The driver should not arm the system until first
confirming that all passengers have left the vehicle. If the
driver arms the system while a passenger(s) in the
vehicle, the alarm may be activated when the passen-
ger(s) leave the vehicle.

Alarm stage

The alarm will be activated if any of the following occur
while the vehicle is parked and the system is armed.

1. The driver’s or passenger’s door is opened without
using the key or the remote keyless transmitter.

2. The trunk lid is opened without using the key or the
remote keyless transmitter.

TYPE OF ALARM
When the alarm is activated:

1. The headlights blink on and off for 3 minutes. After 3
minutes the headlights automatically shut off.

2. The horn will sound intermittently for 3 minutes.

NOTE

: The alarm will continue to operate for 3 minutes.

At the end of that period, the alarm will automatically
shut off to save battery power. The system will then be
rearmed until the proper disarming step is taken.

F30A0020

Horn sounds!
Headlights blink on and off!

50

LOCKING AND UNLOCKING

-------------------------------------------------------------------------------------------------------------------------------------------------------------

Alarm deactivation
The alarm can be deactivated in the following ways.

1. By turning the key (in the driver’s, passenger’s door or
the trunk lid) in either direction (toward lock or unlock).

2. By using the remote keyless transmitter to lock or
unlock the door or trunk lid.

Disarmed stage

The system will be disarmed when either of the following
steps are taken:

1. The front driver’s door, passenger’s door or the trunk
lid is unlocked by using the key or the remote keyless
transmitter.

2. The ignition key is turned to the “ACC” or “ON ”
position.

F30A0040T

Disarm....by key (or by keyless transmitter)

LOCKING AND UNLOCKING

51

2

-------------------------------------------------------------------------------------------------------------------------------------------------------------

3. If the UNLOCK switch is pressed when all doors are
closed and no door is opened within approximately 30
seconds, re-arming will automatically occur.

NOTE

: Once the system has been disarmed, it cannot be

rearmed except by repeating the arming procedure.

Testing the theft-alarm system

Use the following procedure to test the system:

1. Lower the driver’s window.

2. Arm the system as explained in “Armed stage”.

3. Make sure that the theft-alarm indicator illuminates
and goes off in approximately 20 seconds.

4. Wait a few seconds and then unlock the driver’s side
door by using the inside door lock knob and opening the
door.

5. Check to be sure that the horn sounds intermittently
and the headlights blink on and off when the door is
opened.

6. Disarm the system by unlocking the front driver’s
door, passenger’s door or the trunk lid by using the key
or the remote keyless transmitter.

NOTE

: To make sure the alarm sounds when the trunk

lid is opened, open the trunk lid by using the trunk lid
release lever.

52

LOCKING AND UNLOCKING

-------------------------------------------------------------------------------------------------------------------------------------------------------------


Content      ..     1      2      3      4      ..