Chrysler Town, Dodge Caravan. Manual - part 384


  Index      Chrysler     Chrysler TOWN & COUNTRY, VOYAGER, Dodge Caravan - service repair manual 2001-2007 year


Search            


Content   ..  382  383  384  385   ..


Chrysler Town, Dodge Caravan. Manual - part 384


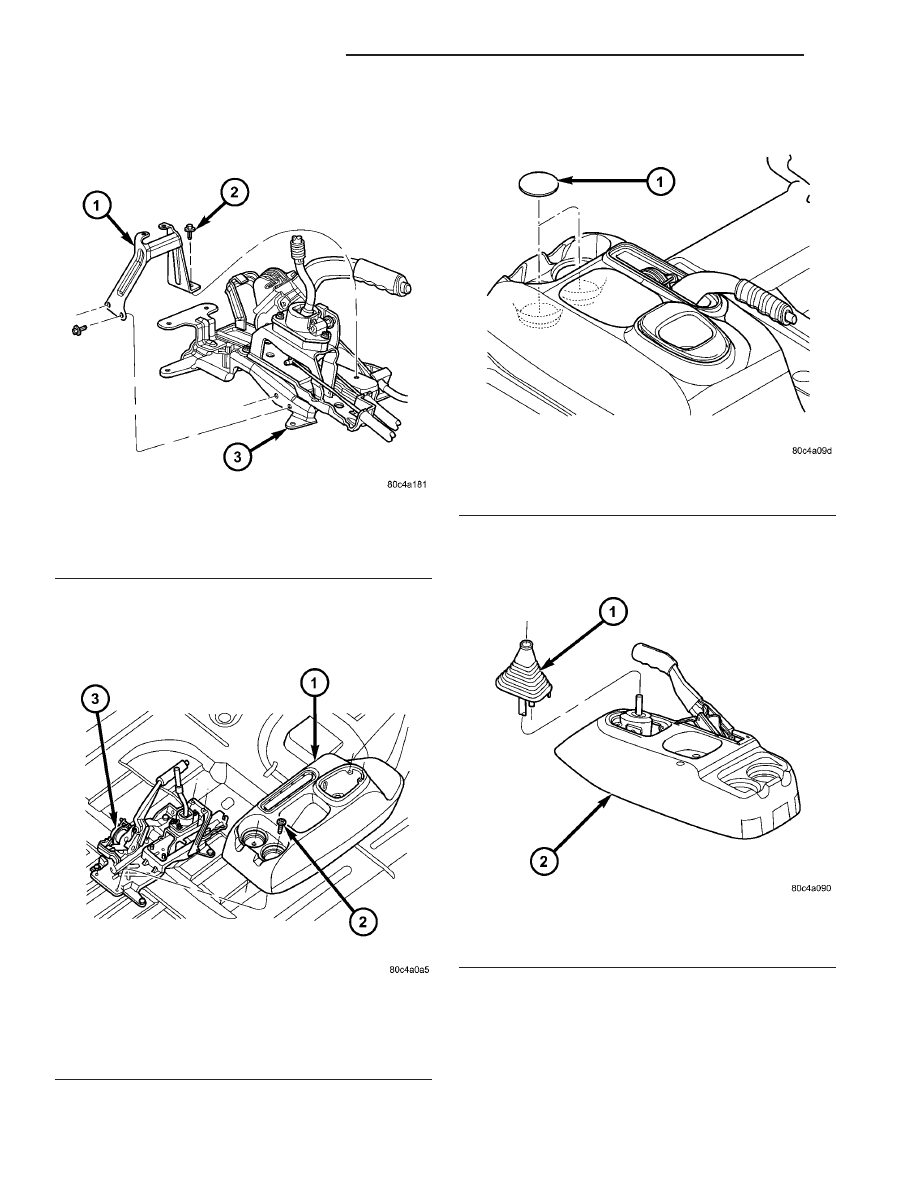
(11) Install center console support bracket (Fig.

179). Torque support bracket-to-gearshift mechanism
screws to 12 N·m (108 in. lbs.).

(12) Install center console assembly (Fig. 180).

Install and torque center console-to-gearshift mecha-
nism screws to 5 N·m (45 in. lbs.).

(13) Install cupholder plugs (Fig. 181).

(14) Install gearshift boot to console (Fig. 182).

Secure with three (3) retainer clips.

Fig. 179 Center Console Support Bracket

1 - BRACKET
2 - SCREW
3 - GEARSHIFT MECHANISM

Fig. 180 Center Console Removal/Installation (LHD

Shown — RHD Typical)

1 - CENTER CONSOLE
2 - SCREW (4)
3 - GEARSHIFT MECHANISM

Fig. 181 Cup Holder Plugs

1 - CUPHOLDER PLUG (2)

Fig. 182 Gearshift Boot Removal/Installation

1 - GEARSHIFT BOOT
2 - CENTER CONSOLE

21 - 86

T850 MANUAL TRANSAXLE

RS

GEARSHIFT CABLE - SELECTOR (Continued)

(15) Install gearshift knob to gearshift lever (Fig.

183). Orient shift pattern

1

4

-turn clockwise, push

down

and

rotate

1

4

-turn

counter-clockwise

and

release. Secure boot to knob.

(16) Connect battery negative cable.

GEARSHIFT KNOB

REMOVAL

(1) Separate gearshift boot from base of knob.
(2) Remove gearshift knob by pushing down and

rotating

1

4

-turn clockwise (Fig. 184).

INSTALLATION

(1) Install gearshift knob pattern

1

4

-turn clock-

wise, press down, and rotate

1

4

-turn counter clock-

wise (Fig. 184).

(2) Secure gearshift boot to base of knob.

GEARSHIFT MECHANISM

REMOVAL

(1) Disconnect battery negative cable.
(2) Remove gearshift knob by pushing down and

rotating

1

4

turn clock-wise (Fig. 185).

Fig. 183 Gearshift Knob Removal/Installation

1 - GEARSHIFT KNOB
2 - GEARSHIFT LEVER

Fig. 184 Gearshift Knob Removal/Installation

1 - GEARSHIFT KNOB
2 - GEARSHIFT LEVER

Fig. 185 Gearshift Knob Removal/Installation

1 - GEARSHIFT KNOB
2 - GEARSHIFT LEVER

RS

T850 MANUAL TRANSAXLE

21 - 87

GEARSHIFT CABLE - SELECTOR (Continued)

(3) Remove gearshift boot from center console by

disengaging at three (3) retaining clips (Fig. 186).

(4) Apply park brake to allow park brake handle to

clear center console upon removal.

(5) Remove two (2) cupholder bottom plugs (Fig.

187).

(6) Remove four (4) center console-to-gearshift

mechanism screws. Remove console assembly (Fig.
188).

(7) Remove center console support bracket (Fig.

189).

Fig. 186 Gearshift Boot Removal/Installation

1 - GEARSHIFT BOOT
2 - CENTER CONSOLE

Fig. 187 Cup Holder Plugs

1 - CUPHOLDER PLUG (2)

Fig. 188 Center Console Removal/Installation (LHD

Shown — RHD Typical)

1 - CENTER CONSOLE
2 - SCREW (4)
3 - GEARSHIFT MECHANISM

Fig. 189 Center Console Support Bracket

1 - BRACKET
2 - SCREW
3 - GEARSHIFT MECHANISM

21 - 88

T850 MANUAL TRANSAXLE

RS

GEARSHIFT MECHANISM (Continued)

(8) Remove crossover cable retainer clip (Fig. 190).

(9) Remove crossover cable from gearshift mecha-

nism (Fig. 191).

(10) Remove selector cable retainer clip (Fig. 192).
(11) Remove selector cable from gearshift mecha-

nism (Fig. 193).

(12) Remove four (4) gearshift mechanism-to-park

brake bracket nuts. Remove gearshift mechanism
from bracket (Fig. 194).

INSTALLATION

(1) Install gearshift mechanism to park brake

bracket (Fig. 195). Install and torque nuts to 12 N·m
(108 in. lbs.).

(2) Install selector cable to gearshift mechanism

(Fig. 196). Install retainer clip (Fig. 197).

Fig. 190 Crossover Cable Retainer Clip

1 - RETAINER CLIP
2 - CROSSOVER CABLE

Fig. 191 Crossover Cable at Gearshift Mechanism

1 - GEARSHIFT MECHANISM
2 - CROSSOVER CABLE

Fig. 192 Selector Cable Retainer Clip

1 - RETAINER CLIP

Fig. 193 Selector Cable at Gearshift Mechanism

1 - GEARSHIFT MECHANISM
2 - SELECTOR CABLE

RS

T850 MANUAL TRANSAXLE

21 - 89

GEARSHIFT MECHANISM (Continued)


Content   ..  382  383  384  385   ..