Chrysler Town, Dodge Caravan. Manual - part 53


  Index      Chrysler     Chrysler TOWN & COUNTRY, VOYAGER, Dodge Caravan - service repair manual 2001-2007 year


Search            


Content   ..  51  52  53  54   ..


Chrysler Town, Dodge Caravan. Manual - part 53


REMOVAL - PARKING BRAKE CABLE (LEFT
REAR)

(1) Raise vehicle on jackstands or centered on a

hoist. (Refer to LUBRICATION & MAINTENANCE/
HOISTING - STANDARD PROCEDURE).

(2) Remove rear tire and wheel assembly.
(3) Remove rear brake drum from the rear wheel

of the vehicle requiring service to the rear park
brake cable.

(4) Create slack in rear park brake cables by lock-

ing out the automatic adjuster as described here.
Grasp an exposed section of front park brake cable
near the equalizer and pull down on it. Then install
a pair of locking pliers on the cable just rearward of
the second body outrigger bracket (Fig. 98).

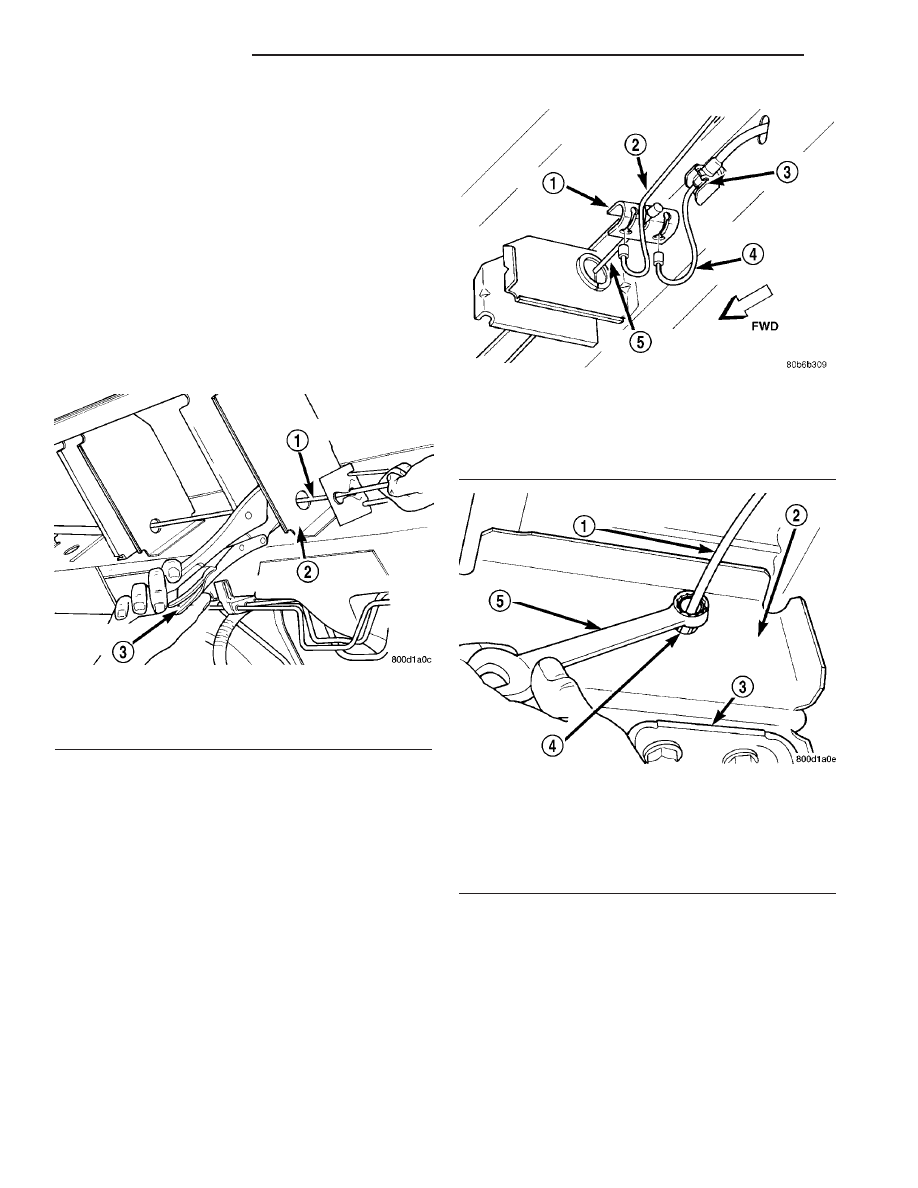
(5) Disconnect the left rear parking brake cable

from the parking brake cable equalizer (Fig. 99).

(6) To remove parking brake cable housing from

the body bracket, slide a 14 mm box end wrench over
retainer end compressing the three fingers (Fig. 100).
Alternate method is to use an aircraft type hose
clamp.

(7) Remove the brake shoes from the brake sup-

port plate. (Refer to 5 - BRAKES/HYDRAULIC/ME-
CHANICAL/BRAKE PADS/SHOES - REMOVAL).

(8) Disconnect parking brake cable from parking

brake actuator lever.

(9) Remove

the

parking

brake

cable

housing

retainer from the brake support plate using a 14mm
wrench to compress the retaining fingers (Fig. 101).

Fig. 98 Locked Out Park Brake Automatic Adjuster

1 - PARK BRAKE CABLE
2 - REAR BODY OUTRIGGER BRACKET
3 - LOCKING PLIERS

Fig. 99 Parking Brake Cables At Equalizer

1 - EQUALIZER
2 - LEFT REAR PARKING BRAKE CABLE
3 - LOCKING NUT
4 - INTERMEDIATE PARKING BRAKE CABLE
5 - FRONT PARKING BRAKE CABLE

Fig. 100 Parking Brake Cable Removal From Body

Bracket

1 - LEFT REAR PARK BRAKE CABLE
2 - BODY BRACKET
3 - LEAF SPRING MOUNTING BRACKET
4 - CABLE RETAINER
5 - 14MM BOX WRENCH

5 - 62

BRAKES - BASE

RS

CABLES - PARKING BRAKE (Continued)

INSTALLATION

INSTALLATION - PARKING BRAKE CABLE
(FRONT)

(1) Pass

front

parking

brake

cable

assembly

through hole in floor pan from the inside of the vehi-
cle.

(2) Pass cable strand button through the hole in

the lever (pedal) assembly bracket.

(3) Install cable retainer onto the park brake cable

and then install cable retainer into pedal assembly
bracket.

(4) Install the end of the park brake cable into the

retainer previously installed into the park brake
pedal bracket.

(5) Install cable strand button into the clevis on

the park brake pedal mechanism.

(6) Install the front park brake cable floor pan seal

into hole in floor pan. Seal is to be installed so the
flange on the seal is flush with the floor pan (Fig.
91). Fold carpeting back down on floor.

(7) Raise vehicle.
(8) Insert brake cable and housing into body out-

rigger bracket making certain that housing retainer
fingers lock the housing firmly into place (Fig. 90).

(9) Manually reset the automatic self-adjusting

mechanism tension of the parking brake lever (pedal)
assembly. (Refer to 5 - BRAKES - STANDARD PRO-
CEDURE).

(10) Assemble the park brake cables onto the park

brake cable equalizer (Fig. 89).

(11) Lower vehicle and apply the park brake pedal

1 time. This will seat the parking brake cables.

INSTALLATION - PARKING BRAKE CABLE
(INTERMEDIATE)

(1) Install the ends of the park brake cables

through the frame rails and into the side brackets.

(2) Install the locking nuts at each end of the cable

and securely tighten (Fig. 92) (Fig. 93).

(3) If the vehicle is a short-wheel-base model, it

will be necessary to reinstall the fuel tank to its nor-
mal mounting position. (Refer to 14 - FUEL SYS-
TEM/FUEL

DELIVERY/FUEL

TANK

-

INSTALLATION).

(4) Install the intermediate parking brake cable on

the cable connector at the right rear parking brake
cable (Fig. 93).

(5) Install the intermediate park brake cable on

the cable equalizer (Fig. 92).

(6) Remove the locking pliers from the front park

brake cable. This will activate the automatic adjuster
and correctly adjust the parking brake cables.

(7) Install and position the foam collar on the

parking brake cable to prevent it from rattling
against the vehicle’s floor.

(8) Lower the vehicle and apply the park brake

pedal 1 time, this will seat the park brake cables.

INSTALLATION - PARKING BRAKE CABLE
(RIGHT REAR)

(1) Install the rear parking brake cable in the

brake support plate. Insert cable housing retainer
into brake support plate making certain that cable
housing

retainer

fingers

lock

the

housing

and

retainer firmly into place.

(2) Attach the parking brake cable onto the park-

ing brake actuator lever.

(3) Install the brake shoes on the rear brake sup-

port plate. (Refer to 5 - BRAKES/HYDRAULIC/ME-
CHANICAL/BRAKE

PADS/SHOES

-

INSTALLATION).

(4) Insert cable housing retainer into body outrig-

ger bracket making certain that cable housing
retainer fingers lock the housing firmly into place.

(5) Connect the right rear parking brake cable to

the connector on the intermediate parking brake
cable (Fig. 95).

(6) Install the brake drum, then the wheel and tire

assembly.

(7) Remove the locking pliers from the front park

brake cable. This will automatically adjust the park
brake cables.

(8) Lower the vehicle.
(9) Apply and release park brake pedal 1 time.

This will seat the park brake cables.

Fig. 101 Removing Parking Brake Cable From Brake

Support Plate

1 - PARK BRAKE CABLE RETAINER
2 - PARK BRAKE CABLE
3 - 14MM BOX WRENCH
4 - BRAKE SUPPORT PLATE

RS

BRAKES - BASE

5 - 63

CABLES - PARKING BRAKE (Continued)

INSTALLATION - PARKING BRAKE CABLE
(LEFT REAR)

(1) Install the rear parking brake cable in the

brake support plate. Insert cable housing retainer
into brake support plate making certain that cable
housing

retainer

fingers

lock

the

housing

and

retainer firmly into place.

(2)

Attach the parking brake cable onto the park

brake actuator lever.

(3) Install the brake shoes on the rear brake sup-

port plate. (Refer to 5 - BRAKES/HYDRAULIC/ME-
CHANICAL/BRAKE

PADS/SHOES

-

INSTALLATION).

(4) Insert cable housing retainer into body outrig-

ger bracket making certain that cable housing
retainer fingers lock the housing firmly into place.

(5) Connect rear parking brake cable to the equal-

izer bracket (Fig. 99).

(6) Install brake drum, and wheel and tire assem-

bly.

(7) Remove the locking pliers from the front park

brake cable. This will automatically adjust the park
brake cables.

(8) Apply and release park brake pedal 1 time.

This will seat the park brake cables.

ADJUSTMENTS

ADJUSTMENT - PARKING BRAKE CABLES

The park brake cables on this vehicle have an

automatic self adjuster built into the park brake
pedal mechanism. When the foot operated park brake
pedal is in its released (upward most) position, a
clock spring automatically adjusts the park brake
cables. The park brake cables are adjusted (ten-
sioned) just enough to remove all the slack from the
cables. The automatic adjuster system will not over
adjust the cables causing rear brake drag.

Due to the automatic adjust feature of the park

brake pedal, adjustment of the parking brake cables
on these vehicles relies on proper drum brake and
park brake shoe adjustment. (Refer to 5 - BRAKES/
HYDRAULIC/MECHANICAL/DRUM

-

ADJUST-

MENTS) and (Refer to 5 - BRAKES/PARKING
BRAKE/SHOES - ADJUSTMENTS).

When the park brake pedal is applied the self

adjuster is by-passed and the pedal operates nor-
mally to engage the park brakes.

When a service procedure needs to be performed on

the park brake pedal or the park brake cables, the
automatic self adjuster can be manually locked out
by the service technician.

CABLES - PARKING BRAKE
(EXPORT)

REMOVAL - FRONT CABLE

(Refer to 5 - BRAKES - BASE/PARKING BRAKE/

LEVER - REMOVAL)

INSTALLATION - FRONT CABLE

(Refer to 5 - BRAKES - BASE/PARKING BRAKE/

LEVER - INSTALLATION)

LEVER - PARKING BRAKE

REMOVAL

(1) Manually release the automatic self-adjusting

mechanism tension of the parking brake lever (pedal)
assembly. (Refer to 5 - BRAKES/PARKING BRAKE -
STANDARD PROCEDURE).

(2) Disconnect negative (ground) cable from the

battery and isolate cable from battery terminal.

(3) Remove sill scuff plate from left door sill.
(4) Remove the left side kick panel.
(5) Remove the silencer panel under the instru-

ment panel.

(6) Remove the steering column cover from the

lower instrument panel.

(7) Remove the reinforcement from the lower

instrument panel.

(8) Remove the front parking brake cable from the

parking brake cable equalizer (Fig. 102).

(9) Remove tension from front park brake cable.

Tension is removed by releasing the locking pliers
from the front park brake cable.

Fig. 102 Parking Brake Cable Equalizer

1 - EQUALIZER
2 - LEFT REAR PARKING BRAKE CABLE
3 - LOCKING NUT
4 - INTERMEDIATE PARKING BRAKE CABLE
5 - FRONT PARKING BRAKE CABLE

5 - 64

BRAKES - BASE

RS

CABLES - PARKING BRAKE (Continued)

(10) Remove the 3 bolts mounting the wiring junc-

tion block to the instrument panel.

NOTE: When removing the lower mounting bolt,
push the park brake pedal down 5 clicks to access
the lower mounting bolt.

(11) Remove the lower bolt mounting the park

brake pedal to the body (Fig. 103).

(12) Remove the forward nut mounting the park

brake pedal to the body (Fig. 103).

(13) Remove the upper bolt mounting the park

brake pedal to the body (Fig. 103).

(14) Pull downward on front park brake cable

while rotating park brake pedal mechanism out from
behind junction block.

(15) Remove park brake pedal release link from

park brake mechanism.

(16) Remove the warning lamp ground switch con-

nector from the park brake pedal mechanism (Fig.
103).

(17) Remove front park brake cable button from

park brake pedal mechanism. Tap end housing for
front park brake cable out of park brake pedal mech-
anism.

INSTALLATION

(1) Install park brake cable end housing into park

brake pedal mechanism.

(2) Install cable retainer onto the park brake cable

strand and then install retainer into pedal bracket.

(3) Install cable strand button into the clevis on

the park brake pedal mechanism.

(4) Install wiring harness connector on warning

indicator lamp ground switch.

(5) Install the park brake release rod on the

release mechanism of the park brake pedal.

(6) Position the park brake pedal mechanism into

its installed position on the body of the vehicle.

(7) Loosely install the top bolt mounting the park

brake pedal mechanism to the body (Fig. 103).

(8) Loosely install the forward nut mounting the

park brake pedal mechanism to the body (Fig. 103).

(9) Loosely install the lower bolt mounting the

park brake pedal mechanism to the body (Fig. 103).

(10) Tighten pedal mechanism attaching bolts and

nut to 28 N·m (250 in. lbs.).

(11) Verify that the park brake pedal is in the fully

released (full up) position.

(12) Raise vehicle.
(13) Install the front park brake cable on the park

brake cable equalizer (Fig. 102).

NOTE: If the original lever assembly is being used,
the lever mechanism auto adjuster spring tension
will need to be reset. (Refer to 5 - BRAKES/PARK-
ING BRAKE - STANDARD PROCEDURE)

(14) Lower vehicle.
(15) Remove the lock-out pin (if a new lever has

been installed) from the automatic cable adjuster on
the park brake pedal mechanism.

(16) Install the electrical junction block on the

instrument panel.

(17) Install the reinforcement on the lower instru-

ment panel.

(18) Install the steering column lower cover on the

lower instrument panel.

(19) Install the silencer panel under the instru-

ment panel.

(20) Install the left side kick panel.
(21) Install the sill scuff plate on the lower sill of

the left door.

(22) Install the negative (ground) cable on the bat-

tery.

(23) Cycle the park brake pedal one time. This will

seat the park brake cables and will allow the auto-
matic self adjuster to properly tension the park brake
cables.

LEVER - PARKING BRAKE
(EXPORT)

REMOVAL - PARKING BRAKE LEVER AND
FRONT CABLE

(1) Raise vehicle. (Refer to LUBRICATION &

MAINTENANCE/HOISTING - STANDARD PROCE-
DURE)

(2) Grasp the exposed section of the front parking

brake cable and pull rearward on it. While holding

Fig. 103 PARKING BRAKE LEVER MOUNTING

1 - WIRE HARNESS CONNECTOR
2 - LEVER MECHANISM
3 - FRONT CABLE

RS

BRAKES - BASE

5 - 65

LEVER - PARKING BRAKE (Continued)


Content   ..  51  52  53  54   ..