Chrysler Town, Dodge Caravan. Manual - part 7
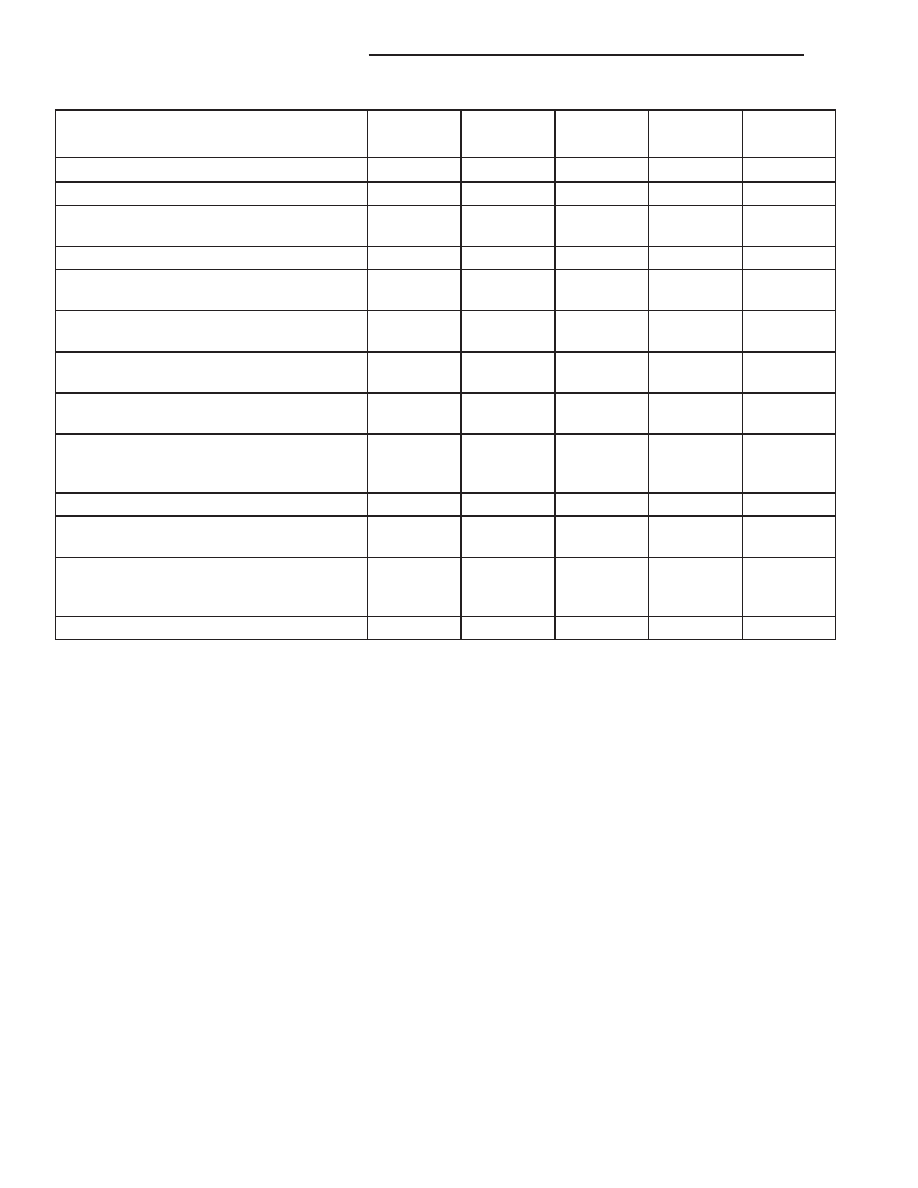
Miles
108, 000
111, 000
114, 000
117, 000
120, 000
(Kilometers)
(173 000)
(178 000)
(182 000)
(187 000)
(192 000)
Change engine oil and engine oil filter.
X
X
X
X
X
Inspect the brake linings.
X
X
Inspect the engine air cleaner filter, replace
if necessary. *
X
X
X
X
Replace the engine air cleaner filter.
X
Replace the spark plugs
on 2.4 liter
engines.
X
Replace the ignition cables
on 2.4 liter
engines.
X
Inspect and adjust the power steering pump
belt tension on 2.4 liter engines.
X
Inspect the generator belt on 2.4 liter
engines, replace if necessary.
X
Inspect engine accessory drive belts on 3.3
liter and 3.8 liter engines, replace if
necessary. ‡
X
Inspect the tie rod ends and boot seals.
X
Inspect the PCV valve
and replace as
necessary.*
X
Change the All Wheel Drive (AWD) power
transfer unit fluid. (See note at the end of
this chart)
X
Replace the air conditioning filter.
X
X
* This maintenance is recommended by the manu-
facture to the owner but is not required to maintain
the emissions warranty.
‡ This maintenance is not required if previously
replaced.
Inspection and service should also be performed
anytime a malfunction is observed or suspected.
Retain all receipts.
NOTE: The AWD power transfer unit fluid and the
AWD overrunning clutch/ rear carrier fluid must be
changed at the more frequent intervals shown in
schedule B if the vehicle is operated under any of
the conditions noted by a diamond at the beginning
of the schedule.
0 - 12
LUBRICATION & MAINTENANCE
RS
MAINTENANCE SCHEDULES (Continued)