Chrysler New Yorker. Manual - part 296


  Index      Chrysler     Chrysler New Yorker - service repair manual 1997-1999 year


Search            


Content   ..  294  295  296  297   ..


Chrysler New Yorker. Manual - part 296


Reinstall overdrive clutch and reverse clutch as

shown. Rechecking these clutch clearances is
not necessary, as they were set and approved
previously.

TRANSAXLE ASSEMBLE

To assemble the transaxle centerline, refer to the

following procedures.

To install the output bearing cups, use Special Tool

# 5050A.

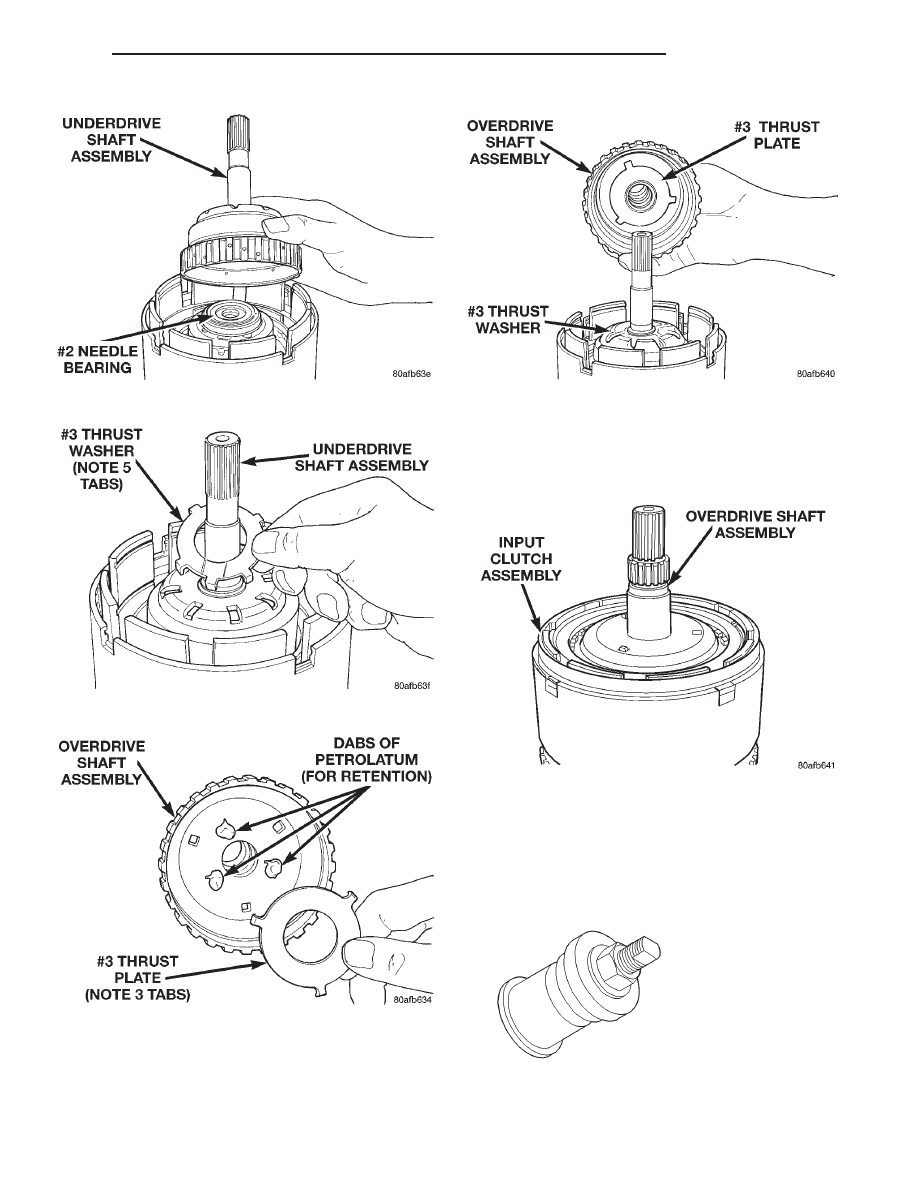
Fig. 197 Install Underdrive Shaft Assembly

Fig. 198 Install No. 3 Thrust Washer

Fig. 199 Install No. 3 Thrust Plate

Fig. 200 Install Overdrive Shaft Assembly

Fig. 201 Input Clutch Assembly

Fig. 202 Bearing Cup Installation Special Tool

5050A

300M

TRANSAXLE

21 - 57

DISASSEMBLY AND ASSEMBLY (Continued)

Fig. 203 Install Piston Retainer Gasket

Fig. 204 Install Piston Retainer

Fig. 205 Install Retainer Attaching Screws

Fig. 206 Install Low/Reverse Clutch Piston

Fig. 207 Guide Bracket Disassembled

Fig. 208 Guide Bracket

21 - 58

TRANSAXLE

300M

DISASSEMBLY AND ASSEMBLY (Continued)

CAUTION: When installing, be sure guide bracket
and split sleeve touch the rear of the transaxle
case.

Fig. 209 Install Guide Bracket Pivot Shaft

Fig. 210 Install Parking Sprag Pivot Retaining Screw

Fig. 211 Install Low/Reverse Piston Return Spring

Fig. 212 Low/Reverse Spring Compressor Tool

Fig. 213 Compressor Tool in Use

Fig. 214 Install Snap Ring

300M

TRANSAXLE

21 - 59

DISASSEMBLY AND ASSEMBLY (Continued)

OUTPUT SHAFT BEARING PRELOAD SHIM
SELECTION

When assembling, the output bearing preload must

be checked and/or adjusted if any of the following
items have been replaced:

• Output shaft (rear carrier assembly)

• Output shaft bearings

• Transaxle case

SHIM SELECTION

(1) Install rear output shaft bearing cone and spe-

cial tool 6618A (Fig. 216).

(2) Install special tool 6618A (Fig. 217). Lightly

tighten retaining screws. Screws should be below the
plate surface, but do not snug screws.

(3) Turn case over on arbor press so that the plate

is resting on the press base.

CAUTION: The output shaft will extend through the
hole of tool 6618A. Ensure your press table has
clearance for the output shaft.

(4) Install shim on output shaft (Fig. 218). Apply

small amount of petrolatum onto the shim to hold it
in place. Use the original shim as a starting point. If
original shim is not available, use the thickest shim

available. Refer to Output Shaft Rear Shim Chart for
available sizes.

(5) Install output shaft/rear carrier into rear bear-

ing. The shaft must be pressed into position. Use spe-
cial tool MD-998911 (Disc) and C- 4171 and C4171-2
(Handle) to press shaft into rear bearing (Fig. 219).

CAUTION: Do not reuse old transfer shaft nut or
output shaft nut because the removed stake weak-
ens the nut flange.

(6) Using special tools 6497 and 6498, install new

output shaft nut. Do not reuse old output shaft nut.
Tighten new output shaft nut to 271 N·m (200 ft.
lbs.).

(7) Check the turning torque of the output shaft

(Fig. 220). The shaft should have 1 to 8 in. lbs. of
turning torque. If the turning torque is higher than
8 in. lbs., install a thicker shim. If the turning torque
is less than 1 in. lb., install a thinner shim. Make
sure there is no end play.

Fig. 216 Bearing Installation

Fig. 217 Special Tool Installed

Fig. 215 Install Rear Carrier Front Bearing Cone

21 - 60

TRANSAXLE

300M

DISASSEMBLY AND ASSEMBLY (Continued)


Content   ..  294  295  296  297   ..