Chrysler Crossfire. Manual - part 250


  Index      Chrysler     Chrysler Crossfire - service repair manual 2005 year


Search            


Content   ..  248  249  250  251   ..


Chrysler Crossfire. Manual - part 250


*LEFT FRONT TURN LAMP INOPERATIVE (CONTINUED)

3.

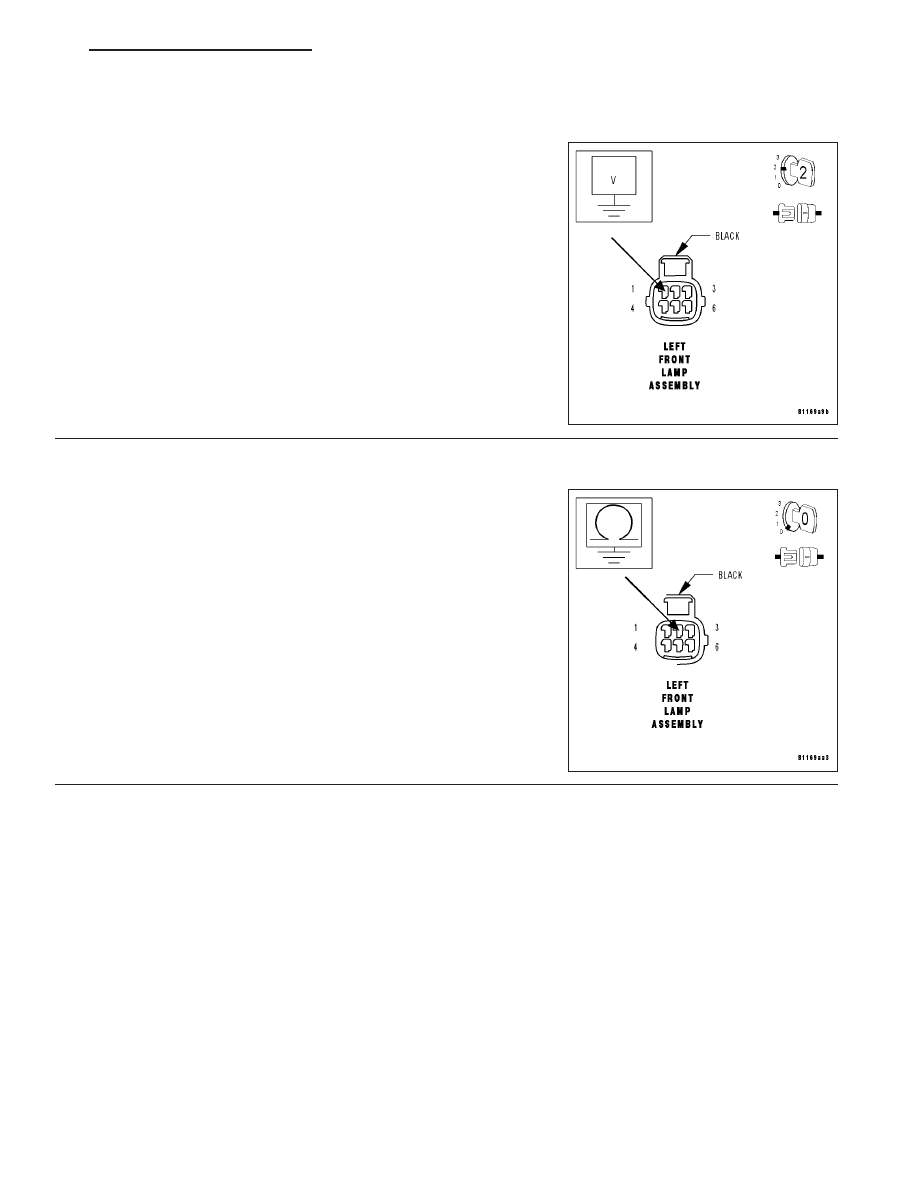
MEASURE LEFT FRONT TURN LAMP VOLTAGE

Connect the Multi-Function Switch harness connector.

Turn the ignition on.

Turn the left turn signal on.

Measure the voltage between the Left Front Lamp Assembly harness
connector cavity 1 and ground.

Is voltage present?

Yes

>> Go to 4

No

>> Replace the Multi-Function Switch. (Refer to 8 - ELECTRI-

CAL/LAMPS/LIGHTING - EXTERIOR/MULTI-FUNCTION
SWITCH - REMOVAL).

Perform BODY VERIFICATION TEST.

4.

MEASURE LEFT FRONT TURN LAMP GROUND CIRCUIT RESISTANCE

Turn the ignition off.

Turn the left turn signal off.

Measure the resistance between the Left Front Lamp Assembly har-
ness connector cavity 2 and ground.

Is the resistance below 5.0 ohms?

Yes

>> Ensure that the Left Front Turn Lamp bulb is installed

properly and replace the bulb socket if necessary.

Perform BODY VERIFICATION TEST.

No

>> Repair the Left Front Lamp Assembly ground circuit for an

open.

Perform BODY VERIFICATION TEST.

ZH

LAMPS/LIGHTING - EXTERIOR - ELECTRICAL DIAGNOSTICS

8L - 13

*RIGHT PARK LAMP INOPERATIVE

8L - 14

LAMPS/LIGHTING - EXTERIOR - ELECTRICAL DIAGNOSTICS

ZH

*RIGHT PARK LAMP INOPERATIVE (CONTINUED)

POSSIBLE CAUSES

FUSED B(+) CIRCUIT OPEN

GROUND CIRCUIT OPEN

RIGHT PARK LAMP BULB

For a complete Exterior Lamps Circuit Diagram, (Refer to 8 - ELECTRICAL/LAMPS/LIGHTING - EXTERIOR -
SCHEMATICS AND DIAGRAMS).

Diagnostic Test

1.

INSPECT THE RIGHT PARK LAMP BULB

Note: If the right front side marker lamp, the right park lamp, the right rear side marker lamp, and the right
tail lamp are inoperative, inspect Fuse 7 located in the Illumination Control Module/IP Fuse Block. If the fuse
is open, repair the cause of the open fuse before continuing.
Turn the ignition off.

Remove the Right Park Lamp bulb and inspect for an open filament.

Is the Bulb filament open?

Yes

>> Replace the Right Park Lamp bulb. (Refer to 8 - ELECTRICAL/LAMPS/LIGHTING - EXTERIOR/

MARKER LAMP - REMOVAL).

Perform BODY VERIFICATION TEST.

No

>> Go to 2

2.

MEASURE FUSED B(+) CIRCUIT RESISTANCE

Disconnect the Right Park Lamp harness connector.

Disconnect the Illumination Control Module harness connector.

Note: Check connectors - Clean/repair as necessary.
Measure the resistance between the Right Park Lamp harness con-
nector and the Illumination Control Module harness connector.

Is the resistance below 5.0 ohms?

Yes

>> Go to 3

No

>> Repair the Fused B(+) circuit for an open between the

Right Park Lamp and the Illumination Control Module.

Perform BODY VERIFICATION TEST.

ZH

LAMPS/LIGHTING - EXTERIOR - ELECTRICAL DIAGNOSTICS

8L - 15

*RIGHT PARK LAMP INOPERATIVE (CONTINUED)

3.

MEASURE RIGHT PARK LAMP VOLTAGE

Connect the Illumination Control Module harness connector.

Turn the ignition on.

Turn the park lamps on.

Measure the voltage between the Right Park Lamp harness connector
cavity 2 and ground.

Is voltage present?

Yes

>> Go to 4

No

>> Replace the Illumination Control Module. (Refer to 8 -

ELECTRICAL/LAMPS/LIGHTING

-

EXTERIOR/HEAD-

LAMP SWITCH - REMOVAL).

Perform BODY VERIFICATION TEST.

4.

MEASURE RIGHT PARK LAMP GROUND CIRCUIT RESISTANCE

Turn the ignition off.

Turn the park lamps off.

Measure the resistance between the Right Park Lamp harness con-
nector cavity 1 and ground.

Is the resistance below 5.0 ohms?

Yes

>> Ensure that the Right Park Lamp bulb is installed properly

and replace the bulb socket if necessary.

Perform BODY VERIFICATION TEST.

No

>> Repair the Right Park Lamp ground circuit for an open.

Perform BODY VERIFICATION TEST.

8L - 16

LAMPS/LIGHTING - EXTERIOR - ELECTRICAL DIAGNOSTICS

ZH


Content   ..  248  249  250  251   ..