Chrysler 300/300 Touring/300C, Dodge Magnum. Manual - part 710


  Index      Chrysler     Chrysler 300/300 Touring/300C, Dodge Magnum - service repair manual


Search            


Content   ..  708  709  710  711   ..


Chrysler 300/300 Touring/300C, Dodge Magnum. Manual - part 710


13.

CHECK FOR DTC B1B8E-DRIVER SEAT TRACK POSITION SENSOR CIRCUIT HIGH WITH DRIVER
SEAT TRACK POSITION SENSOR DISCONNECTED

WARNING: To avoid personal injury or death, turn the ignition off, disconnect the battery and wait two min-
utes before proceeding.
Disconnect the Driver Seat Track Position Sensor connector.

WARNING: To avoid personal injury or death, turn the ignition on, then reconnect the battery.
Wait two minutes, and then with the scan tool, read ORC DTCs.

Does the scan tool display: B1B8E-DRIVER SEAT TRACK POSITION SENSOR CIRCUIT HIGH?

Yes

>> Go To 14

No

>>

WARNING: To avoid personal injury or death, turn the ignition off, disconnect the battery and wait two min-
utes before proceeding.Replace the Driver Seat Track Position Sensor in accordance with the service infor-
mation.

Perform the ORC VERIFICATION TEST-VER 1.

14.

CHECK (R261) SEAT POSITION SENSOR DATA-DRIVER CIRCUIT AND (R263) SEAT POSITION
SENSOR VOLTAGE-DRIVER CIRCUIT FOR A SHORT TO VOLTAGE

WARNING: To avoid personal injury or death, turn the ignition off,
disconnect the battery and wait two minutes before proceeding.
Disconnect the ORC C1 connector.

WARNING: To avoid personal injury or death, turn the ignition on,
then reconnect the battery.
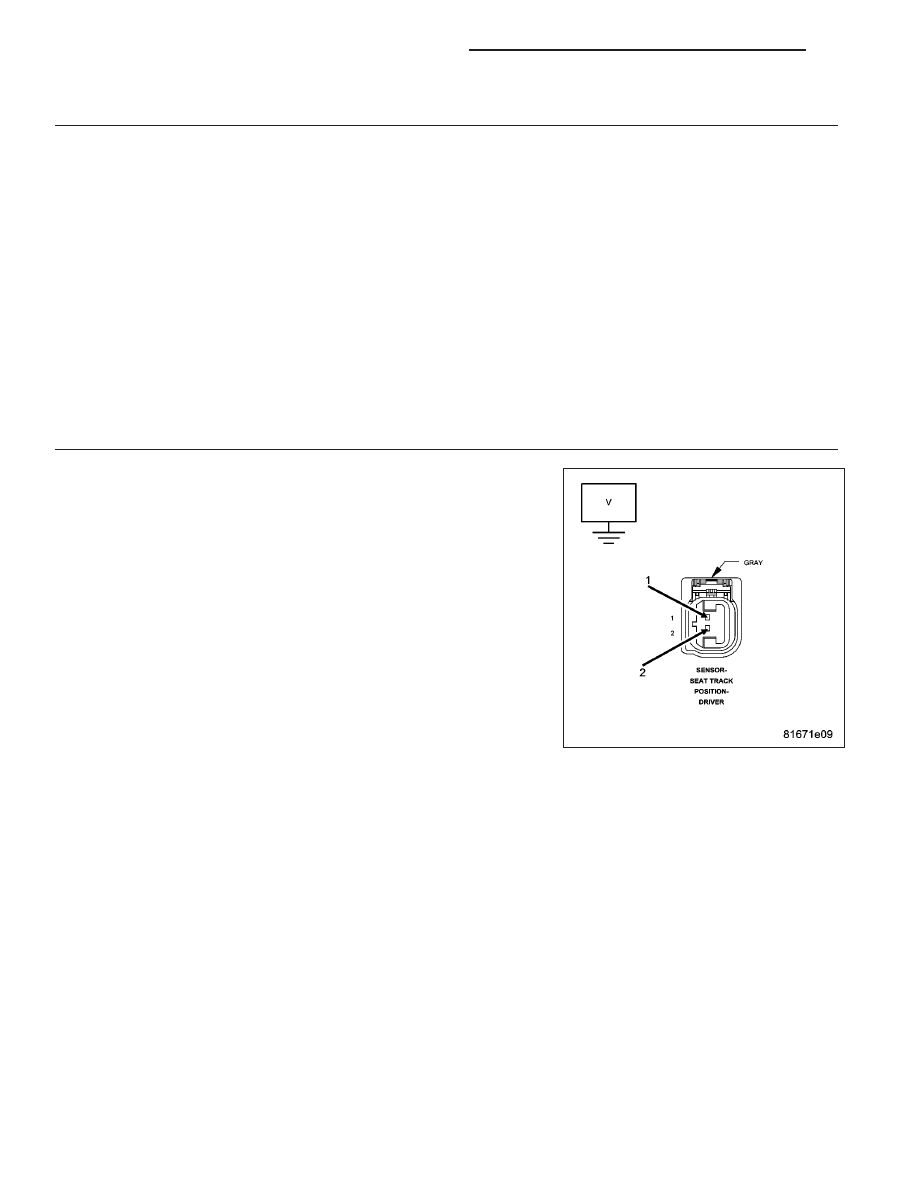
Measure the voltage of the (R261) Seat Position Sensor Data-Driver cir-
cuit at the Driver Seat Track Position Sensor connector.

Measure the voltage of the (R263) Seat Position Sensor Voltage-Driver
circuit at the Driver Seat Track Position Sensor connector.

Is the voltage above 0.2 volts on either circuit?

Yes

>>

NOTE: Do not attempt to repair the Seat Harness. Replace the Seat
Harness if the condition inspecting or testing for is present in the
Seat Harness.

WARNING: To avoid personal injury or death, turn the ignition off,
disconnect the battery and wait two minutes before proceeding.Replace the Driver Seat Harness in accor-
dance with the Service Information.

Perform the ORC VERIFICATION TEST-VER 1.

No

>> Go To 15

8O - 246

RESTRAINTS - ELECTRICAL DIAGNOSTICS

LX

15.

CHECK (R261) SEAT POSITION SENSOR DATA-DRIVER CIRCUIT FOR A SHORT TO (R263) SEAT
POSITION SENSOR VOLTAGE-DRIVER CIRCUIT

WARNING: To avoid personal injury or death, turn the ignition off,
disconnect the battery and wait two minutes before proceeding.
Measure the resistance between the (R261) Seat Position Sensor Data-
Driver circuit and the (R263) Seat Position Sensor Voltage-Driver circuit
in the Driver Seat Track Position Sensor connector.

Is the resistance below 10k ohms?

Yes

>>

NOTE: Do not attempt to repair the Seat Harness. Replace the Seat
Harness if the condition inspecting or testing for is present in the
Seat Harness.

Replace the Driver Seat Harness in accordance with the ser-
vice information.

Perform the ORC VERIFICATION TEST-VER 1.

No

>> Replace the ORC in accordance with the Service information.

Perform the ORC VERIFICATION TEST-VER 1.

16.

TEST FOR AN INTERMITTENT CONDITION

With the scan tool, record and erase all DTC’s from the OCM.

If any ACTIVE codes are present they must be resolved before diagnosing any stored codes.

WARNING: To avoid personal injury or death, turn the ignition off, disconnect the battery and wait two min-
utes before proceeding.
Using the wiring diagram/schematic as a guide, inspect the wiring and connectors.

Look for chafed, pierced, pinched, or partially broken wires and broken, bent, pushed out, spread, corroded, or con-
taminated terminals.

The following additional checks may assist you in identifying a possible intermittent problem.

Reconnect any disconnected components and harness connector.

WARNING: To avoid personal injury or death, turn the ignition on, then reconnect the battery.
With the scan tool monitor active codes as you work through the following steps.

WARNING: To avoid personal injury or death, maintain a safe distance from all airbags while performing the
following steps.
Wiggle the wiring harness and connectors of the related airbag circuit or component.

If only stored codes return continue the test until the problem area has been isolated.

In the previous steps you have attempted to recreate the conditions responsible for setting active DTC in question.

Are any ACTIVE DTCs present?

Yes

>> Select the appropriate symptom from Symptom List.

No

>> No problem found at this time. Erase all codes before returning vehicle to customer.

LX

RESTRAINTS - ELECTRICAL DIAGNOSTICS

8O - 247

B1B91-DRIVER SEAT TRACK POSITION SENSOR CONFIGURATION MISMATCH

For a complete wiring diagram Refer to Section 8W.

8O - 248

RESTRAINTS - ELECTRICAL DIAGNOSTICS

LX

When Monitored:
With the ignition on the OCM monitors the Seat Track Position Sensors circuits.

Set Condition:
If the module detects current on the Seat Track Position Sensors circuits and the module is not configured for
STPS.

Possible Causes

SENSORS

WIRING

OCCUPANT CLASSIFICATION MODULE (OCM)

OCCUPANT RESTRAINT CONTROLLER (ORC)

Diagnostic Test

1.

IDENTIFYING VEHICLE EQUIPMENT

NOTE: Ensure the battery is fully charged.

NOTE: The Seat Track Position Sensor(s) will be wired to the Occupant Restraint Controller (ORC) if the
vehicle is not equipped with the Occupant Classification Module (OCM).
Turn the ignition on.

With the scan tool, read ORC and if equipped OCM active DTCs.

Select the module reporting the Active Seat Track Position Sensor DTC(s)

ORC

>> Go To 5

OCM

Go To Diagnostic Test

2.

CHECK FOR ACTIVE INTERNAL FAULTS, IGNITION FAULTS, AND BATTERY FAULTS IN THE OCCUPANT
CLASSIFICATION MODULE (OCM)

With the scan tool, read Occupant Classification Module (OCM) DTCs.

Does the scan tool display any active DTCs relating to internal faults, ignition faults, or battery faults?

Yes

>> Diagnose and repair the DTCs. Refer to the Table of Contents in this Section for a complete list of

symptoms.

No

>> Go To 3

3.

VERIFY THAT B1B91-DRIVER SEAT TRACK POSITION SENSOR CONFIGURATION MISMATCH IS ACTIVE

Turn the ignition off, wait 10 seconds and then turn the ignition on.

Wait 2 minutes, and then with the scan tool, read OCM DTCs.

Does the scan tool display active: B1B91-DRIVER SEAT TRACK POSITION SENSOR CONFIGURATION
MISMATCH?

Yes

>> Go To 4

No

>> Perform the OCS VERIFICATION TEST-VER. 1

LX

RESTRAINTS - ELECTRICAL DIAGNOSTICS

8O - 249


Content   ..  708  709  710  711   ..