Chrysler 300/300 Touring/300C, Dodge Magnum. Manual - part 524


  Index      Chrysler     Chrysler 300/300 Touring/300C, Dodge Magnum - service repair manual


Search            


Content   ..  522  523  524  525   ..


Chrysler 300/300 Touring/300C, Dodge Magnum. Manual - part 524


1. Remove the switch from the vehicle. (Refer to 8 - ELECTRICAL/LAMPS/LIGHTING - EXTERIOR/STOP LAMP

SWITCH - REMOVAL)

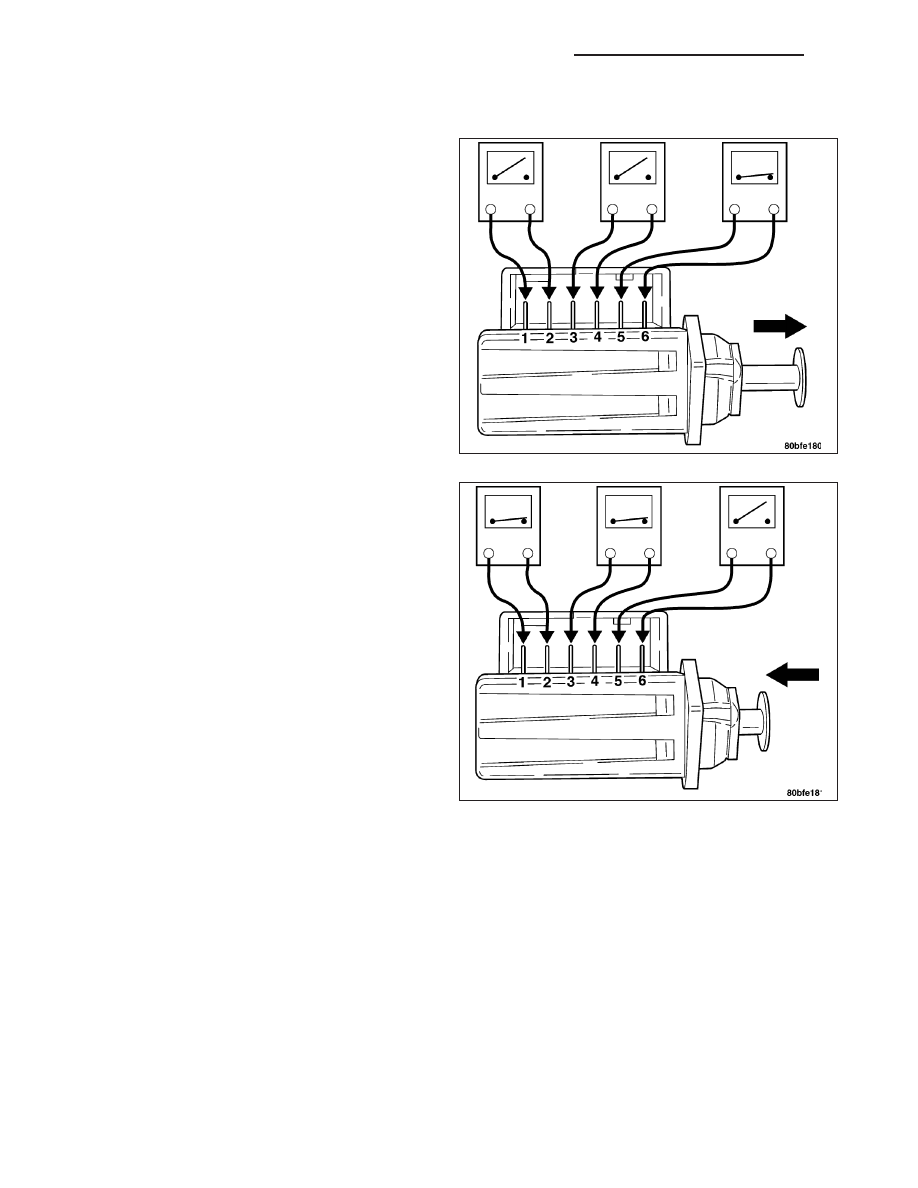
2. With the switch in the released position (plunger

extended), use an ohmmeter to test each of the
three internal switches as shown. You should
achieve the results as indicated in the figure.

3. Gently push the plunger on the stop lamp switch in

until it stops.

4. With the switch in the depressed position (plunger

pushed in), use an ohmmeter to test each of the
three internal switches as shown. You should
achieve the results as indicated in the figure.

If you do not achieve the results as indicated in both
figures, the switch is faulty and must be replaced.

5. Install the switch in the vehicle. (Refer to 8 - ELEC-

TRICAL/LAMPS/LIGHTING

-

EXTERIOR/STOP

LAMP SWITCH - INSTALLATION)

8L - 126

LAMPS/LIGHTING - EXTERIOR - SERVICE INFORMATION

LX

REMOVAL

1. Depress and hold the brake pedal.

2. Remove the stop lamp switch (2) from it’s bracket

on the brake pedal assembly (6). To do so, rotate
the stop lamp switch in a counterclockwise direc-
tion approximately 30 degrees from its proper
mounting position. Pull the switch rearward and
remove it from its mounting bracket.

3. Disconnect the wiring harness connector (1) from

the switch.

INSTALLATION

NOTE: Prior to installing the stop lamp switch into its bracket, the plunger must be moved to its fully
extended position using the procedure described in Step 1.

1. Hold the stop lamp switch firmly in one hand. Using your other hand, pull outward on the plunger of the switch

until it has ratcheted out to its fully extended position.

2. Connect the wiring harness connector (1) to the

stop lamp switch (2).

3. Mount the stop lamp switch into the bracket on the

brake pedal assembly (6) as follows: Depress the
brake pedal as far down as possible. Install the
switch in its bracket by aligning the index key on
switch with the notch in the square mounting hole
of the mounting bracket. Once the switch is fully
seated, rotate the switch clockwise approximately
30 degrees to lock the switch into the bracket.

CAUTION: Do not use excessive force when pull-
ing back on the brake pedal to adjust the stop
lamp switch. If to much force is used, damage to
the stop lamp switch or striker can result.

4. Gently pull back on brake pedal until the pedal

stops moving. This will cause the switch plunger to
ratchet backward to the correct position.

5. Check for proper operation of the brake lamps and

speed control.

LX

LAMPS/LIGHTING - EXTERIOR - SERVICE INFORMATION

8L - 127

ADJUSTMENTS

STOP LAMP SWITCH ADJUSTMENT

1. Depress and hold the brake pedal.

2. Remove the stop switch from its bracket. To do so, rotate the stop lamp switch in a counterclockwise direction

approximately 30 degrees from its proper mounting position. Pull the switch rearward and remove it from it’s
mounting bracket.

3. Hold the stop lamp switch firmly in one hand. Using your other hand, pull outward on the plunger of the switch

until it has ratcheted out to its fully extended position.

4. Mount the stop lamp switch into the bracket as follows: Depress the brake pedal as far down as possible. Install

the switch in its bracket by aligning the index key on switch with the notch in the square mounting hole of the
mounting bracket. Once the switch is fully seated, rotate the switch clockwise approximately 30 degrees to lock
the switch into the bracket.

CAUTION: Do not use excessive force when pulling back on the brake pedal to adjust the stop lamp switch.
If to much force is used, damage to the stop lamp switch or striker can result.

5. Gently pull back on brake pedal until the pedal stops moving. This will cause the switch plunger to ratchet back-

ward to the correct position.

6. Check for proper operation of the brake lamps and speed control.

8L - 128

LAMPS/LIGHTING - EXTERIOR - SERVICE INFORMATION

LX

TAIL LAMP UNIT

REMOVAL

SEDAN

1. Disconnect and isolate the battery negative cable.

2. From inside the trunk, peel back the trunk trim and

disconnect the electrical connector.

3. Remove the three plastic wing nuts (3).

4. Pull the tail lamp unit (1) straight out of the rear of

the quarter trim panel.

LX

LAMPS/LIGHTING - EXTERIOR - SERVICE INFORMATION

8L - 129


Content   ..  522  523  524  525   ..