Chrysler 300/300 Touring/300C, Dodge Magnum. Manual - part 1959


  Index      Chrysler     Chrysler 300/300 Touring/300C, Dodge Magnum - service repair manual


Search            


Content   ..  1957  1958  1959  1960   ..


Chrysler 300/300 Touring/300C, Dodge Magnum. Manual - part 1959


DISASSEMBLY

1. Remove electrohydraulic unit from the vehicle.

(Refer

to

21

-

TRANSMISSION/AUTOMATIC

TRANSMISSION - NAG1/ELECTROHYDRAULIC
UNIT - REMOVAL)

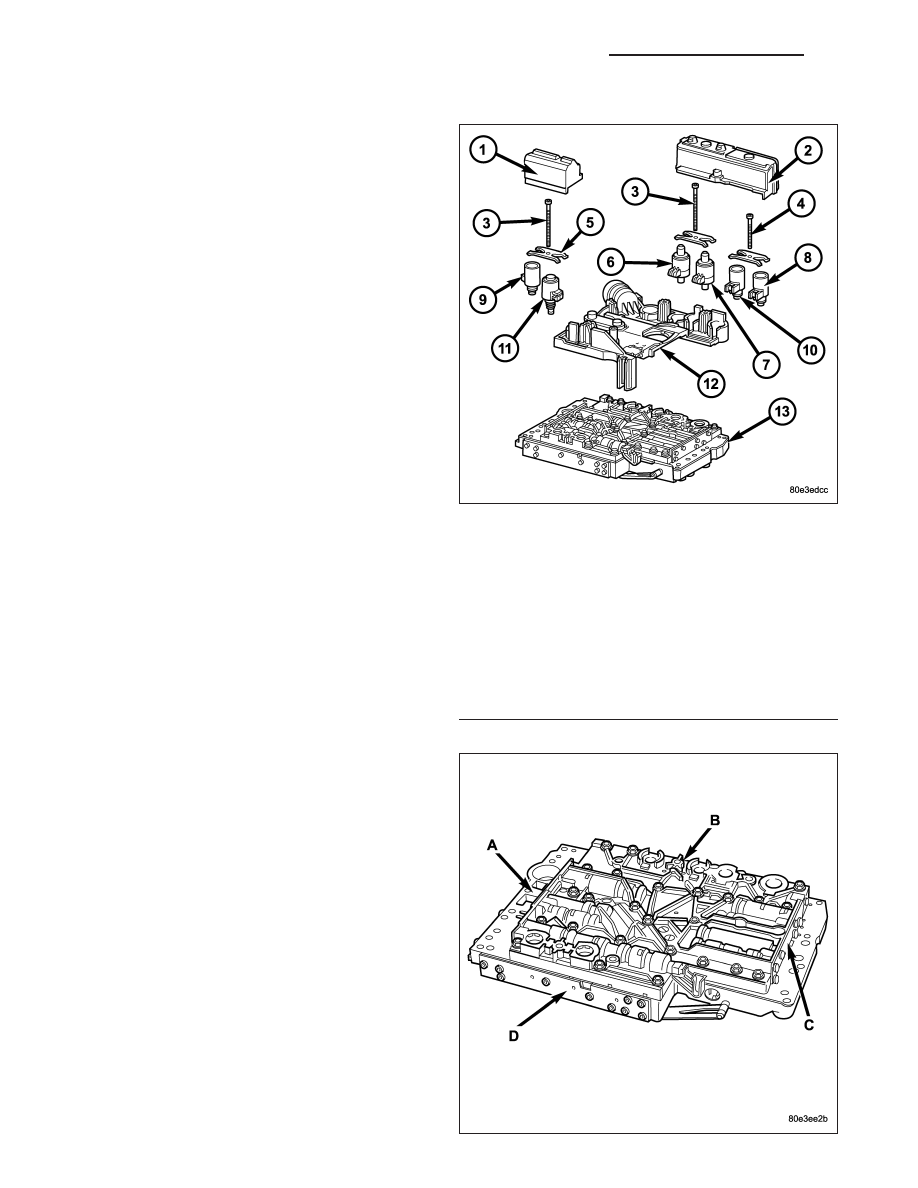
2. Remove solenoid caps (1, 2).

3. Unscrew Torx

T

socket bolts (3, 4).

NOTE: Pay attention to the different lengths of the
Torx

T

socket bolts.

4. Remove leaf springs (5).

5. Withdraw solenoid valves (6 - 11) from shift plate

(13).

NOTE: Check O-rings on solenoid valves for dam-
age and replace if necessary.

6. Bend away retaining lug on stiffening rib on trans-

mission oil temperature sensor.

7. Remove electrohydraulic control module (12) from

the shift plate (13).

8. Note the locations of the major shift valve group

components for assembly reference.

A - Operating and Lubricating Pressure Regulating
valves and 2-3 Overlap valve

B - 1-2/4-5 Shift Group and Shift, Shift Valve, and
Regulating Valve Pressure Regulating Valves

C - 3-4 Shift Group

D - 2-3 Shift Group, TCC Lock-up, and B2 Regulat-
ing Valves

Electrical Unit Components

1 - SOLENOID CAP
2 - SOLENOID CAP
3 - BOLT - M6X32
4 - BOLT - M6X30
5 - LEAF SPRING
6 - MODULATING PRESSURE REGULATING SOLENOID VALVE
7 - SHIFT PRESSURE REGULATING SOLENOID
8 - 3-4 SHIFT SOLENOID
9 - TORQUE CONVERTER LOCK-UP SOLENOID
10 - 1-2/4-5 SHIFT SOLENOID
11 - 2-3 SHIFT SOLENOID
12 - ELECTRICHYDRAULIC CONTROL MODULE
13 - SHIFT PLATE

21 - 370

AUTOMATIC TRANSMISSION NAG1 - SERVICE INFORMATION

LX

NOTE: Pay great attention to cleanliness for all
work on the shift plate. Fluffy cloths must not be
used. Leather cloths are particularly good. After
dismantling, all parts must be washed and blown
out with compressed-air, noting that parts may be
blown away.

9. Unbolt leaf spring (5).

10. Unscrew Torx

T

bolts (1).

11. Remove valve housing (2) from valve body (4).

12. Remove sealing plate (3).

13. Remove the strainers (1) for the modulating pres-

sure and shift pressure control solenoid valves
from the valve housing.

14. Remove the strainer (1) in the inlet to torque con-

verter lock-up control solenoid valve.

LX

AUTOMATIC TRANSMISSION NAG1 - SERVICE INFORMATION

21 - 371

NOTE: A total of 12 valve balls are located in the
valve body, four made from plastic (4) and eight
from steel (1, 3).

15. Note the location of all check balls (1, 3, 4) and

the central strainer (2) for re-installation. Remove
all check balls (1, 3, 4) and the central strainer
(2).

16. Remove the screws holding the side covers to the valve body and valve housing.

17. Remove all valves and springs from the valve body (1). Check all valves for ease of movement and shavings.

NOTE: The sleeves and pistons of the overlap regulating valves must not be mixed up.

Valve Body Components

1 - VALVE BODY

8 - SHIFT VALVE PRESSURE REGULATING VALVE

2 - 1-2/4-5 COMMAND VALVE

9 - B2 SHIFT VALVE

3 - 1-2/4-5 HOLDING PRESSURE SHIFT VALVE

10 - 2-3 HOLDING PRESSURE SHIFT VALVE

4 - 1-2/4-5 SHIFT PRESSURE SHIFT VALVE

11 - 2-3 COMMAND VALVE

5 - 1-2/4-5 OVERLAP REGULATING VALVE, SLEEVE, AND PISTON

12 - 2-3 SHIFT PRESSURE SHIFT VALVE

6 - SHIFT PRESSURE REGULATING VALVE

13 - TCC LOCK-UP REGULATING VALVE

7 - REGULATING VALVE PRESSURE REGULATING VALVE

14 - TCC DAMPER VALVE - if equipped

21 - 372

AUTOMATIC TRANSMISSION NAG1 - SERVICE INFORMATION

LX

18. Remove all valves and springs from the valve housing (2). Check all valves for ease of movement and shav-

ings.

19. Remove the pressure supply valve (1) from the

valve body.

ASSEMBLY

NOTE: Pay great attention to cleanliness for all work on the shift plate. Fluffy cloths must not be used.
Leather cloths are particularly good. After dismantling, all parts must be washed and blown out with com-
pressed-air, noting that parts may be blown away.

Valve Housing Components

1 - 2-3 OVERLAP REGULATING VALVE, SLEEVE, AND PISTON

6 - 3-4 SHIFT PRESSURE SHIFT VALVE

2 - VALVE HOUSING

7 - 3-4 OVERLAP REGULATING VALVE, SLEEVE, AND PISTON

3 - SELECTOR VALVE

8 - OPERATING PRESSURE REGULATING VALVE

4 - 3-4 HOLDING PRESSURE SHIFT VALVE

9 - LUBRICATING PRESSURE REGULATING VALVE

5 - 3-4 COMMAND VALVE

LX

AUTOMATIC TRANSMISSION NAG1 - SERVICE INFORMATION

21 - 373


Content   ..  1957  1958  1959  1960   ..