Chrysler 300/300 Touring/300C, Dodge Magnum. Manual - part 1947


  Index      Chrysler     Chrysler 300/300 Touring/300C, Dodge Magnum - service repair manual


Search            


Content   ..  1945  1946  1947  1948   ..


Chrysler 300/300 Touring/300C, Dodge Magnum. Manual - part 1947


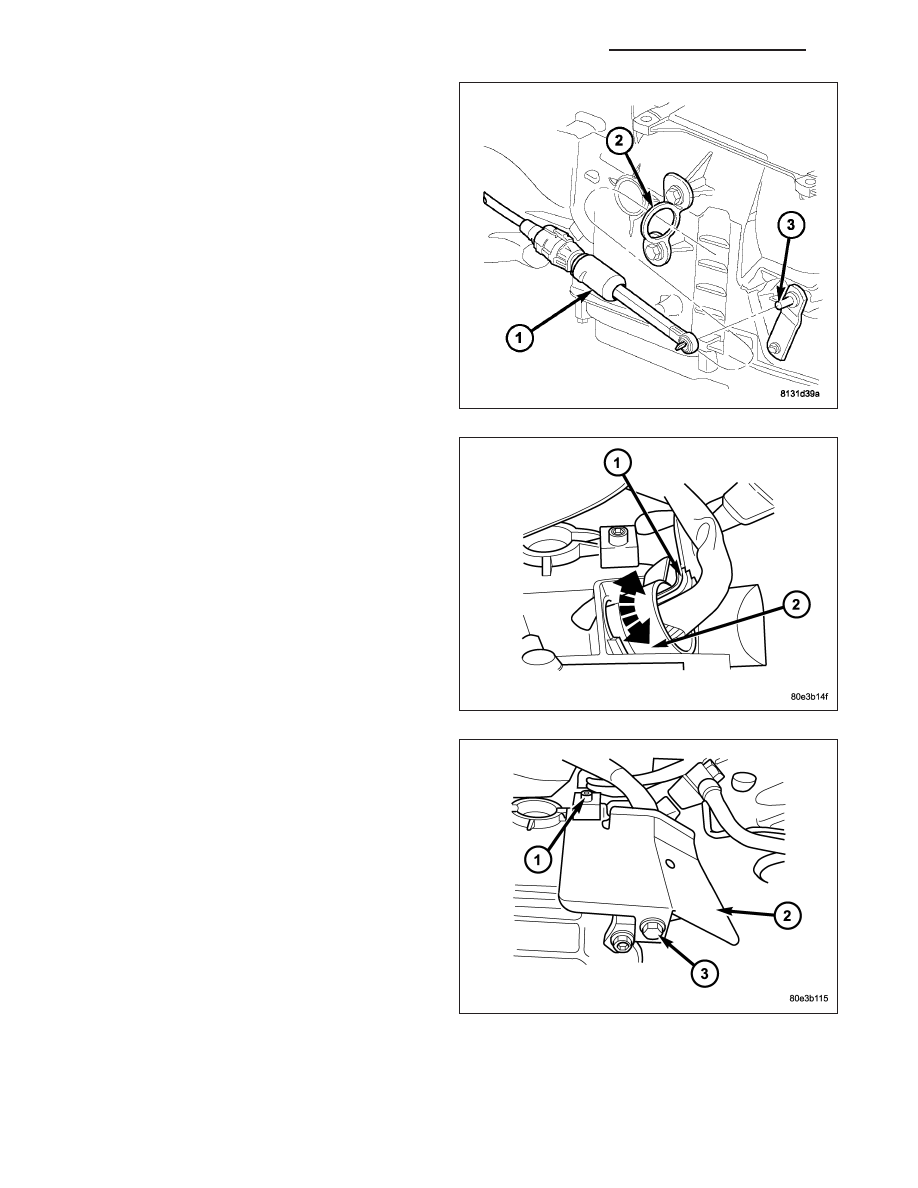
22. Connect the gearshift cable (1) to the transmis-

sion manual shift lever (3).

23. Check O-rings on plug connector (1) , and replace

if necessary.

24. Install the plug connector (1) into the adapter plug

(2). Turn bayonet lock of the adapter plug (2)
clockwise to connect plug connector (1).

25. Position the heat shield (2) , if equipped, onto the

transmission housing and install the screw (1) and
bolt (3) to hold the shield in place.

21 - 322

AUTOMATIC TRANSMISSION NAG1 - SERVICE INFORMATION

LX

CAUTION: It is essential that correct length bolts
be used to attach the converter to the driveplate.
Bolts that are too long will damage the clutch sur-
face inside the converter.

26. For gas engines, install all torque converter-to-

driveplate bolts (1) by hand.

27. Verify that the torque converter is pulled flush to

the driveplate. Tighten bolts to 42 N·m (31 ft. lbs.).

CAUTION: It is essential that correct length bolts
be used to attach the converter to the driveplate.
Bolts that are too long will damage the clutch sur-
face inside the converter.

28. For diesel engines, install all torque converter-to-

driveplate bolts (1) by hand.

29. Verify that the torque converter is pulled flush to

the driveplate. Tighten bolts to 42 N·m (31 ft. lbs.).

30. Install the torque converter bolt access cover (1)

onto the transmission. Install the access cover
bolt (2) and tighten to 11 N·m (8 ft.lbs.).

LX

AUTOMATIC TRANSMISSION NAG1 - SERVICE INFORMATION

21 - 323

NOTE: The starters are located on the right side of
the transmission for RWD vehicles and they are on
the left side for AWD vehicles.

31. Install starter motor (1). (Refer to 8 - ELECTRI-

CAL/STARTING/STARTER

MOTOR

-

INSTALLATION)

32. Connect the cooler line fittings (2) and cooler lines

(1) to the transmission.

NOTE: Inspect the fill tube grommet to determine
if the grommet is new or used. If a new fill tube
grommet is in the transmission case, pierce the
center of the grommet with a ballpoint pen, or sim-
ilar instrument, to prepare the grommet for the fill
tube installation.

33. Install transmission fill tube.

34. Install exhaust components.

35. For AWD vehicles, install the transfer case, (Refer

to 21 - TRANSMISSION/TRANSFER CASE -
INSTALLATION), and the front axle, (Refer to 3 -
DIFFERENTIAL & DRIVELINE/FRONT AXLE -
INSTALLATION).

36. For RWD vehicles:

a. Align and connect the propeller shaft (1).

(Refer to 3 - DIFFERENTIAL & DRIVELINE/
PROPELLER SHAFT - INSTALLATION)

37. Adjust gearshift cable if necessary.

38. Lower vehicle.

39. Connect negative battery cable.

40. Fill the transmission with the appropriate transmis-

sion fluid (Refer to LUBRICATION & MAINTE-
NANCE/FLUID

TYPES

-

DESCRIPTION)

according to the standard procedure (Refer to 21 - TRANSMISSION/AUTOMATIC - NAG1/FLUID AND FILTER
- STANDARD PROCEDURE).

21 - 324

AUTOMATIC TRANSMISSION NAG1 - SERVICE INFORMATION

LX

NOTE: If the transmission is being reconditioned (clutch/seal replacement) or replaced, it is necessary to
perform the TCM Adaptation Procedure using the scan tool (Refer to 8 - ELECTRICAL/ELECTRONIC CON-
TROL MODULES/TRANSMISSION CONTROL MODULE - STANDARD PROCEDURE).

41. Verify proper operation.

LX

AUTOMATIC TRANSMISSION NAG1 - SERVICE INFORMATION

21 - 325


Content   ..  1945  1946  1947  1948   ..