Chrysler 300/300 Touring/300C, Dodge Magnum. Manual - part 1588


  Index      Chrysler     Chrysler 300/300 Touring/300C, Dodge Magnum - service repair manual


Search            


Content   ..  1586  1587  1588  1589   ..


Chrysler 300/300 Touring/300C, Dodge Magnum. Manual - part 1588


INSTALLATION

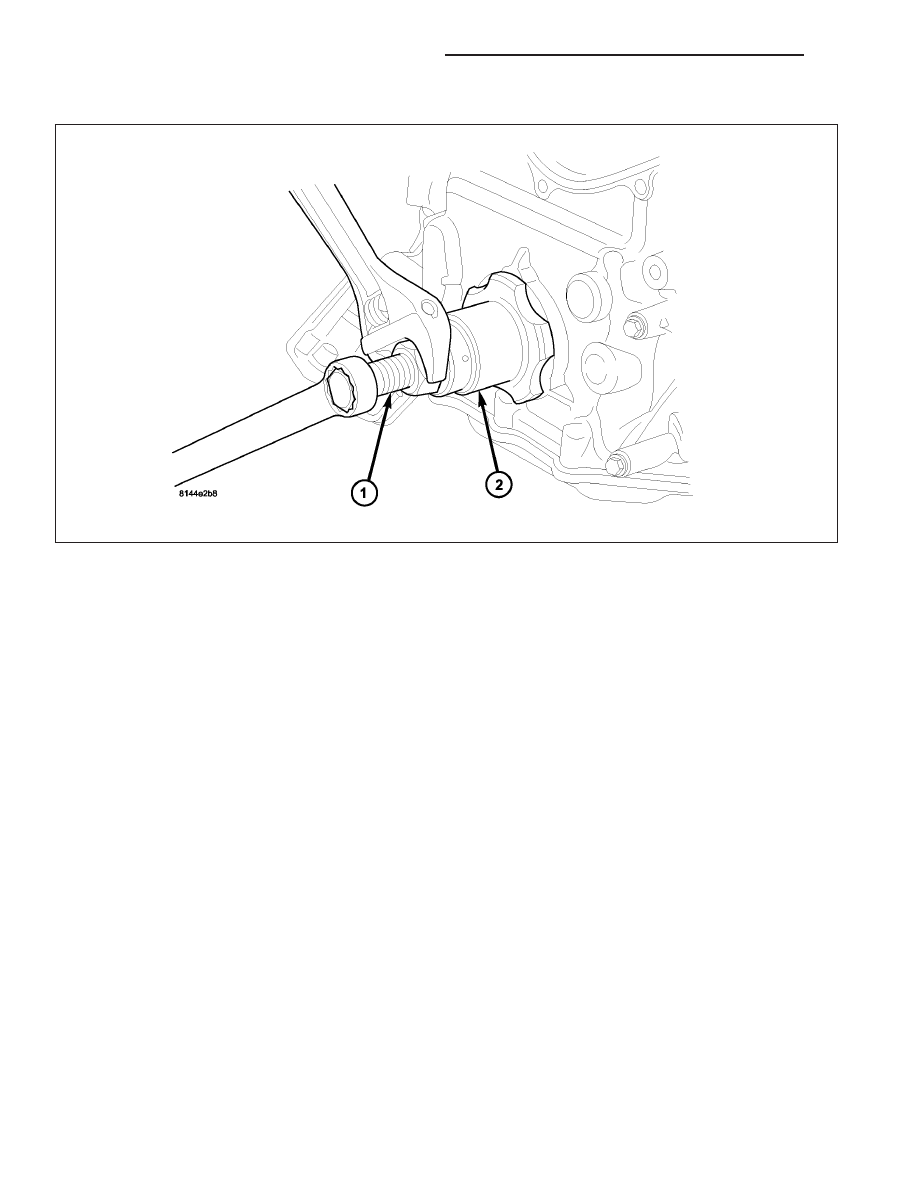
CAUTION: The front crankshaft seal must be installed dry. Do not apply lubricant to sealing lip or to outer
edge.

1. Using Special Tool 9072 and 8512A, install crankshaft front seal.

CAUTION: To prevent severe damage to the Crankshaft or Damper, thoroughly clean the damper bore and
the crankshaft nose before installing Damper.

2. Install vibration damper (Refer to 9 - ENGINE/ENGINE BLOCK/VIBRATION DAMPER - INSTALLATION).

3. Install radiator cooling fan and shroud (Refer to 7 - COOLING/ENGINE/RADIATOR FAN - INSTALLATION).

4. Install upper radiator hose.

5. Install accessory drive belt refer (Refer to 7 - COOLING/ACCESSORY DRIVE/DRIVE BELTS - INSTALLATION).

6. Refill cooling system (Refer to 7 - COOLING - STANDARD PROCEDURE).

7. Connect negative cable to battery.

9 - 2376

ENGINE - 5.7L SERVICE INFORMATION

LX

SEAL-CRANKSHAFT OIL-REAR

DIAGNOSIS AND TESTING - REAR SEAL AREA LEAKS

Since it is sometimes difficult to determine the source of an oil leak in the rear seal area of the engine, a more
involved inspection is necessary. The following steps should be followed to help pinpoint the source of the leak.

If the leakage occurs at the crankshaft rear oil seal area:

1. Disconnect the battery.

2. Raise the vehicle.

3. Remove torque converter or clutch housing cover and inspect rear of block for evidence of oil. Use a black light

to check for the oil leak:

a. Circular spray pattern generally indicates seal leakage or crankshaft damage.

b. Where leakage tends to run straight down, possible causes are a porous block, camshaft bore cup plugs, oil

galley pipe plugs, oil filter runoff, and main bearing cap to cylinder block mating surfaces. See Engine, for
proper repair procedures of these items.

4. If no leaks are detected, pressurized the crankcase as outlined in the section, Inspection (Engine oil Leaks in

general)

CAUTION: Do not exceed 20.6 kPa (3 psi).

5. If the leak is not detected, very slowly turn the crankshaft and watch for leakage. If a leak is detected between

the crankshaft and seal while slowly turning the crankshaft, it is possible the crankshaft seal surface is damaged.
The seal area on the crankshaft could have minor nicks or scratches that can be polished out with emery cloth.

CAUTION: Use extreme caution when crankshaft polishing is necessary to remove minor nicks or
scratches. The crankshaft seal flange is specially machined to complement the function of the rear oil seal.

6. For bubbles that remain steady with shaft rotation, no further inspection can be done until disassembled. (Refer

to 9 - ENGINE - DIAGNOSIS AND TESTING), under the Oil Leak row, for components inspections on possible
causes and corrections.

7. After the oil leak root cause and appropriate corrective action have been identified, (Refer to 9 - ENGINE/EN-

GINE BLOCK/CRANKSHAFT OIL SEAL - REAR - REMOVAL).

REMOVAL

NOTE: This procedure can be performed in vehi-
cle.

1. If being performed in vehicle, remove the transmis-

sion.

2. Remove the flexplate (Refer to 9 - ENGINE/EN-

GINE BLOCK/FLEX PLATE - REMOVAL).

NOTE: The crankshaft oil seal CAN NOT be reused
after removal.

NOTE: The crankshaft rear oil seal remover Spe-
cial Tool 8506 must be installed deeply into the
seal. Continue to tighten the removal tool into the
seal until the tool can not be turned farther. Fail-
ure to install tool correctly the first time will cause
tool to pull free of seal without removing seal from
engine.

LX

ENGINE - 5.7L SERVICE INFORMATION

9 - 2377

3. Using Special Tool 8506 (1), remove the crankshaft rear oil seal (2).

INSTALLATION

CAUTION: The rear seal must be installed dry for
proper operation. Do not lubricate the seal lip or
outer edge.

1. Position the plastic seal guide (2) onto the crank-

shaft rear face. Then position the crankshaft rear
oil seal (3) onto the guide.

2. Using Special Tools 8349 Crankshaft Rear Oil Seal

Installer (1) and C-4171 Driver Handle, with a ham-
mer, tap the seal (3) into place. Continue to tap on
the driver handle until the seal installer seats
against the cylinder block crankshaft bore.

3. Install the flexplate. (Refer to 9 - ENGINE/ENGINE

BLOCK/FLEX PLATE - INSTALLATION).

4. Install the transmission.

9 - 2378

ENGINE - 5.7L SERVICE INFORMATION

LX

RETAINER-CRANK REAR OIL - SEAL

REMOVAL

1. Disconnect negative cable from battery.

2. Remove the transmission. (Refer to 21 - TRANS-

MISSION/TRANSAXLE/AUTOMATIC

-

NAG1

-

REMOVAL).

3. Remove the flexplate. (Refer to 9 - ENGINE/EN-

GINE BLOCK/FLEX PLATE - REMOVAL).

4. Remove the oil pan. (Refer to 9 - ENGINE/LUBRI-

CATION/OIL PAN - REMOVAL)

5. Remove the rear oil seal retainer mounting bolts.

6. Carefully remove the retainer from the engine

block.

INSTALLATION

1. Throughly clean all gasket resdue from the engine

block.

2. Use extream care and clean all gasket resdue from

the retainer.

3. Position the gasket onto the retainer.

4. Position the retainer onto the engine block.

5. Install the retainer mounting bolts. Tighten the bolts

to 15 N·m (132 in. lbs.) using the procedure shown.

6. Install the oil pan (Refer to 9 - ENGINE/LUBRICA-

TION/OIL PAN - INSTALLATION).

7. Install the flexplate (Refer to 9 - ENGINE/ENGINE

BLOCK/FLEX PLATE - INSTALLATION).

8. Install the transmission (Refer to 21 - TRANSMIS-

SION/TRANSAXLE/AUTOMATIC

-

NAG1

-

INSTALLATION).

9. Check and verify engine oil level.

10. Start engine and check for leaks.

LX

ENGINE - 5.7L SERVICE INFORMATION

9 - 2379


Content   ..  1586  1587  1588  1589   ..