Chrysler 300/300 Touring/300C, Dodge Magnum. Manual - part 1555


  Index      Chrysler     Chrysler 300/300 Touring/300C, Dodge Magnum - service repair manual


Search            


Content   ..  1553  1554  1555  1556   ..


Chrysler 300/300 Touring/300C, Dodge Magnum. Manual - part 1555


NOTE: Assure that the rear face of the oil pan is
flush to the transmission bell housing when
installing the oil pan.

5. Pre-torque the horizontal rear oil pan to transmis-

sion bolts to 1.4 N·m (12 in. lbs.).

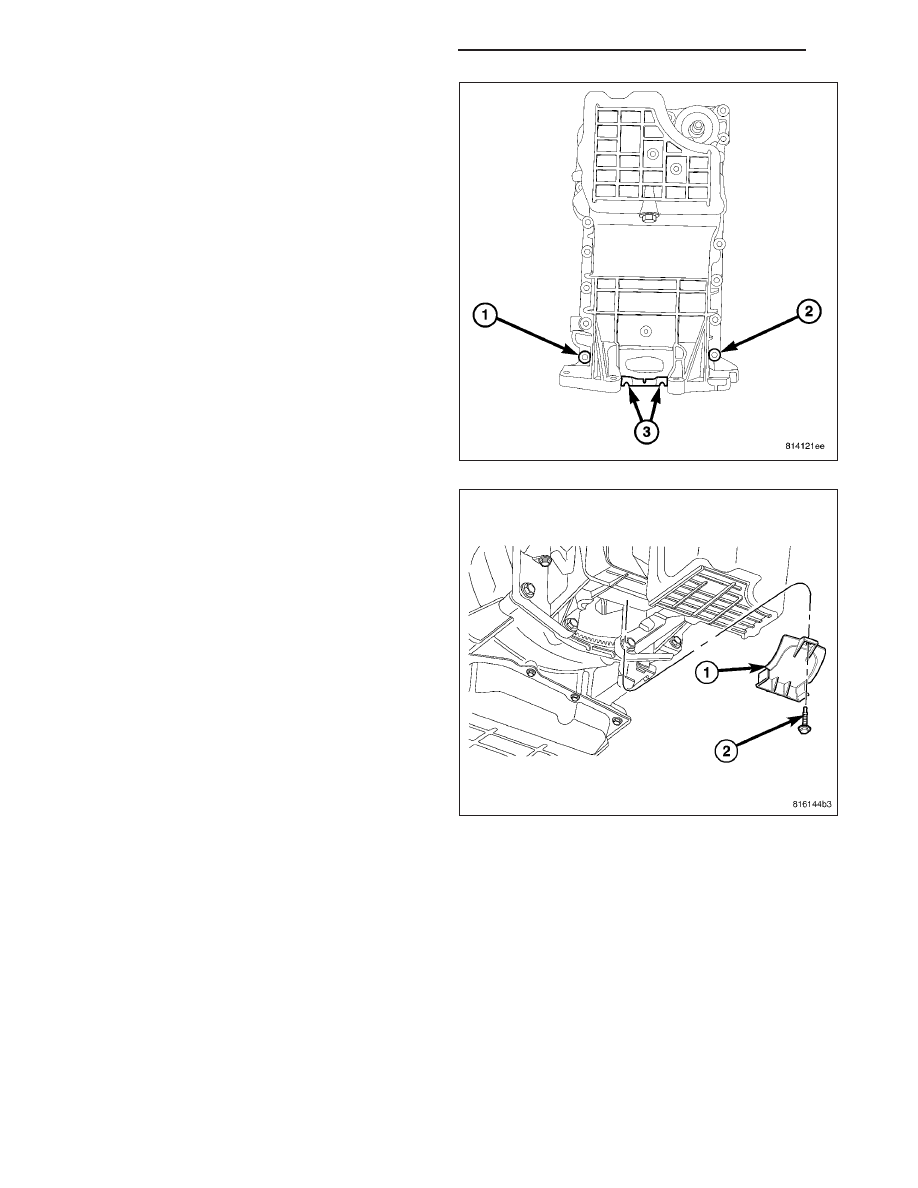
6. First tighten the M8 (1) oil pan alignment bolt to

28N·m (250 lbs. in.), then tighten bolt (2) to 28N·m
(250 lbs. in.).

7. Tighten the remaining M8 bolts and M8 nuts to 28

N.m (250 in. lbs.), and the M6 bolts to 12 N.m (105
in. lbs.).

8. Tighten the four M10 oil pan to transmission bolts

to 55 N·m (40 ft.lbs.).

9. Lower the engine and remove the lifting fixture.

Tighten the engine mount to cradle fasteners to 75
N·m (55 lbs. ft.).

10. Install the flex plate inspection cover (1) and

tighten the fastener (2) to 11 N·m (97 in. lbs.).

11. Install the oil cooler (align the oil cooler notch to

oil pan tab) (Refer to 9 - ENGINE/LUBRICATION/
OIL COOLER & LINES - INSTALLATION).

12. Install the engine oil filter. Tighten filter to 12 N·m

(106 in. lbs.).

9 - 2244

ENGINE - 3.5L - SERVICE INFORMATION

LX

13. Install the steering gear to cradle bolts and tighten

the fasteners to 70 N·m (95 ft. lbs.).

14. Connect the steering gear coupler and tighten the

fastener to 30 N·m (22 ft. lbs.)

15. Attach the splash shield.

16. Lower the vehicle.

17. Install the engine oil indicator.

18. Fill engine crankcase with proper oil to correct

level.

19. Connect negative battery cable.

AWD

1. Clean oil pan and all mating surfaces.

2. Replace the oil level indicator tube seal.

3. Apply a 1/8 inch bead of Mopar

T

Engine RTV GEN

II at the parting line of the oil pump housing and
the rear seal retainer.

LX

ENGINE - 3.5L - SERVICE INFORMATION

9 - 2245

4. Install the oil pan gasket (4) to the engine block

(5).

5. Install the oil pan (1) while aligning the oil level

indicator tube and attach the fasteners finger tight.

NOTE: Assure that the rear face of the oil pan is
flush to the transmission bell housing when
installing the oil pan.

6. Pre-torque the horizontal rear oil pan to transmis-

sion bolts to 1.4 N·m (12 lbs. in.).

7. First tighten the M8 (1) oil pan alignment bolt to 28

N·m (250 lbs. in.), then tighten bolt (2) to 28 N·m
(250 lbs. in.).

8. Tighten the remaining M8 bolts and M8 nuts to 28

N·m (250 lbs. in.), and the M6 bolts to 12 N·m (105
lbs. in).

9. Tighten the four M10 oil pan (2) to transmission (3)

bolts (1) to 55 N·m (40 lbs.ft.).

9 - 2246

ENGINE - 3.5L - SERVICE INFORMATION

LX

10. Install the torque converter access cover (1) and

tighten the fastener (2) to 11 N·m (97 lbs. in.).

11. Install the engine oil cooler and new oil filter

(Refer

to

9

-

ENGINE/LUBRICATION/OIL

COOLER & LINES - INSTALLATION).

12. Support the engine with a jack stand.

13. Install the front drive axle housing (3). Tighten

mounting bolts to oil pan to 65 N·m (48 lbs. ft.).

14. Remove the jack stand.

15. Install the front drive axle housing support bracket

(1).

16. Install the front suspension sway bar to cradle.

17. Install the engine mount to front cradle fasteners.

Tighten the fasteners to 75 N·m (55 lbs. ft.).

18. Position and install the power steering hose to

cradle hold downs.

19. Install the right catalytic converter.

20. Align the paint marks and install the front drive

shaft.

21. Install the front drive shaft heat shield (4).

LX

ENGINE - 3.5L - SERVICE INFORMATION

9 - 2247


Content   ..  1553  1554  1555  1556   ..