Chrysler 300/300 Touring/300C, Dodge Magnum. Manual - part 1488


  Index      Chrysler     Chrysler 300/300 Touring/300C, Dodge Magnum - service repair manual


Search            


Content   ..  1486  1487  1488  1489   ..


Chrysler 300/300 Touring/300C, Dodge Magnum. Manual - part 1488
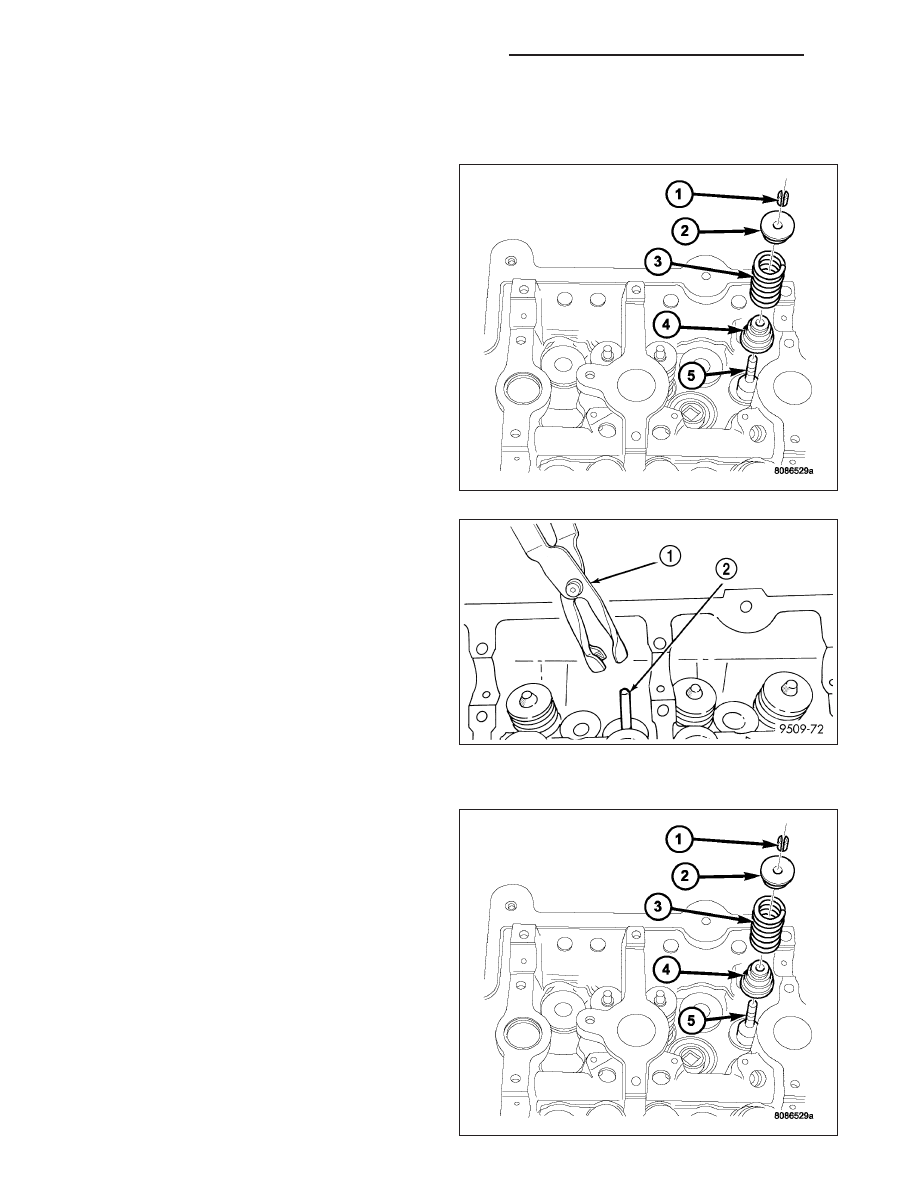


SEALS-VALVE STEM

REMOVAL

1. Remove valve spring (3) (Refer to 9 - ENGINE/

CYLINDER HEAD/VALVE SPRINGS - REMOVAL).

2. Remove valve stem seal by using a valve seal tool

(1).

INSTALLATION

1. The valve stem seal/valve spring seat (4) should

be pushed firmly and squarely over the valve guide
using the valve stem (5) as guide. Do Not Force
seal against top of guide.

2. Install valve spring (3) (Refer to 9 - ENGINE/CYL-

INDER HEAD/VALVE SPRINGS - INSTALLATION).

9 - 1976

ENGINE - 2.7L DOHC - SERVICE INFORMATION

LX

ADJUSTERS-HYDRAULIC LASH

DIAGNOSIS AND TESTING

HYDRAULIC LASH ADJUSTER NOISE DIAGNOSIS

Proper noise diagnosis is essential in locating the source of a NVH complaint. Locating a lash adjuster (tappet) type
noise can sometimes be difficult. As a result, an initial misdiagnosis may occur.

Refer to LASH ADJUSTER (TAPPET) NOISE CHART indicating possible lash adjuster (tappet) noise sources and
possible sources that could lead to a misdiagnosis.

Refer to LASH ADJUSTER (TAPPET) NOISE CHART for possible causes and correction of a lash adjuster (tappet)
type noise.

LASH ADJUSTER (TAPPET) NOISE CHART

POSSIBLE CAUSES

CORRECTION

1. Engine oil level—too high or too low. This may cause
aerated oil to enter the adjusters and cause them to be
spongy.

1. Check and correct engine oil level.

2. Insufficient running time after rebuilding cylinder
head.

2. Low speed running of up to 1 hour may be required
to fully evacuate trapped air from the valve train
system. During this time, turn engine off and let set for
a few minutes before restarting. Repeat this several
times after engine has reached normal operating
temperature.

3. Air trapped in lash adjuster (after 1 hour run time).

3. See below:

(a) Check lash adjusters for sponginess while installed
in cylinder head. Depress part of rocker arm over
adjuster. Normal adjusters should feel very firm. Very
spongy adjusters can be bottomed out easily.

(b) If lash adjuster(s) are still spongy, replace with new
adjuster/rocker arm assembly.

4. Low oil pressure

4. See below:

(a) Check and correct engine oil level.

(b) Check engine oil pressure.

(c) Check for excessive bearing clearance and correct.

(d) Check for worn oil pump.

5. Oil passage to cylinder head(s) plugged with debris.

5. Check cylinder head oil passages and cylinder head
gasket restrictor for blockage. Clean or replace as
necessary.

6. Worn valve guide(s).

6. Ream guide(s) and replace valve(s) with oversize
valves and seal(s).

7. Air ingested into oil due to broken or cracked oil
pump pickup tube.

7. Inspect pickup tube and replace as necessary.

8. Collapsed lash adjuster due to debris ingestion.

8. Clean debris from engine and replace lash
adjuster(s).

LX

ENGINE - 2.7L DOHC - SERVICE INFORMATION

9 - 1977

REMOVAL

1. Remove cylinder head cover(s). (Refer to 9 - ENGINE/CYLINDER HEAD/CYLINDER HEAD COVER(S) -

REMOVAL)

2. Remove rocker arm(s). (Refer to 9 - ENGINE/CYLINDER HEAD/ROCKER ARMS - REMOVAL)

CAUTION: If lash adjusters and rocker arms are to be reused, always mark position for reassembly in their
original positions.

3. Remove lash adjuster(s).

INSTALLATION

1. Install hydraulic lash adjuster making sure adjusters are at least partially full of oil. This can be verified by little

or no plunger travel when lash adjuster is depressed.

2. Install rocker arm(s) (Refer to 9 - ENGINE/CYLINDER HEAD/ROCKER ARMS - INSTALLATION) and cylinder

head covers (Refer to 9 - ENGINE/CYLINDER HEAD/CYLINDER HEAD COVER(S) - INSTALLATION).

9 - 1978

ENGINE - 2.7L DOHC - SERVICE INFORMATION

LX

ARMS-ROCKER

DESCRIPTION

The rocker arms are composed of steel stampings
with an integral roller bearing (3). The rocker arms
incorporate a 0.5 mm (0.0197 in.) oil hole (2) in the
lash adjuster socket (1) for roller/camshaft lobe
lubrication.

REMOVAL

1. Remove cylinder head cover(s). (Refer to 9 -

ENGINE/CYLINDER

HEAD/CYLINDER

HEAD

COVER(S) - REMOVAL)

CAUTION: Always rotate engine by turning the
crankshaft. Failure to do so will result in valve
and/or piston damage.

2. Rotate engine until the cam lobe is on its base cir-

cle (heel), on the rocker arm being removed.

CAUTION: Depress valve spring only enough to
remove rocker arm.

3. Using Special Tools 8215 (1) and 8216 Adaptor (2)

and a 3/8

9

ratchet (3), depress valve spring only

enough to release tension on rocker arm.

4. Remove rocker arm from cylinder head.

CAUTION: If rocker arms are to be reused, identify
position of rocker arms for reassembly in their original positions.

5. Repeat procedure for each rocker arm removed.

6. Inspect the rocker arm for wear or damage. (Refer to 9 - ENGINE/CYLINDER HEAD/ROCKER ARMS - INSPEC-

TION).

INSPECTION

Inspect the cam follower assembly for wear or dam-
age. Replace as necessary.

LX

ENGINE - 2.7L DOHC - SERVICE INFORMATION

9 - 1979


Content   ..  1486  1487  1488  1489   ..