Chrysler 300/300 Touring/300C, Dodge Magnum. Manual - part 1481


  Index      Chrysler     Chrysler 300/300 Touring/300C, Dodge Magnum - service repair manual


Search            


Content   ..  1479  1480  1481  1482   ..


Chrysler 300/300 Touring/300C, Dodge Magnum. Manual - part 1481


REMOVAL

1. Remove the primary timing chain (Refer to 9 - ENGINE/VALVE TIMING/TIMING BELT/CHAIN AND SPROCKETS

- REMOVAL).

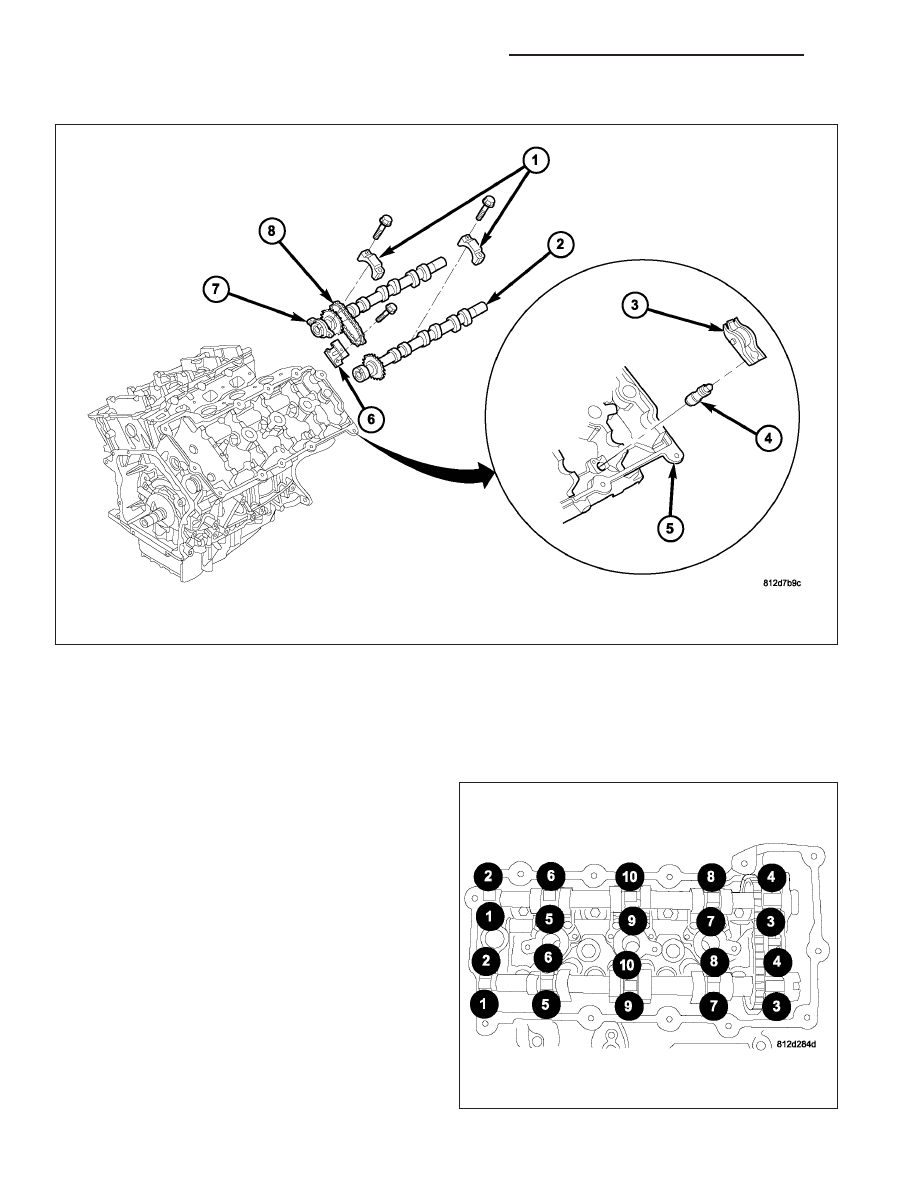
2. Remove secondary chain tensioner (6) mounting bolts.

NOTE: Camshaft bearing caps have been marked during engine manufacturing. For example, number one
exhaust camshaft bearing is marked “1E”.

3. Slowly loosen camshaft bearing cap bolts in the

order shown.

9 - 1948

ENGINE - 2.7L DOHC - SERVICE INFORMATION

LX

4. Remove camshaft bearing caps (1).

5. Remove intake camshaft (7), exhaust camshaft (2), secondary timing chain (8), and secondary timing chain ten-

sioner (6) together as an assembly.

6. Remove secondary timing chain tensioner (6) and secondary timing chain (8) from camshafts (2)&(7).

7. Inspect camshafts (Refer to 9 - ENGINE/CYLINDER HEAD/CAMSHAFT(S) - INSPECTION).

INSPECTION

1. Inspect camshaft bearing journals (2) for damage

and binding. If journals are binding, check the cyl-
inder head for damage. Also check cylinder head
oil holes for clogging.

2. Inspect camshaft sprockets for excessive wear.

Replace camshafts if necessary.

3. Check the cam lobe (5) surfaces for abnormal wear

and damage. Replace camshaft if defective. Mea-
sure the actual wear and replace, if out of limits—
standard value is 0.0254 mm (0.001 in.); wear limit
is 0.254 mm (0.010 in.).

LX

ENGINE - 2.7L DOHC - SERVICE INFORMATION

9 - 1949

INSTALLATION

CAUTION: When the timing chain is removed and
the cylinder heads are installed, DO NOT rotate
the camshafts or crankshaft without first locating
the proper crankshaft position. Failure to do so
will result in valve and/or piston damage.

1. Assemble camshaft chain on the cams. Verify that

plated links (1) are facing toward the front. Align
the plated links (1) to the dots (4) on the camshaft
sprockets.

2. If camshaft chain tensioner is already in the com-

pressed and locked position, proceed to step #4.

3. When the camshaft chain tensioner is removed, it

is necessary to compress and lock the tensioner
using the following procedures:

a. Place tensioner (1) into a soft jaw vise.

b. SLOWLY compress tensioner until fabricated

lock pin (2) or the equivalent can be inserted
into the locking holes.

c. Remove compressed and locked tensioner

from the vise.

9 - 1950

ENGINE - 2.7L DOHC - SERVICE INFORMATION

LX

4. Insert the compressed and locked camshaft chain

tensioner (2) in between the camshafts and chain.

5. Rotate the cams so that the plated links (1) and

dots (4) are facing the 12:00 o’clock position.

6. Install cams to cylinder head. Verify that rocker

arms are correctly seated and in proper positions.

7. Install camshaft bearing caps. Verify that bearing

caps are installed in same position as removed.

8. Tighten

cam

bearing

cap

bolts

gradually

in

sequence shown in to 12 N·m (105 in. lbs.).

9. Install secondary chain tensioner (2) bolts and

tighten to 12 N·m (105 in. lbs.).

10. Remove locking pin (3) from secondary tensioners

(2).

11. Measure camshafts end play (Refer to 9 -

ENGINE/CYLINDER

HEAD/CAMSHAFT(S)

-

STANDARD PROCEDURE).

12. Install the primary timing chain (Refer to 9 -

ENGINE/VALVE

TIMING/TIMING

BELT/CHAIN

AND SPROCKETS - INSTALLATION).

LX

ENGINE - 2.7L DOHC - SERVICE INFORMATION

9 - 1951


Content   ..  1479  1480  1481  1482   ..