Content .. 2311 2312 2313 2314 ..
Chevrolet Silverado / GMC Sierra. Manual - part 2313

Fig. 8: View of A/C Compressor & Bolts
Courtesy of GENERAL MOTORS CORP.
13. Remove the A/C compressor mounting bolts. The lower right bolt (3) will stay with the
compressor due to a lack of clearance.
14. Remove the A/C compressor (2) from the bracket (1).
15. If replacing the A/C compressor. Refer to Compressor Oil Balancing.
Installation Procedure
2008 Chevrolet Silverado 1500
2008 HVAC Heating, Ventilation, and Air Conditioning - Cab & Chassis Sierra, Cab & Chassis Silverado, Sierra &
Silverado

Fig. 9: View of A/C Compressor & Bolts
Courtesy of GENERAL MOTORS CORP.
1. Install the A/C compressor (2) to the bracket (1) through the fender well. Insert the
mounting bolt (3) into the lower right mounting boss before installing the A/C compressor.
2. Install the A/C compressor to the bracket. Insert the mounting bolt into the lower right
mount before installing the A/C compressor.
3. Install the A/C compressor mounting bolts.
NOTE:
Refer to Fastener Notice .
2008 Chevrolet Silverado 1500
2008 HVAC Heating, Ventilation, and Air Conditioning - Cab & Chassis Sierra, Cab & Chassis Silverado, Sierra &
Silverado

Tighten: Tighten the bolts to 50 N.m (37 lb ft).
4. Connect the electrical connector to the A/C compressor.
5. Install the A/C discharge hose to the compressor using new sealing washers. Refer to
Sealing Washer Replacement.
6. Install the A/C discharge hose bolt to the A/C compressor.
Tighten: Tighten the bolt to 16 N.m (12 lb ft).
7. Install the A/C suction hose to the compressor using new sealing washers. Refer to Sealing
Washer Replacement.
8. Install the A/C suction hose bolt to the A/C compressor.
Tighten: Tighten the bolt to 16 N.m (12 lb ft).
9. Install the A/C drive belt. Refer to Air Conditioning Compressor Belt Replacement .
10. Evacuate and recharge the A/C system. Refer to Refrigerant Recovery and Recharging.
11. Install the air cleaner resonator outlet duct. Refer to Air Cleaner Resonator Outlet Duct
Replacement .
12. Leak test the fittings of the component using the J 39400-A . See Special Tools.
AIR CONDITIONING COMPRESSOR REPLACEMENT (LLY/LMM)
Tools Required
J 39400-A Halogen Leak Detector. See Special Tools.
Removal Procedure
2008 Chevrolet Silverado 1500
2008 HVAC Heating, Ventilation, and Air Conditioning - Cab & Chassis Sierra, Cab & Chassis Silverado, Sierra &
Silverado
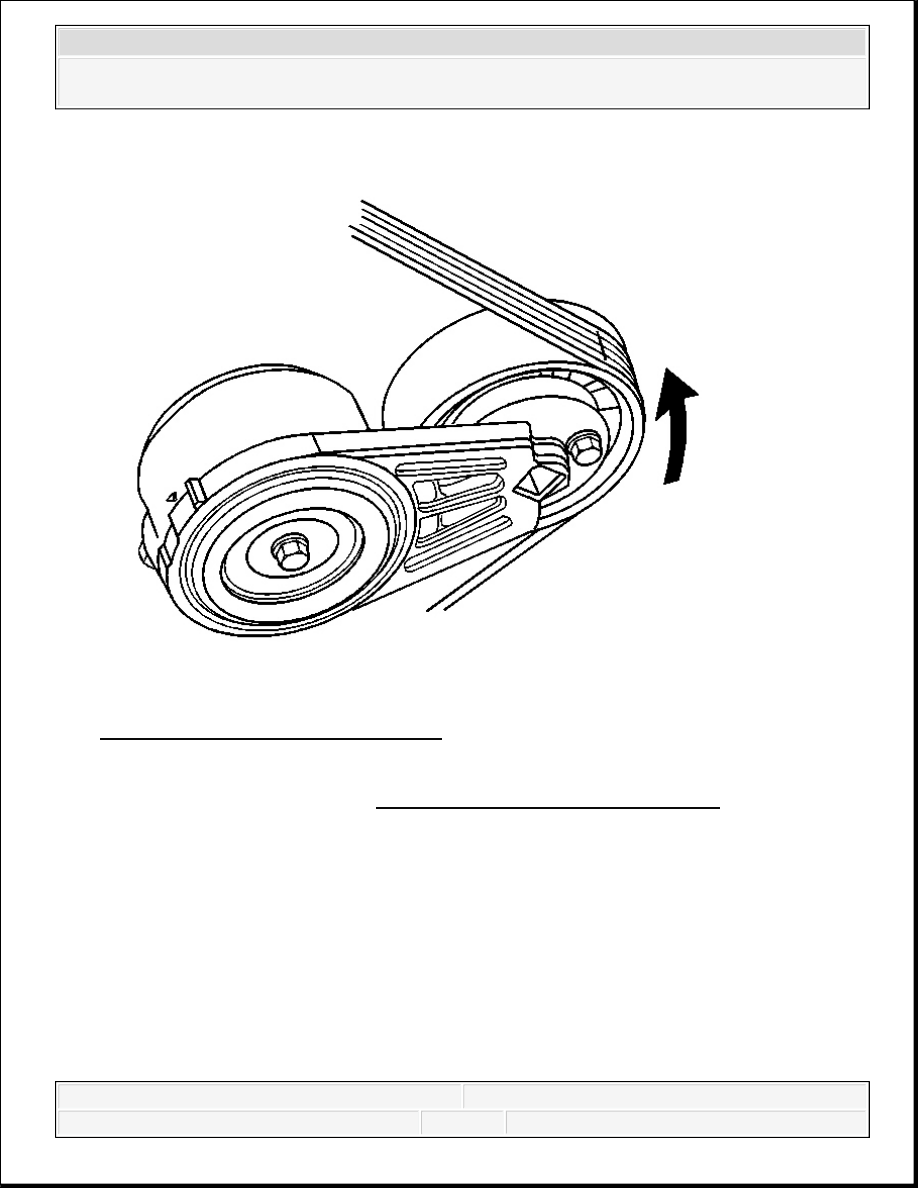
Fig. 10: View Of Drive Belt Tensioner
Courtesy of GENERAL MOTORS CORP.
1. Recover the refrigerant. Refer to Refrigerant Recovery and Recharging.
2. Install a ratchet into the belt tensioner adapter opening.
3. Rotate the belt tensioner counterclockwise in order to relieve the tension on the belt.
4. Remove the belt from the A/C compressor.
5. Slowly release the tension on the belt tensioner.
2008 Chevrolet Silverado 1500
2008 HVAC Heating, Ventilation, and Air Conditioning - Cab & Chassis Sierra, Cab & Chassis Silverado, Sierra &
Silverado
Content .. 2311 2312 2313 2314 ..