Chery Tiggo 5 (T21). Manual - part 470


  Index      Chery     Chery Tiggo 5 (T21) - service repair manual 2014 year


Search            


Content   ..  468  469  470  471   ..


Chery Tiggo 5 (T21). Manual - part 470


43–

60

43

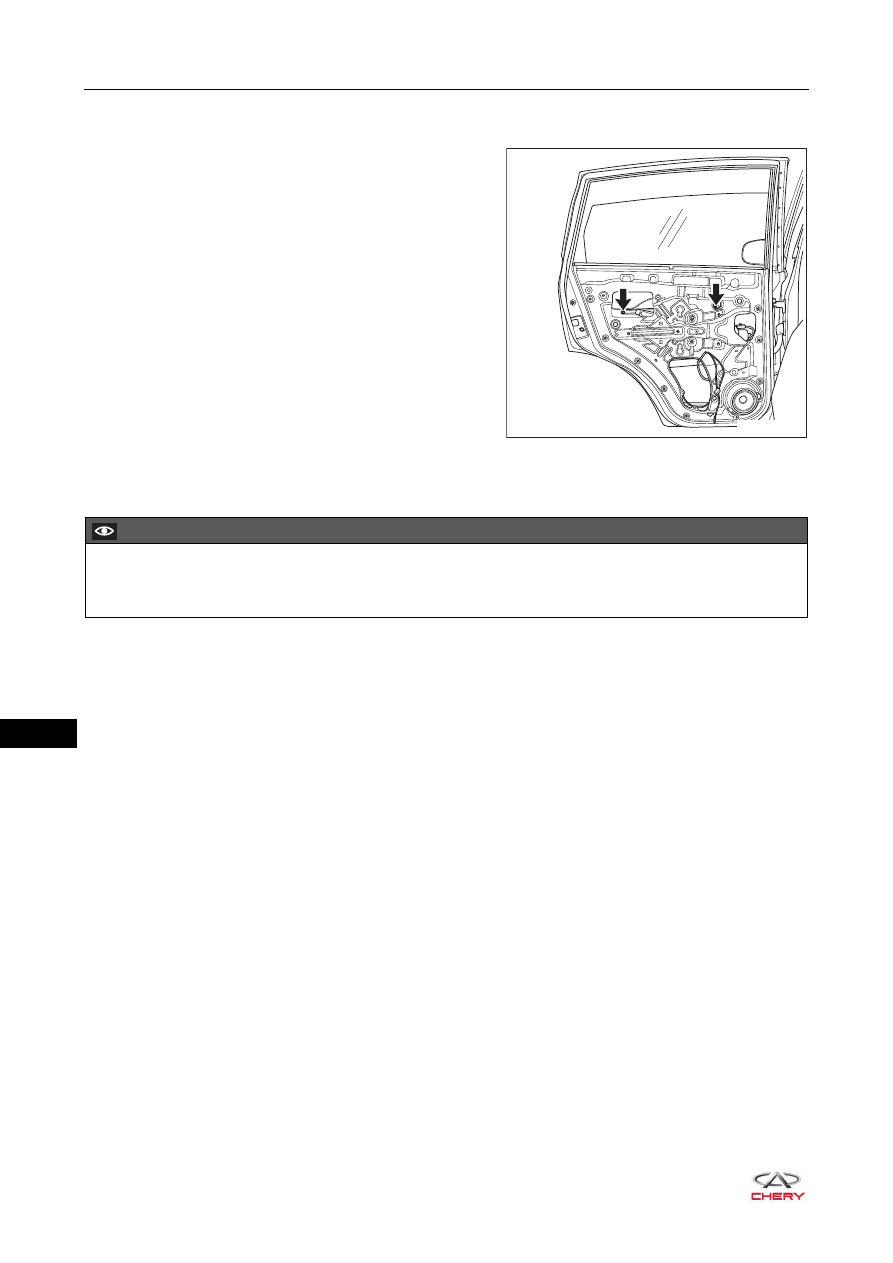
9. Remove the rear left door glass assembly.

a. Raise the rear door glass assembly to the proper position.
b. Remove 2 fixing bolts (arrow) from rear door glass 

assembly, and remove the rear left door glass 
assembly.

(Tightening torque: 9 ± 1 N·m)

Installation

Installation is in the reverse order of removal.

RT21430260

CAUTION

 When installing rear door glass assembly, avoid the window glass from dropping and becomes 

damaged.

43–

61

43

Rear Door Glass Rear Guide Rail Assembly

Removal

HINT:

 Use the same procedures for the right side and left side.

 Procedures listed below are for the left side.

1. Turn off all the electrical equipment and ignition switch.
2. Disconnect the negative battery cable.
3. Remove the rear left door protector assembly (

See page 47-36

).

4. Remove the rear left door assist grip mounting bracket assembly (

See page 47-39

).

5. Remove the rear left door protective film assembly (

See page 47-39

).

6. Remove the rear left door glass rear guide rail assembly.

a. Remove the rear left door frame weatherstrip.

HINT:
It is not necessary to remove the rear left door frame weatherstrip completely. There is a fixing screw in 
the rear door frame weatherstrip.

b. Remove 2 fixing screws (arrow) from rear door glass 

rear guide rail assembly.

(Tightening torque: 5 ± 0.5 N·m)

c. Remove the fixing bolt (1) from rear door glass rear 

guide rail assembly, and remove the rear left door 
glass rear guide rail assembly.

(Tightening torque: 9 ± 1 N·m)

Installation

Installation is in the reverse order of removal.

CAUTION

 Make sure to wear safety equipment to prevent accidents when removing rear door glass rear guide rail 

assembly.

 Appropriate force should be applied when removing rear door glass rear guide rail assembly. Be careful 

not to operate roughly.

1

RT21430270

CAUTION

 After glass regulating system is installed, make sure that the window glass can go up and down smoothly 

and freely without any vibration, chattering or shock loading, etc.

43–

62

43

Rear Door Power Glass Regulator Assembly

Removal

HINT:

 Use the same procedures for the right side and left side.

 Procedures listed below are for the left side.

1. Turn off all the electrical equipment and ignition switch.
2. Disconnect the negative battery cable.
3. Remove the rear door outer weather bar (

See page 43-58

).

4. Remove the rear left door protector assembly (

See page 47-36

).

5. Remove the rear left door assist grip mounting bracket assembly (

See page 47-39

).

6. Remove the rear left door protective film assembly (

See page 47-39

).

7. Remove the rear door glass rear guide rail assembly (

See page 43-61

).

8. Remove the rear left door glass assembly (

See page 43-59

).

9. Remove the rear left door power glass regulator assembly.

a. Disconnect the connector (1) from rear door power 

glass regulator assembly.

b. Remove 6 fixing bolts (arrow) from rear door power 

glass regulator assembly, and remove the rear left 
door power glass regulator assembly.

(Tightening torque: 9 ± 1 N·m)

CAUTION

 Make sure to wear safety equipment to prevent accidents when removing rear door power glass 

regulator assembly.

 Appropriate force should be applied when removing rear door power glass regulator assembly. Be 

careful not to operate roughly.

1

RT21430280

43–

63

43

Inspection

1. Check rear door power glass regulator motor.

a. Apply battery voltage to the terminals of power glass 

regulator motor connector, and check the operation of 
power glass regulator motor according to the table 
below.

If result is not as specified, replace rear door power 
glass regulator assembly.

Installation

Installation is in the reverse order of removal.

RT21430290

1 2

-

+

Measurement Condition

Specified 

Condition

Battery positive 

(+)

Battery negative 

(-)

1

2

UP smoothly

2

1

Down smoothly

CAUTION

 After rear door power glass regulator is installed, make sure that the window glass can go up and down 

smoothly and freely without any vibration, chattering or shock loading, etc.


Content   ..  468  469  470  471   ..