Chery Tiggo. Manual - part 351


  Index      Chery     Chery Tiggo - service repair manual 2009 year


Search            


Content   ..  349  350  351  352   ..


Chery Tiggo. Manual - part 351


Electrical Schematics

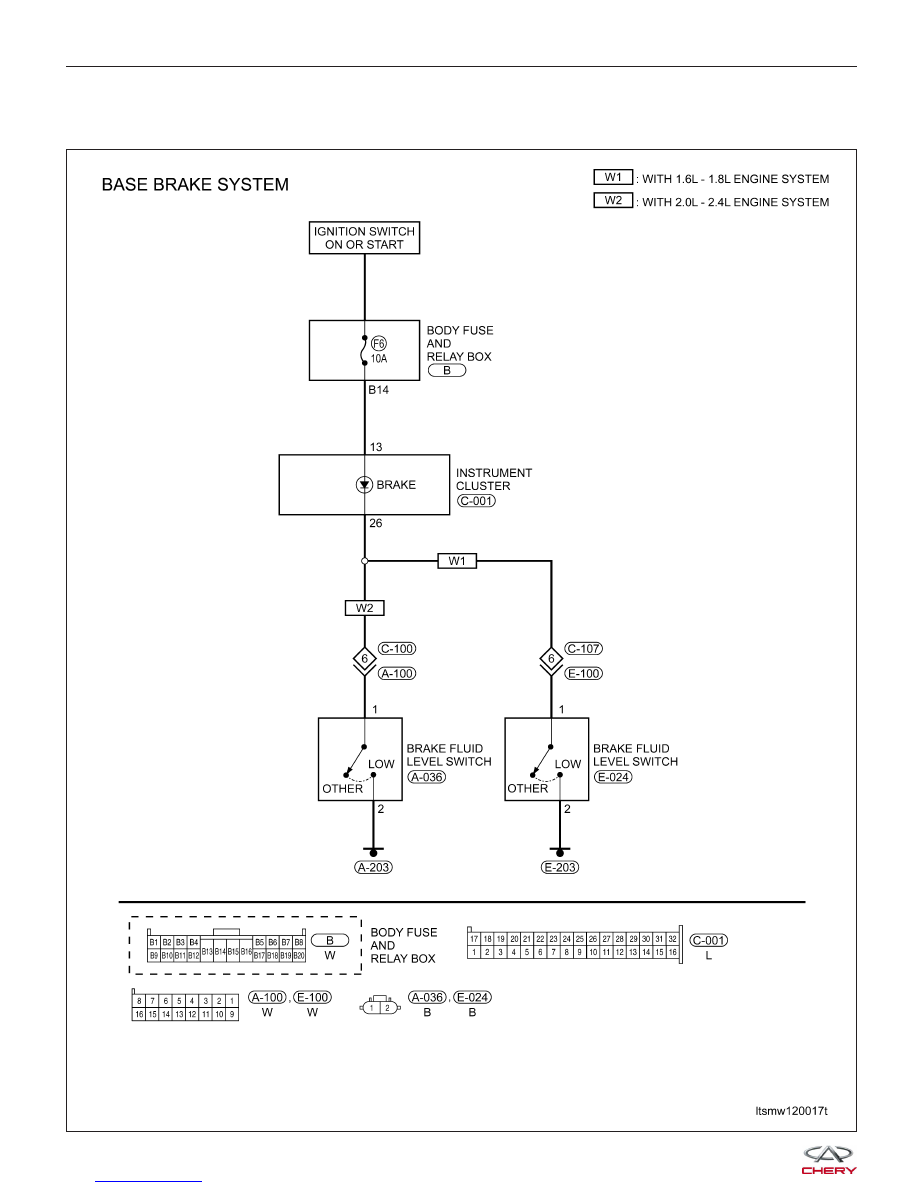
Brake System (Page 1 of 1)

GENERAL INFORMATION

LTSMW120017T


DIAGNOSIS & TESTING

Diagnostic Help

Brake diagnosis involves determining if the concern is related to a mechanical, hydraulic, electrical or vacuum oper-
ated component.

NOTE :
The brake reservoir fluid level will decrease in proportion to normal lining wear.

NOTE :
Brake fluid tends to darken over time. This is normal and should not be mistaken for contamination.

Preliminary Brake Check:

• Check the condition of the tires and wheels. Damaged wheels and worn, damaged or under inflated tires can

cause a pull, shudder, vibration and a condition similar to brake grab.

• If a complaint was based on noise while braking, check the suspension components. Jounce the front and the

rear of vehicle and listen for anything that might be caused by a loose, worn or damaged suspension or steer-
ing component.

• Inspect the brake fluid level and condition.

1. If the fluid level is abnormally low, look for any evidence of leaks at the calipers, brake lines, master cyl-
inder and at the Antilock Brake System (ABS) Hydraulic Control Unit (HCU).
2. If the fluid appears to be contaminated, drain a sample to examine.

• The system will have to be flushed if the fluid is separated into layers, or contains a substance other than

brake fluid. The system seals, cups, hoses, master cylinder and HCU will also have to be replaced after flush-
ing. Use clean brake fluid to flush the system.

• Check the parking brake operation. Verify free movement and full release of the cables and the lever. Also note

if the vehicle was being operated with the parking brake partially applied.

• Check the brake pedal operation. Verify that the pedal does not bind and has adequate free play. If the pedal

lacks free play, check the pedal and the power booster for looseness or for a binding condition. DO NOT road
test the vehicle until the condition is located and corrected.

• Check the vacuum booster check valve and vacuum supply hose.

• If the preliminary checks appear to be OK, road test the vehicle.

Brake Noise

CONDITION

POSSIBLE CAUSES

CORRECTION

Disc Brake Chirp

· Excessive brake rotor runout.
· Small particles

· Diagnose and correct as
necessary.

Disc Brake Rattle Or Clunk

· Broken or missing spring clips.
· Caliper guide pin bolts loose.
· Missing abutment shims.
· Small metal particles

· Replace brake pads.
· Tighten guide pin bolts.
· Replace missing abutment shims.

Disc Brake Squeak At Low Speed
(While Applying Light Brake Pedal
Effort)

· Brake shoe linings.

· Replace brake pads.

Scraping Or Whirring

· ABS wheel speed sensor hitting
tone wheel.

· Inspect, correct or replace faulty
component(s).

12


Braking Concerns

CONDITION

POSSIBLE CAUSES

CORRECTION

Excessive Pedal Effort

· Obstruction of brake pedal.
· Low power brake booster assist.
· Glazed brake pads.
· Brake pad lining transfer to brake
rotor.

· Inspect, remove or move
obstruction.
· Refer to Power Brake Booster in
this section.
· Resurface or replace brake rotors
as necessary. Replace brake pads.
· Resurface or replace brake rotors
as necessary. Replace brake pads.

Excessive Pedal Effort (Hard Pedal
Unable To Lock-Up Wheels)

· Power brake booster runout
(vacuum assist).

· Check booster vacuum hose and
engine tune for adequate vacuum
supply.

Excessive Pedal Travel (Vehicle
Stops OK)

· Air in brake lines.

· Bleed brakes.

Pedal Pulsates/Surges During
Braking

· Disc brake rotor has excessive
thickness variation.

· Isolate condition as rear or front.
Resurface or replace brake rotors as
necessary.

Pedal Is Spongy

· Air in brake lines.

· Bleed brakes.

Vehicle Pulls To Right Or Left On
Braking

· Frozen brake caliper piston.
· Contaminated brake pad/shoe
lining (most likely front lining).
· Pinched brake lines.
· Leaking piston seal.
· Suspension problem.

· Replace frozen piston or caliper.
Bleed brakes.
· Inspect and clean, or replace
pads/shoes. Repair source of
contamination.
· Replace pinched line.
· Replace piston seal or brake
caliper.
· See the Suspension section.

Parking Brake - Excessive Handle
Travel

· Rear brakes out of adjustment.

· Adjust rear parking brake shoes on
vehicles with rear disc brakes.

DIAGNOSIS & TESTING


ON-VEHICLE SERVICE

Brake Bleeding

Brake Bleeding Information

WARNING!

When bleeding the brake system, wear safety glasses. A clear bleed tube must be attached to the bleeder
screws and submerged in a clear container filled partially with clean brake fluid. Direct the flow of brake fluid
away from yourself and the painted surfaces of the vehicle. Brake fluid at high pressure may come out of the
bleeder screws when opened.

CAUTION:
Before removing the master cylinder cap, wipe it clean to prevent dirt and other foreign matter
from dropping into the master cylinder reservoir. Use brake fluid or an equivalent from a fresh,
tightly sealed container. Brake fluid must conform to DOT 4 specifications.

NOTE :
During the brake bleeding procedure, be sure the brake fluid level remains close to the

⬙MAX⬙ level in the master

cylinder fluid reservoir. Check the fluid level periodically during the bleeding procedure and add brake fluid as
required.

NOTE :
Do not pump the brake pedal at any time while having a bleeder screw open during the bleeding process. This will
only increase the amount of air in the system and make additional bleeding necessary. Do not allow the master
cylinder reservoir to run out of brake fluid while bleeding the system. An empty reservoir will allow additional air into
the brake system. Check the fluid level frequently and add fluid as needed. The following wheel circuit sequence for
bleeding the brake hydraulic system should be used to ensure adequate removal of all trapped air from the hydraulic
system.

Brake Bleeding Procedure

The following wheel circuit sequence for bleeding the brake hydraulic system should be used to ensure adequate
removal of all trapped air from the hydraulic system:

• Left rear wheel

• Right front wheel

• Right rear wheel

• Left front wheel

Manual Brake Bleeding

NOTE :
To bleed the brakes manually, the aid of a helper will be required.

Fill the brake master cylinder reservoir to the proper level with brake fluid.

12


Content   ..  349  350  351  352   ..