Chery Tiggo. Manual - part 335


  Index      Chery     Chery Tiggo - service repair manual 2009 year


Search            


Content   ..  333  334  335  336   ..


Chery Tiggo. Manual - part 335


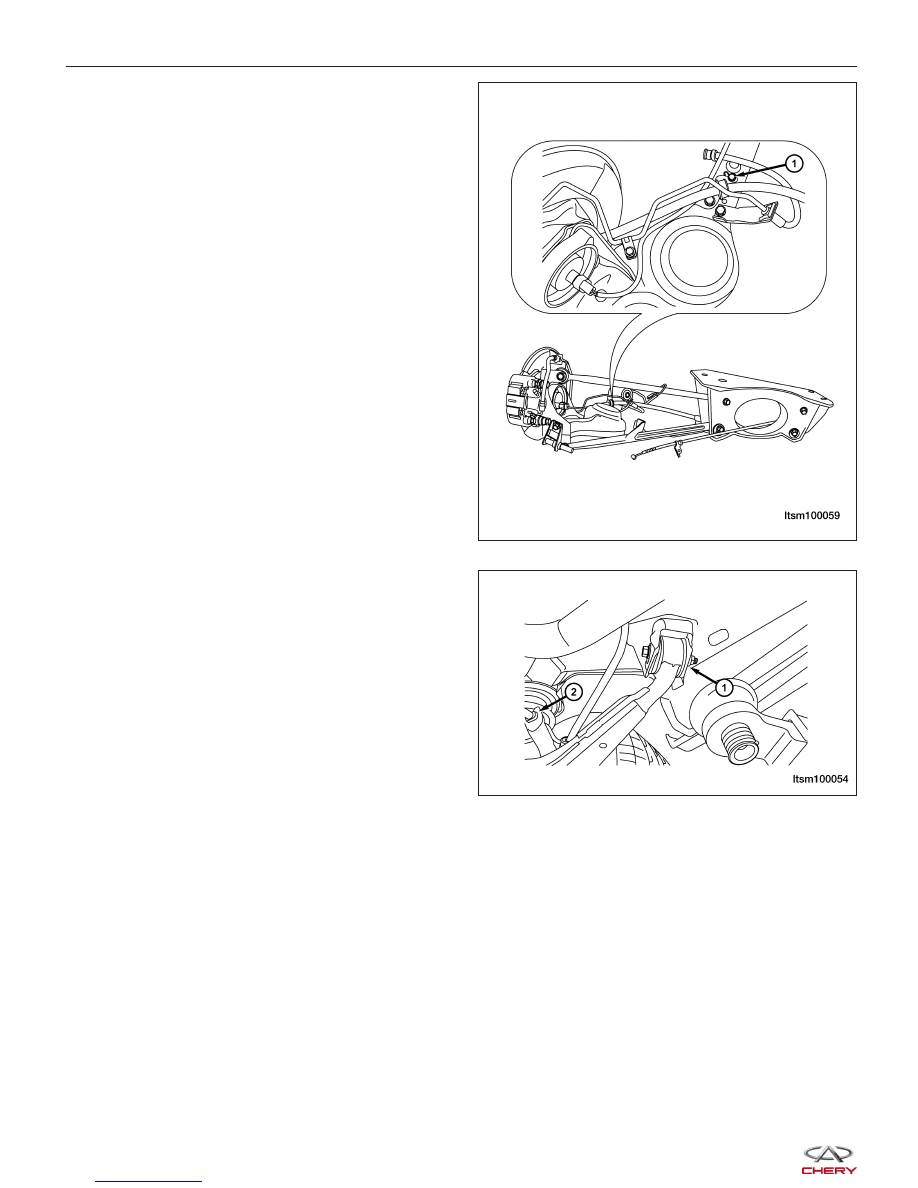
8. Remove the connecting bolt (1) that joins the rear

trailing arm to the hand brake cable bracket.
(Tighten:

Hand

brake

cable

bracket

bolt

to

25 - 35 N·m)

9. Remove the bolt (1) that joins the rear trailing arm

to the vehicle body.

10. Remove the brake fluid pipe clamp (2).

ON-VEHICLE SERVICE

LTSM100059

LTSM100054


11. Remove the brake fluid pipe clamp (1) and bracket

bolts (2) on the trailing arm.

12. Remove the rear brake rotor (See Rear Brake Rotor Removal & Installation in Section 10 Brakes).

13. Remove the rear hub and bearing (See Rear Hub and Bearing Removal & Installation in Section 09 Driveline &

Axle).

14. Remove the rear trailing arm.

15. Installation is in the reverse order of removal.

Installation Notes:
• After installation, each bolt must be tightened to the required tightening torque.

ON-VEHICLE SERVICE

LTSM100067

10


ALIGNMENT

GENERAL INFORMATION

10-39

Description

10-39

Operation

10-39

Pre-Wheel Alignment Inspection

10-39

Wheel Alignment Setup

10-40

Specifications

10-40

DIAGNOSIS & TESTING

10-42

Vehicle Inspection

10-42

Tire Wear

10-42

Tire Wear Chart

10-42

Alignment Troubleshooting Chart

10-43

ON-VEHICLE SERVICE

10-44

Front Wheel Alignment

10-44

Front Wheel Alignment Specifications

10-44

Front Axle Toe-In Adjustment

10-44

Front Camber Adjustment

10-44

Rear Wheel Alignment

10-45

Rear Wheel Alignment Specifications

10-45

Rear Axle Toe-In Adjustment

10-45

Rear Camber Adjustment

10-46


GENERAL INFORMATION

Description

Vehicle wheel alignment is the positioning of all interrelated front and rear suspension angles. These angles affect the
handling and steering of the vehicle when it is in motion. Proper wheel alignment is essential for efficient steering,
good directional stability, and proper tire wear.

The method of checking a vehicle’s front and rear wheel alignment varies depending on the manufacturer and type
of equipment used. The manufacturer’s instructions should always be followed to ensure accuracy of the alignment.
On this vehicle, the suspension angles that can be adjusted are as follows:

Front Axle
• Camber

• Caster

• Toe-in

Rear Axle
• Camber

• Toe-in
Check the wheel alignment and make all wheel alignment adjustments with the vehicle standing at its proper curb
height specification. Curb height is the normal riding height of the vehicle. It is measured from a certain point on the
vehicle to the ground or a designated area while the vehicle is sitting on a flat, level surface.

Operation

Curb Height Measurement

The wheel alignment is to be checked and all alignment adjustments made with the vehicle at its required curb height
specification.

• Vehicle height is to be checked with the vehicle on a flat, level surface, preferably a vehicle alignment rack.

• The tires are to be inflated to the recommended pressure.

• All tires are to be the same size as standard equipment.

• Vehicle height is checked with the fuel tank full of fuel, and no passenger or luggage compartment load.

• Vehicle height is not adjustable.

• If the measurement is not within specifications, inspect the vehicle for bent or weak suspension components.

• Compare the parts tag on the suspect coil spring(s) to the parts book and the vehicle sales code, checking for

a match.

• Once removed from the vehicle, compare the coil spring height to a new or known good coil spring. The

heights should vary if the suspect spring is weak.

NOTE :
Prior to reading the curb height measurement, the front and rear of the vehicle must be jounced to settle the sus-
pension. Induce jounce by pushing down on the center of the bumper (fascia), using care not to damage the vehicle,
moving the vehicle up and down, gradually increasing the suspension travel with each stroke. Release the bumper at
the bottom of each stroke, repeating this action several times. Perform this to both front and rear suspensions an
equal number of times.

Pre-Wheel Alignment Inspection

Before any attempt is made to change or correct the wheel alignment, the following inspection and necessary cor-
rections must be made to the vehicle to ensure proper alignment.

1. Verify the fuel tank is full of fuel. If the fuel tank is not full, the reduction in weight will affect the curb height of

the vehicle and the alignment specifications.

2. The passenger and luggage compartments of the vehicle should be free of any load that is not factory equip-

ment.

10


Content   ..  333  334  335  336   ..