Chery SQR 7160 sedan. Manual - part 32
 

  Index      Chery     Chery SQR 7160 sedan - service repair manual


Search            


Content   ..  30  31  32  33   ..


Chery SQR 7160 sedan. Manual - part 32


CAC Gasoline Engine Maintenance And Servicing Manual 

46 

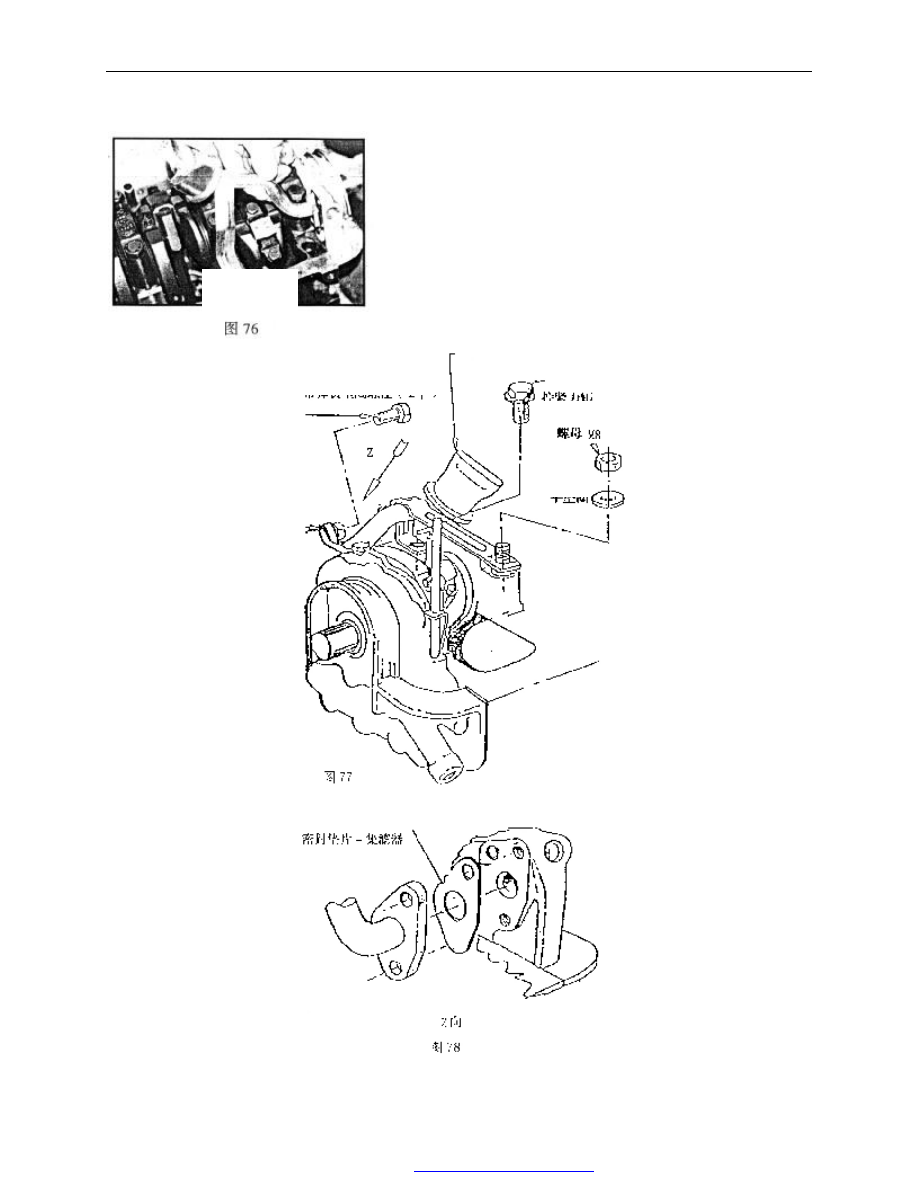
The removal and installation of oil collector assembly 

 
removal: 
——Loosen locknut of oil collector assembly and take out the nut 
and flat washer 
——Loosen carrier bolts and take out the bolts。 
——Loosen flange face bolt of oil collector (two ) and take out the 
two bolts with spring washers 


Installation: 

——Install  a  new 
sealing  gasket  of 
oil  collector  on 
the  flange  face  of 
oil  pump and then 
install 

oil 

collector assembly. 
Screw  two  bolts 
with  gasket  by 
hand. 


——Screw the oil 
collector 

carrier 

into  the  cylinder 
body 

with  M8 

bolt.  At  the  same 
time,  hitch  the 
carrier  into  the 
stud  which  is  in 
the  left  of  the 
second 

bearing 

cap.  Install  the 
flat  washer  and 
screw  in  the  nut 
by hand. 


——Tighten  the 
flange face bolt of 
oil  collector  to 
8.0—12.0Nm. 


——Tighten carrier bolt to 

17—23Nm 

 
——Tighten the locknut to 

17—23Nm 

Fig. 76 

Tightening torque 8.0-12.0Nm 

with spring plate screws(2)


oil collector


screw M6×20


tightening torque 

23.0Nm


screw M8


flat washer


PDF 文件使用 "pdfFactory Pro" 试用版本创建  


www.fineprint.com.cn

CAC Gasoline Engine Maintenance And Servicing Manual 

47 

4. The removal and installation of oil pump with oil seal assembly 
 
removal: 
——Loosen six M6×30 hexagonal flange surface bolts. Remove the 
bolts (as the figure indicates ) 
——Remove oil pump with oil seal assembly 


——Pry out the front oil seal of crankshaft by screwdriver or chisel. 
Note: Don’t damage the front oil seal bore. 


——Remove  seven  M6  countersunk  head  screws  (as  the  arrow  in 
figure indicates ) 
——Remove oil pump cover 


——Take out the inner and outer rotor 

Fig. 79 

Fig. 80 

Fig. 81 

Fig. 82 

PDF 文件使用 "pdfFactory Pro" 试用版本创建  


www.fineprint.com.cn

CAC Gasoline Engine Maintenance And Servicing Manual 

48 

——Check the clearance between outer rotor of oil pump and case bore 
of oil pump.   

The clearance between outer rotor of oil pump and case bore of oil 

pump should be 0.06—0.19mm. 


——Check  the  radial  clearance  between  inner  rotor  and  outer  rotor  of 
oil pump. 
        The  radial  clearance  between  inner  rotor  and  outer  rotor  of  oil 
pump should be 0.05—0.18mm. 


——Check the end play of rotor 
        The end play of rotor should be 0.014—0.100mm. 


——Remove horizontal hexagonal socket head plug (small one) 
——Take out the spring of relief valve and plunger of relief valve. 
——Check the spring load and free length 
        spring free length is 46mm。 
        spring load is 32.8N±2N when the length is 29mm. 
        installation length of relief valve spring is 38.5mm. 


Fig. 83 

Fig. 84 

Fig. 85 

Fig. 86 

PDF 文件使用 "pdfFactory Pro" 试用版本创建  


www.fineprint.com.cn

CAC Gasoline Engine Maintenance And Servicing Manual 

49 

——If  relief  valve  spring  is  not  to  specification,  it  must  be 
replaced.   


Installation: 
——Install  the  outer  and  inner  rotor  into  the  oil  pump  house 
ensuring      the installation mark of outer and inner rotor upward. 
——Install  oil  pump  cover  on  oil  pump.  Tighten  seven  chamfer 
head screws. tightening torque is 7-10Nm. 

——Install  relief  valve  and  relief  valve  spring  into  the  oil  pump 
bore. 
——Screw  3/8″plug  screw  into  the  oil  pump  house.  keep  it  in 
place.    tightening torque is 20-25Nm. 
——Stick  the  new  oil  pump  sealing  gasket  on  the  front  end  of 
cylinder block. 
——Install the oil pump into the front end  of crankshaft.    center 
the inner bore of inner rotor Before installation. 

——Screw six mounting bolts by hand. 
——Check and adjust the roughness of lower surface of oil pump 
and flange surface of cylinder block oil pan. It should be within the 
range:±0.26mm. 
——Tighten the retaining bolt of oil pump to 8-11Nm. 

——Apply the engine oil on the oil seal journal of crankshaft. 
——Wrap  a  plastic  tape  on  the  oil  seal  journal  of  crankshaft   
avoiding to damage the edge of front crankshaft oil seal .   

——Apply  engine  oil  on  the  edge  of  front  crankshaft  oil  seal. 
Press  the  oil  seal  in  place  using  appropriate  socket  or  sleeve  and 
crankshaft pulley and pulley bolt and washers. 

Fig. 87 

Fig. 88 

Fig. 89 

Fig. 90 

PDF 文件使用 "pdfFactory Pro" 试用版本创建  


www.fineprint.com.cn


Content   ..  30  31  32  33   ..