Chery IndiS (S18D) . Manual - part 9


  Index      Chery     Chery IndiS (S18D) - service manual


Search            


Content   ..  7  8  9  10   ..


Chery IndiS (S18D) . Manual - part 9


7.2. Pull   off   the   harness   connector   and   remove 

the license lamp.

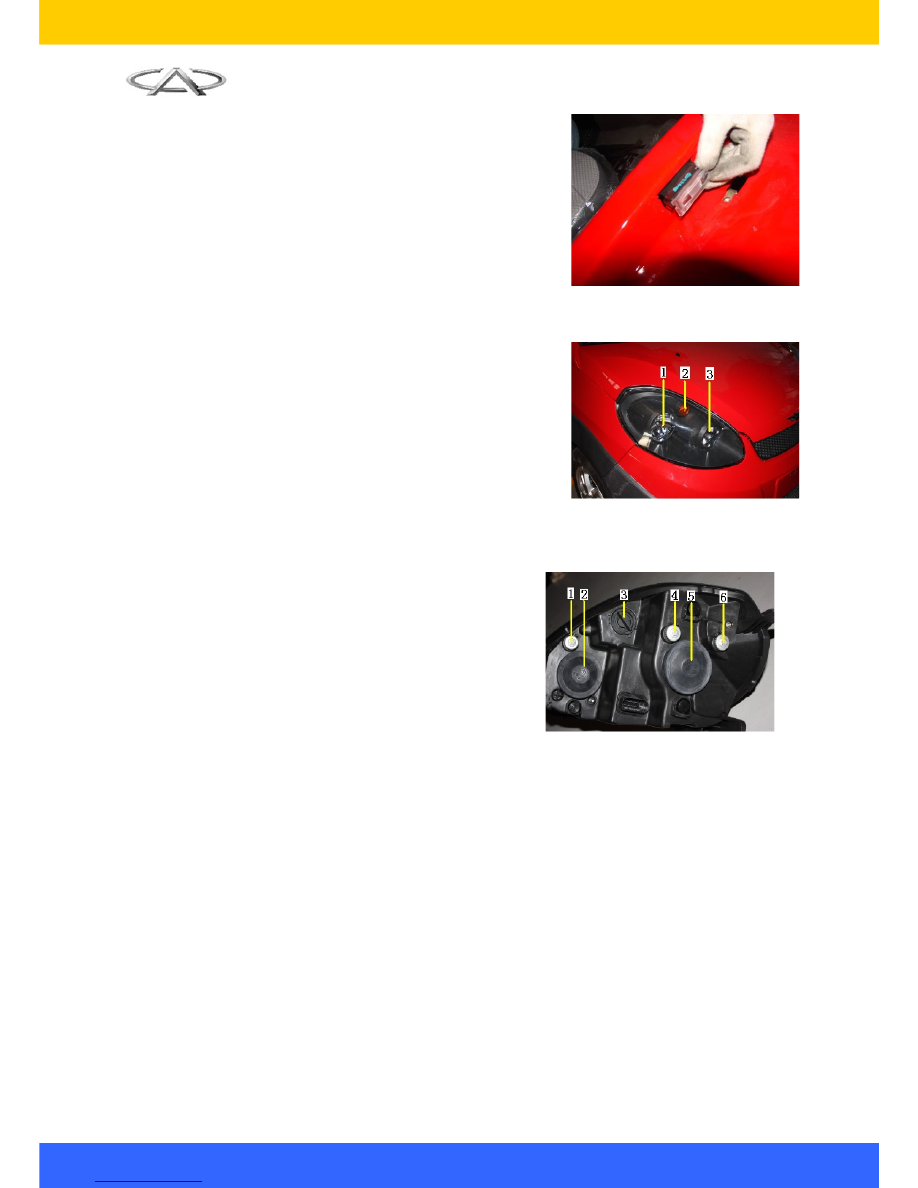
Ⅷ.Installation & Adjustment of Headlamp

8.1. Installation Procedures for the Headlamp

The   installation   procedures   of   headlamp   are 
reverse to those for removal. 

8.2. Function of headlamp

8.2.1.

Front view

As shown in right figure:

1

Low beam lamp

2

Turn lamp

3

High beam lamp and position lamp

8.2.2.

Back view

1

High beam lamp up & down adjusting nut

2

High and low beam lamp and position lamp 
rear cover

3

Turn lamp bulb holder

4

Low beam left & right adjusting nut

5

Low beam lamp rear cover

6

Low beam lamp up & down adjusting nut


8.3. Adjustment of Headlamp

8.3.1.

Pay attention to law and regulations and verify the following items before adjustment:

1). The tire air pressure should comply with the related standard;

2). Vehicle  is  unloaded  (except  for  spare  tire and equipping tools,  and  include  driver’s  weight  for 

sedan);

3). The vehicle should be parked on level and smooth road or field;

4). The matched mirror surface of the headlamp should be fresh of dirt;

5). The power supply should work normally and the bulb should be properly installed. 

8.3.2.

Insert a hexagon wrench into corresponding adjusting hole to adjust the lamp.

33


Ⅸ.Installation of Tail Lamp

9.1. Installation Procedure of tail lamp

The   installation   procedures   of   tail   lamp   are 
reverse to those for removal.

9.2. Function of tail lamp

9.2.1.

Front view

1). Brake lamp/ position lamp (one bulb has two 

filaments)

2). Turn lamp

3). Reverse lamp

9.2.2. Rear view

As shown in right figure:

1). Reverse lamp holder

2). Turn lamp holder

3). Brake lamp/ position lamp holder

34


Chapter VI Removal and Installation of Vehicle Ceiling

I. Preparations

Tools: socket wrench, cross screwdriver, slotted screwdriver and etc.

Parts: expansion bolt.

II. Precautions

1.

During the removal and installation, make sure to apply proper force and violent operation is not 
allowed.

2.

During   removal   and   installation   of   the   inner   trims,   make   sure   to   protect   the   tirms   from   being 
scratched.

III. Removal and Installation of Sun Visor

1.

Removal Procedure

1.1. Use   a   cross   screwdriver   to   remove   the 

screws on sun visor in left of the driver’s cab 
and remove the sun visor.

1.2. The   removal   procedures   for   the   right   sun 

visor are reverse to those for removal of the 
left one.

2.

Installation Procedure

The installation procedures are reverse to those for removal.

IV. Removal and Installation of Ceiling Armrest

1.

Removal Procedure

1.1. Open the ceiling armrest screw cover over the 

co-driver’s   seat   by   hand,   and   then   use   a 
cross   screwdriver   to   loosen   off   the   left   and 
right fixing screws.

35


1.2. Remove the ceiling armrest.

2.

Installation Procedure

The installation procedures are reverse to those for removal.

V. Removal and Installation of Front Ceiling Lamp

1.

Removal Procedure

1.1. Align   a   slotted   screwdriver   with   the   groove 

along the ceiling lamp edge to pry it open.

Note: Do not scratch part surface.

1.2. Remove the three fixing screws of the front 

ceiling lamp.

1.3. Disconnect the harness connector and 

remove the front ceiling lamp assembly.

2.

Installation Procedure 

The installation procedures are reverse to those for removal.

VI. Removal and Installation of A-pillar Panel

1.

Removal Procedure

36


Content   ..  7  8  9  10   ..