Acura RL (2011 year). Manual - part 31


  Index      Acura     Acura RL (2011 year) - manual in english


Search            copyright infringement  


Content      ..     29      30      31      32     ..


Acura RL (2011 year). Manual - part 31


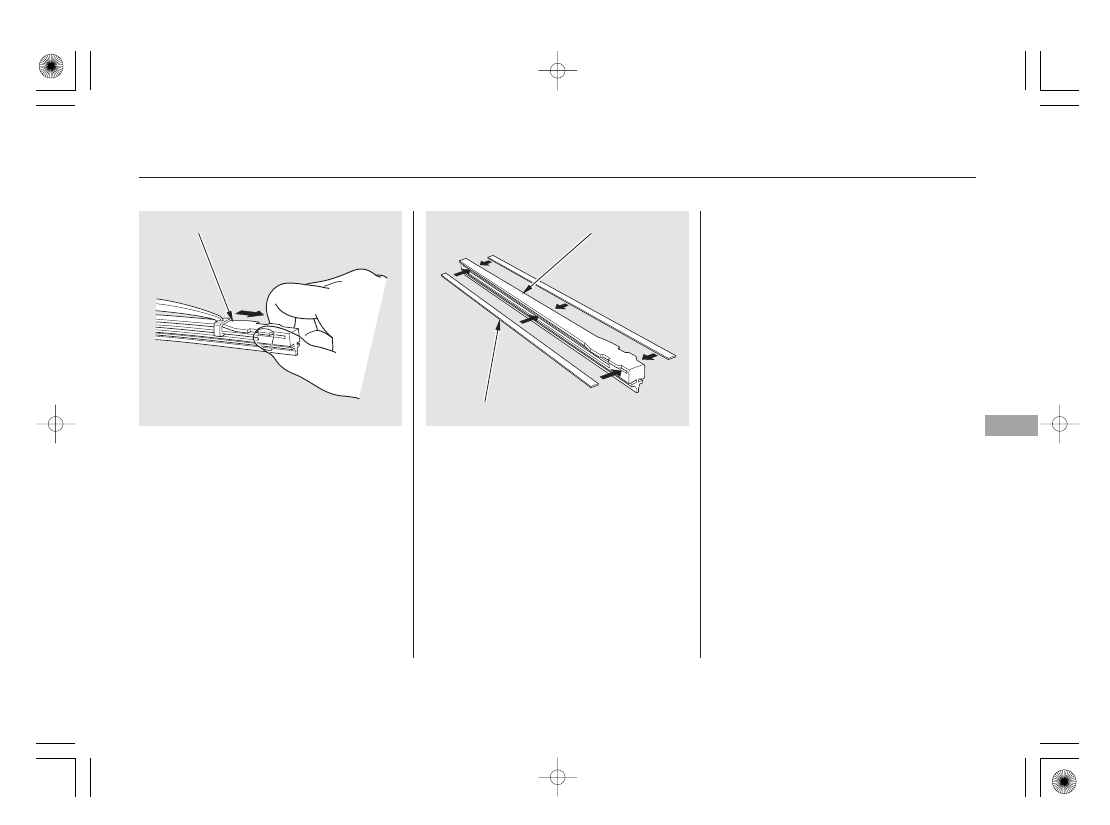
Examine the new wiper blades. If
they have no plastic or metal
reinforcement along the back
edge, remove the metal
reinforcement strips from the old
wiper blade, and install them in
the slots along the edge of the new
blade.

Slide the new wiper blade into the
holder until the tabs lock.

Reinstall the blade assembly to the
wiper arm and tighten the two
screws securely. Reinstall the
cover by pushing it in.

Set the wiper arms back on the
windshield. Adjust the windshield
wipers to their previously parked
position.

Remove the blade from its holder
by grabbing the tabbed end of the
blade. Pull up firmly until the tabs
come out of the holder.

4.

5.

6.

7.

8.

Wiper Blades

Ma

int
e

na
nce

479

BLADE

BLADE

REINFORCEMENT

10/08/04 20:05:57 31SJA660_484

-------------------------------------------------------------------------------------------------------------------------------------------------------------

Clean the wheels as you would the
rest of the exterior. Wash them with
the same solution, and rinse them
thoroughly.

Aluminum alloy wheels have a
protective clear-coat that keeps the
aluminum from corroding and
tarnishing. Cleaning the wheels with
harsh chemicals (including some
commercial wheel cleaners) or a stiff
brush can damage the clear-coat. To
clean the wheels, use a mild
detergent and a soft brush or sponge.

Exterior Care, Wheels

Exterior Care

Wheels

480

Chemical solvents and strong cleaners
can damage the paint, metal, and
plastic on your vehicle.

10/08/04 20:06:05 31SJA660_485

-------------------------------------------------------------------------------------------------------------------------------------------------------------

CONTINUED

To safely operate your vehicle, your
tires must be the proper type and
size, in good condition with adequate
tread, and correctly inflated.

The following pages give more
detailed information on how to take
care of your tires and what to do
when they need to be replaced.

Keeping the tires properly inflated
provides the best combination of
handling, tread life, and riding
comfort.

Underinflated tires wear unevenly,
adversely affect handling and fuel
economy, and are more likely to
fail from being overheated.

Overinflated tires can make your
vehicle ride more harshly, are
more prone to damage from road
hazards, and wear unevenly.

The tire pressure monitoring system
(TPMS) will warn you when a tire
pressure is low. See page

for

information on the TPMS.

Even though your vehicle is
equipped with TPMS, we
recommend that you visually check
your tires every day. If you think a
tire might be low, check it
immediately with a tire gauge.

Use a gauge to measure the air
pressure in each tire at least once a
month. Even tires that are in good
condition may lose one to two psi (10
to 20 kPa, 0.1 to 0.2 kgf/cm ) per
month. Remember to check the
spare tire at the same time.

429

Tires

Inf lation Guidelines

Ma

int
e

na
nce

481

Using tires that are excessively
worn or improperly inflated can
cause a crash in which you can
be seriously hurt or killed.

Follow all instructions in this
owner’s manual regarding tire
inflation and maintenance.

10/08/04 20:06:16 31SJA660_486

-------------------------------------------------------------------------------------------------------------------------------------------------------------

The following charts show the
recommended cold tire pressures for
most normal driving conditions.

Check the pressure in the tires when
they are cold. This means the vehicle
has been parked for at least three
hours, or driven less than 1 mile (1.6
km).

Add or release air, if needed, to
match the recommended cold tire
pressures on this page.

You should get your own tire
pressure gauge and use it whenever
you check your tire pressures. This
will make it easier for you to tell if a
pressure loss is due to a tire problem
and not due to a variation between
gauges.

If you check the pressure when the
tires are hot [driven for several miles
(kilometers)], you will see readings 4
to 6 psi (30 to 40 kPa, 0.3 to
0.4 kgf/cm ) higher than the cold
reading. This is normal; do not
release air to match the cold
pressure. The tires will be
underinflated.

While tubeless tires have some
ability to self-seal if they are
punctured, you should look closely
for punctures if a tire starts losing
pressure.

Tire Size/Type

Compact Spare

Cold Tire Pressure

Front

Rear

Tires

Recommended Tire Pressures

Normal Driving

482

T155/70D17

110M

32 psi (220 kPa , 2.2 kgf/cm )

30 psi (210 kPa , 2.1 kgf/cm )

P245/45R18 96V

60 psi (420 kPa , 4.2 kgf/cm )

10/08/04 20:06:28 31SJA660_487

-------------------------------------------------------------------------------------------------------------------------------------------------------------

For convenience, the recommended
tire sizes and cold tire pressures are
on a label on the driver’s doorjamb.

For additional technical information
about your tires, see page

.

We strongly recommend that you do
not drive faster than the posted
speed limits and conditions allow. If
you ever drive in a sanctioned
competitive event at sustained high
speeds (over 112 mph or 181 km/h),
be sure to adjust the cold tire
pressures as shown below. If you do
not, excessive heat can build up and
cause sudden tire failure.

The recommended tire pressures for
high speed driving are not on the
label on the driver’s doorjamb,
contact your dealer for more
information about the tire pressures.

When you return to normal speed
driving, be sure to readjust the tire
pressure for normal driving. You
should wait until the tires are cold
before adjusting the tire pressure.

528

Tire Size

Cold Tire Pressure

Rear

Front

High Speed Driving

High Speed Driving

Tires

Ma

int
e

na
nce

483

P245/45R18 96V

36 psi (250 kPa , 2.5 kgf/cm )

35 psi (240 kPa , 2.4 kgf/cm )

10/08/04 20:06:40 31SJA660_488

-------------------------------------------------------------------------------------------------------------------------------------------------------------

Every time you check inflation, you
should also examine the tires for
damage, foreign objects, and wear.

You should look for:

Bumps or bulges in the tread or
side of the tire. Replace the tire if
you find either of these conditions.

Cuts, splits, or cracks in the side
of the tire. Replace the tire if you
can see fabric or cord.

Excessive tread wear.

Your tires have wear indicators
molded into the tread. When the
tread wears down, you will see a 1/2
inch (12.7 mm) wide band across the
tread. This shows there is less than
1/16 inch (1.6 mm) of tread left on
the tire.

The service life of your tires is
dependent on many factors,
including, but not limited to, driving
habits, road conditions, vehicle
loading, inflation pressure,
maintenance history, speed, and
environmental conditions (even
when the tires are not in use).

A tire this worn gives very little
traction on wet roads. You should
replace the tire if you can see three
or more tread wear indicators.

Tire Inspection

Tire Service Lif e

Tires

484

INDICATOR LOCATION MARKS

TREAD WEAR INDICATOR

10/08/04 20:06:51 31SJA660_489

-------------------------------------------------------------------------------------------------------------------------------------------------------------

In addition to your regular
inspections and inflation pressure
maintenance, it is recommended that
you have annual inspections
performed once the tires reach five
years old. It is also recommended
that all tires, including the spare, be
removed from service after 10 years
from the date of manufacture,
regardless of their condition or state
of wear.

The last four digits of the TIN (tire
identification number) are found on
the sidewall of the tire and indicate
the date of manufacture (See

on page

).

In addition to proper inflation,
correct wheel alignment helps to
decrease tire wear. If you find a tire
is worn unevenly, have your dealer
check the wheel alignment.

Have your dealer check the tires if
you feel a consistent vibration while
driving. A tire should always be
rebalanced if it is removed from the
wheel. When you have new tires
installed, make sure they are
balanced. This increases riding
comfort and tire life. For best results,
have the installer perform a dynamic
balance.

530

Tires

Tire

Labeling

Tire Maintenance

Ma

int
e

na
nce

485

Improper wheel weights can damage
your vehicle’s aluminum wheels. Use
only Acura wheel weights f or balancing.

10/08/04 20:06:59 31SJA660_490

-------------------------------------------------------------------------------------------------------------------------------------------------------------

Replace your tires with radial tires of
the same size, load range, speed
rating, and maximum cold tire
pressure rating (as shown on the
tire’s sidewall).

Mixing radial and bias-ply tires on
your vehicle can reduce braking
ability, traction, and steering
accuracy. Using tires of a different
size or construction can cause the
ABS and vehicle stability assist
system (VSA) to work inconsistently.

The ABS and VSA system work by
comparing the speed of each wheel.
When replacing tires, use the same
size originally supplied with the
vehicle. Tire size and construction
can affect wheel speed and may
cause the system to activate.

To help increase tire life and
distribute wear more evenly, rotate
the tires according to the
maintenance messages displayed on
the multi-information display. Move
the tires to the positions shown in
the illustration each time they are
rotated. If you purchase directional
tires, rotate only front-to-back.

When the tires are rotated, make
sure the air pressures are checked.

Replacing Tires and Wheels

Tire Rotation

Tires

486

(For Non-directional
Tires and Wheels)

(For Directional
Tires and Wheels)

Front

Front

10/08/04 20:07:09 31SJA660_491

-------------------------------------------------------------------------------------------------------------------------------------------------------------

It is best to replace all four tires at
the same time. If that is not possible
or necessary, replace the two front
tires or two rear tires as a pair.
Replacing just one tire can seriously
affect your vehicle’s handling.

Wheels:

Tires:

See page

for DOT tire quality

grading information, and page

for tire size explanation.

If you ever replace a wheel, make
sure that the wheel’s specifications
match those of the original wheels.

Also be sure you use only TPMS
specific wheels. If you do not, the
tire pressure monitoring system will
not work on that tire.

Replacement wheels are available at
your dealer.

528

530

Wheel and Tire Specif ications

Tires

Ma

int
e

na
nce

487

18 x 8.0J AL (TPMS)

P245/45R18 96V

Installing improper tires on your
vehicle can affect handling and
stability. This can cause a crash
in which you can be seriously
hurt or killed.

Always use the size and type of
tires recommended in this
owner’s manual.

10/08/04 20:07:20 31SJA660_492

-------------------------------------------------------------------------------------------------------------------------------------------------------------

Tires marked ‘‘M

S’’ or ‘‘All

Season’’ on the sidewall have an all-
weather tread design suitable for
most winter driving conditions.

For the best performance in snowy
or icy conditions, you should install
snow tires or tire chains. They may
be required by local laws under
certain conditions.

If you mount snow tires on your
vehicle, make sure they are radial
tires of the same size and load range
as the original tires. Mount snow
tires on all four wheels. The traction
provided by snow tires on dry roads
may be lower than your original tires.
Check with the tire dealer for
maximum speed recommendations.

Mount tire chains on your tires when
required by driving conditions or
local laws. Install them only on the
front tires.

Because your vehicle has limited tire
clearance, Acura strongly
recommends using the chain listed
below, made by Security Chain
Company (SCC).

Cable-type: SCC Radial Chain
SC1040

Winter Driving

Snow Tires

Tire Chains

Tires

488

10/09/08 21:20:35 31SJA660_493

-------------------------------------------------------------------------------------------------------------------------------------------------------------

When installing cables, follow the
manufacturer’s instructions, and
mount them as tight as you can.
Make sure they are not contacting
the brake lines or suspension. Drive
slowly with them installed. If you
hear them coming into contact with
the body or chassis, stop and
investigate. Remove them as soon as
you begin driving on cleared roads.

Tires

Ma

int
e

na
nce

489

Using the wrong chains, or not
properly installing chains, can
damage the brake lines and
cause a crash in which you can
be seriously injured or killed.

Follow all instructions in this
owner’s manual regarding the
selection and use of tire chains.

Traction devices that are the wrong
size or improperly installed can
damage your vehicle’s brake lines,
suspension, body, and wheels. Stop
driving if they are hitting any part of
the vehicle.

10/08/04 20:07:35 31SJA660_494

-------------------------------------------------------------------------------------------------------------------------------------------------------------

Check the condition of the battery
monthly by looking at the test
indicator window. The label on the
battery explains the test indicator’s
colors.

Battery posts,

terminals, and related accessories
contain lead and lead compounds.

Check the terminals for corrosion (a
white or yellowish powder). To
remove it, cover the terminals with a
solution of baking soda and water. It
will bubble up and turn brown. When
this stops, wash it off with plain
water. Dry off the battery with a
cloth or paper towel. Coat the
terminals with grease to help prevent
future corrosion.

If additional battery maintenance is
needed, see your dealer or a
qualified technician.

If you need to connect the battery to
a charger, disconnect both cables to
prevent damaging your vehicle’s
electrical system. Always disconnect
the negative (

) cable first, and

reconnect it last.

To see the label, remove the battery
cover (see page

).

492

WARNING:

Wash your hands af ter handling.

Checking the Battery

490

TEST INDICATOR WINDOW

The battery gives off explosive
hydrogen gas during normal
operation.

A spark or flame can cause the
battery to explode with enough
force to kill or seriously hurt you.

Wear protective clothing and a
face shield, or have a skilled
technician do the battery
maintenance.

10/08/04 20:07:44 31SJA660_495

-------------------------------------------------------------------------------------------------------------------------------------------------------------

If your vehicle’s battery is
disconnected or goes dead, all stored
driving positions will be lost. To
store the driving positions again, see
the storing procedure on page

.

The navigation system will also
disable itself. The next time you turn
on the ignition switch, the system
will require you to enter a PIN
before it can be used. Refer to the
navigation system manual.

If your vehicle’s battery is
disconnected or goes dead, the audio
system may disable itself. The next
time you turn on the radio you will
see ‘‘

’’ in the frequency

display. Use the preset buttons to
enter the code (see page

).

If your vehicle’s battery is
disconnected or goes dead, the
power tilt and telescopic steering
wheel system will be disabled. The
system needs to be reset after
reconnecting the battery (see page

).

The compass system will also disable
itself. The next time you turn on the
ignition switch, the system will
require you to enter a PIN before it
can be used. Enter the four-digit anti-
theft security code (see page

).

You will also need to reset the clock
according to the instruction of
setting the clock (see page

).

298

313

280

149

164

On vehicles with navigation system

On vehicles without navigation system

Checking the Battery

Ma

int
e

na
nce

491

10/08/04 20:07:54 31SJA660_496

-------------------------------------------------------------------------------------------------------------------------------------------------------------

To reinstall the cover, reinstall the
two holding clips and secure them
by pushing on the center of each
fastener head.

Turn the knob of the cover to
LOCK position as shown in the
illustration.

Turn the knob of the battery cover
to UNLOCK as shown in the
illustration.

Remove the holding clips by
pushing on the center of each
fastener head.

2.

3.

4.

1.

:
:

Removing the Battery Cover

Checking the Battery

492

KNOB

CLIPS

Push to reset/install clip

Push to remove clip

Unlock
Lock

10/08/04 20:08:04 31SJA660_497

-------------------------------------------------------------------------------------------------------------------------------------------------------------

Cover the vehicle with a
‘‘breathable’’ cover, one made
from a porous material such as
cotton. Non-porous materials, such
as plastic sheeting, trap moisture,
which can damage the paint.

If possible, periodically run the
engine until it reaches full
operating temperature (the
cooling fans cycle on and off
twice). Preferably, do this once a
month.

If you need to park your vehicle for
an extended period (more than 1
month), there are several things you
should do to prepare it for storage.
Proper preparation helps prevent
deterioration and makes it easier to
get your vehicle back on the road. If
possible, store your vehicle indoors.

Fill the fuel tank.

Wash and dry the exterior
completely.

Clean the interior. Make sure the
carpeting, floor mats, etc., are
completely dry.

Leave the parking brake off. Put
the transmission in Park.

Block the rear wheels.

If the vehicle is to be stored for a
longer period, it should be
supported on jackstands so the
tires are off the ground.

Leave one window open slightly (if
the vehicle is being stored
indoors).

Disconnect the battery.

Support the front wiper blade
arms with a folded towel or rag so
they do not touch the windshield.

To minimize sticking, apply a
silicone spray lubricant to all door
and trunk seals. Also, apply a
vehicle body wax to the painted
surfaces that mate with the door
and trunk seals.

Vehicle Storage

Ma

int
e

na
nce

493

10/08/04 20:08:17 31SJA660_498

-------------------------------------------------------------------------------------------------------------------------------------------------------------

Vacuum dirt and dust from the
leather frequently. Pay close
attention to the pleats and seams.
Clean the leather with a soft cloth
dampened with a 90% water and 10%
neutral wool detergent solution.
Then buff it with a clean, dry cloth.
Remove any dust or dirt on leather
surfaces immediately.

Interior Care

Leather

494

10/08/04 20:08:21 31SJA660_499

-------------------------------------------------------------------------------------------------------------------------------------------------------------


Content      ..     29      30      31      32     ..