Acura RL (2011 year). Manual - part 30


  Index      Acura     Acura RL (2011 year) - manual in english


Search            copyright infringement  


Content      ..     28      29      30      31     ..


Acura RL (2011 year). Manual - part 30


Do not add any rust inhibitors or
other additives to your vehicle’s
cooling system. They may not be
compatible with the coolant or
engine components.

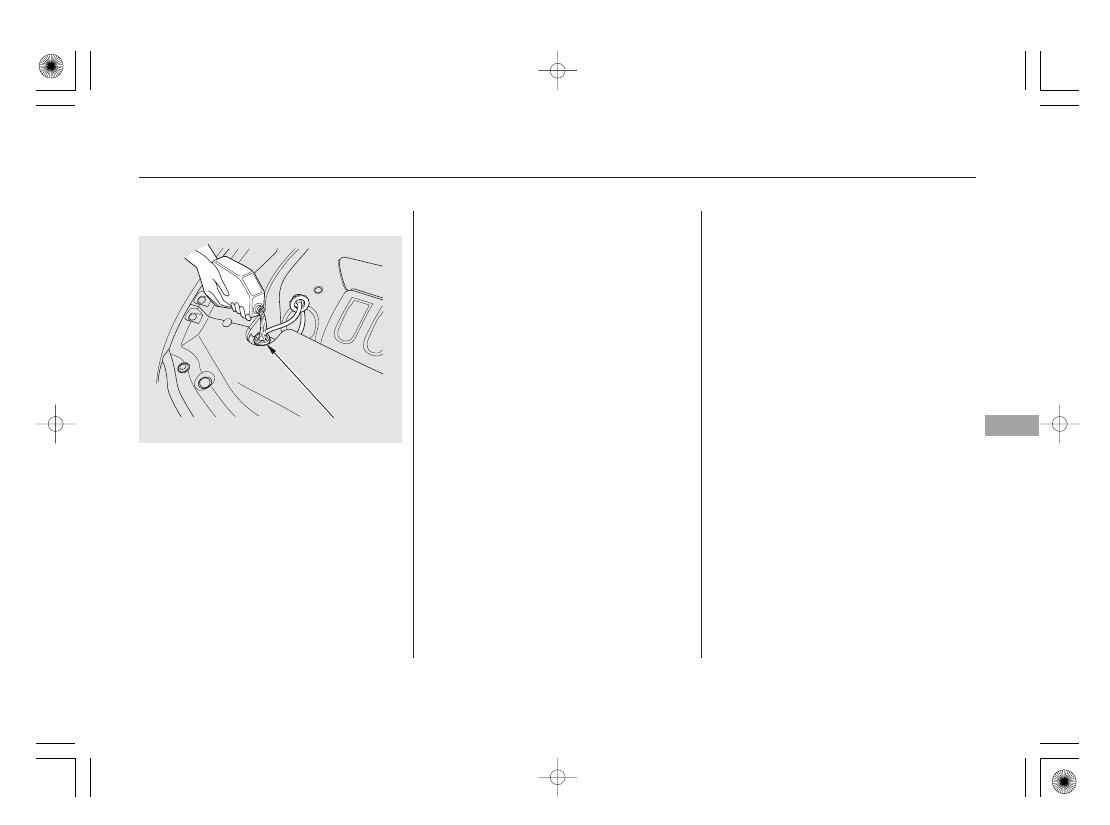
Check the fluid level in the
windshield washer reservoir at least
monthly during normal use.
If the washer fluid is low, a
‘‘WASHER FLUID LOW’’ message
appears on the multi-information
display.

Fill the reservoir with a good-quality
windshield washer fluid. This
increases the cleaning capability and
prevents freezing in cold weather.

Reinstall the lid.

Pour coolant into the reserve tank.
Fill it to halfway between the MAX
and MIN marks. Put the cap back
on the reserve tank.

6.

7.

CONTINUED

Windshield Washers

Engine Coolant, Windshield Washers

Ma

int
e

na
nce

463

RESERVE TANK

10/08/04 20:02:55 31SJA660_468

-------------------------------------------------------------------------------------------------------------------------------------------------------------

Check the fluid level with the engine
at normal operating temperature.

Remove the dipstick (yellow loop)
from the transmission, and wipe it
with a clean cloth.

Park the vehicle on level ground.
Start the engine, let it run until the
radiator fan comes on, then shut
off the engine. For accurate
results, wait about 60 seconds (but
no longer than 90 seconds) before
doing step 2.

When you refill the reservoir, clean
the edges of the windshield wiper
blades with windshield washer fluid
on a clean cloth. This will help to
condition the blade edges.

1.

2.

Windshield Washers, Automatic Transmission Fluid

Automatic Transmission Fluid

464

DIPSTICK

Do not use engine antif reeze or a
vinegar/water solution in the
windshield washer reservoir. Antif reeze
can damage your vehicle’s paint, while
a vinegar/water solution can damage
the windshield washer pump. Use only
commercially-available windshield
washer f luid.

10/09/08 21:19:25 31SJA660_469

-------------------------------------------------------------------------------------------------------------------------------------------------------------

Insert the dipstick all the way back
into the transmission securely as
shown in the illustration.

Insert the dipstick all the way into
the transmission as shown.

Remove the dipstick and check
the fluid level. It should be
between the upper and lower
marks.

If the level is below the lower
mark, add fluid into the dipstick
hole to bring it to the level
between the upper and lower
marks.

Pour the fluid slowly and carefully so
you do not spill any. Clean up any
spill immediately; it could damage
components in the engine
compartment.

If you are not sure how to add fluid,
contact your dealer.

The transmission should be drained
and refilled with new fluid when this
service is shown by a maintenance
message on the multi-information
display.

Make sure the rubber cap on the
dipstick fits in the dipstick guide
and that you push the dipstick in
all the way.

Always use Acura ATF DW-1
(automatic transmission fluid).

5.

6.

3.

4.

Automatic Transmission Fluid

Ma

int
e

na
nce

465

UPPER
MARK

LOWER
MARK

GUIDE

Use only Acura ATF DW-1 (automatic
transmission f luid). Do not mix with
other transmission f luids.
Using transmission f luid other than
Acura ATF DW-1 may cause
deterioration in transmission operation
and durability, and could result in
damage to the transmission.
Damage resulting f rom the use of
transmission f luid other than Acura
ATF DW-1 is not covered by the Acura
new vehicle warranty.

10/08/04 20:03:17 31SJA660_470

-------------------------------------------------------------------------------------------------------------------------------------------------------------

The fluid level should be between
the MIN and MAX marks on the side
of the reservoir. If the level is at or
below the MIN mark, your brake
system needs attention. Have the
brake system inspected for leaks or
worn brake pads.

Check the brake fluid level in the
reservoirs monthly.

To check the fluid level, remove the
left engine compartment cover (see
page

).

Always use Honda Heavy Duty
Brake Fluid DOT 3. If it is not
available, you should use only DOT 3
or DOT 4 fluid, from a sealed
container, as a temporary
replacement.

Using any non-Honda brake fluid can
cause corrosion and decrease the life
of the system. Have the brake
system flushed and refilled with
Honda Heavy Duty Brake Fluid
DOT 3 as soon as possible.

Brake fluid marked DOT 5 is not
compatible with your vehicle’s
braking system and can cause
extensive damage.

Independent of the Maintenance
Minder information, replace the
brake fluid every 3 years.

457

Brake Fluid

466

MAX

MIN

10/08/04 20:03:26 31SJA660_471

-------------------------------------------------------------------------------------------------------------------------------------------------------------

The timing belt should be replaced
according to the Maintenance
Minder

(see page

).

Replace the timing belt every 60,000
miles (100,000 km) if you regularly
drive your vehicle in any of the
following conditions:

If you frequently tow a trailer.

In very high temperatures
(over 110°F, 43°C).

In very low temperatures
(under

20°F,

29°C).

Pour the fluid slowly and carefully so
you do not spill any. Clean up any
spill immediately; it could damage
components in the engine
compartment.

Always use Acura Power Steering
Fluid. You may use another power
steering fluid as an emergency
replacement, but have the power
steering system flushed and refilled
with Acura PSF as soon as possible.

A low power steering fluid level can
indicate a leak in the system. Check
the fluid level frequently, and have
the system inspected as soon as
possible.

After removing the right engine
compartment cover (see page

),

check the level on the side of the
reservoir when the engine is cold.
The fluid should be between the
UPPER LEVEL and LOWER LEVEL.
If not, add power steering fluid to the
UPPER LEVEL mark.

454

457

Power Steering Fluid, Timing Belt

Timing Belt

Power Steering Fluid

Ma

int
e

na
nce

467

UPPER LEVEL

LOWER LEVEL

TM

Turning the steering wheel to f ull lef t
or right lock and holding it there can
damage the power steering pump.

10/08/04 20:03:39 31SJA660_472

-------------------------------------------------------------------------------------------------------------------------------------------------------------

Your vehicle is equipped with an
automatic headlight adjusting
system that adjusts the vertical angle
of the headlights automatically.
Refer to page

for more

information.

The headlights were properly aimed
when your vehicle was new. If you
regularly carry heavy items in the
trunk or pull a trailer, readjustment
may be required. Adjustments
should be done by your dealer or
another qualified technician.

The low beam headlight bulbs are
high voltage discharge tube bulbs.
High voltage can remain in the
circuit even with the light switch off
and the key removed. Because of
this, you should not attempt to
examine or change a low beam
headlight bulb yourself. If a low
beam headlight bulb fails, take the
vehicle to your dealer to have it
replaced.

Your vehicle has halogen high beam
headlight bulbs which are also used
for the daytime running light.
Handle it by its base and protect the
glass from contact with your skin or
hard objects. If you touch the glass,
clean it with denatured alcohol and a
clean cloth.

145

Lights

Headlight Aiming

Low Beam Headlight Bulb
Replacement

Replacing a High Beam
Headlight/Daytime Running
Light Bulb

468

Halogen bulbs get very hot when lit. Oil,
perspiration, or a scratch on the glass
can cause the bulb to overheat and
shatter.

10/08/04 20:03:48 31SJA660_473

-------------------------------------------------------------------------------------------------------------------------------------------------------------

Remove the electrical connector
from the bulb by pushing on the
tab and pulling the connector
down.

Remove the bulb by turning it one-
quarter turn counterclockwise.

If you are replacing the bulb on
the driver’s side, remove the
battery cover (see page

).

Remove the left or right side
engine compartment cover from
the side you are working on by
carefully pulling the cover out (see
page

).

Open the hood.

Insert the new bulb into the hole,
and turn it one-quarter turn
clockwise to lock it in place.

Push the electrical connector back
onto the bulb. Make sure it is on
all the way.

Turn on the headlights to test the
new bulb.

Reinstall the engine compartment
side cover.

Reinstall the battery cover.

(Driver’s side)

2.

3.

1.

4.

5.

6.

7.

8.

9.

457

492

Lights

Ma

int
e

na
nce

469

BULB

CONNECTOR

10/08/04 20:04:00 31SJA660_474

-------------------------------------------------------------------------------------------------------------------------------------------------------------

Remove the left or right side
engine compartment cover from
the side you are working on by
carefully pulling the cover out (see
page

).

Remove the socket from the
headlight assembly by turning it
one-quarter turn counterclockwise.

Push the bulb in slightly, and turn
it counterclockwise.

Open the hood.

If you are replacing the bulb on
the driver’s side, remove the
battery cover (see page

).

Install the new bulb into the
socket.

Insert the socket back into the
headlight assembly. Turn it
clockwise to lock it in place.

Turn on the lights to make sure
the new bulb is working.

Reinstall the engine compartment
side cover.

(Driver’s side)
Reinstall the battery cover.

2.

1.

3.

4.

5.

6.

7.

457

492

8.

9.

Lights

Replacing a Front Turn Signal
Light Bulb

470

BULB

SOCKET

10/08/04 20:04:13 31SJA660_475

-------------------------------------------------------------------------------------------------------------------------------------------------------------

Remove the left or right side
engine compartment cover (see
page

).

Use a flat-tip screwdriver to
remove the holding clip from the
windshield washer reservoir.

(Passenger’s side)

Open the hood.

If you are replacing the bulb on
the driver’s side, remove the
battery cover (see page

).

Remove the socket from the
headlight assembly by turning it
one-quarter turn counterclockwise.

Pull the bulb straight out of its
socket.

Turn on the lights to make sure
the new bulb is working.

Reinstall the engine compartment
side cover.

Install the new bulb into the
socket.

Insert the socket back into the
headlight assembly. Turn it
clockwise to lock it in place.

Reinstall the windshield washer
reservoir.

(Driver’s side)
Reinstall the battery cover.

(Passenger’s side)

1.

2.

3.

4.

5.

6.

7.

8.

9.

457

492

10.

Lights

Replacing a Front Parking/Side
Marker Bulb

Ma

int
e

na
nce

471

SOCKET

BULB

CLIP

10/08/04 20:04:31 31SJA660_476

-------------------------------------------------------------------------------------------------------------------------------------------------------------

Remove the electrical connector
from the bulb by pushing on the
tab and pulling the connector
down.

Remove the bulb by turning it one-
quarter turn counterclockwise.

Use a Phillips-head screwdriver to
remove the two undercover bolts,
and remove the holding clip with a
flat-tip screwdriver.

Carefully push up the side under
cover into the bumper.

Your vehicle uses halogen light
bulbs. When replacing a bulb, handle
it by its plastic case, and protect the
glass from contact with your skin or
hard objects. If you touch the glass,
clean it with denatured alcohol and a
clean cloth.

The fog lights were properly aimed
when your vehicle was new. If you
regularly carry heavy items in the
trunk or pull a trailer, readjustment
may be required. Adjustment should
be done by your dealer or another
qualified technician.

3.

4.

1.

2.

Lights

Replacing a Fog Light Bulb

472

CLIP

CONNECTOR

BOLTS

BULB

Halogen bulbs get very hot when lit. Oil,
perspiration, or a scratch on the glass
can cause the bulb to overheat and
shatter.

10/08/04 20:04:42 31SJA660_477

-------------------------------------------------------------------------------------------------------------------------------------------------------------

Carefully pry in the top or bottom
edge of the trim with a small flat-
tip screwdriver, and pull the trim
straight back.

Open the trunk lid, and remove
the left or right maintenance lid.

Remove the mounting nut with an
8 mm wrench.

Pull the taillight assembly straight
back out of the body.

Remove the two mounting bolts
with an 8 mm wrench.

Insert the new bulb into the hole,
and turn it one-quarter turn
clockwise to lock it in place.

Push the electrical connector back
onto the bulb. Make sure it is on
all the way.

Turn on the fog lights to test the
new bulb.

Reinstall the two undercover bolts
on the side under cover and
tighten them securely. Put the
holding clip back on the side
undercover and push on the center
until it locks (the center is flush
with the head).

2.

1.

3.

4.

5.

5.

6.

7.

8.

CONTINUED

Replacing a Rear Turn Signal
Light Bulb

Lights

Ma

int
e

na
nce

473

MOUNTING NUT

MAINTENANCE LID

TAIL LIGHT TRIM

BOLTS

10/08/04 20:04:55 31SJA660_478

-------------------------------------------------------------------------------------------------------------------------------------------------------------

Open the trunk.

Remove the light assembly cover
by pulling its outside edge.

Install the new bulb in the socket
by pushing it straight in the socket
until it bottoms.

Reinstall the socket into the light
assembly. Turn it clockwise to
lock it in place.

Test the lights to make sure the
new bulb is working.

When reinstalling the taillight
assembly, align and pop the snap
fasteners in place. Tighten the two
mounting bolts and reinstall the
trim in place.

Tighten the mounting nut securely,
and reinstall the maintenance lid.

Remove the socket by turning it
one-quarter turn counterclockwise.

Remove the burned out bulb by
pulling it straight out of its socket.

9.

8.

1.

2.

12.

11.

10.

6.

7.

Replacing a Back-up Light Bulb

Lights

474

SOCKET

BULB

COVERS

10/08/04 20:05:09 31SJA660_479

-------------------------------------------------------------------------------------------------------------------------------------------------------------

Pull the bulb straight out of its
socket. Push the new bulb straight
into the socket until it bottoms.

Remove the socket from the light
assembly by turning it one-quarter
turn counterclockwise.

Reinstall the socket into the light
assembly. Turn it clockwise to
lock it in place.

Each outside mirror has side turn
signal lights. The lights should be
replaced by your dealer.

Test the lights to make sure the
new bulb is working.

Reinstall the back-up light cover.

The license plate has two lights
above it. The bulbs should be
replaced by your dealer.

This light should be replaced by your
dealer.

3.

4.

5.

6.

7.

Lights

Side Turn Signal Lights

Rear License Plate Light Bulbs

High-mount Brake Light

Ma

int
e

na
nce

475

BULB

SOCKET

10/08/04 20:05:21 31SJA660_480

-------------------------------------------------------------------------------------------------------------------------------------------------------------

This filter removes the dust and
pollen that is brought in from the
outside through the climate control
system.

Have your dealer replace the filter
when this service is indicated by a
maintenance message on the multi-
information display. It should be
replaced every 15,000 miles (24,000
km) if you drive primarily in urban
areas that have high concentrations
of soot in the air, or if the flow from
the climate control system becomes
less than usual.

If your seat belts get dirty, use a soft
brush with a mixture of mild soap
and warm water to clean them. Do
not use bleach, dye, or cleaning
solvents. Let the belts air-dry before
you use the vehicle.

Dirt build-up around the openings of
the seat belt anchors can cause the
belts to retract slowly. Wipe the
openings with a clean cloth
dampened in mild soap and warm
water or isopropyl alcohol.

Dust and Pollen Filter, Cleaning the Seat Belts

Dust and Pollen Filter

Cleaning the Seat Belts

476

OPENING

10/08/04 20:05:29 31SJA660_481

-------------------------------------------------------------------------------------------------------------------------------------------------------------

Make sure the rear floor mats are
properly hooked to the floor mat
anchors. Your vehicle is equipped
with front passenger’s seat weight
sensors. If the rear passenger’s floor
mat is on the seat rail of the front
passenger’s seat, the sensors will
detect the decreased weight on the
seat, and they may not work properly.

The floor mats that came with your
vehicle hook over the floor mat
anchors. This keeps the floor mats
from sliding forward (possibly
interfering with the pedals), or
backwards (making the front
passenger’s weight sensors
ineffective).

If you remove a floor mat, make sure
to re-anchor it when you put it back
in your vehicle.

If you use non-Acura floor mats,
make sure they fit properly and that
they can be used with the floor mat
anchors. Do not put additional floor
mats on top of the anchored mats.

To lock or unlock each anchor, turn
the knob.

Floor Mats

Ma

int
e

na
nce

477

DRIVER’S SIDE FLOOR MAT

REAR PASSENGER’S FLOOR MAT

Unlock

Lock

Unlock

Lock

ANCHORS

ANCHOR

10/08/04 20:05:39 31SJA660_482

-------------------------------------------------------------------------------------------------------------------------------------------------------------

Push the end of the cover on the
blade assembly until the other end
is pivoted out, and remove the
cover.

Disconnect the blade assembly
from the wiper arm by removing
the two screws from the arm.

Adjust the windshield wiper arms
to the winter position by holding
both wiper arms as shown in the
illustration at the same time (see
page

). Raise the wiper arms

off the windshield.

Check the condition of the wiper
blades at least every 6 months.
Replace them if you find signs of
cracking in the rubber, areas that are
getting hard, or if they leave streaks
and unwiped areas when used.

2.

1.

3.

139

Wiper Blades

478

COVER

SCREWS

WIPER ARMS

HOLDING LOCATIONS

BLADE

Do not open the hood when the wiper
arms are raised, or you will damage
the hood and the wiper arms.

10/08/04 20:05:48 31SJA660_483

-------------------------------------------------------------------------------------------------------------------------------------------------------------


Content      ..     28      29      30      31     ..