Acura RSX (2006 year). Manual - part 11


  Index      Acura     Acura RSX (2006 year) - manual in english


Search            copyright infringement  


Content      ..     9      10      11      12     ..


Acura RSX (2006 year). Manual - part 11


If you choose electric brakes, be
sure they are electrically actuated.
Do not attempt to tap into your
vehicle’s hydraulic system. No
matter how successful it may seem,
any attempt to attach trailer brakes
to your vehicle’s hydraulic system
will lower braking effectiveness and
create a potential hazard.

See your trailer dealer for more
information on installing electric
brakes.

Trailer lights and equipment must
comply with federal, state, province,
and local regulations. Check with
local trailer sales or rental agencies
for requirements for the areas where
you plan to tow, and use only
equipment designed for your vehicle.

Since lighting and wiring vary by
trailer type and brand, you should
have a qualified technician install a
suitable connector between the
vehicle and the trailer. Improper
equipment or installation can cause
damage to your vehicle’s electrical
system and affect your vehicle
warranty.

If you use a converter, you can get
the connector and pins that mate
with the connector in your vehicle
from your dealer.

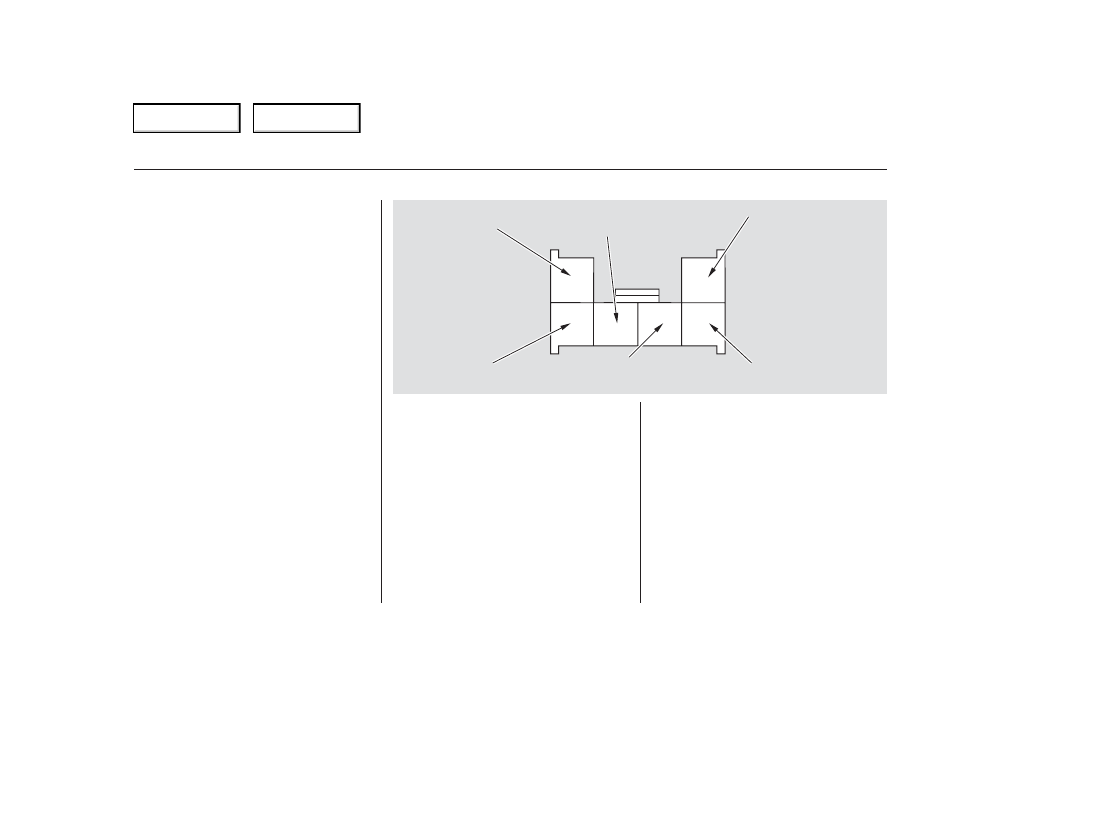
Your vehicle has a trailer lighting
connector located behind the right
side panel in the cargo area. Refer to
the drawing above for the wiring
color code and purpose of each pin.

Towing a Trailer

Trailer Lights

162

TAILLIGHT
(RED/YELLOW)

LEFT TURN SIGNAL
(GREEN/RED)

RIGHT TURN SIGNAL
(GREEN/YELLOW)

GROUND
(BLACK)

BACK UP LIGHT
(GREEN)

BRAKE LIGHT
(WHITE/BLACK)

Main Menu

Table of Contents

-------------------------------------------------------------------------------------------------------------------------------------------------------------

Many states and Canadian provinces
require special outside mirrors when
towing a trailer. Even if they don’t,
you should install special mirrors if
you cannot clearly see behind you, or
if the trailer creates a blind spot.

Ask your trailer sales or rental
agency if any other items are
recommended or required for your
towing situation.

The added weight, length, and
height of a trailer will affect your
vehicle’s handling and performance,
so driving with a trailer requires
some special driving skills and
techniques.

For your safety and the safety of
others, take time to practice driving
maneuvers before heading for the
open road, and follow the guidelines
discussed below.

When preparing to tow, and before
driving away, be sure to check the
following:

The vehicle has been properly
serviced, and the tires, brakes,
suspension, cooling system, and
lights are in good operating
condition.

All items in or on the trailer are
properly secured and cannot shift
while you drive.

Your vehicle tires and spare are
properly inflated, and the trailer
tires and spare are inflated as
recommended by the trailer
maker.

The hitch, safety chains, and any
other attachments are secure.

All weights and loads are within
limits.

Drive slower than normal in all
driving situations, and obey posted
speed limits for vehicles with trailers.
If you have an automatic
transmission, use the D position
when towing a trailer on level roads.

CONTINUED

Towing a Trailer

Additional Towing Equipment

Towing Speeds and Gears

Driving Saf ely With a Trailer

Pre-Tow Checklist

D

riv

ing

163

Main Menu

Table of Contents

-------------------------------------------------------------------------------------------------------------------------------------------------------------

Make turns more slowly and wider
than normal. The trailer tracks a
smaller arc than your vehicle, and it
can hit or run over something the
vehicle misses. Allow more time and
distance for braking. Do not brake or
turn suddenly as this could cause the
trailer to jackknife or turn over.

When climbing hills, closely watch
your temperature gauge. If it nears
the red (hot) mark, turn the air
conditioning off, reduce speed and, if
necessary, pull to the side of the
road to let the engine cool.

If the automatic transmission shifts
frequently while going up a hill, shift
to D .

Always drive slowly and have
someone guide you when backing up.
Grip the

of the steering

wheel; then turn the wheel to the left
to get the trailer to move to the left,
and turn the wheel right to move the
trailer to the right.

If you must stop when facing uphill,
use the foot brake or parking brake.
Do not try to hold the vehicle in
place by pressing on the accelerator,
as this can cause the automatic
transmission to overheat.

When driving down hills, reduce
your speed and shift down to 2nd
gear (manual) or D (automatic). Do
not ‘‘ride’’ the brakes, and remember
it will take longer to slow down and
stop when towing a trailer.

Follow all normal precautions when
parking, including firmly setting the
parking brake and putting the
transmission in Park (automatic) or
in 1st or reverse (manual). Also,
place wheel chocks at each of the
trailer’s tires.

Crosswinds and air turbulence
caused by passing trucks can disrupt
your steering and cause the trailer to
sway. When being passed by a large
vehicle, keep a constant speed, and
steer straight ahead. Do not try to
make quick steering or braking
corrections.

3

3

bottom

Towing a Trailer

Making Turns and Braking

Driving on Hills

Handling Crosswinds and Buf f eting

Backing Up

Parking

164

Main Menu

Table of Contents

-------------------------------------------------------------------------------------------------------------------------------------------------------------

This section explains why it is
important to keep your vehicle well
maintained and how to follow basic
maintenance safety precautions.

This section also includes
Maintenance Schedules for normal
driving and severe driving conditions,
a Maintenance Record, and instruc-
tions for simple maintenance tasks
you may want to take care of
yourself.

If you have the skills and tools to
perform more complex maintenance
tasks on your vehicle, you may want
to purchase the service manual. See
page

for information on how to

obtain a copy, or see your dealer.

......................

Maintenance Safety

.

166

.................

Maintenance Schedule

.

167

....................

Maintenance Record

.

171

..............................

Fluid Locations

.

173

........................

Adding Engine Oil

.

174

.........

Changing the Oil and Filter

.

175

..............................

Engine Coolant

.

177

....................

Windshield Washers

.

179

....

Automatic Transmission Fluid

.

179

........

Manual Transmission Fluid

.

181

.....................................

Brake Fluid

.

181

..................................

Clutch Fluid

.

182

.....................................

Drive Belts

.

182

....................

Power Steering Fluid

.

183

.............................................

Lights

.

184

................

Cleaning the Seat Belts

.

191

.....................................

Floor Mats

.

191

..................

Dust and Pollen Filter

.

191

.................................

Wiper Blades

.

192

...............................................

Tires

.

194

...................

Checking the Battery

.

200

.............................

Vehicle Storage

.

201

243

Maintenance

Ma

int
e

na
nce

165

Main Menu

-------------------------------------------------------------------------------------------------------------------------------------------------------------

To eliminate potential hazards, read
the instructions before you begin,
and make sure you have the tools
and skills required.

Do

not run the engine unless
instructed to do so.

Some of the most important safety
precautions are given here. However,
we cannot warn you of every
conceivable hazard that can arise in
performing maintenance. Only you
can decide whether or not you
should perform a given task.

All service items not detailed in this
section should be performed by a
certified technician or other qualified
mechanic.

Make sure your vehicle is parked
on level ground, the parking brake
is set, and the engine is off.

To clean parts, use a commercially
available degreaser or parts
cleaner, not gasoline.

To reduce the possibility of fire or
explosion, keep cigarettes, sparks,
and flames away from the battery
and all fuel-related parts.

Wear eye protection and
protective clothing when working
with the battery or compressed air.

Be sure there is

adequate ventilation whenever you
operate the engine.

Let the

engine and exhaust system cool
before touching any parts.

Maintenance Safety

Important Saf ety Precautions

Injury f rom moving parts.

Potential Vehicle Hazards

Carbon Monoxide poison f rom
engine exhaust.

Burns f rom hot parts.

166

Failure to properly follow
maintenance instructions and
precautions can cause you to
be seriously hurt or killed.

Always follow the procedures
and precautions in this owner’s
manual.

Improperly maintaining this
vehicle, or failing to correct a
problem before driving can
cause a crash in which you can
be seriously hurt or killed.

Always follow the inspection
and maintenance
recommendations and
schedules in this owner’s
manual.

Main Menu

Table of Contents

-------------------------------------------------------------------------------------------------------------------------------------------------------------

The maintenance schedule assumes
you will use your vehicle as normal
transportation for passengers and
their possessions. You should also
follow these recommendations:

Driving less than 5 miles (8 km)
per trip, or in freezing
temperatures, driving less than 10
miles (16 km) per trip.

Driving in extremely hot [over
90°F (32°C)] conditions.

Used primarily as a delivery
vehicle or taxi that is driven
mostly in stop-and-go traffic and/
or parked with the engine idling.

Driving on muddy, dusty, or de-
iced roads.

Avoid exceeding your vehicle’s
load limit. This puts excess stress
on the engine, brakes, and many
other vehicle parts. The load limit
is shown on the tire information
label on the driver’s doorjamb.

Operate your vehicle on
reasonable roads within the legal
speed limit.

Drive your vehicle regularly over a
distance of several miles
(kilometers).

Always use unleaded gasoline with
the proper octane rating (see page

).

Service your vehicle according to the
time and mileage periods on one of
the maintenance schedules on the
following pages.

Follow the

maintenance schedule for severe
conditions if you drive your vehicle
MAINLY under one or more of the
following conditions.

Trailer towing, driving with a
loaded roof rack, or driving in
mountainous conditions.

If you only

drive under a ‘‘severe’’ condition, you
should follow the normal conditions
maintenance schedule.

Follow the

maintenance schedule for severe
conditions.

133

OCCASIONALLY

Maintenance Schedule

Which Schedule to Follow

U.S. Owners

Canadian Owners

Ma

int
e

na
nce

167

NOTE:

Main Menu

Table of Contents

-------------------------------------------------------------------------------------------------------------------------------------------------------------

We recommend the use of genuine
Acura parts and fluids whenever you
have maintenance done.

Engine oil level

Check every

time you fill the fuel tank. See
page

.

Engine coolant level

Check the

radiator reserve tank every time
you fill the fuel tank. See page

.

Automatic transmission

Check

the fluid level monthly. See page

.

Brakes

Check the fluid level

monthly. See page

.

Tires

Check the tire pressure

monthly. Examine the tread for
wear and foreign objects. See page

.

U.S. Vehicles:

According to state and federal
regulations, failure to perform
maintenance on the items marked
with

will not void your emissions

warranties. However, all
maintenance services should be
performed at the recommended time
or mileage period to ensure long-
term reliability.

You should check the following
items at the specified intervals. If
you are unsure of how to perform
any check, turn to the appropriate
page listed.

Lights

Check the operation of

the headlights, parking lights,
taillights, high-mount brake light,
and license plate lights monthly.

Your authorized dealer knows your
vehicle best and can provide
competent, efficient service.
However, service at a dealer is not
mandatory to keep your warranties
in effect. Maintenance may be done
by any qualified service facility or
skilled person to keep your
warranties in effect. Keep all the
receipts as proof of completion, and
have the person who does the work
fill out the maintenance record.
Check your warranty booklet for
more information.

137

137

179

181

196

Servicing Your Vehicle

Maintenance,

replacement, or repair of
emissions control devices and
systems may be done by any
automotive repair establishment
or individual using parts that are
‘‘certif ied’’ to EPA standards.

Owner’s Maintenance Checks

Maintenance Schedule

168

Main Menu

Table of Contents

-------------------------------------------------------------------------------------------------------------------------------------------------------------

Follow the Normal Maintenance
Schedule if the severe driving
conditions specified in the Severe
Conditions Maintenance Schedule on
the next page do not apply.

CONTINUED

NOTE: If you only OCCASIONALLY
drive under a ‘‘severe’’ condition, you
should follow the Normal Conditions
Maintenance Schedule.

Canadian owners should follow the
Maintenance Schedule for Severe
Conditions on the next page.

169

miles x 1,000

km x 1,000

Service the items listed at the indicated distance (or time, if given).

(

(

O

O

r

r

e

e

v

v

e

e

r

r

y

y

6

6

y

y

e

e

a

a

r

r

s

s

,

,

w

w

h

h

i

i

c

c

h

h

e

e

v

v

e

e

r

r

c

c

o

o

m

m

e

e

s

s

f

f

i

i

r

r

s

s

t

t

)

)

(

(

O

O

t

t

h

h

e

e

r

r

w

w

i

i

s

s

e

e

a

a

d

d

j

j

u

u

s

s

t

t

o

o

n

n

l

l

y

y

i

i

f

f

n

n

o

o

i

i

s

s

y

y

)

)

Every 10,000 miles (16,000 km)

(

(

O

O

r

r

e

e

v

v

e

e

r

r

y

y

1

1

y

y

e

e

a

a

r

r

,

,

w

w

h

h

i

i

c

c

h

h

e

e

v

v

e

e

r

r

c

c

o

o

m

m

e

e

s

s

f

f

i

i

r

r

s

s

t

t

)

)

Check inflation and condition once a month

Check oil and coolant at each fuel stop

10

16

20

32

30

48

40

64

50

80

60

96

70

112

80

128

100

160

90

144

(

(

O

O

r

r

e

e

v

v

e

e

r

r

y

y

2

2

y

y

e

e

a

a

r

r

s

s

,

,

w

w

h

h

i

i

c

c

h

h

e

e

v

v

e

e

r

r

c

c

o

o

m

m

e

e

s

s

f

f

i

i

r

r

s

s

t

t

)

)

120

192

130

208

140

224

150

240

Every 3 years (independent of mileage)

Every 160,000 miles (256,000 km)

110

176

Replace at 120,000 miles (192,000 km) or 6 years, then every 90,000 miles (144,000 km) or 5 years.

(

(

O

O

r

r

e

e

v

v

e

e

r

r

y

y

1

1

y

y

e

e

a

a

r

r

,

,

w

w

h

h

i

i

c

c

h

h

e

e

v

v

e

e

r

r

c

c

o

o

m

m

e

e

s

s

f

f

i

i

r

r

s

s

t

t

)

)

At 120,000 miles (192,000 km) or 10 years, then

every 60,000 miles (96,000 km) or 5 years

Check engine oil and coolant

Check tires

Replace engine oil

Rotate tires (follow pattern on page

197

)

Replace engine oil filter

Check front and rear brakes

Check parking brake adjustment

Inspect the following items:

Tie-rod ends, steering gear box and boots

Suspension components

Driveshaft boots

Brake hoses and lines (including ABS)

All fluid levels and condition of fluids

Exhaust system

Fuel lines and connections

Inspect drive belts

Replace dust and pollen filter

Replace air cleaner element

Replace spark plugs

Inspect valve clearance

Replace automatic transmission fluid

Replace manual transmission fluid

Inspect idle speed

Replace engine coolant

Replace brake fluid

See information on maintenance and emissions warranty, page

.

1:

:

168

1

Maintenance

S

chedule

for
Normal

C

onditions

Main Menu

Table of Contents

-------------------------------------------------------------------------------------------------------------------------------------------------------------

Follow the Severe Maintenance
Schedule if you drive your vehicle
MAINLY under one or more of the
following conditions:

Driving less than 5 miles (8 km) per
trip or, in freezing temperatures,
driving less than 10 miles (16 km)
per trip.
Driving in extremely hot [over 90°F
(32°C)] conditions.
Extensive idling or long periods of
stop and go driving, such as a taxi or
a commercial delivery vehicle.

Driving on muddy, dusty, or de-iced
roads.

Trailer towing, driving with a roof
rack, or driving in mountainous
conditions.

Follow this

Maintenance Schedule for Severe
Conditions.

Canadian Owners

170

miles x 1,000

km x 1,000

(

(

O

O

r

r

e

e

v

v

e

e

r

r

y

y

2

2

y

y

e

e

a

a

r

r

s

s

,

,

w

w

h

h

i

i

c

c

h

h

e

e

v

v

e

e

r

r

c

c

o

o

m

m

e

e

s

s

f

f

i

i

r

r

s

s

t

t

)

)

10

16

20

32

30

48

40

64

50

80

70

112

80

128

100

160

Check oil and coolant at each fuel stop

130

208

140

224

Service the items listed at the indicated distance (or time, if given).

Every 10,000 miles (16,000 km)

Check inflation and condition once a month

Every 5,000 miles (8,000 km) or every 6 months,

whichever comes first

(

(

O

O

r

r

e

e

v

v

e

e

r

r

y

y

3

3

y

y

e

e

a

a

r

r

s

s

,

,

w

w

h

h

i

i

c

c

h

h

e

e

v

v

e

e

r

r

c

c

o

o

m

m

e

e

s

s

f

f

i

i

r

r

s

s

t

t

)

)

(

(

O

O

t

t

h

h

e

e

r

r

w

w

i

i

s

s

e

e

a

a

d

d

j

j

u

u

s

s

t

t

o

o

n

n

l

l

y

y

i

i

f

f

n

n

o

o

i

i

s

s

y

y

)

)

Every 160,000 miles (256,000 km)

Every 3 years (independent of mileage)

110

176

120

192

60

96

90

144

150

240

Clean every 15,000 miles (24,000 km), and replace

every 30,000 miles (48,000 km)

(Use normal schedule except in dusty condition)

(

(

O

O

r

r

e

e

v

v

e

e

r

r

y

y

1

1

y

y

e

e

a

a

r

r

,

,

w

w

h

h

i

i

c

c

h

h

e

e

v

v

e

e

r

r

c

c

o

o

m

m

e

e

s

s

f

f

i

i

r

r

s

s

t

t

)

)

(

(

O

O

r

r

e

e

v

v

e

e

r

r

y

y

1

1

y

y

e

e

a

a

r

r

,

,

w

w

h

h

i

i

c

c

h

h

e

e

v

v

e

e

r

r

c

c

o

o

m

m

e

e

s

s

f

f

i

i

r

r

s

s

t

t

)

)

See dust and pollen filter on page

for

replacement information under special

driving conditions.

Replace at 60,000 miles (96,000 km) or 3

years, then every 30,000 miles (48,000

km) or 2 years.

See information on maintenance and

emissions warranty, middle column,

page

.

At 120,000 miles (192,000 km) or 10 years, then

every 60,000 miles (96,000 km) or 5 years

Check engine oil and coolant

Check tires

Replace engine oil

Rotate tires (follow pattern on page

197

)

Replace engine oil filter

Check front and rear brakes

Lubricate all hinges, locks, and latches

Inspect the following items:

Tie-rod ends, steering gear box and boots

Suspension components, Driveshaft boots

Check parking brake adjustment

Inspect the following items:

Brake hoses and lines (including ABS)

All fluid levels and condition of fluids

Exhaust system , Fuel lines and connections

Lights and controls/vehicle underbody

Inspect drive belts

Replace dust and pollen filter

Clean and replace air cleaner element

Replace spark plugs

Inspect valve clearance

Replace automatic transmission fluid

Replace manual transmission fluid

Inspect idle speed

Replace engine coolant

Replace brake fluid

1 :

2 :

:

191

168

1

2

Maintenance

S

chedule

for

Severe

Conditions

Main Menu

Table of Contents

-------------------------------------------------------------------------------------------------------------------------------------------------------------

(for Normal and Severe Schedules)

CONTINUED

Maintenance Record

Ma

int
e

na
nce

171

5,000 mi

10,000 mi

15,000 mi

20,000 mi

25,000 mi

30,000 mi

35,000 mi

40,000 mi

45,000 mi

50,000 mi

55,000 mi

60,000 mi

65,000 mi

70,000 mi

75,000 mi

80,000 mi

8,000 km

16,000 km

24,000 km

32,000 km
(or 1 year)

40,000 km

48,000 km

56,000 km

64,000 km
(or 2 years)

Signature or dealer stamp

mi/km

Date

mi/km

Date

mi/km

Date

mi/km

Date

mi/km

Date

mi/km

Date

mi/km

Date

mi/km

Date

72,000 km

80,000 km

88,000 km

96,000 km
(or 3 years)

104,000 km

112,000 km

120,000 km

128,000 km
(or 4 years)

Signature or dealer stamp

mi/km

Date

mi/km

Date

mi/km

Date

mi/km

Date

mi/km

Date

mi/km

Date

mi/km

Date

mi/km

Date

You or the servicing dealer can record all completed maintenance here, whether you follow the schedule for normal conditions (page

) or severe

conditions (page

). Keep the receipts for all work done on your vehicle.

169

170

Main Menu

Table of Contents

-------------------------------------------------------------------------------------------------------------------------------------------------------------

(for Normal and Severe Schedules)

Maintenance Record

172

85,000 mi

90,000 mi

95,000 mi

100,000 mi

105,000 mi

110,000 mi

115,000 mi

120,000 mi

125,000 mi

130,000 mi

135,000 mi

140,000 mi

145,000 mi

150,000 mi

155,000 mi

160,000 mi

136,000 km

144,000 km

152,000 km

160,000 km
(or 5 years)

168,000 km

176,000 km

184,000 km

192,000 km
(or 6 years)

Signature or dealer stamp

mi/km

Date

mi/km

Date

mi/km

Date

mi/km

Date

mi/km

Date

mi/km

Date

mi/km

Date

mi/km

Date

200,000 km

208,000 km

216,000 km

224,000 km
(or 7 years)

232,000 km

240,000 km

248,000 km

256,000 km
(or 8 years)

Signature or dealer stamp

mi/km

Date

mi/km

Date

mi/km

Date

mi/km

Date

mi/km

Date

mi/km

Date

mi/km

Date

mi/km

Date

Main Menu

Table of Contents

-------------------------------------------------------------------------------------------------------------------------------------------------------------

Fluid Locations

Ma

int
e

na
nce

173

ENGINE OIL
FILL CAP
(Black cap)

POWER STEERING
FLUID (Red cap)

ENGINE COOLANT
RESERVOIR

RADIATOR CAP

BRAKE FLUID
(Gray cap)

AUTOMATIC
TRANSMISSION
FLUID DIPSTICK
(Yellow loop)

WASHER FLUID
(Blue cap)

ENGINE OIL DIPSTICK
(Orange tab)

CLUTCH FLUID
(Manual Transmission only)
(Gray cap)

Main Menu

Table of Contents

-------------------------------------------------------------------------------------------------------------------------------------------------------------

Make sure the API Certification Seal
says ‘‘For Gasoline Engines.’’

The oil’s viscosity or weight is
provided on the container’s label.
5W-20 oil is formulated for year-
round protection of your vehicle, to
improve cold weather starting and
fuel economy.

Unscrew and remove the engine oil
fill cap on the valve cover. Pour in
the oil slowly and carefully so you do
not spill any. Clean up any spills
immediately. Spilled oil could
damage components in the engine
compartment.

Reinstall the engine oil fill cap, and
tighten it securely. Wait a few
minutes, and recheck the oil level on
the engine oil dipstick. Do not fill
above the upper mark; you could
damage the engine.

Oil is major contributor to your
engine’s performance and longevity.
Always use a premium-grade
detergent oil displaying the API
Certification Seal. This seal indicates
the oil is energy conserving, and that
it meets the American Petroleum
Institute’s latest requirements. It is
highly recommended that you use
Acura Precision Crafted motor oil in
your vehicle.

RSX and Premium models

Adding Engine Oil

Recommended Oil

174

ENGINE OIL FILL CAP

API CERTIFICATION SEAL

Ambient Temperature

Main Menu

Table of Contents

-------------------------------------------------------------------------------------------------------------------------------------------------------------

Always change the oil and filter
according to the recommendations in
the maintenance schedule. The oil
and filter collect contaminants that
can damage your engine if they are
not removed regularly.

Changing the oil and filter requires
special tools and access from
underneath the vehicle. The vehicle
should be raised on a service station-
type hydraulic lift for this service.
Unless you have the knowledge and
proper equipment, you should have
this maintenance done by a skilled
mechanic.

Run the engine until it reaches
normal operating temperature,
then shut it off.

You may use a synthetic motor oil if
it meets the same requirements
given for a conventional motor oil: it
displays the API Certification Seal
and it is the proper weight. You must
follow the oil and filter change
intervals given in the maintenance
schedule.

An oil with a viscosity of 5W-30 is
preferred for improved fuel economy
and year-round protection in your
vehicle. You may use a 10W-30 oil if
the temperature in your area never
goes below 20°F (

7°C).

Your vehicle does not require any oil
additives. Additives may adversely
affect the engine or transmission
performance and durability.

1.

CONTINUED

Type-S

Synthetic Oil

Engine Oil Additives

Changing the Oil and Filter

Adding Engine Oil, Changing the Oil and Filter

Ma

int
e

na
nce

175

Ambient Temperature

Main Menu

Table of Contents

-------------------------------------------------------------------------------------------------------------------------------------------------------------

Open the hood, and remove the
engine oil fill cap. Remove the oil
drain bolt and washer from the
bottom of the engine. Drain the oil
into an appropriate container.

Refill the engine with the
recommended oil.

Engine oil change capacity
(including filter):

Remove the oil filter and let the
remaining oil drain. A special
wrench (available from your
dealer) is required.

Put a new washer on the drain bolt,
then reinstall the drain bolt.
Tighten the drain bolt to:

Check the oil filter to make sure
its gasket did not stick to the
engine block. A stuck gasket could
cause an oil leak.

Install a new oil filter according to
the instructions that come with it.

4.

3.

2.

(Type-S)

(RSX and Premium models)

Type-S

RSX and Premium models

5.

6.

7.

Changing the Oil and Filter

176

WASHER

OIL DRAIN BOLT

OIL FILTER

33 lbf·ft (44 N·m , 4.5 kgf·m)

29 lbf·ft (39 N·m , 4.0 kgf·m)

5.0 US qt (4.7 )

4.4 US qt (4.2 )

Main Menu

Table of Contents

-------------------------------------------------------------------------------------------------------------------------------------------------------------

CONTINUED

Let the engine run for several
minutes, then check the drain bolt
and oil filter for leaks.

Replace the engine oil fill cap.
Start the engine. The oil pressure
indicator should go off within 5
seconds. If it does not, turn off the
engine and check your work.

If the coolant level in the reserve
tank is at or below the MIN line, add
coolant to bring it up to the MAX line.
Inspect the cooling system for leaks.

Turn off the engine and let it sit
for several minutes, then check
the oil level on the dipstick. If
necessary, add more oil.

Always use Acura Precision Crafted
Long Life Antifreeze/Coolant Type 2.
This coolant is pre-mixed with 50
percent antifreeze and 50 percent
water. Never add straight antifreeze
or plain water.

If Acura antifreeze/coolant is not
available, you may use another
major-brand non-silicate coolant as a
temporary replacement. Make sure it
is a high-quality coolant
recommended for aluminum engines.
Continued use of any non-Acura
coolant can result in corrosion,
causing the cooling system to
malfunction or fail. Have the cooling
system flushed and refilled with
Acura antifreeze/coolant as soon as
possible.

8.

9.

10.

Adding Engine Coolant

Changing the Oil and Filter, Engine Coolant

Ma

int
e

na
nce

177

MAX

MIN

Improper disposal of engine oil can be
harmf ul to the environment. If you
change your own oil, please dispose of
the used oil properly. Put it in a sealed
container, and take it to a recycling
center. Do not discard it in a trash bin
or dump it on the ground.

Main Menu

Table of Contents

-------------------------------------------------------------------------------------------------------------------------------------------------------------


Content      ..     9      10      11      12     ..