Acura RSX (2006 year). Manual - part 3


  Index      Acura     Acura RSX (2006 year) - manual in english


Search            copyright infringement  


Content      ..     1      2      3      4      ..


Acura RSX (2006 year). Manual - part 3


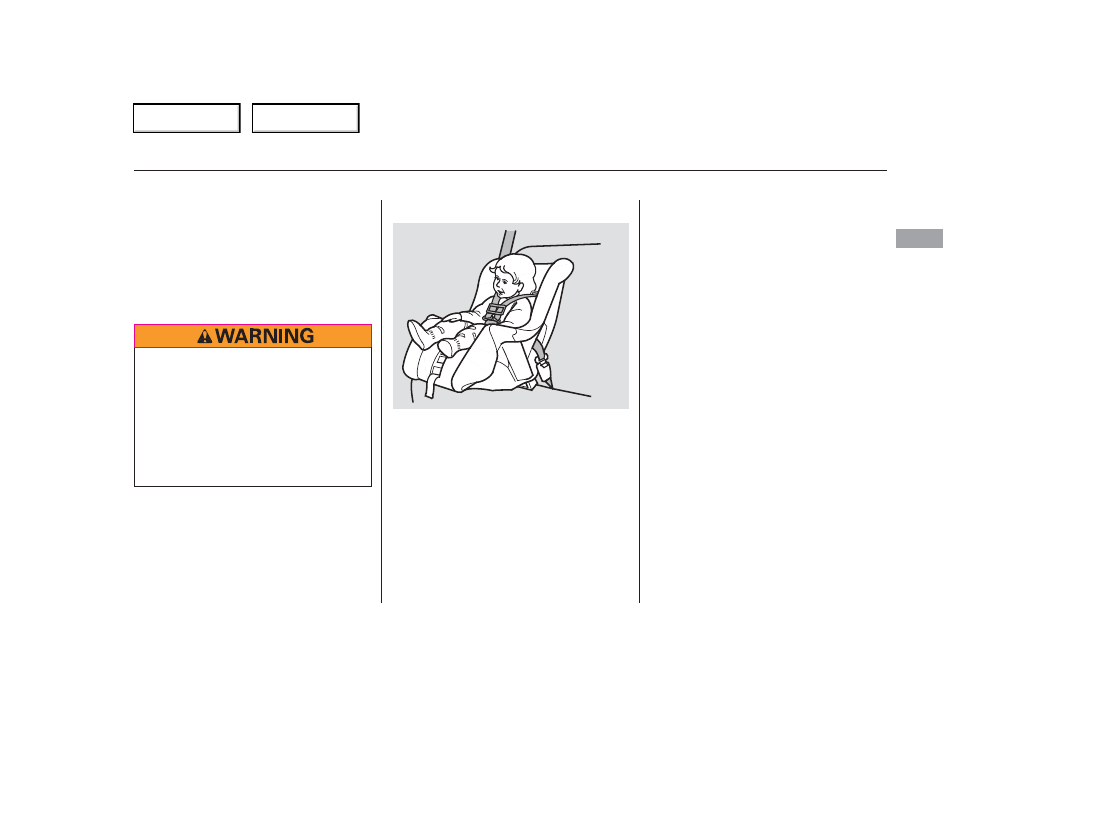
A child who is at least 1 year old, and
who fits within the child seat maker’s
weight and height limits, should be
restrained in a forward-facing,
upright child seat.

Of the different seats available, we
recommend those that have a five-
point harness system as shown.

In either situations, we strongly
recommend that you install the child
seat directly behind the front
passenger seat, move the front seat
as far forward as needed, and leave it
unoccupied. Or you may wish to get
a smaller child seat.

If it is necessary to put a forward-
facing child seat in the front, move
the vehicle seat as far to the rear as
possible, and be sure the child seat is
firmly secured to the vehicle and the
child is properly strapped in the seat.

If the vehicle seat is too

far forward, or the child’s head is
thrown forward during a collision, an
inflating airbag can strike the child
with enough force to cause very
serious or fatal injuries.

We strongly recommend placing a
forward-facing child seat in a back
seat, not the front.

We also recommend that a small
child use the child seat until the child
reaches the weight or height limit
for the seat.

Protecting Small Children

Protecting Infants and Small Children

Child Seat Type

Placing a f orward-f acing child seat in
the f ront seat of a vehicle equipped
with a passenger’s airbag can be
hazardous.

Child Seat Placement

Dr
iv

er
and

P

asseng

er
Saf

e

ty

33

Placing a rear-facing child seat
in the front seat can result in
serious injury or death if the
passenger’s front airbag inflates.

Always place a rear-facing child
seat in the back seat, not the
front.

Main Menu

Table of Contents

-------------------------------------------------------------------------------------------------------------------------------------------------------------

Before purchasing a conventional
child seat, or using a previously
purchased one, we recommend that
you test the seat in the specific
vehicle seating position, or positions,
where the seat will be used.

Rear-facing for infants, forward-
facing for small children.

Look for FMVSS

213 or CMVSS 213 on the box.

Whatever type of seat you choose, to
provide proper protection, a child
seat should meet three
requirements:

In seating positions and vehicles not
equipped with LATCH, a LATCH-
compatible child seat can be installed
using a seat belt.

We also recommend selecting a
LATCH-compatible seat with a rigid,
rather than a flexible, anchor (see
page

).

Since LATCH-compatible child seats
are easier to install and reduce the
possibility of improper installation,
we recommend selecting this style.

Conventional child seats must be
secured to a vehicle with a seat belt,
whereas LATCH-compatible seats
are secured by attaching the seat to
hardware built into the rear seats.

When buying a child seat, you need
to choose either a conventional child
seat, or one designed for use with
the lower anchors and tethers for
children (LATCH) system.

1.

2.

3.

36

The child seat should f it the
vehicle seating position (or
positions) where it will be used.

The child seat should be of the
proper type and size to f it the child.

The child seat should meet U.S. or
Canadian Motor Vehicle Saf ety
Standard 213.

Protecting Infants and Small Children, Selecting a Child Seat

Selecting a Child Seat

34

Placing a forward-facing child
seat in the front seat can result
in serious injury or death if the
front airbag inflates.

If you must place a forward-
facing child seat in front, move
the vehicle seat as far back as
possible, and properly restrain
the child.

Main Menu

Table of Contents

-------------------------------------------------------------------------------------------------------------------------------------------------------------

After selecting a proper child seat
and a good place to install the seat,
there are three main steps in
installing the seat:

All child seats must be

secured to the vehicle with the lap
part of a lap/shoulder belt or with
the LATCH (lower anchors and
tethers for children) system. A
child whose seat is not properly
secured to the vehicle can be
endangered in a crash.

After installing a child

seat, push and pull the seat
forward and from side-to-side to
verify that it is secure.

A child seat secured with a seat belt
should be installed as firmly as
possible. However, it does not need
to be ‘‘rock solid.’’ Some side-to-side
movement can be expected and
should not reduce the child seat’s
effectiveness.

If the child seat is not secure, try
installing it in a different seating
position, or use a different style of
child seat that can be firmly secured.

Make sure the child is properly
strapped in the child seat
according to the child seat maker’s
instructions. A child who is not
properly secured in a child seat
can be seriously injured in a crash.

The following pages provide
guidelines on how to properly install
a child seat. A forward-facing child
seat is used in all examples, but the
instructions are the same for a rear-
facing child seat.

1.

2.

3.

Properly secure the child seat to
the vehicle.

Make sure the child seat is f irmly
secured.

Secure the child in the child seat.

Installing a Child Seat

Dr
iv

er
and

P

asseng

er
Saf

e

ty

35

Main Menu

Table of Contents

-------------------------------------------------------------------------------------------------------------------------------------------------------------

Your vehicle is equipped with
LATCH (lower anchors and tethers
for children) at the rear seats.

To install a LATCH-compatible child
seat:

Move the seat belt buckle or
tongue away from the lower
anchors.

Make sure there are no objects
near the anchors that could
prevent a secure connection
between the child seat and the
anchors.

Place the child seat on the vehicle
seat, then attach the seat to the
lower anchors according to the
child seat maker’s instructions.

Some LATCH-compatible seats
have a rigid-type connector as
shown above.

The lower anchors are located
between the seat-back and seat
bottom, and are to be used only with
a child seat designed for use with
LATCH.

The location of each lower anchor is
indicated by a small button above the
anchor point.

1.

2.

3.

Installing a Child Seat

Installing a Child Seat with
LATCH

36

LOWER ANCHORS

LOWER ANCHOR
MARKS

Rigid type

Main Menu

Table of Contents

-------------------------------------------------------------------------------------------------------------------------------------------------------------

Other LATCH-compatible seats have
a flexible-type connector as shown
above.

Whatever type you have, follow
the child seat maker’s instructions
for adjusting or tightening the fit.

Route the tether strap over the top
of the seat-back, making sure the
strap is not twisted.

Push and pull the child seat
forward and from side to side to
verify that it is secure.

Attach the tether strap hook to the
tether anchor, then tighten the
strap as instructed by the child
seat maker.

Locate the appropriate anchor
cover, and pull it down and out
to expose the tether anchor.

4.

5.

7.

6.

8.

Installing a Child Seat

Dr
iv

er
and

P

asseng

er
Saf

e

ty

37

Flexible type

Main Menu

Table of Contents

-------------------------------------------------------------------------------------------------------------------------------------------------------------

When not using the LATCH system,
all child seats must be secured to the
vehicle with the lap part of a lap/
shoulder belt.

With the child seat in the desired
seating position, route the belt
through the child seat according
to the seat maker’s instructions,
then insert the latch plate into the
buckle.

To activate the lockable retractor,
slowly pull the shoulder part of the
belt all the way out until it stops,
then let the belt feed back into the
retractor.

After the belt has retracted, tug on
it. If the belt is locked, you will not
be able to pull it out. If you can pull
the belt out, it is not locked, and
you will need to repeat these steps.

In addition, the lap/shoulder belts in
all seating positions except the
driver’s have a locking mechanism
that must be activated to secure a
child seat.

1.

2.

3.

Installing a Child Seat with a Lap/
Shoulder Belt

Installing a Child Seat

38

Main Menu

Table of Contents

-------------------------------------------------------------------------------------------------------------------------------------------------------------

After confirming that the belt is
locked, grab the shoulder part of
the belt near the buckle, and pull
up to remove any slack from the
lap part of the belt. Remember, if
the lap part of the belt is not tight,
the child seat will not be secure.

To remove slack, it may help to
put weight on the child seat, or
push on the back of the seat while
pulling up on the belt.

Push and pull the child seat
forward and from side to side to
verify that it is firmly secured
during normal driving maneuvers.
If the child seat is not secure,
unlatch the belt, allow it to retract
fully, then repeat these steps.

To deactivate the locking
mechanism and remove a child seat,
unlatch the buckle, unroute the seat
belt, and let the belt fully retract.

Since a tether can provide additional
security to the lap/shoulder belt
installation, we recommend using a
tether whenever one is required or
available.

A child seat with a tether can be
installed in either seating position in
the back seat, using one of the
anchorage points.

4.

5.

CONTINUED

Installing a Child Seat with a
Tether

Installing a Child Seat

Dr
iv

er
and

P

asseng

er
Saf

e

ty

39

COVER

TETHER ANCHORAGE POINT

Main Menu

Table of Contents

-------------------------------------------------------------------------------------------------------------------------------------------------------------

After properly securing the child
seat, route the tether strap over the
seat-back, then follow steps 6, 7, and
8 on page

.

37

Installing a Child Seat

40

Main Menu

Table of Contents

-------------------------------------------------------------------------------------------------------------------------------------------------------------

To determine if a lap/shoulder belt
properly fits a child, have the child
put on the seat belt, then ask
yourself:

Does the child sit all the way back
against the seat?

Do the child’s knees bend
comfortably over the edge of the
seat?

When a child reaches the
recommended weight or height limit
for a forward-facing child seat, the
child should sit in a back seat on a
booster seat and wear a lap/shoulder
belt.

The following pages give
instructions on how to check proper
seat belt fit, what kind of booster
seat to use if one is needed, and
important precautions for a child
who must sit in front.

1.

2.

CONTINUED

Protecting Larger Children

Checking Seat Belt Fit

Dr
iv

er
and

P

asseng

er
Saf

e

ty

41

Allowing a child age 12 or under
to sit in front can result in injury
or death if the passenger’s front
airbag inflates.

If a child must ride in front,
move the vehicle seat as far
back as possible, use a booster
seat if needed, have the child
sit up properly and wear the
seat belt properly.

Main Menu

Table of Contents

-------------------------------------------------------------------------------------------------------------------------------------------------------------

Does the shoulder belt cross
between the child’s neck and arm?

Is the lap part of the belt as low as
possible, touching the child’s
thighs?

Will the child be able to stay
seated like this for the whole trip?

If you answer yes to all these
questions, the child is ready to wear
the lap/shoulder belt correctly. If
you answer no to any question, the
child needs to ride on a booster seat.

A child who has outgrown a forward-
facing child seat should ride in a
back seat and use a booster seat
until the lap/shoulder belt fits them
properly without the booster.

Booster seats can be high-back or
low-back. Whichever style you select,
make sure the booster seat meets
federal safety standards (see page

) and that you follow the booster

seat maker’s instructions.

If a child who uses a booster seat
must ride in front, move the vehicle
seat as far to the rear as possible,
and be sure the child is wearing the
seat belt properly.

A child may continue using a booster
seat until the tops of their ears are
even with the top of the vehicle’s or
booster’s seat-back. A child of this
height should be tall enough to use
the lap/shoulder belt without a
booster seat.

Some states and Canadian provinces
also require children to use a booster
seat until they reach a given age or
weight (e.g., 6 years or 60 lbs). Be
sure to check current laws in the
states or provinces where you intend
to drive.

3.

4.

5.

34

Protecting Larger Children

Using a Booster Seat

42

Main Menu

Table of Contents

-------------------------------------------------------------------------------------------------------------------------------------------------------------

The National Highway Traffic Safety
Administration and Transport
Canada recommend that all children
age 12 and under be properly
restrained in the back seat.

If the passenger’s front airbag
inflates in a moderate to severe
frontal collision, the airbag can cause
serious injuries to a child who is
unrestrained, improperly restrained,
sitting too close to the airbag, or out
of position.

A side airbag also poses risks. If any
part of a larger child’s body is in the
path of a deploying side airbag, the
child could receive possibly serious
injuries.

Of course, children vary widely. And
while age may be one indicator of
when a child can safely ride in front,
there are other important factors you
should consider.

Physically, a child must be large
enough for the lap/shoulder belt to
properly fit (see page

). If the seat

belt does not fit properly, with or
without the child sitting on a booster
seat, the child should not sit in front.

To safely ride in front, a child must
be able to follow the rules, including
sitting properly, and wearing the seat
belt properly throughout a ride.

If you decide that a child can safely
ride up front, be sure to:

Carefully read the owner’s manual,
and make sure you understand all
seat belt instructions and all safety
information.

Move the vehicle seat to the rear-
most position.

Have the child sit up straight, back
against the seat, and feet on or
near the floor.

Check that the child’s seat belt is
properly and securely positioned.

Supervise the child. Even mature
children sometimes need to be
reminded to fasten the seat belts
or sit properly.

41

Protecting Larger Children

When Can a Larger Child Sit in
Front

Physical Size

Maturity

Dr
iv

er
and

P

asseng

er
Saf

e

ty

43

Main Menu

Table of Contents

-------------------------------------------------------------------------------------------------------------------------------------------------------------

This could result

in serious neck injuries during a
crash.

This could

cause very serious injuries during
a crash. It also increases the
chance that the child will slide
under the belt in a crash and be
injured.

If they do, they

could be very seriously injured in a
crash.

Devices intended to

improve a child’s comfort or
reposition the shoulder part of a
seat belt can make the belt less
effective and increase the chance
of serious injury in a crash.

Protecting Larger Children

Do not let a child wear a seat belt
across the neck.

Do not let a child put the shoulder
part of a seat belt behind the back
or under the arm.

Two children should never use the
same seat belt.

Do not put any accessories on a
seat belt.

Additional Saf ety Precautions

44

Main Menu

Table of Contents

-------------------------------------------------------------------------------------------------------------------------------------------------------------

Your vehicle’s exhaust contains
carbon monoxide gas. You should
have no problem with carbon
monoxide entering the vehicle in
normal driving if you maintain your
vehicle properly.

High levels of carbon monoxide can
collect rapidly in enclosed areas,
such as a garage. Do not run the
engine with the garage door closed.
Even with the door open, run the
engine only long enough to move the
vehicle out of the garage.

Have the exhaust system inspected
for leaks whenever:

The vehicle is raised for an oil
change.

You notice a change in the sound
of the exhaust.

The vehicle was in an accident
that may have damaged the
underside.

Select the fresh air mode.

Select the

mode.

Turn the fan on high speed.

Set the temperature control to a
comfortable setting.

If you must sit in your parked vehicle
with the engine running, even in an
unconfined area, adjust the climate
control system as follows:

With the hatch open, airflow can pull
exhaust gas into your vehicle’s
interior and create a hazardous
condition. If you must drive with the
hatch open, open all the windows,
and set the climate control system as
shown below.

1.

2.

3.

4.

Carbon Monoxide Hazard

Dr
iv

er
and

P

asseng

er
Saf

e

ty

45

Carbon monoxide gas is toxic.
Breathing it can cause
unconsciousness and even kill
you.

Avoid any enclosed areas or
activities that expose you to
carbon monoxide.

Main Menu

Table of Contents

-------------------------------------------------------------------------------------------------------------------------------------------------------------

These labels are in the locations
shown. They warn you of potential
hazards that could cause serious
injury or death.

If a label comes off or becomes hard
to read (except for the U.S.
dashboard label, which is removed
by the owner), contact your dealer
for a replacement.

U.S. models only

Safety Labels

46

RADIATOR CAP

DASHBOARD

HOOD

Main Menu

Table of Contents

-------------------------------------------------------------------------------------------------------------------------------------------------------------

U.S. models

Canadian models

U.S. models

Canadian models

Safety Labels

Dr
iv

er
and

P

asseng

er
Saf

e

ty

47

SUN VISOR

DOORJAMB

Main Menu

Table of Contents

-------------------------------------------------------------------------------------------------------------------------------------------------------------

This section gives information about
the controls and displays that
contribute to the daily operation of
your vehicle. All the essential
controls are within easy reach.

...........................

Control Locations

.

50

............................

Instrument Panel

.

51

..........

Instrument Panel Indicators

.

52

.............................................

Gauges

.

57

.....................................

Odometer

.

57

...................................

Trip Meter

.

57

..................................

Fuel Gauge

.

58

...................

Temperature Gauge

.

58

..........

Check Fuel Cap Indicator

.

58

Controls Near the Steering

...........................................

Wheel

.

59

.

Windshield Wipers and Washers .

60

...........

Turn Signal and Headlights

.

61

........

Instrument Panel Brightness

.

62

.................

Hazard Warning Button

.

62

.................

Rear Window Defogger

.

62

..........

Steering Wheel Adjustment

.

63

...............................

Keys and Locks

.

64

........................

Immobilizer System

.

65

................................

Ignition Switch

.

66

Door Locks,

.........

Power Door/Hatch Locks

.

67

............................................

Hatch

.

68

.......................

Remote Transmitter

.

69

.................................................

Seats

.

71

....................................

Seat Heaters

.

74

...........................

Cargo Area Cover

.

75

..............................

Power Windows

.

77

.........................................

Moonroof

.

79

.............................................

Mirrors

.

79

.................................

Parking Brake

.

81

...........

Interior Convenience Items

.

82

.......................

Beverage Holders

.

83

..........

Accessory Power Sockets

.

83

...............

Console Compartment

.

84

....................................

Glove Box

.

84

..............................

Vanity Mirror

.

85

....................................

Coat Hook

.

85

.................................

Interior Lights

.

86

Instruments and Controls

Inst

ru

m

e

nt
s

a

nd

Cont

ro

ls

49

Main Menu

-------------------------------------------------------------------------------------------------------------------------------------------------------------


Content      ..     1      2      3      4      ..