Acura RL (1996-2004 year). Manual - part 461


  Index      Acura     Acura RL 1996-2004 year - service repair manual


Search            


Content   ..  459  460  461  462   ..


Acura RL (1996-2004 year). Manual - part 461


Shift Cable

Replacement (cont'd)

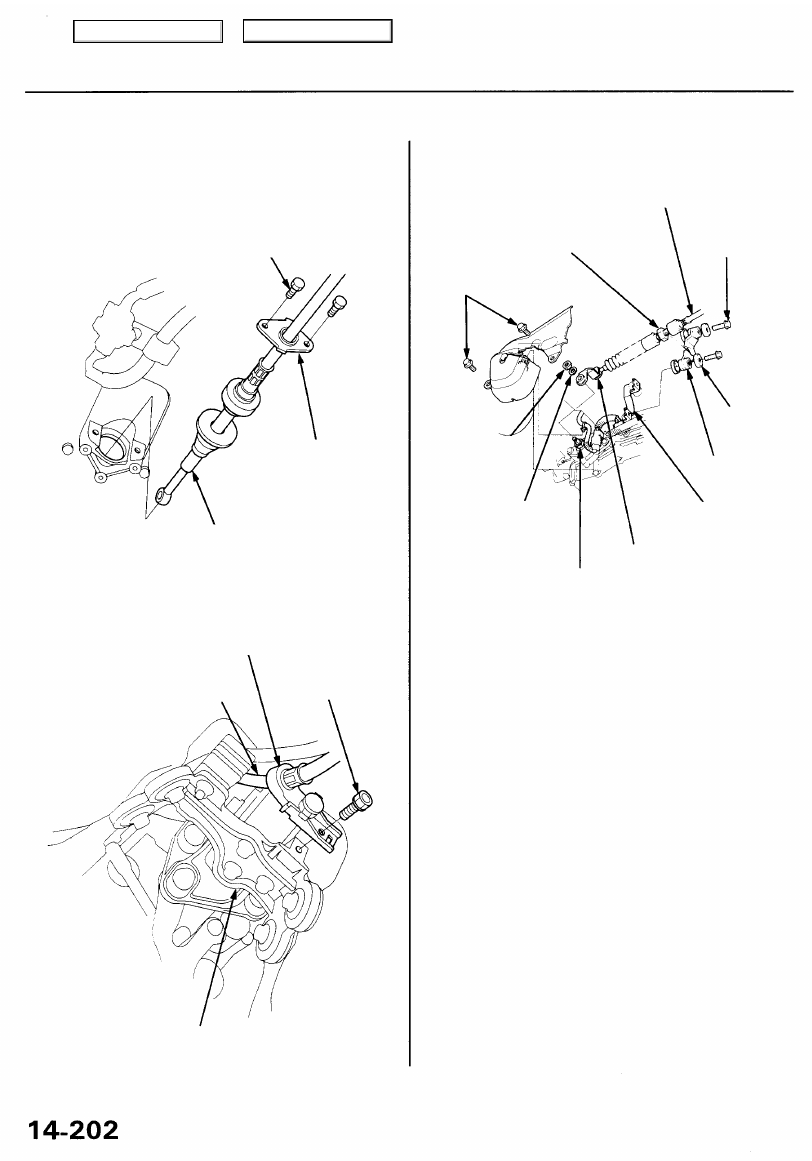
11. Remove the shift cable bracket.

CAUTION: Take care not to bend the shift cable.

6 x 1.0mm

9.8 N-m (1.0 kgf-m, 7.2 Ibf-ft)

SHIFT CABLE
BRACKET

SHIFT CABLE

12. Remove the shift cable guide bracket.

SHIFT CABLE GUIDE
BRACKET

SHIFT CABLE

6 x 1.0mm

9.8 N-m (1.0 kgf-m,
7.2 Ibf-ft)

TRANSMISSION BEAM

13. Remove the shift cable cover mounting bolts.

SHIFT CABLE

LOCKNUT
29 N-m (3.0 kgf-m

22 Ibf-ft)

6 x 1.0mm

12 N-m (1.2 kgf-m

8.7 Ibf-ft)

6 x 1.0mm

12 N-m (1.2 kgf-m

8.7 Ibf-ft)

LOCKNUT
16 N-m (1.6 kgf-m
12 Ibf-ft)

SPRING
WASHER

WASHER

SHIFT CABLE
HOLDER

SHIFT CABLE
HOLDER BASE

14. Remove the shift solenoid valve/A/T clutch pressure

control solenoid valve harness connector and clamp
from the shift cable cover.

15. Remove the shift cable cover from the transmission

housing.

16. Remove the shift cable holder with the shift cable

from the shift cable holder base.

17. Remove the control lever from the control shaft,

then remove the shift cable.

18. Remove the shift cable holder from the shift cable.

19. Install the new shift cable in the reverse order of

removal.

CAUTION: Take care not to bend the shift cable
when installing it.

20. Check the shift lever operation after installation.

21. If shift lever adjustment is required, remove the

center console (see 

section 20

), and adjust the link

adjuster (see pages 

14-199

 and 

14-200

).

CONTROL SHAFT

CONTROL LEVER

Main Menu

Table of Contents

Special Tools

Ref. No.

Tool Number

Description

Qty

Page Reference

Bearing Driver Attachment
Locknut Socket, 36 x 41 mm
Extension Shaft Puller

Pinion Cover Driver Attachment

Attachment, 45 x 55 mm I.D.

Pilot, 32 x 50 mm
Extension Shaft Installer

Tapered Bearing Race Installer A
Tapered Bearing Race Installer B

Installer Shaft

Attachment, 32 x 35 mm

Driver, 40 mm I.D.
Attachment, 35 mm I.D.
Driver

Driver Attachment

15-17, 15-18

15-10, 11, 15-19, 15-21, 22

15-5

15-21

15-15

15-23

15-28

15-17

15-17

15-17

15-14, 15-15

15-16, 15-18, 15-20

15-16

15-17, 15-18, 15-21, 15-23

15-23

07GAD-SD40101
07HAA-SF10100
07LAC-PW50100 or
07LAC-PW50101
07LAD - PW50500
07MAD-PR90100
07MAD - PR90200
07MAF-PY40100 or
07MAF-PY40101
07MAF-SP0011A
07MAF-SP0012A
07MAF-SP0013A
07746-0010100
07746-0030100

07746 - 0030400
07749-0010000

07965-SA00600

Main Menu

Table of Contents

Differential

Troubleshooting

NOTE: Most problems in the unit are to be diagnosed by identifying noises from the gears or bearings.
Care should be taken during diagnosis not to confuse differential noises with those from other drivetrain components.

[Noise symptoms will be most prominent]

Symptom

Consistent noise during
cruising

Gear noises while
accelerating

Gear noises while
coasting or accelerating

Bearing noises while
accelerating or

coasting/deceleration

Abnormal noises when

rounding a curve

Abnormal noises during
acceleration or when first
driving away from a stop

Oil leak

Overheating

Probable Cause

• Lack of oil
• Foreign matter stuck in gears, etc.
• Improper tooth contact between ring gear and

drive pinion

• Worn or damaged side bearing

• Deformed ring gear or differential carrier

• Lack of oil
• Foreign matter stuck in gears, etc.
• Improper drive pinion preload
• Chipped or damaged gears

• Improper drive pinion preload
• Damaged or chipped gears

Cracked or damaged drive pinion bearing or side
bearing

• Worn (excessive play) or damaged side bearing
• Damaged side gear, pinion, or pinion shaft

• Excessive backlash between ring gear and

drive pinion

• Improper ring gear or drive pinion preload
• Excessive pinion backlash
• Worn differential splines
• Loose companion flange nuts and other

fasteners

• Oil level too high
• Clogged breather hole
• Loose case cover or inadequate sealing
• Worn or damaged oil seal

• Lack of oil
• Insufficient ring gear-to-pinion backlash
• Excessive ring gear or drive pinion preload

Remedy

• Replenish oil
• Clean and inspect
• Adjust or replace

• Replace any damaged or

faulty parts

• Replenish oil
• Clean and inspect
• Adjust
• Replace

Adjust or replace

Replace

Replace

• Adjust

• Adjust or replace
• Recheck torque or replace

• Lower to proper level
• Clean or replace
• Recheck torque or apply sealant
• Replace

• Replenish
• Adjust
• Adjust or replace

Main Menu

Table of Contents

Maintenance

Differential Oil

NOTE: Check the differential oil with engine OFF, and

the vehicle on level ground.

1. Remove the oil filler plug, then check the level and

condition of the oil.

WASHER
Replace.

Proper Lever

OIL FILLER PLUG
44 N-m (4.5 kgf-m, 33 Ibf-ft)
WASHER
 Replace.

2. The oil level must be up to the fill hole. If it is below

the hole, add oil until it runs out, then reinstall the

oil filler plug with a new washer.

3. If the differential oil is dirty, remove the drain plug,

and drain the oil.

DRAIN PLUG
39 N-m (4.0 kgf-m, 29 Ibf-ft)

WASHER Replace.

OIL FILLER PLUG
44 N-m (4.5 kgf-m, 33 Ibf-ft)

4. Reinstall the drain plug with a new washer, and refill

the differential with the recommended oil to the

proper level.

NOTE:

The drain plug washer should be replaced at every

oil change.
Clean the drain plug before reinstalling.

5. Reinstall the oil filler plug with a new washer.

Oil Capacity

1.05 (1.11 US qt, 0.92 Imp qt) at oil change
1.10 (1.16 US qt, 0.97 Imp qt) at overhaul

Recommended oil:
Hypoid gear oil

API Classification GL4 or GL5
viscosity:

SAE 90 above 0°F (-18°C)
SAE 80 W - 90 below 0°F (-18°C)

Main Menu

Table of Contents


Content   ..  459  460  461  462   ..