Acura RL. Manual - part 612


  Index      Acura     Acura RL - service repair manual 2005-2008 year


Search            


Content   ..  610  611  612  613   ..


Acura RL. Manual - part 612


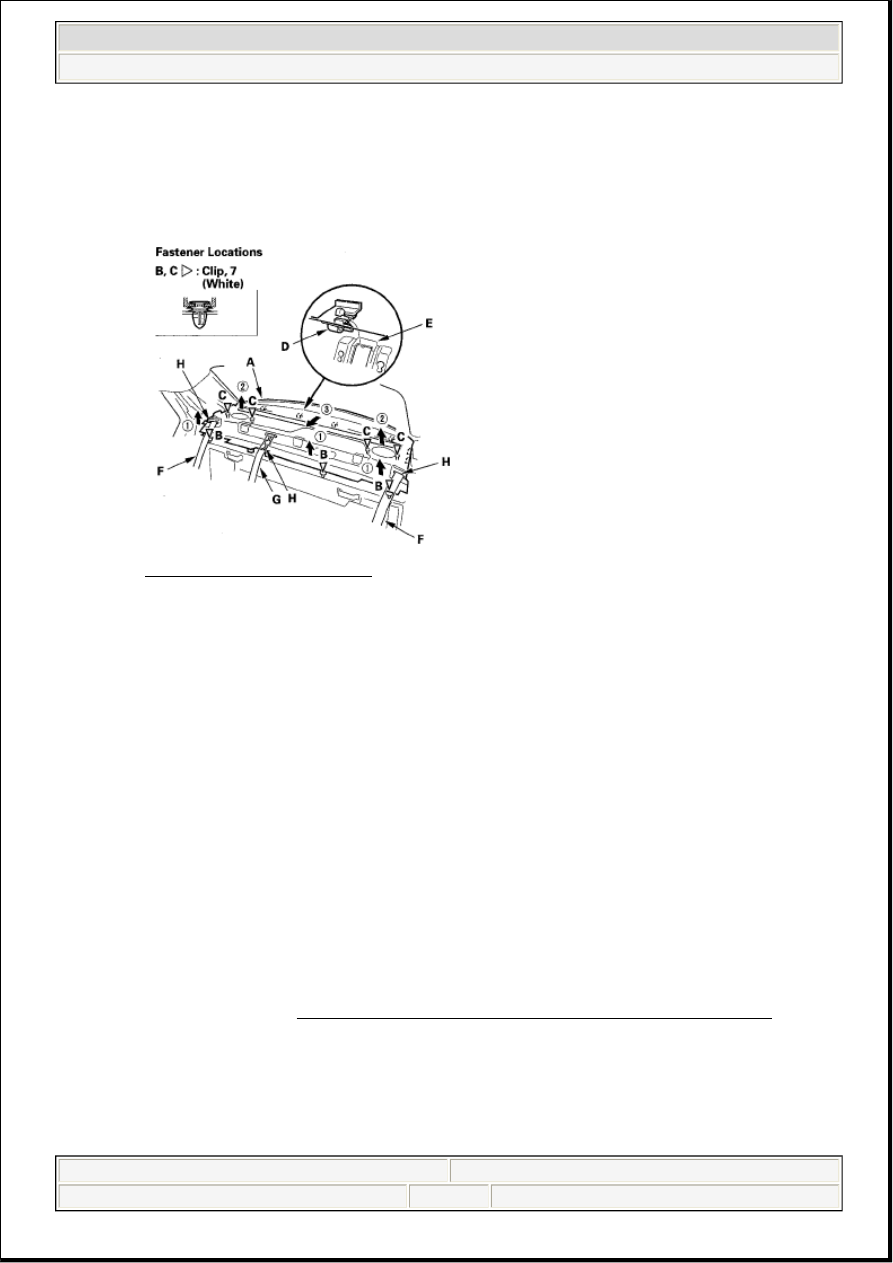
2. Pull the rear shelf up and forward to release the four hooks (D) from the rear window sunshade 

brackets (E).  

3. Pull both rear seat belts (F) and rear center seat belt (G) out through the slits (H) in the rear 

shelf. 

Fig. 34: Removing Rear Shelf 
Courtesy of AMERICAN HONDA MOTOR CO., INC. 

4. Install the rear shelf. 

1. Using a clip remover, remove any clips left in the body, and reinstall them on the rear shelf.  

2. Check if the clips are damaged or stress-whitened, and if necessary, replace them with new 

ones.  

3. Slip both rear seat belts and rear center seat belt through the slits in the rear shelf.  

4. Insert the hooks to the rear window sunshade bracket, and fit the clips into the holes in the 

body, then push on the rear shelf until the clips snap into place.  

5. Reinstall all remaining removed parts.  

REAR WINDOW SUNSHADE REMOVAL/INSTALLATION 

1. Remove the rear shelf (see TRIM REMOVAL/INSTALLATION - REAR SHELF AREA ).  

2. Disconnect the rear window sunshade control unit connector (A). Remove two nuts (B), and loosen 

four nuts (C) securing the rear window sunshade. 

NOTE:

Put on gloves to protect your hands.  

Take care not to hit the rear window when removing or loosing the 
bolts.  

Take care not to scratch the trim and panels.  


2007 Acura RL 

2005-08 ACCESSORIES AND EQUIPMENT Interior Trim - RL


me 


Friday, June 05, 2009 3:37:01 PM

Page 24 

© 2005 Mitchell Repair Information Company, LLC. 

Fig. 35: Identifying Controller And Rear Window Sunshade With Torque Specifications  
Courtesy of AMERICAN HONDA MOTOR CO., INC. 

3. While lifting at the front edge of the rear window sunshade (A), slide it forward, then remove it. Do 

not catch the screen portion (B) while removing the sunshade. 

Fig. 36: Removing Rear Window Sunshade 
Courtesy of AMERICAN HONDA MOTOR CO., INC. 

4. Install the sunshade in the reverse order of removal, and note these items: 

Be sure there is no gap between the bracket and rear parcel shelf, then tighten the mounting nuts 
securely.  

Make sure the control unit connector is plugged in properly.  

Check the rear window sunshade operation.  

REAR WINDOW SUNSHADE DISASSEMBLY/REASSEMBLY 

1. Remove the left arm holder from the screen plate, and remove the left screen holder (NOTE: It is pre-

loaded), then slide the screen completely out of the screen base.  

2. Reassemble in the reverse order of disassembly, and note these items: 

NOTE:

Put on gloves to protect your hands.  

Take care not to scratch the sunshade screen and related parts. 


2007 Acura RL 

2005-08 ACCESSORIES AND EQUIPMENT Interior Trim - RL


me 


Friday, June 05, 2009 3:37:01 PM

Page 25 

© 2005 Mitchell Repair Information Company, LLC. 

Before attaching the screen holder, rotate the shaft five times to pre-load the screen, then attach 
the screen holder and the arm holder while maintaining the pre-load.  

Be sure the ground lead is installed securely.  

Apply multipurpose grease to each pivoting portion of the sunshade as shown. 

Fig. 37: Identifying Rear Window Sunshade Components With Torque Specifications  
Courtesy of AMERICAN HONDA MOTOR CO., INC. 

TRIM REMOVAL/INSTALLATION - TRUNK AREA 

Special Tools Required  

KTC trim tool set SOJATP2014 * 

* Available through the American Honda Tool and Equipment Program; call 888-424-6857 

1. Remove the spare tire lid (A) and spare tire spacer (B). 

NOTE:

Put on gloves to protect your hands.  

Take care not to bend or scratch the trim and panels.  

Use the appropriate tool from the KTC trim tool set to avoid damage 
when prying components.  


2007 Acura RL 

2005-08 ACCESSORIES AND EQUIPMENT Interior Trim - RL


me 


Friday, June 05, 2009 3:37:01 PM

Page 26 

© 2005 Mitchell Repair Information Company, LLC. 

Fig. 38: Identifying Spare Tire Lid And Spare Tire Spacer 
Courtesy of AMERICAN HONDA MOTOR CO., INC. 

2. Detach the clips, and release the hooks (A) by pulling the trunk rear trim panel (B) up, then remove it. 

Fig. 39: Identifying Trunk Rear Trim Panel 
Courtesy of AMERICAN HONDA MOTOR CO., INC. 

3. Release the clips (A, B) and fasteners (C), then remove the trunk front trim panel (D). 


2007 Acura RL 

2005-08 ACCESSORIES AND EQUIPMENT Interior Trim - RL


me 


Friday, June 05, 2009 3:37:01 PM

Page 27 

© 2005 Mitchell Repair Information Company, LLC. 


Content   ..  610  611  612  613   ..