Kia Sedona (2008 year). Manual - part 353


  Главная      Kia     Kia Sedona (2008 year) - Service Repair Manual


поиск по сайту           правообладателям


содержание   ..  351  352  353  354   ..


Kia Sedona (2008 year). Manual - part 353
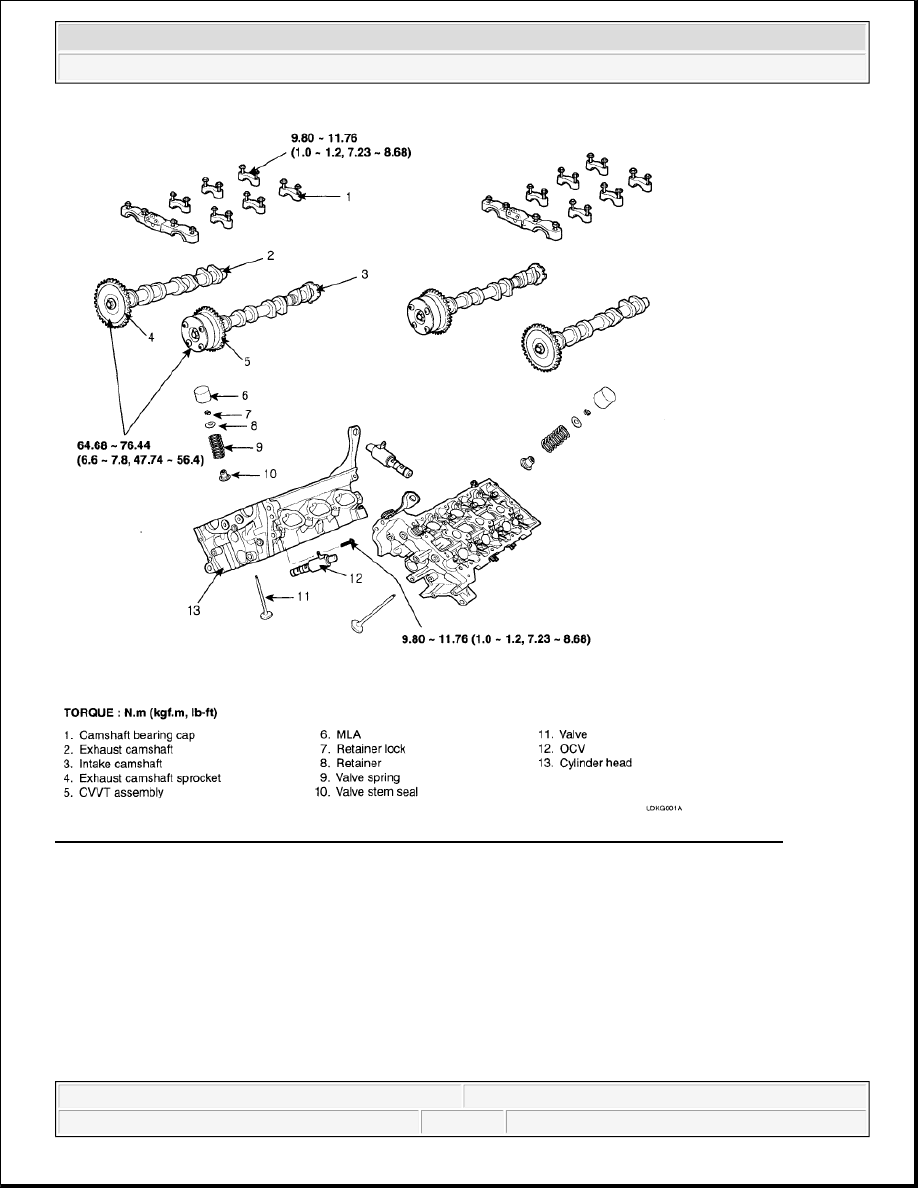


Fig. 102: Identifying Cylinder Head Assembly Components And Torque Specifications (2 Of 2) 
Courtesy of KIA MOTORS AMERICA, INC. 

REMOVAL 

CAUTION:

Use fender covers to avoid damaging painted surfaces.  

To avoid damaging the cylinder head, wait until the engine coolant 
temperature drops below normal operating temperature before 
removing it.  

When handling a metal gasket, take care not to fold the gasket or 
damage the contact surface of the gasket.  


2008 Kia Sedona 

2008 ENGINE Mechanical - Sedona


Microsoft 


Saturday, May 22, 2010 3:54:37 PM

Page 70 

© 2006 Mitchell Repair Information Company, LLC. 

Engine removal is required for this procedure. 

1. Remove exhaust manifold. Refer to EXHAUST MANIFOLD.  

2. Remove intake manifold. Refer to INTAKE MANIFOLD.  

3. Remove timing chain. Refer to REMOVAL.  

4. Remove water temperature control assembly. Refer to WATER TEMPERATURE CONTROL 

ASSEMBLY.  

5. Remove camshaft bearing cap (A). 

Fig. 103: Locating Camshaft Bearing Caps 
Courtesy of KIA MOTORS AMERICA, INC. 

6. Remove camshaft assembly (A). 

To avoid damage, unplug the wiring connectors carefully while 
holding the connector portion.  

NOTE:

Mark all wiring and hoses to avoid disconnection.  

Turn the crankshaft pulley so that the No. 1 piston is at top dead center. 
Refer to VALVE CLEARANCE INSPECTION AND ADJUSTMENT.  


2008 Kia Sedona 

2008 ENGINE Mechanical - Sedona


Microsoft 


Saturday, May 22, 2010 3:54:37 PM

Page 71 

© 2006 Mitchell Repair Information Company, LLC. 

Fig. 104: Identifying Camshaft Assemblies 
Courtesy of KIA MOTORS AMERICA, INC. 

7. Remove cylinder head bolts, then remove cylinder head. 

1. Uniformly loosen and remove the 16 cylinder head bolts, in several passes, in the sequence shown 

in illustration. Remove the 16 cylinder head bolts and plate washers. 

Fig. 105: Identifying Cylinder Head Bolts Loosening Sequence 
Courtesy of KIA MOTORS AMERICA, INC. 

2. Lift the cylinder head from the dowels on the cylinder block and place the cylinder head on wooden 

blocks on a bench.  

CAUTION: Head warpage or cracking could result from removing bolts in 

an incorrect order.

CAUTION: Be careful not to damage the contact surfaces of the cylinder head 


2008 Kia Sedona 

2008 ENGINE Mechanical - Sedona


Microsoft 


Saturday, May 22, 2010 3:54:37 PM

Page 72 

© 2006 Mitchell Repair Information Company, LLC. 

DISASSEMBLY 

1. Remove MLAs (A). 

Fig. 106: Identifying MLA) 
Courtesy of KIA MOTORS AMERICA, INC. 

2. Remove valves. 

1. Using SST (09222-3K000, 09222-3C300), compress the valve spring and remove retainer lock. 

Fig. 107: Identifying SST (09222-3K000, 09222-3C300) 
Courtesy of KIA MOTORS AMERICA, INC.

and cylinder block.

NOTE:

Identify MLA, valves and valve springs as they are removed so that each item 
can be reinstalled in its original position.


2008 Kia Sedona 

2008 ENGINE Mechanical - Sedona


Microsoft 


Saturday, May 22, 2010 3:54:37 PM

Page 73 

© 2006 Mitchell Repair Information Company, LLC. 


содержание   ..  351  352  353  354   ..