FANUC R-30iB Plus CONTROLLER, iRVision 2D Camera Application. OPERATOR'S MANUAL - page 5
Setup
4. 3D TRI-VIEW VISION PROCESS
4.2
SETUP FOR FIXED FRAME OFFSET WITH FIXED
CAMERA
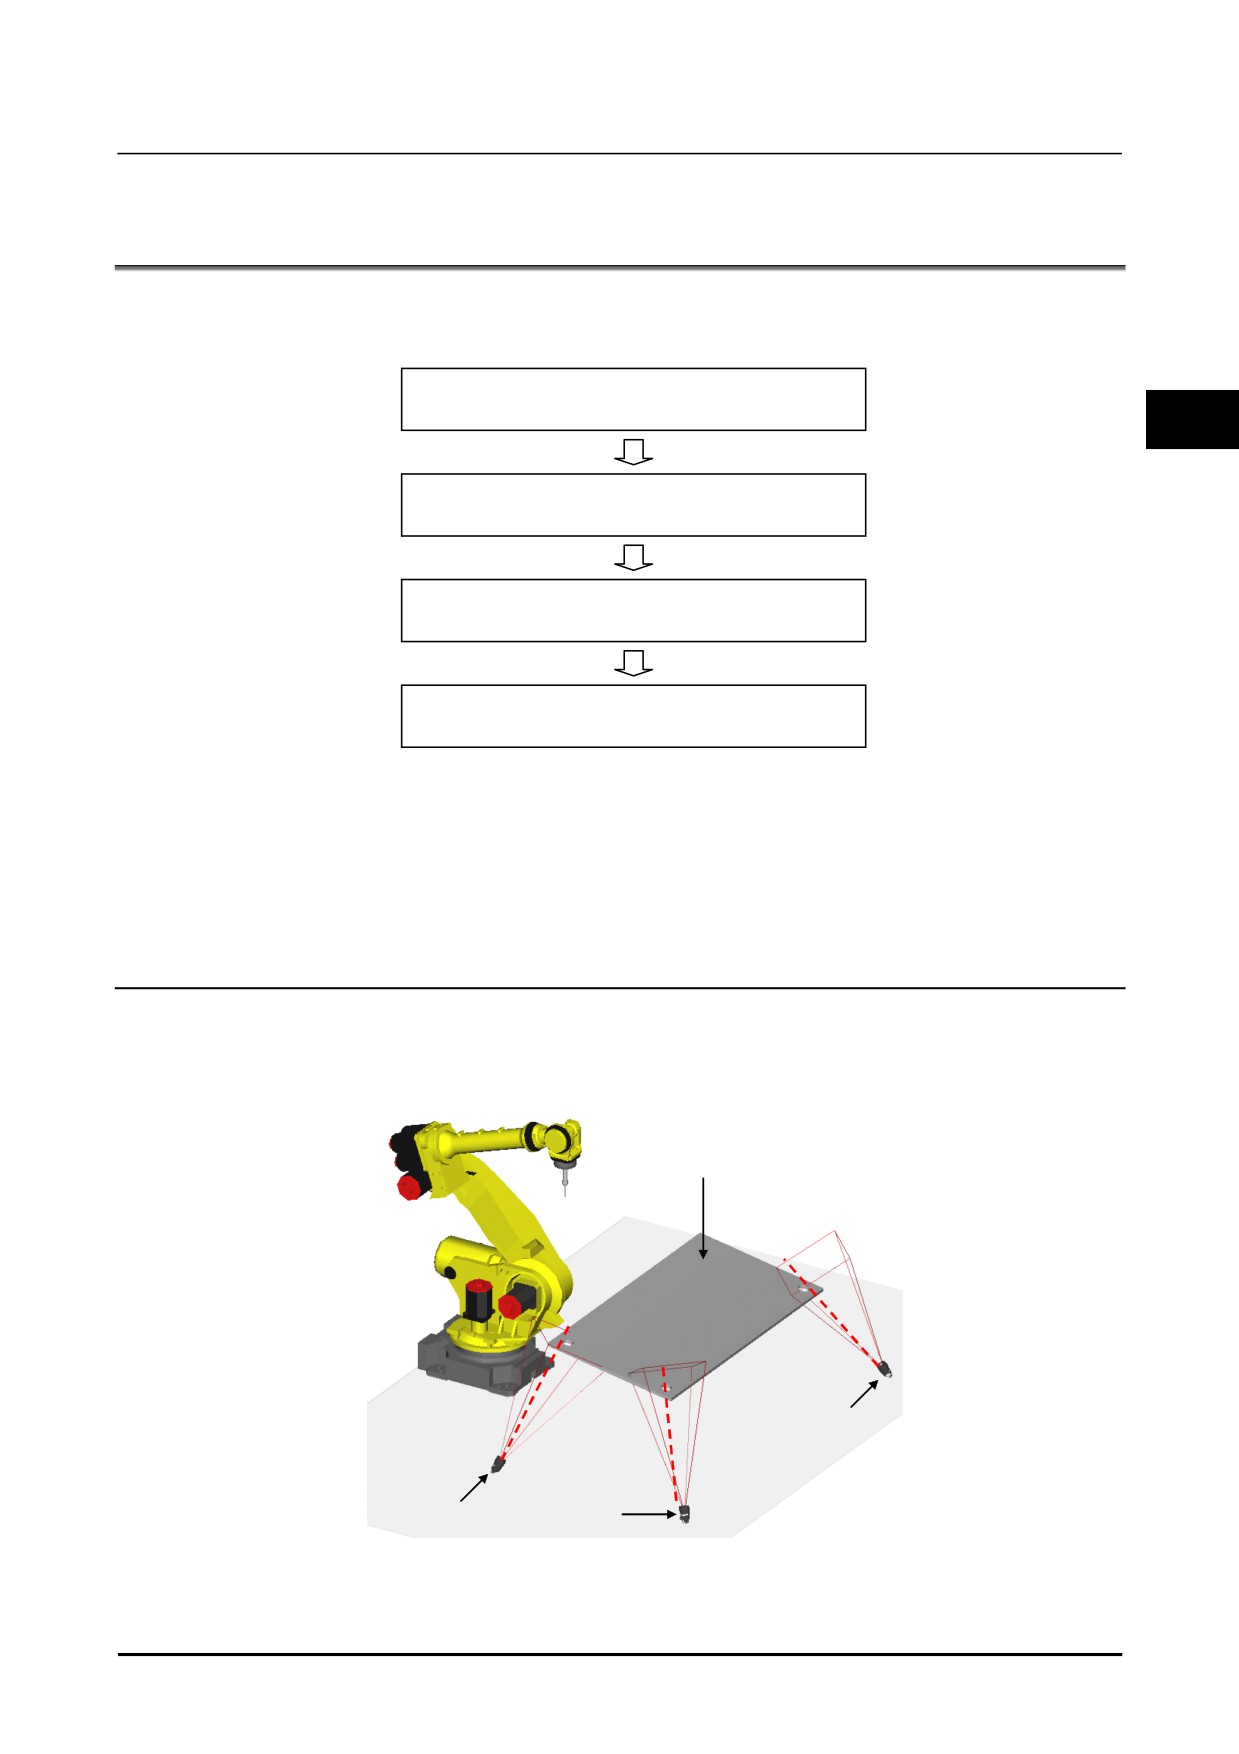
Three fixed cameras measure three points of the workpiece.
Use the following setup procedure for fixed frame offset with fixed camera:
1.
Camera Data Creation and Teaching
4
2.
Vision process creation and teaching
3.
Robot program creation and teaching
4.
Robot Compensation Operation Check
When starting up a robot system that uses iRVision, perform all of the tasks described above. If the
camera gets out of position or the camera is replaced, please perform camera calibration again using
Section 1, ‘Camera Data Creation and Teaching’. When a camera calibration has been already finished,
in addition, a workpiece is changed or a kind of workpiece is added, perform ‘2 Vision process creation
and teaching’ and ‘3 Robot program creation and teaching’.
4.2.1
Camera Data Creation and Teaching
Create camera data and perform basic settings and calibration for the camera.
For the 3-D Tri-View Vision Process, create three sets of camera data and perform calibration for each
camera. As an example, for the layout shown in the figure below, three sets of camera data are taught.
Workpiece
Camera
Camera
Camera
Example of a layout for creating camera data for each camera
B-83914EN-2/01
103
4. 3D TRI-VIEW VISION PROCESS
Setup
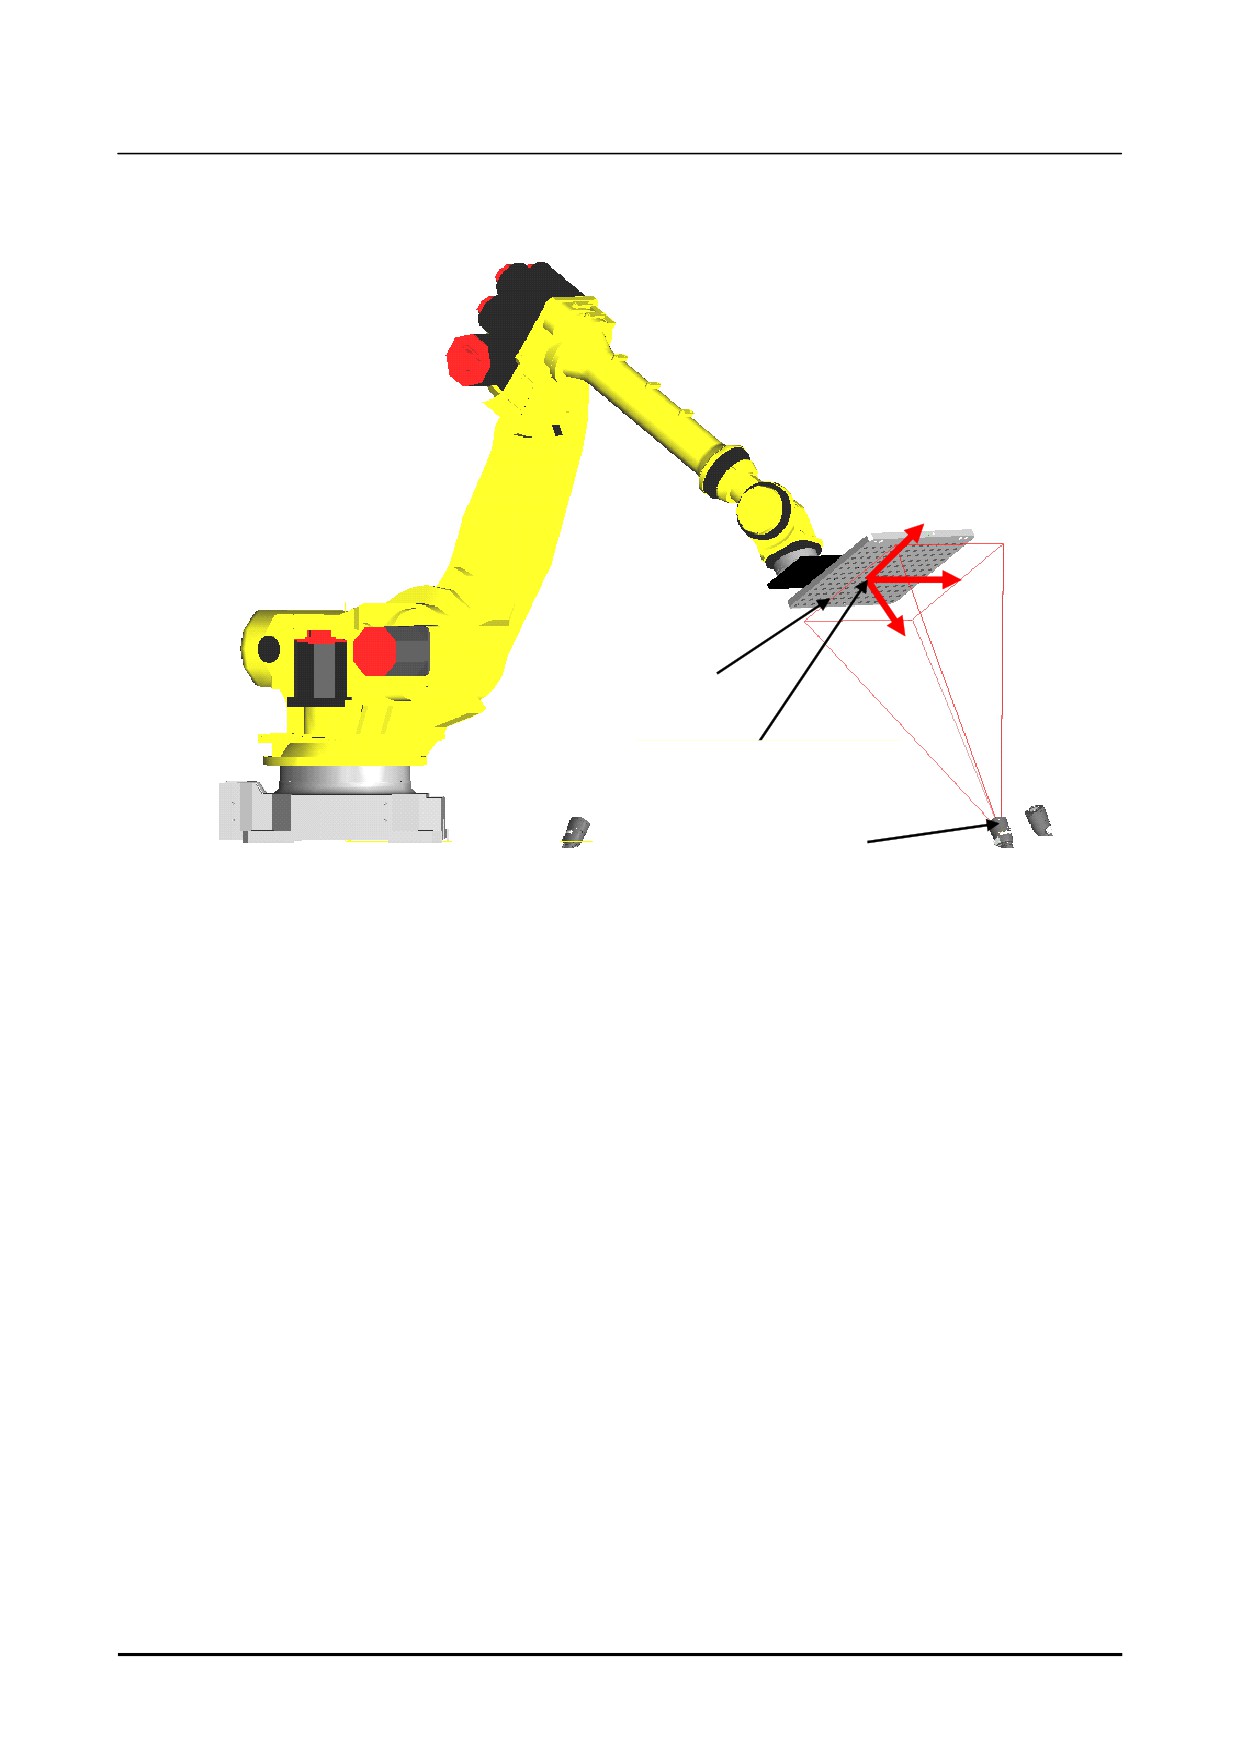
For the 3-D Tri-View Vision Process, a convenient method is to attach a calibration grid to the robot hand
and then calibrate, as shown in the figure below.
Y
X
Z
Calibration grid
Installation information of the calibration grid
(= Tool frame)
Camera
Installation example for Grid Pattern Calibration
For the setup method for Grid Pattern Calibration, refer to Know-how Edition Section 2.1, "GRID
PATTERN CALIBRATION WITH A FIXED CAMERA".
Application frame setup
In the 3D Tri-View Vision Process, application frame has a role of a coordinate system used as a camera
calibration, and a role of a coordinate system used for calculation of the offset data. So, the reference
position and the found position are outputted as a position on the application frame in the 3D Tri-View
Vision Process. Moreover, in the 3D Tri-View Vision Process, a workpiece is large in many cases. So,
two or more robots may use a compensation data. In this case, set up an application frame on a plane
which is a common for all robots, and use this user frame as an application frame.(Set the same
application frame number for all robot).
Information setup for mounting the calibration grid
Install the calibration grid on the mounted robot. When set a calibration grid frame, it is recommended
that use the Grid Frame Setting Function. Set a tool frame as the calibration grid frame.
Calibration data creation and teaching
Create three sets of camera data and perform calibration for each.
Perform the calibration for all cameras. Create three camera setup data files and three camera
calibration data files. Note [Application frame] number must be the same in all calibration data used.
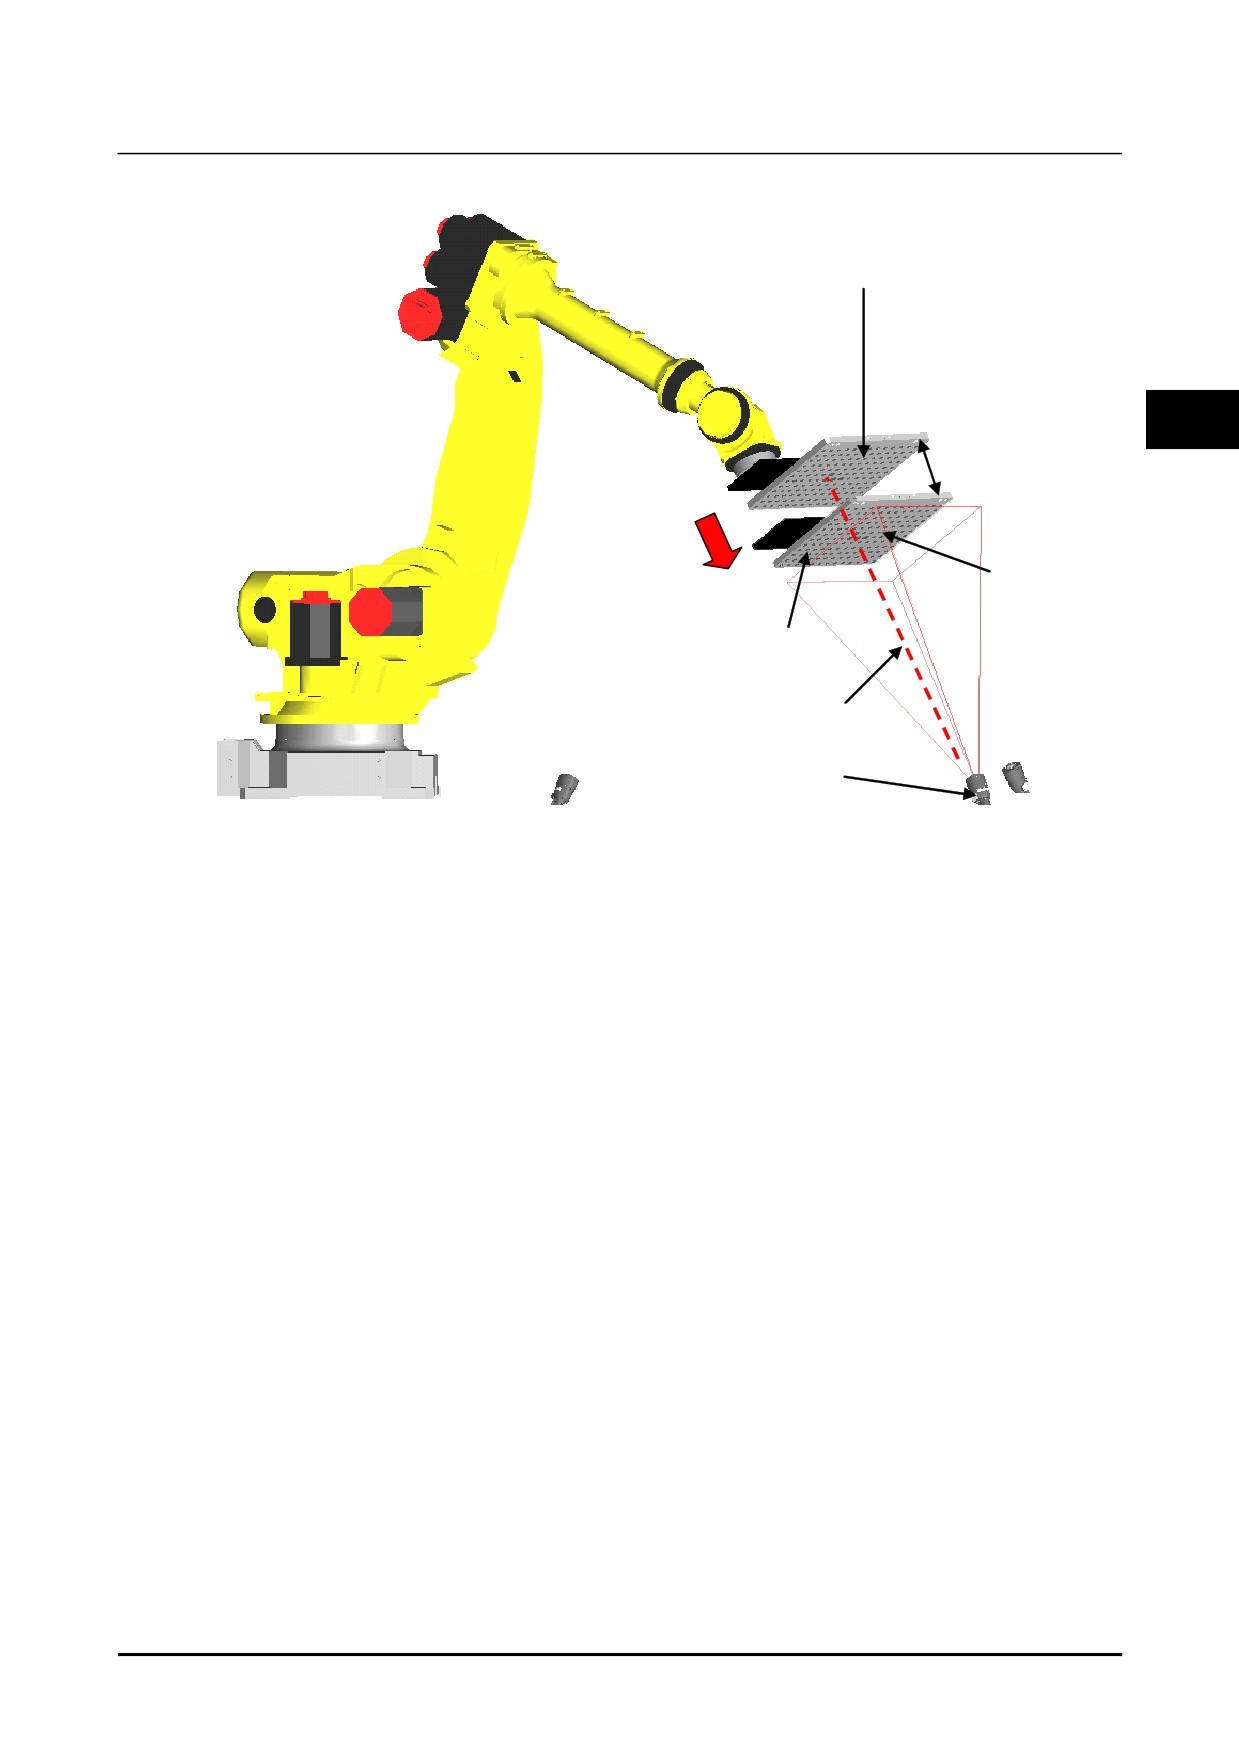
Perform two-plane calibration by moving the robot up and down as shown in the figure below. Perform
detection by bringing calibration surface 1 as close as possible to the detection target. The up/down
distance for two-plane calibration should be 100 to 150 mm. Detect the calibration grid at two different
heights. Move the calibration grid along the optical axis of the camera.
Perform robot jog without changing the calibration grid posture.
104
B-83914EN-2/01
Setup
4. 3D TRI-VIEW VISION PROCESS
1st detection
(Position as close as
possible to the detection target)
4
100mm to 150mm
2nd detectio
Calibration grid
Optical axis
Camera
Example of two plane calibration execution
B-83914EN-2/01
105
4. 3D TRI-VIEW VISION PROCESS
Setup
4.2.2
Vision Process Creation and Teaching
Perform vision process creation and teaching.
The basic setting procedure for the vision process is the same as for [2-D Single-View Vision Process].
The part that is different is that three
[Camera Views] are added. The camera views for each
measurement position are named [Camera View 1], [Camera View 2] and [Camera View 3]. The snap
tool and locator tools such as the GPM Locator Tool are placed under each camera view.
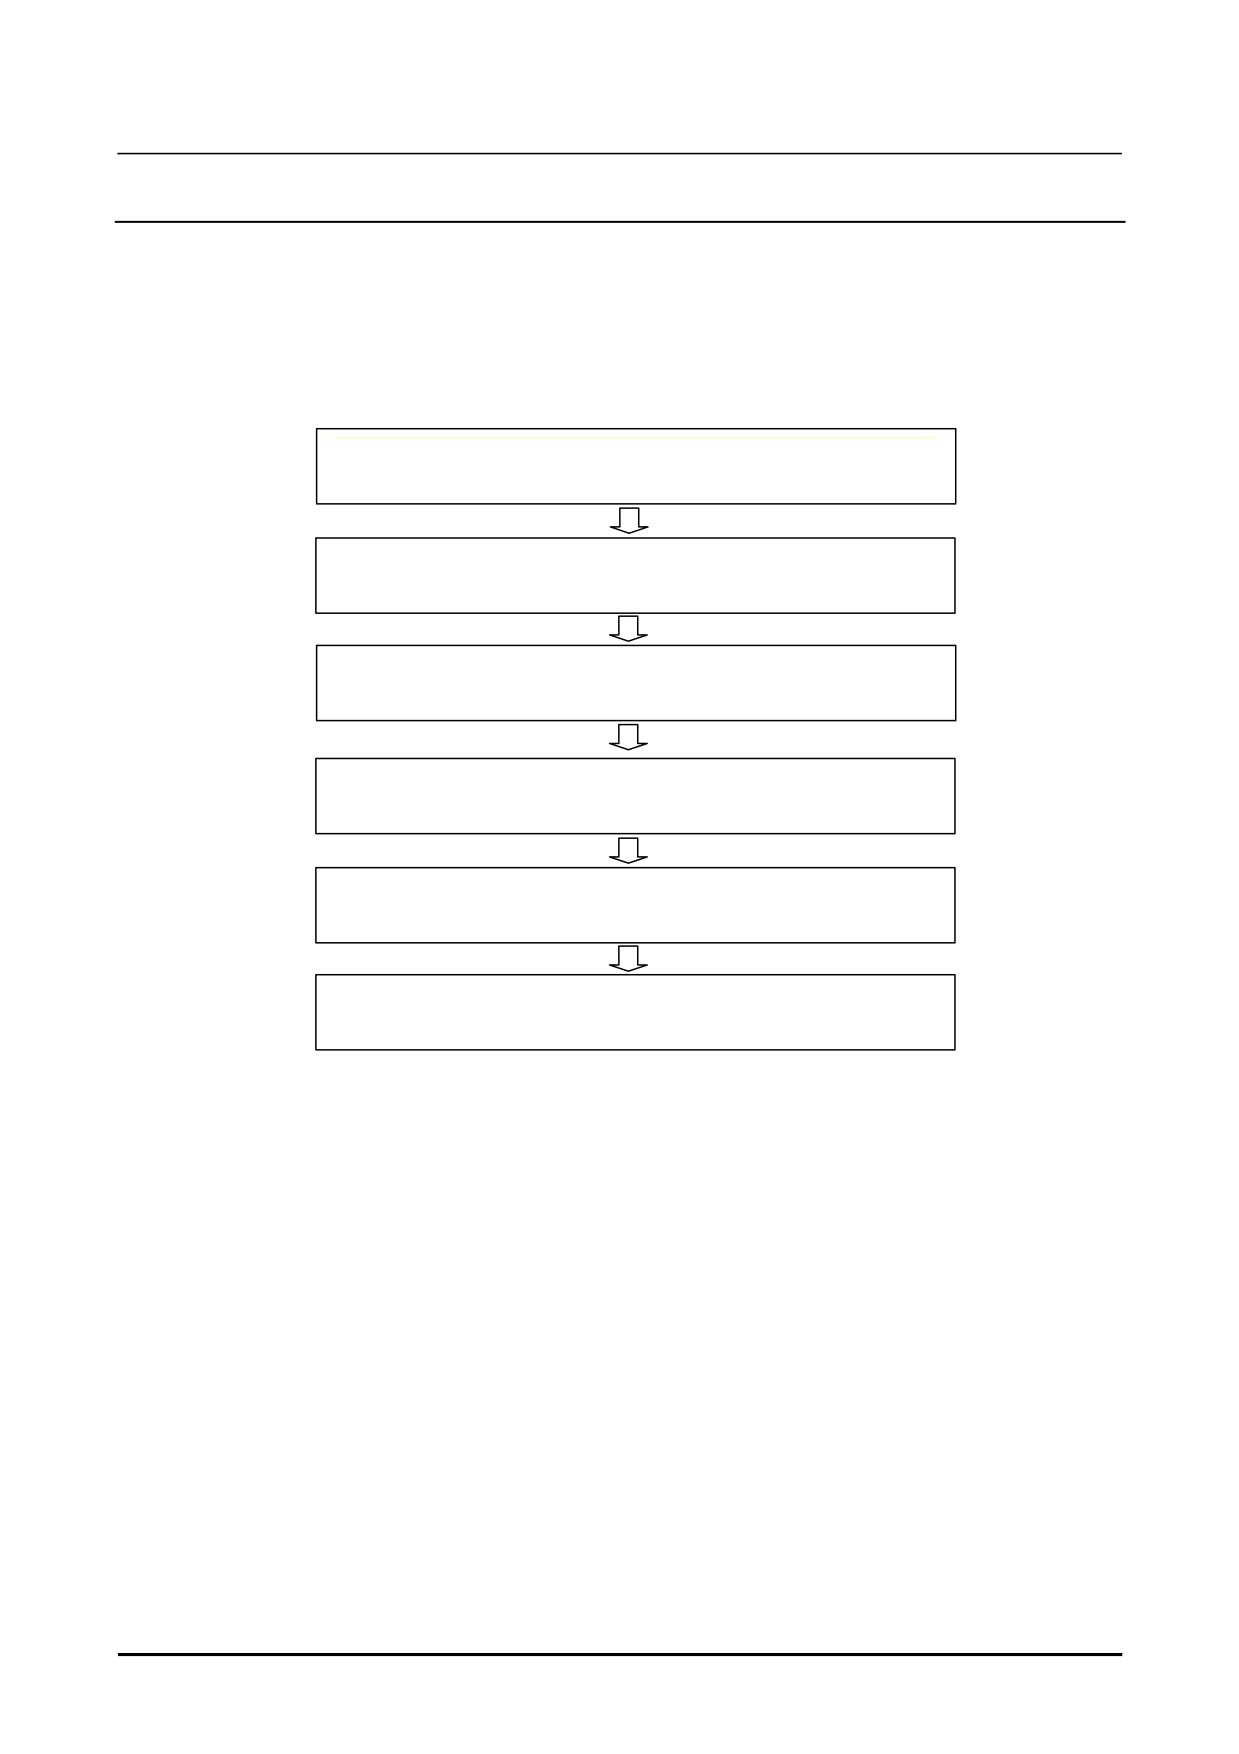
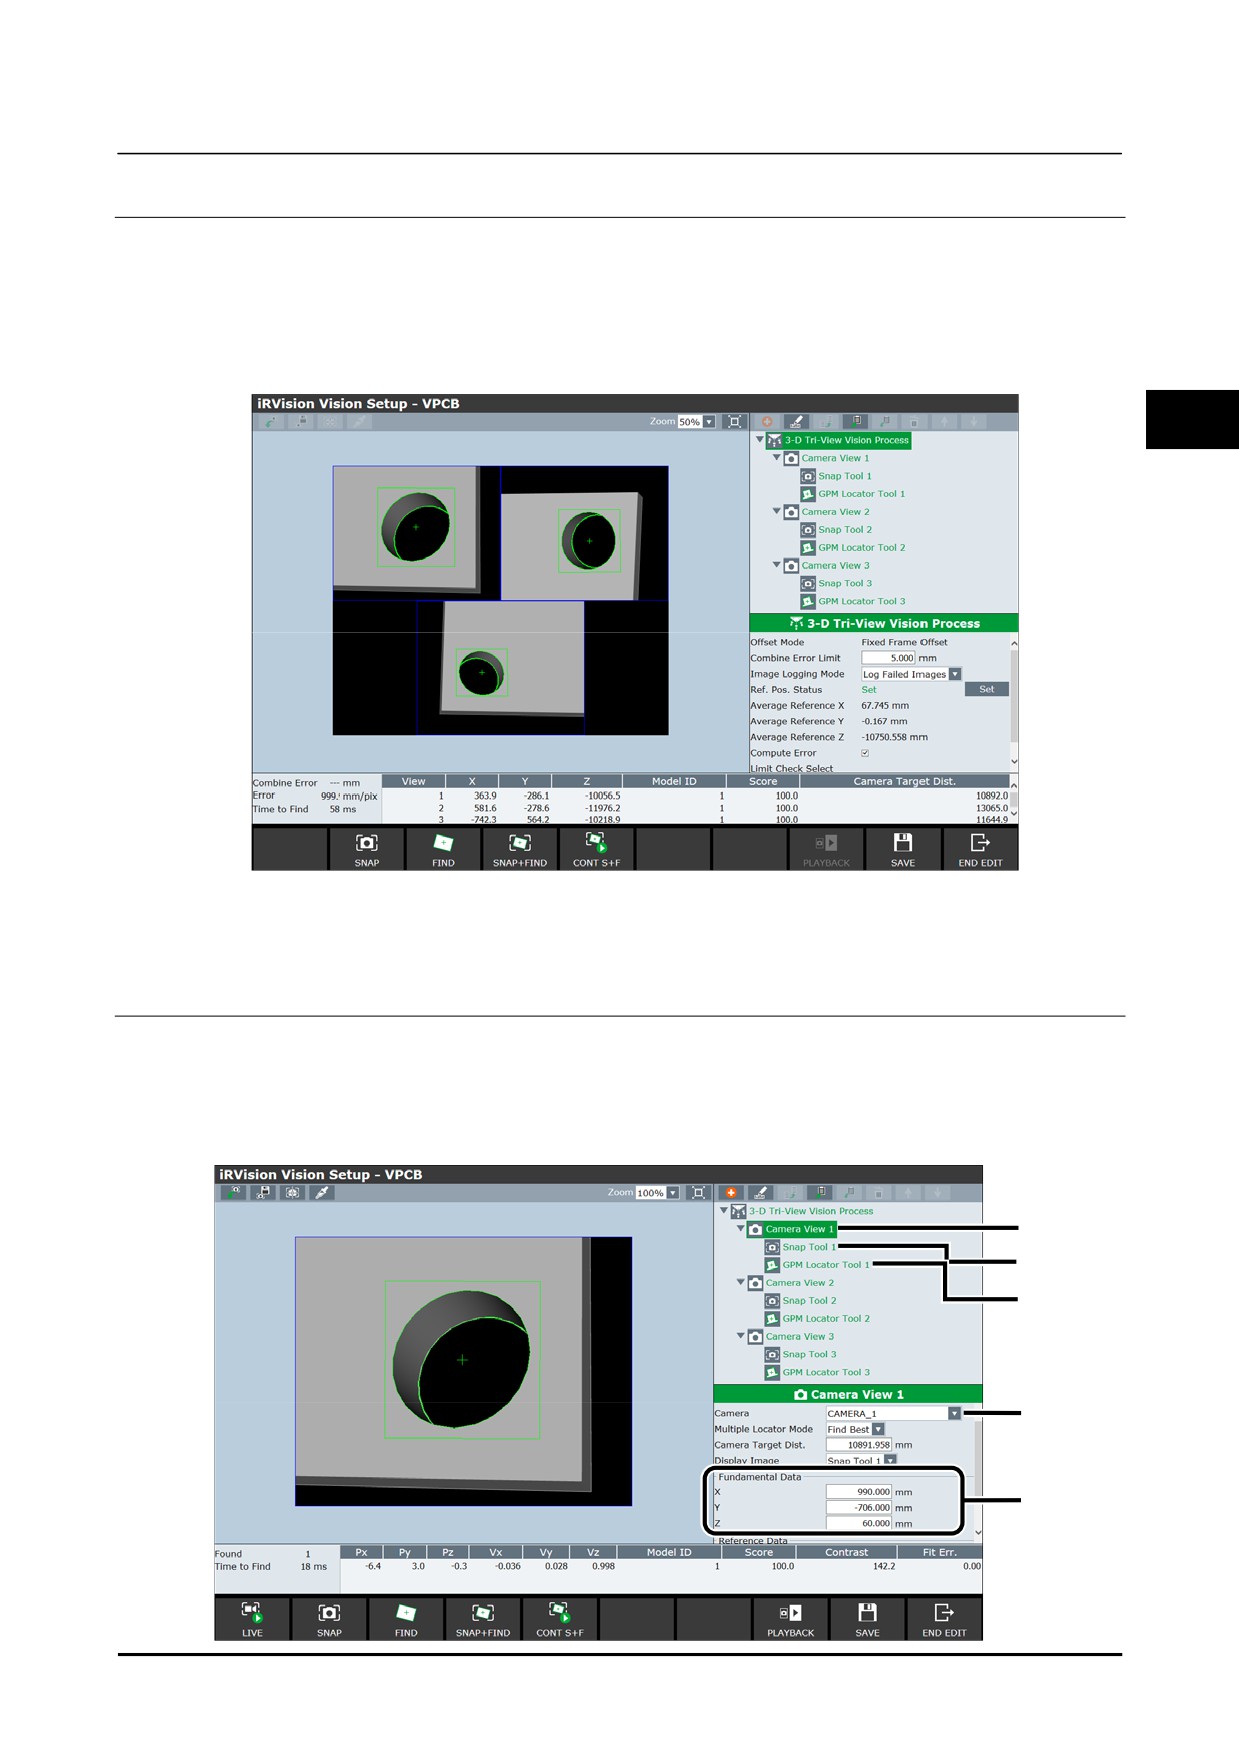
3-D Tri-View Vision Process teaching is performed using the following procedure.
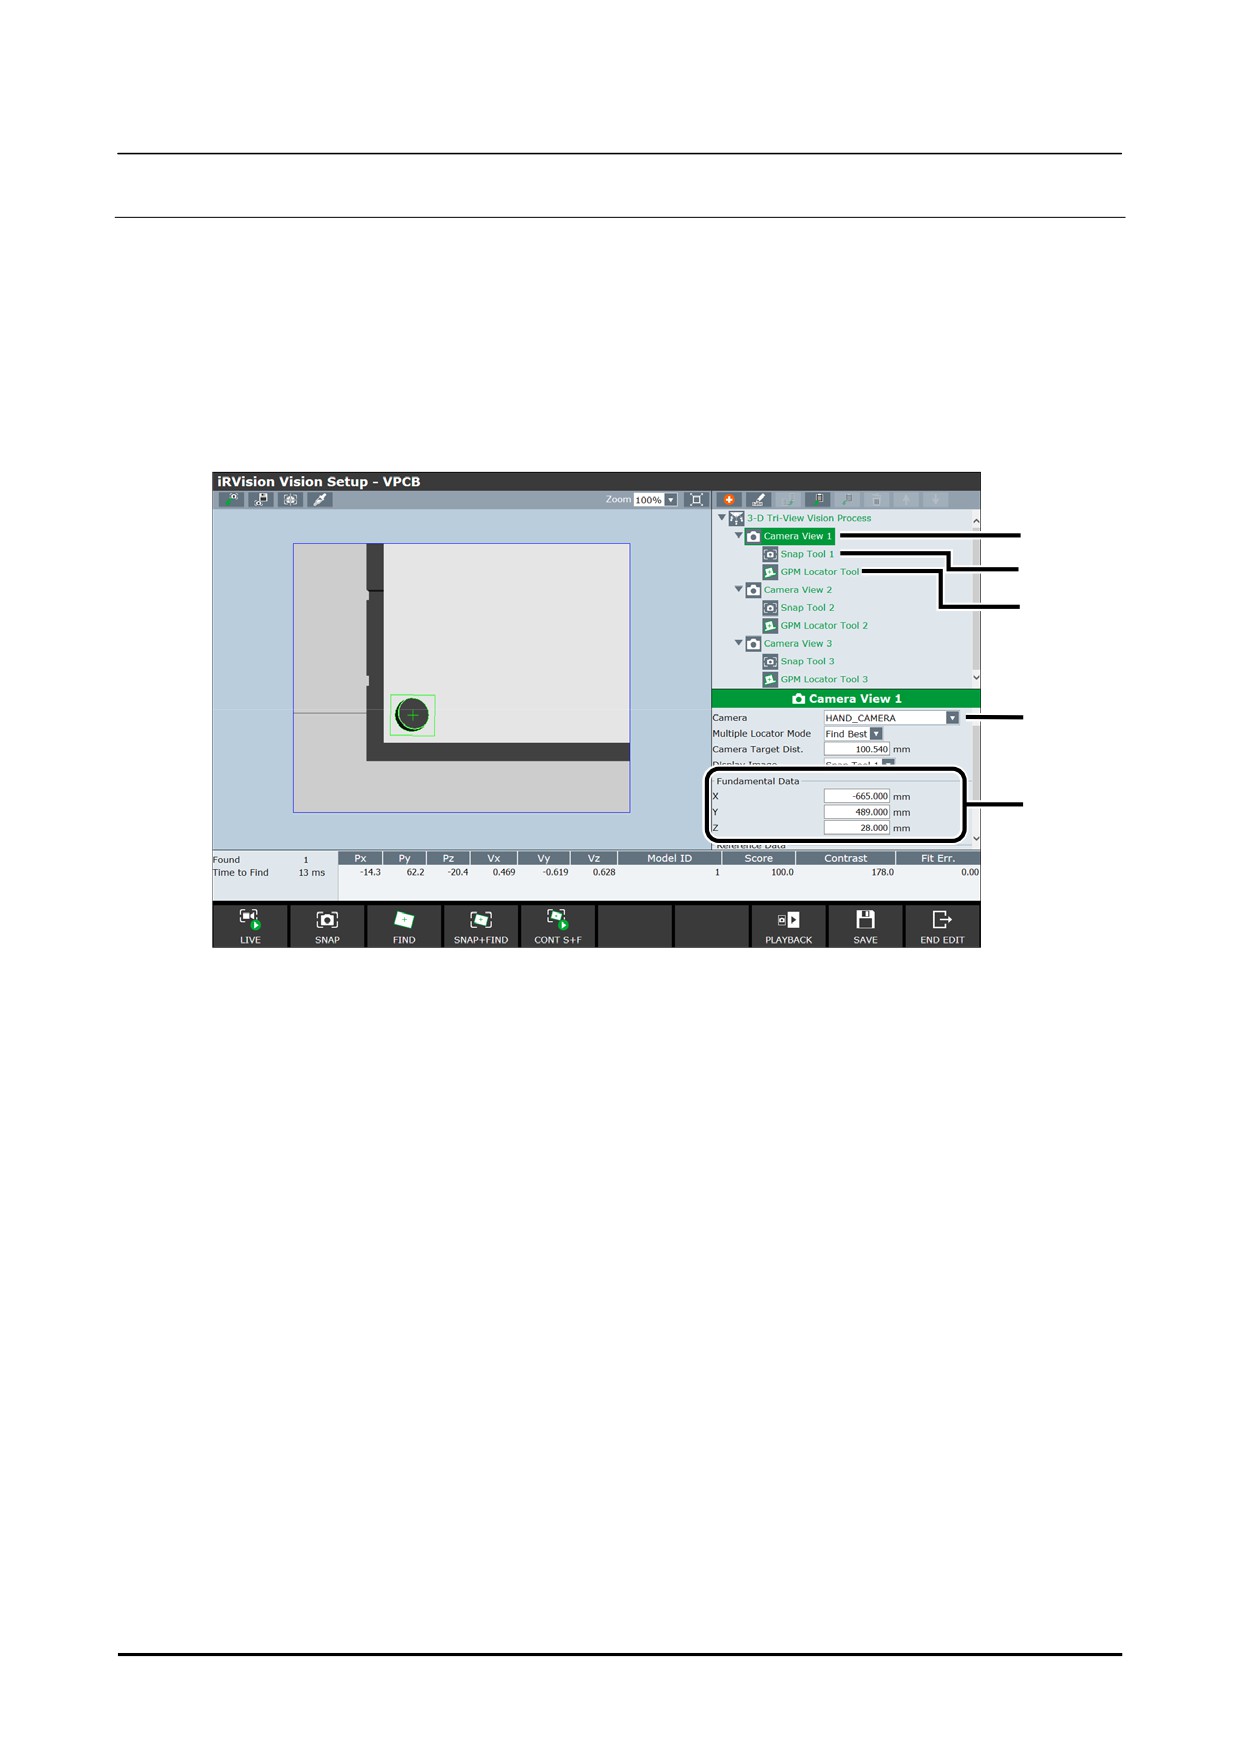
1
Under [Camera View 1], select camera data and teach fundamental data.
2
Teach locator tools for [Camera View 1].
3
Select [Camera View 1], click [Snap] and snap the image, and click [Find]
and detect the workpiece.
4
Perform steps 1 to 3 for [Camera View 2] and [Camera View 3].
5
Select [3-D Tri-View Vision Process], click [Snap] and snap the image, and
click [Find] and detect the workpiece.
6
Select [3-D Tri-View Vision Process] and set the reference position.
106
B-83914EN-2/01
Setup
4. 3D TRI-VIEW VISION PROCESS
4.2.2.1 Vision process creation
1
Create a vision process for [3-D Tri-View Vision Process].
For details on vision process creation, refer to Setup Edition Subsection 1.3.1.1, "Create" in the
"R-30iB Plus CONTROLLER iRVision OPERATOR’S MANUAL(Reference) B-83914EN".
2
On the vision data list screen, if you select the created vision process and click [Edit], the vision data
edit screen will appear.
4
The offset mode for [3-D Tri-View Vision Process] supports only fixed frame offset. Enter [Combine
Error Limit] in the text box as required.
4.2.2.2 Camera View Teaching
Teach the snap tool and the locator tools such as GPM Locator Tool, for each camera view.
1
Put a workpiece in place.
2
Select [Camera View 1] from the tree view.
2
5
6
3
4
B-83914EN-2/01
107
4. 3D TRI-VIEW VISION PROCESS
Setup
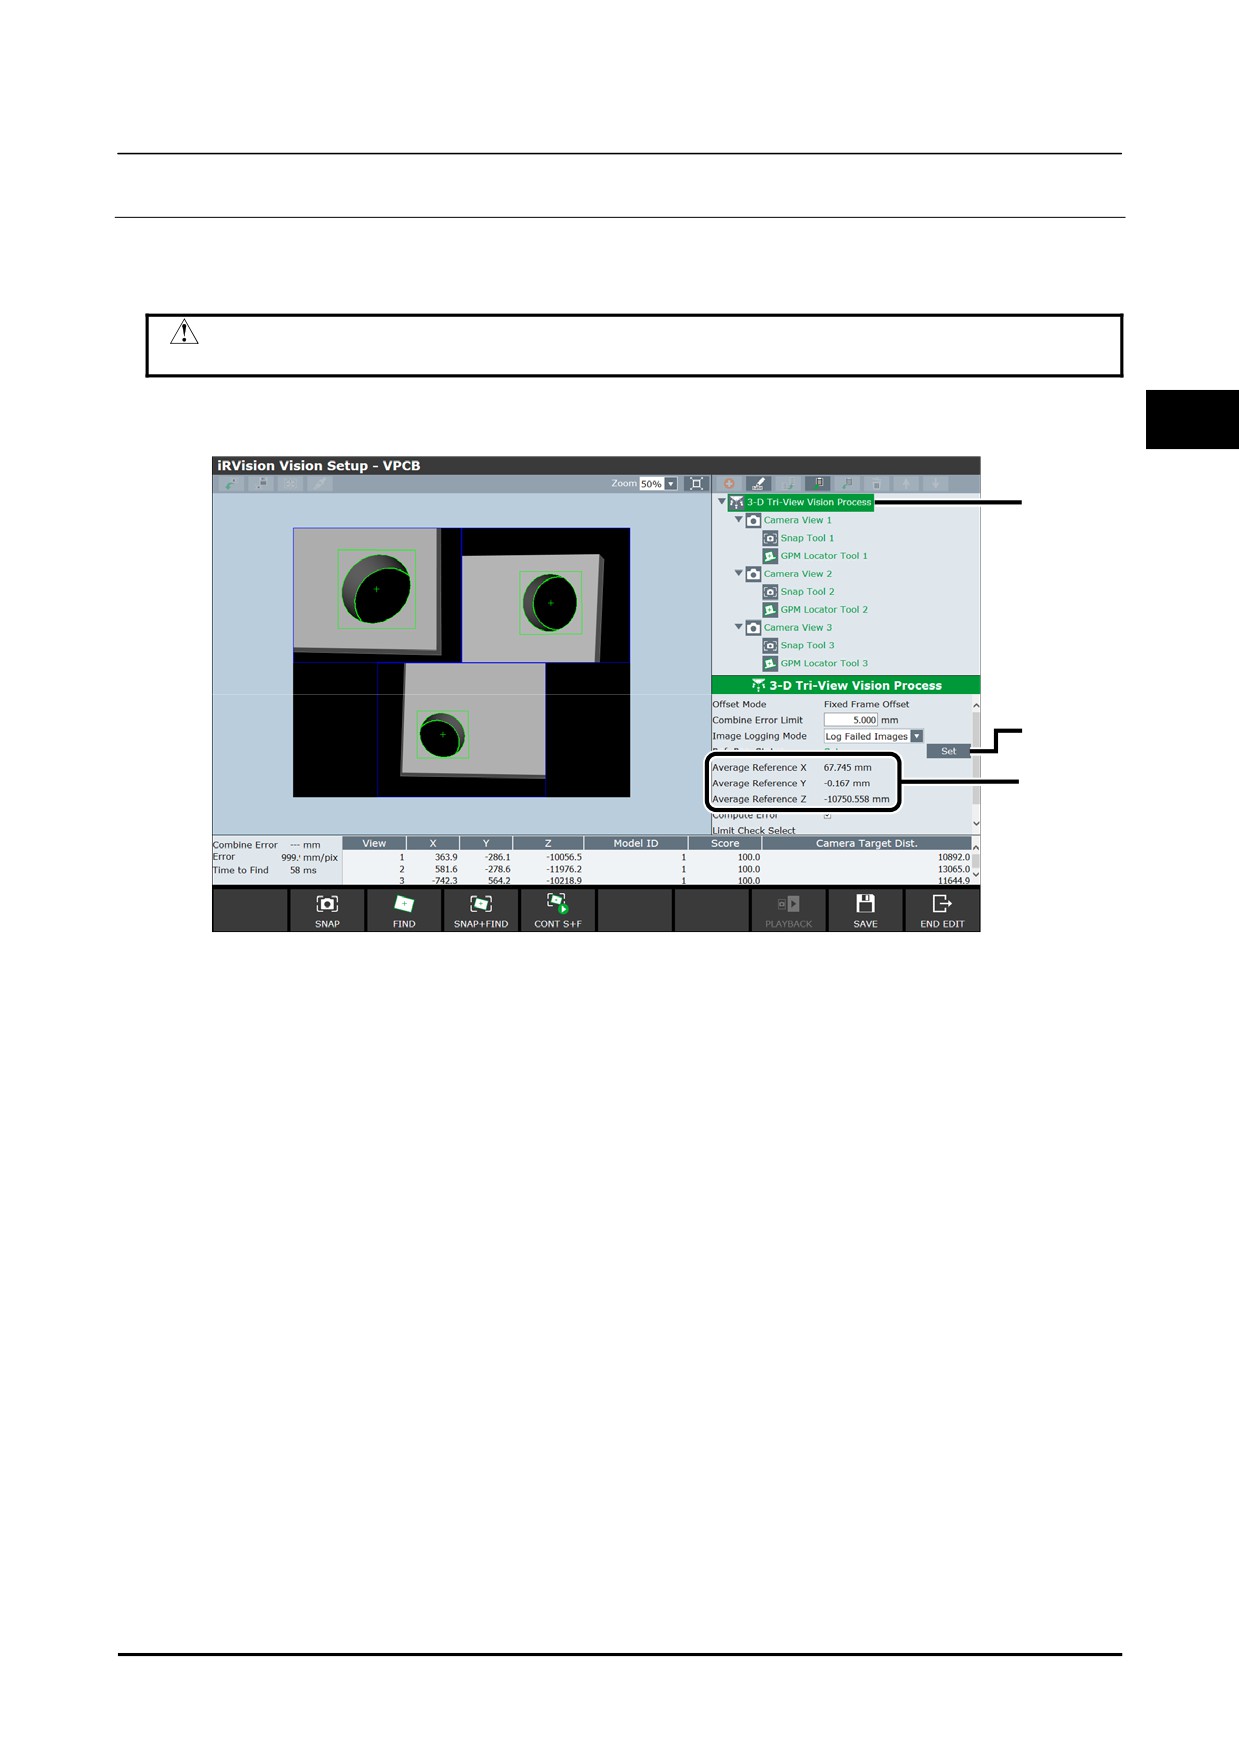
3
From the [Camera] drop-down box, select the camera data to be used.
Select the camera data specified in Setup Edition Subsection 4.2.1, "Camera Data Creation and
Teaching".
4
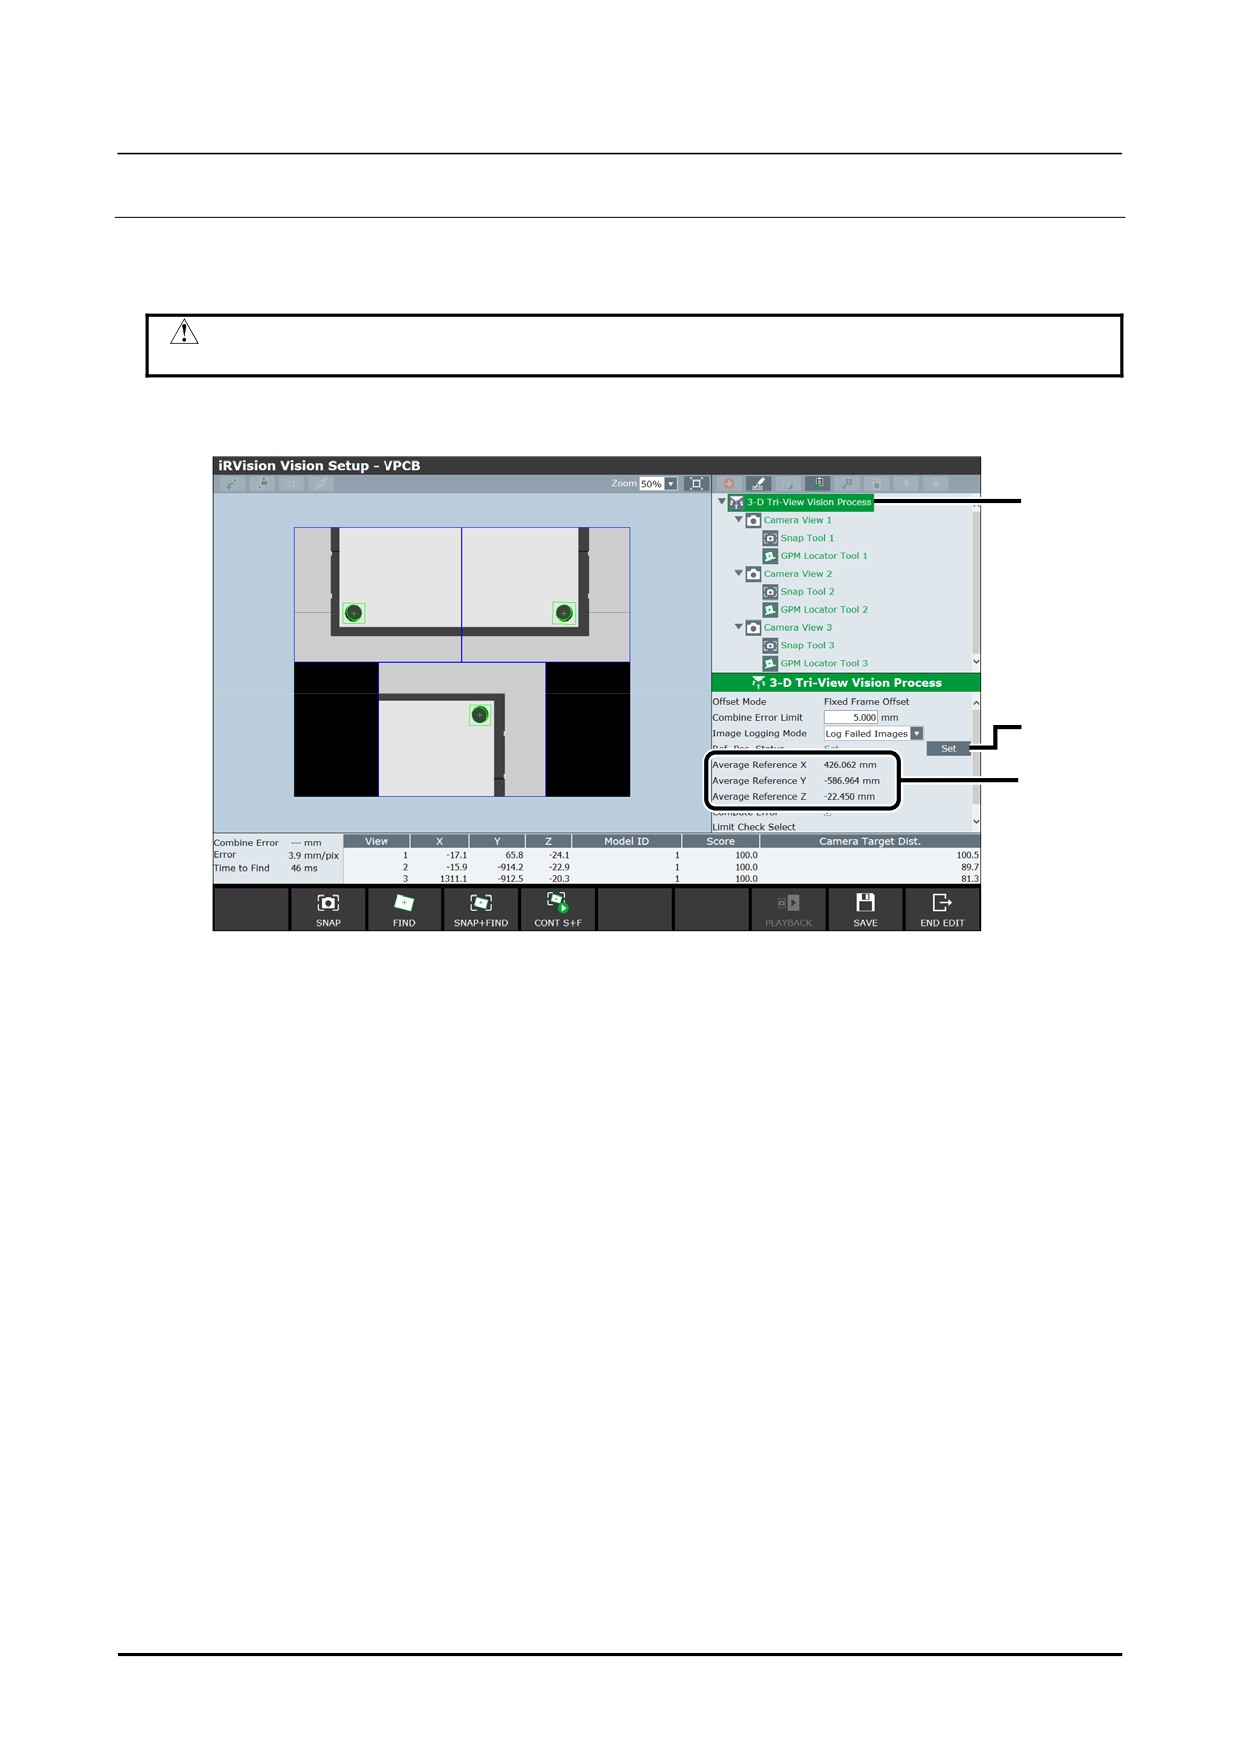
Enter the coordinates of the detection target in the [X], [Y] and [Z] field in [Fundamental Data] of
[Application Frame] specified for camera calibration.
Enter an appropriate value as shown in the figure below.
- Example of entering fundamental data:
This is an example of entering CAD data of the
workpiece. Enter the coordinates of the
detection target displayed in CAD as
fundamental data.
Coordinate system of CAD (the
position is arbitrary)
circle:
center: (x3, y3, z3)
circle:
center: (x1, y1, z1)
circle:
center: (x2, y2, z2)
Example of coordinates for the detection target
5
Set up the snap tool.
The snap tool is a tool that snaps images that are used to teach and find models. Set the snap
conditions such as the snap range and exposure time. For details, refer to Setup Edition Section 4.1,
"SNAP TOOL" in the "R-30iB Plus CONTROLLER iRVision OPERATOR’S
MANUAL(Reference) B-83914EN".
6
Select a locator tool from the tree view and teach the model to use for detection.
By default, the GPM Locator Tool is set as the locator tool. For details on the GPM Locator Tool
and other command tools, refer to Setup Edition Section 4, "COMMAND TOOLS" in "R-30iB Plus
CONTROLLER iRVision OPERATOR’S MANUAL(Reference) B-83914EN".
7
When [Camera View 1] setup is complete, perform the setup in steps 2 to 6 for [Camera View 2] and
[Camera View 3] in the same way.
108
B-83914EN-2/01
Setup
4. 3D TRI-VIEW VISION PROCESS
4.2.2.3 Reference position setting
1
Select [Camera View 1] from the tree view.
2
Click [Snap] and snap the image, and click [Find] and detect [Camera View 1].
CAUTION
Do not move the workpiece until the reference position setting is complete.
3
Perform steps 1 and 2 for all camera views.
4
4
5
6
4
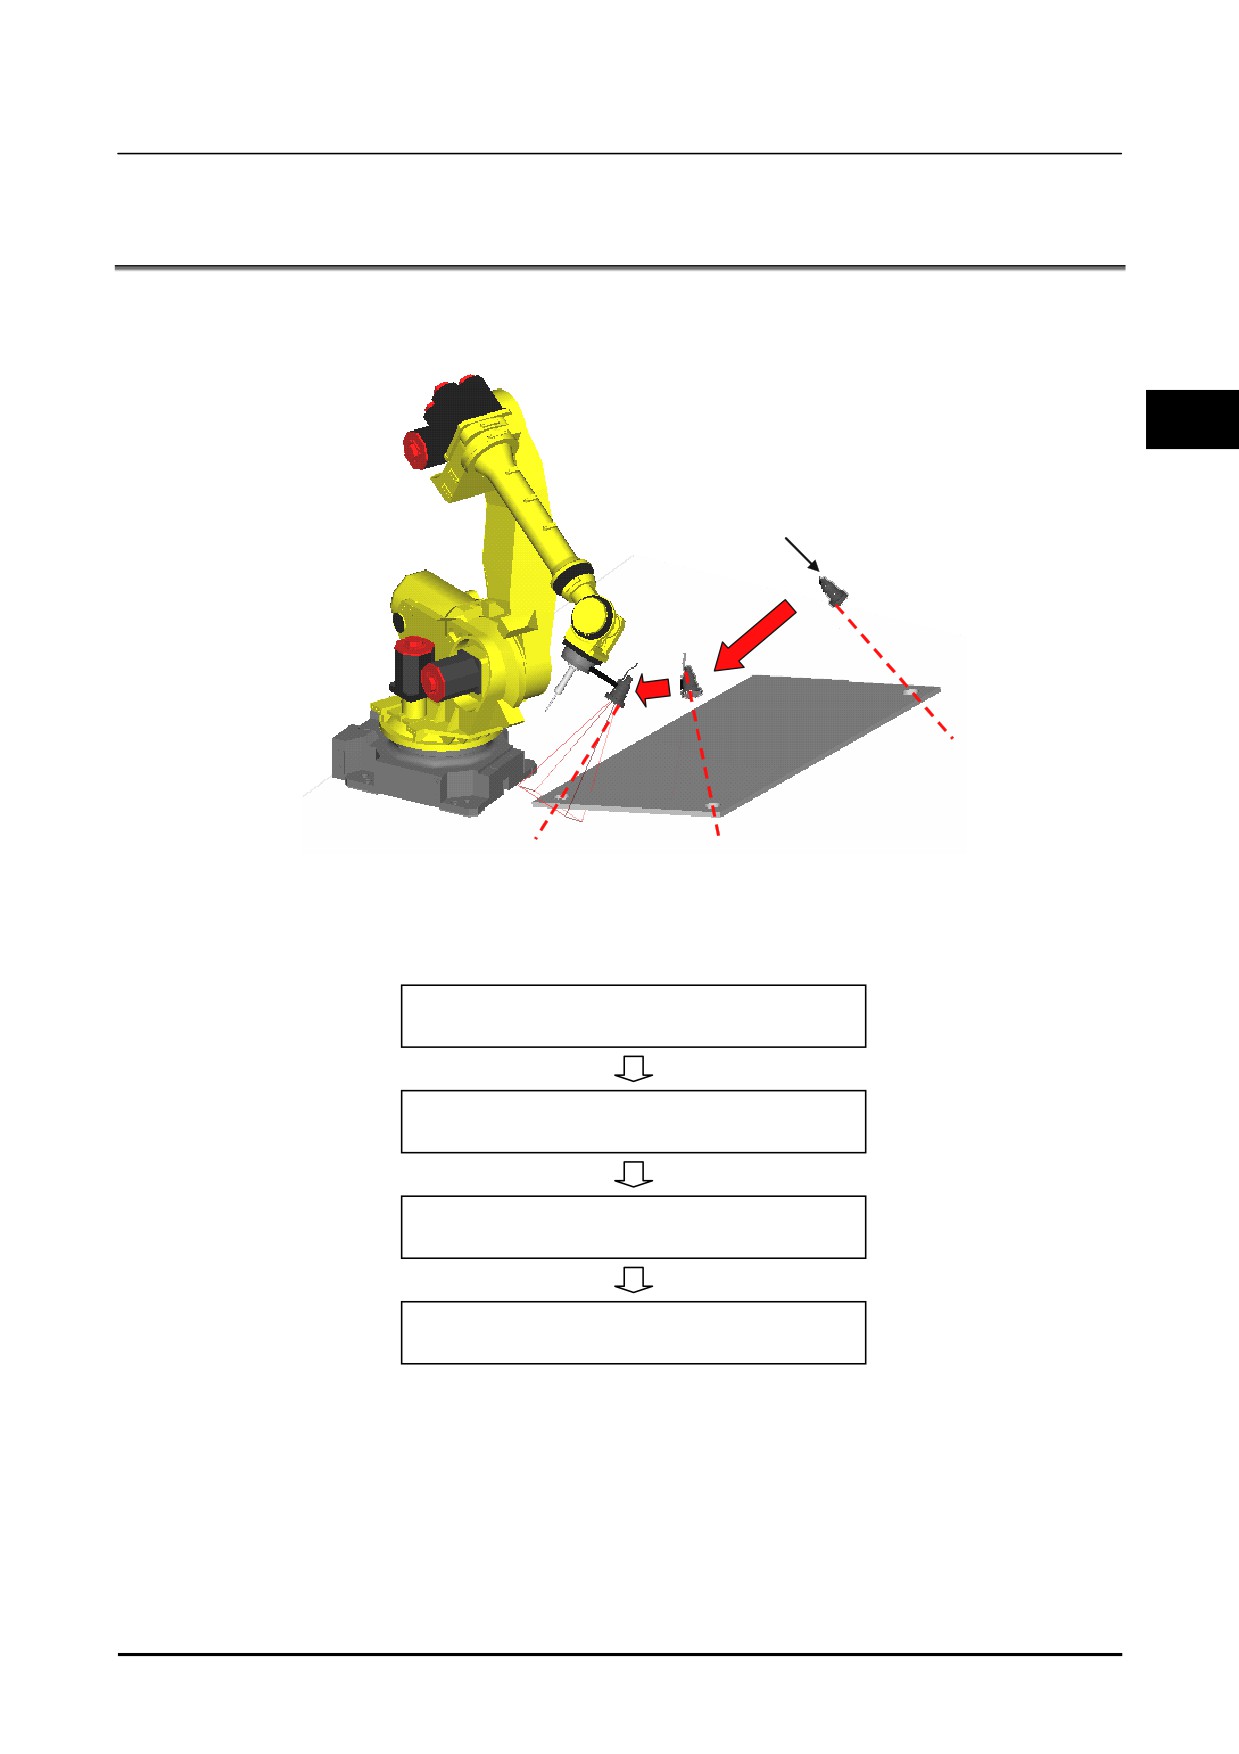
Select [3-D Tri-View Vision Process] from the tree view, and click [Find] to find the workpiece.
5
Click the [Set] button for [Ref. Pos. Status].
6
[Ref. Pos. Status] will be [Set] and values will be entered for [Average Reference X], [Average
Reference Y] and [Average Reference Z].
The values are the average reference of the workpiece, seen from the offset frame.
If you can perform detection in all camera views without moving the robot, you can perform
detection for the entire workpiece by clicking once each on [Snap] and [Find] on the editing view of
[3-D Multi-View Vision Process]. It is not necessary to run find for each camera view.
7
Click [Save] and click [End Edit].
8
Jog the robot and move it to the position for performing work on the workpiece (e.g. gripping it).
For an example, refer to the sample program in Setup Edition Subsection 4.2.3, "Robot Program
Creation and Teaching". P[2] in line 11 is the position for performing work on the workpiece.
Record the current robot position to P[2], and reference position teaching is complete.
B-83914EN-2/01
109
4. 3D TRI-VIEW VISION PROCESS
Setup
4.2.3
Robot Program Creation and Teaching
In the sample program below, a vision process named [A] is used. Three targets of a workpiece are
found. If there is only a fixed camera, it is not necessary to specify a camera view number for the
[VISION RUN_FIND] command. For fixed frame offset, add the [VOFFSET, VR] instruction as an
operation statement.
1:
UFRAME_NUM=1 ;
2:
UTOOL_NUM=1 ;
3:
R[1:Notfound]=0
;
4:L P[1] 2000mm/sec FINE
;
5:
;
6:
VISION RUN_FIND 'A'
;
7:
VISION GET_OFFSET 'A' VR[1] JMP LBL[100] ;
8:
;
9:
!Handling ;
10:L P[2] 2000mm/sec CNT100 VOFFSET,VR[1] Tool_Offset,PR[1]
;
11:L P[2] 500mm/sec FINE VOFFSET,VR[1]
;
12: CALL HAND_CLOSE
;
13:L P[2] 2000mm/sec CNT100 VOFFSET,VR[1] Tool_Offset,PR[1]
;
14:
!Handling ;
15:
JMP_LBL[900] ;
16:
;
17: LBL[100] ;
18: R[1:Notfound]=1
;
19:
;
20: LBL[900] ;
Detect the position of the workpiece in the line 6 and obtain the offset result of the detected workpiece on
line 7. Line 10 is the approach position to the workpiece. Move to the grasp position on line 11.
Move to escape position after grasping the workpiece on line 13. When a fixed camera is used, one
[VISION RUN_FIND] instruction measures all camera views prepared beforehand. When the images of
all camera views have been snapped, the line after the [VISION RUN_FIND] instruction is executed.
4.2.4
Robot Compensation Operation Check
Check that three points of a workpiece can be detected and that the compensation can be performed
correctly.
• At first, place the workpiece in the reference position, find it and check the handling accuracy. If
the accuracy of compensation is low, retry the reference position setting. Moreover, check the
following things.
-
Check the relative relation location among three detection targets and workpiece itself does not
have individual difference.
-
Check whether the each view positions with fundamental data are set correctly.
-
Check the calibration position. The first detection needs to be performed at position as close
as possible to the detection target.
• Start with lower override of the robot to check that the logic of the program is correct. Next,
increase the override to check that the robot can operate continuously.
110
B-83914EN-2/01
Setup
4. 3D TRI-VIEW VISION PROCESS
4.3
SETUP FOR FIXED FRAME OFFSET WITH
ROBOT-MOUNTED CAMERA
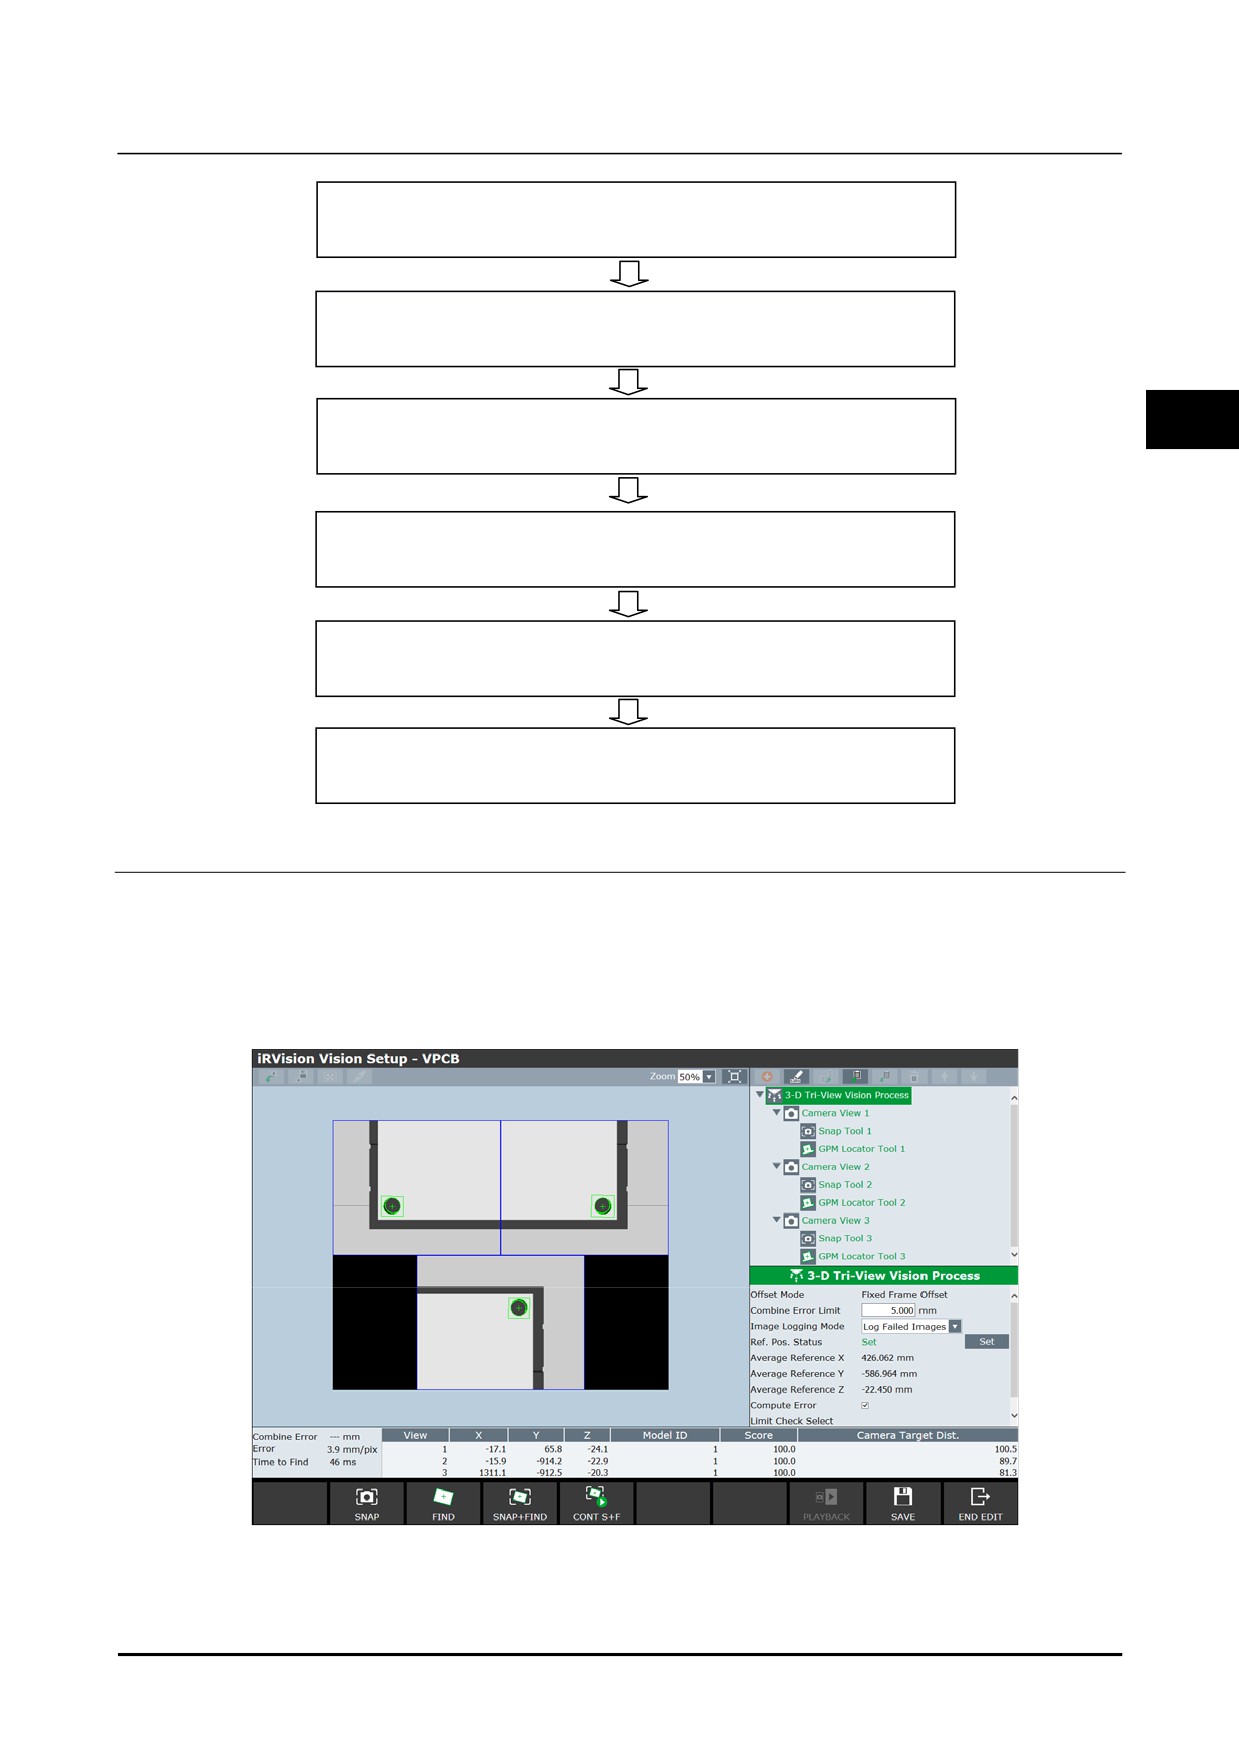
An example of layout for fixed frame offset with robot-mounted camera is shown below. Three targets
of a workpiece are measured by moving a camera.
4
Camera
Example of layout for fixed frame offset with robot-mounted camera
Use the following setup procedure:
1.
Camera Data Creation and Teaching
2.
Vision process creation and teaching
3.
Robot program creation and teaching
4.
Robot Compensation Operation Check
When begin a setup of a vision system newly, perform all the above procedures. When the position of
the camera on the robot mechanical interface frame (the robot face plane) is shifted or cameras are
exchanged, redo ‘1 Camera Data Creation and Teaching’.
When a camera calibration has been already finished, in addition, a workpiece is changed or a kind of
workpiece is added, perform ‘2 Vision process creation and teaching’ and ‘3 Robot program creation and
teaching’.
B-83914EN-2/01
111
4. 3D TRI-VIEW VISION PROCESS
Setup
4.3.1
Camera Data Creation and Teaching
Create camera data and perform basic settings and calibration for the camera.
If you are performing the 3-D Tri-View Vision Process with a robot-mounted camera, multiple locations
on the workpiece are measured by a camera, but only one set of camera data is taught. For
robot-mounted camera calibration, Grid Pattern Calibration is used. Robot-Generated Grid Calibration
cannot be used for robot-mounted cameras. For the setup method for Grid Pattern Calibration, refer to
Know-how Edition Section 2.2, "GRID PATTERN CALIBRATION WITH A ROBOT-MOUNTED
CAMERA".
Application frame setup
The application frame for the 3-D Tri-View Vision Process has a role as the user frame that is the basis
for calibration and a role as the frame to be used for compensation calculations. Therefore, the reference
position and found position for the 3-D Tri-View Vision Process are output as values in the application
frame. Furthermore, in the 3-D Tri-View Vision Process, large workpieces such as car bodies are often
handled, and there are times when compensation for multiple robots is performed with an offset. In such
cases, set a common user frame on an arbitrary plane between the robots (set a common frame number),
and select this as the application frame.
Information setup for mounting the calibration grid
It is recommended that you use the ‘Grid Frame Set’ for information setup for mounting the calibration
grid. Set the calibration grid mounting position in the user frame.
4.3.2
Vision Process Creation and Teaching
Perform vision process creation and teaching.
The basic setting procedure for the vision process is the same as for [2-D Single-View Vision Process].
The part that is different is that 3 [Camera Views] are added. The camera views for each measurement
position are named [Camera View 1], [Camera View 2] and [Camera View 3]. The snap tool and
locator tools such as the GPM Locator Tool are placed under each camera view.
3-D Tri-View Vision Process teaching is performed using the following procedure.
112
B-83914EN-2/01
Setup
4. 3D TRI-VIEW VISION PROCESS
1
Under [Camera View 1], select camera data and teach fundamental data.
2
Move the robot to the first measurement position and teach locator tools for
[Camera View 1].
3
Select [Camera View 1], click [Snap] and snap the image, and click [Find]
4
and detect the workpiece.
4
Perform steps 1 to 3 for [Camera View 2] and [Camera View 3].
5
Select [3-D Tri-View Vision Process], click [Snap] and snap the image, and
click [Find] and detect the workpiece.
6
Select [3-D Tri-View Vision Process] and set the reference position.
4.3.2.1 Vision process creation
1
Create a vision process for [3-D Tri-View Vision Process].
For details on vision process creation, refer to Setup Edition Subsection 1.3.1.1, "Create" in the
"R-30iB Plus CONTROLLER iRVision OPERATOR’S MANUAL(Reference) B-83914EN".
2
On the vision data list screen, if you select the created vision process and click [Edit], the vision data
edit screen will appear.
B-83914EN-2/01
113
4. 3D TRI-VIEW VISION PROCESS
Setup
4.3.2.2 Camera View Teaching
Teach the snap tool and the locator tools such as GPM Locator Tool, for each camera view.
1
Put a workpiece in place.
2
Jog the robot and move the camera to the first snap position.
Record this robot position as a snap position. For an example, refer to the sample program in Setup
Edition Subsection 4.3.3, "Robot Program Creation and Teaching". P[1] in line 4 is the first snap
position.
3
Select [Camera View 1] from the tree view.
3
6
7
4
5
4
From the [Camera] drop-down box, select the camera data to be used.
Select the camera data specified in Setup Edition Subsection 4.3.1, " Camera Data Creation and
Teaching".
5
Enter the coordinates of the detection target as a fundamental data on any frame.
114
B-83914EN-2/01
Setup
4. 3D TRI-VIEW VISION PROCESS
- Example of entering fundamental data:
This is an example of entering CAD data of the
workpiece. Enter the coordinates of the
detection target displayed in CAD as
fundamental data.
Coordinate system of CAD (the
position is arbitrary)
4
circle:
center: (x3, y3, z3)
circle:
center: (x1, y1, z1)
circle:
center: (x2, y2, z2)
Example of coordinates for the detection target
6
Set up the snap tool.
The snap tool is a tool that snaps images that are used to teach and find models. Set the snap
conditions such as the snap range and exposure time. For details, refer to Setup Edition Section 4.1,
"SNAP TOOL" in "R-30iB Plus CONTROLLER iRVision OPERATOR’S MANUAL(Reference)
B-83914EN".
7
Select a locator tool from the tree view and teach the model to use for detection.
By default, the GPM Locator Tool is set as the locator tool. For details on the GPM Locator Tool
and other command tools, refer to Setup Edition Section 4, "COMMAND TOOLS" in "R-30iB Plus
Controller iRVision MANUAL(Reference) B-83914EN".
8
When [Camera View 1] setup is complete, perform the setup in steps 2 to 7 for [Camera View 2] and
[Camera View 3] in the same way.
B-83914EN-2/01
115
4. 3D TRI-VIEW VISION PROCESS
Setup
4.3.2.3 Reference position setting
1
Select [Camera View 1] from the tree view.
2
Click [Snap] and snap the image, and click [Find] and detect [Camera View 1].
CAUTION
Do not move the workpiece until the reference position setting is complete.
3
Perform steps 1 and 2 for all camera views.
4
5
6
4
Select [3-D Tri-View Vision Process] from the tree view and click [Find] to find the workpiece.
5
Click the [Set] button for [Ref. Pos. Status].
6
[Ref. Pos. Status] will be [Set] and values will be entered for [Average Reference X], [Average
Reference Y] and [Average Reference Z].
The values are the average reference of the workpiece, seen from the offset frame.
7
Click [Save] and click [End Edit].
8
Jog the robot and move it to the position for performing work on the workpiece (e.g. gripping it).
For an example, refer to the sample program in Setup Edition Subsection 4.3.3, "Robot Program
Creation and Teaching". P[4] in line 17 is the position for performing work on the workpiece.
Record the current robot position to P[4], and reference position teaching is complete.
116
B-83914EN-2/01
Setup
4. 3D TRI-VIEW VISION PROCESS
4.3.3
Robot Program Creation and Teaching
In the sample program below, a vision process named [A] is used. three targets of a workpiece are found
by moving the robot-mounted camera. Vision process A has three camera views which have different
view positions of robot mounted cameras, so that each camera view number is added to the [VISION
RUN_FIND] instruction. For fixed frame offset, add the [VOFFSET, VR] instruction as an operation
statement.
1:
UFRAME_NUM=1 ;
4
2:
UTOOL_NUM=1 ;
3:
R[1:Notfound]=0
;
4:L P[1] 2000mm/sec FINE
;
5:
WAIT R[1] ;
6:
VISION RUN_FIND 'A' CAMERA_VIEW[1]
;
7:L P[2] 2000mm/sec FINE
;
8:
WAIT R[1] ;
9:
VISION RUN_FIND 'A' CAMERA_VIEW[2]
;
10:L P[3] 2000mm/sec FINE
;
11: WAIT R[1] ;
12: VISION RUN_FIND 'A' CAMERA_VIEW[3]
;
13: VISION GET_OFFSET 'A' VR[1] JMP LBL[100] ;
14:
;
15:
!Handling ;
16:L P[4] 2000mm/sec CNT100 VOFFSET,VR[1] Tool_Offset,PR[1]
;
17:L P[4] 500mm/sec FINE VOFFSET,VR[1]
;
18: CALL HAND_CLOSE
;
19:L P[4] 2000mm/sec CNT100 VOFFSET,VR[1] Tool_Offset,PR[1]
;
20:
!Handling ;
21:
JMP_LBL[900] ;
22:
;
23: LBL[100] ;
24: R[1:Notfound]=1
;
25:
;
26: LBL[900] ;
Move to the position of camera view 1 to snap on line 4. Execute “WAIT” instruction to remove the
possible vibration of a camera on line 5. Execute camera view 1 of vision process “A” with the vision
run_find instruction on line 6. When the camera image has been snapped, the line after the [VISION
RUN_FIND] instruction is executed. Move to the position of camera view 2 to snap on line 7. Move
to the position of camera view 3 to snap on line 10. Obtain the offset of the detected workpiece on line
13. Move to the approach position above the workpiece on line 16. Move to the grasp position on line
17. Move to the escape position after grasping the workpiece on line 18.
4.3.4
Robot Compensation Operation Check
Check that three points of a workpiece can be detected and that the compensation can be performed
correctly.
• At first, place the workpiece on the reference position, find it and check the handling accuracy. If
the accuracy of compensation is low, retry the reference position setting. Moreover, check the
following things.
-
Check the relative relation location among the three detection targets and the workpiece itself
does not have individual difference.
-
Check whether the each view positions with fundamental data are set correctly.
• Start with lower override of the robot to check that the logic of the program is correct. Next,
increase the override to check that the robot can operate continuously.
B-83914EN-2/01
117
1
2
3
Know-How
4
1
FRAME SETTING
2
CAMERA DATA SETTING
3
SETUP OF SNAP IN MOTION
4
FAQS FOR TROUBLESHOOTING
Know-How
1. FRAME SETTING
1
1 FRAME SETTING
This chapter explains the setting method for the user frame and tool frame.
In iRVision, the following frames are used.
• World frame
The frame that is defined in the robot from the start. A specified location is defined for each model
of robot. It cannot be changed.
• User frame
A frame that is defined by a user. It is expressed using a relative position from the world frame. It
will be the same as the world frame when it is not set.
• Tool frame
A frame that shows the tool center point (TCP) and orientation of a tool. It needs to be set up in
accordance with each tool.
In iRVision, the above frames need to be setup in [Application Frame] or [Offset Frame].
For details on the general method for frame setting, refer to "3.9 Frame Setting" in " OPERATOR’S
MANUAL (Basic Operation) B-83284EN".
There are two methods for frame setting. Refer to the following for each setting method.
• Setting with a pointer tool
For the setting method, refer to Know-how Edition Section 1.1, "FRAME SETTING WITH A
POINTER TOOL".
• Setting with the grid frame setting function
For the setting method, refer to Know-how Edition Section 1.2, "FRAME SETTING WITH THE
GRID FRAME SETTING FUNCTION".
1.1
FRAME SETTING WITH A POINTER TOOL
This is a method for setting a user frame or tool frame by physically performing touch-up with a pointer
tool.
This section explains a user frame and tool frame with the following configuration.
• For user frame setting, refer to Know-how Edition Subsection 1.1.1, "User Frame Setting".
• For tool frame setting, refer to Know-how Edition Subsection 1.1.2, "Tool Frame Setting".
1.1.1
User Frame Setting
This subsection explains a method for user frame setting on an arbitrary plane with a pointer attached on
the robot end of the arm tooling. It is necessary to perform a TCP setup to a pointer tool as preparation.
B-83914EN-2/01
121
1. FRAME SETTING
Know-How
1.1.1.1 TCP set up
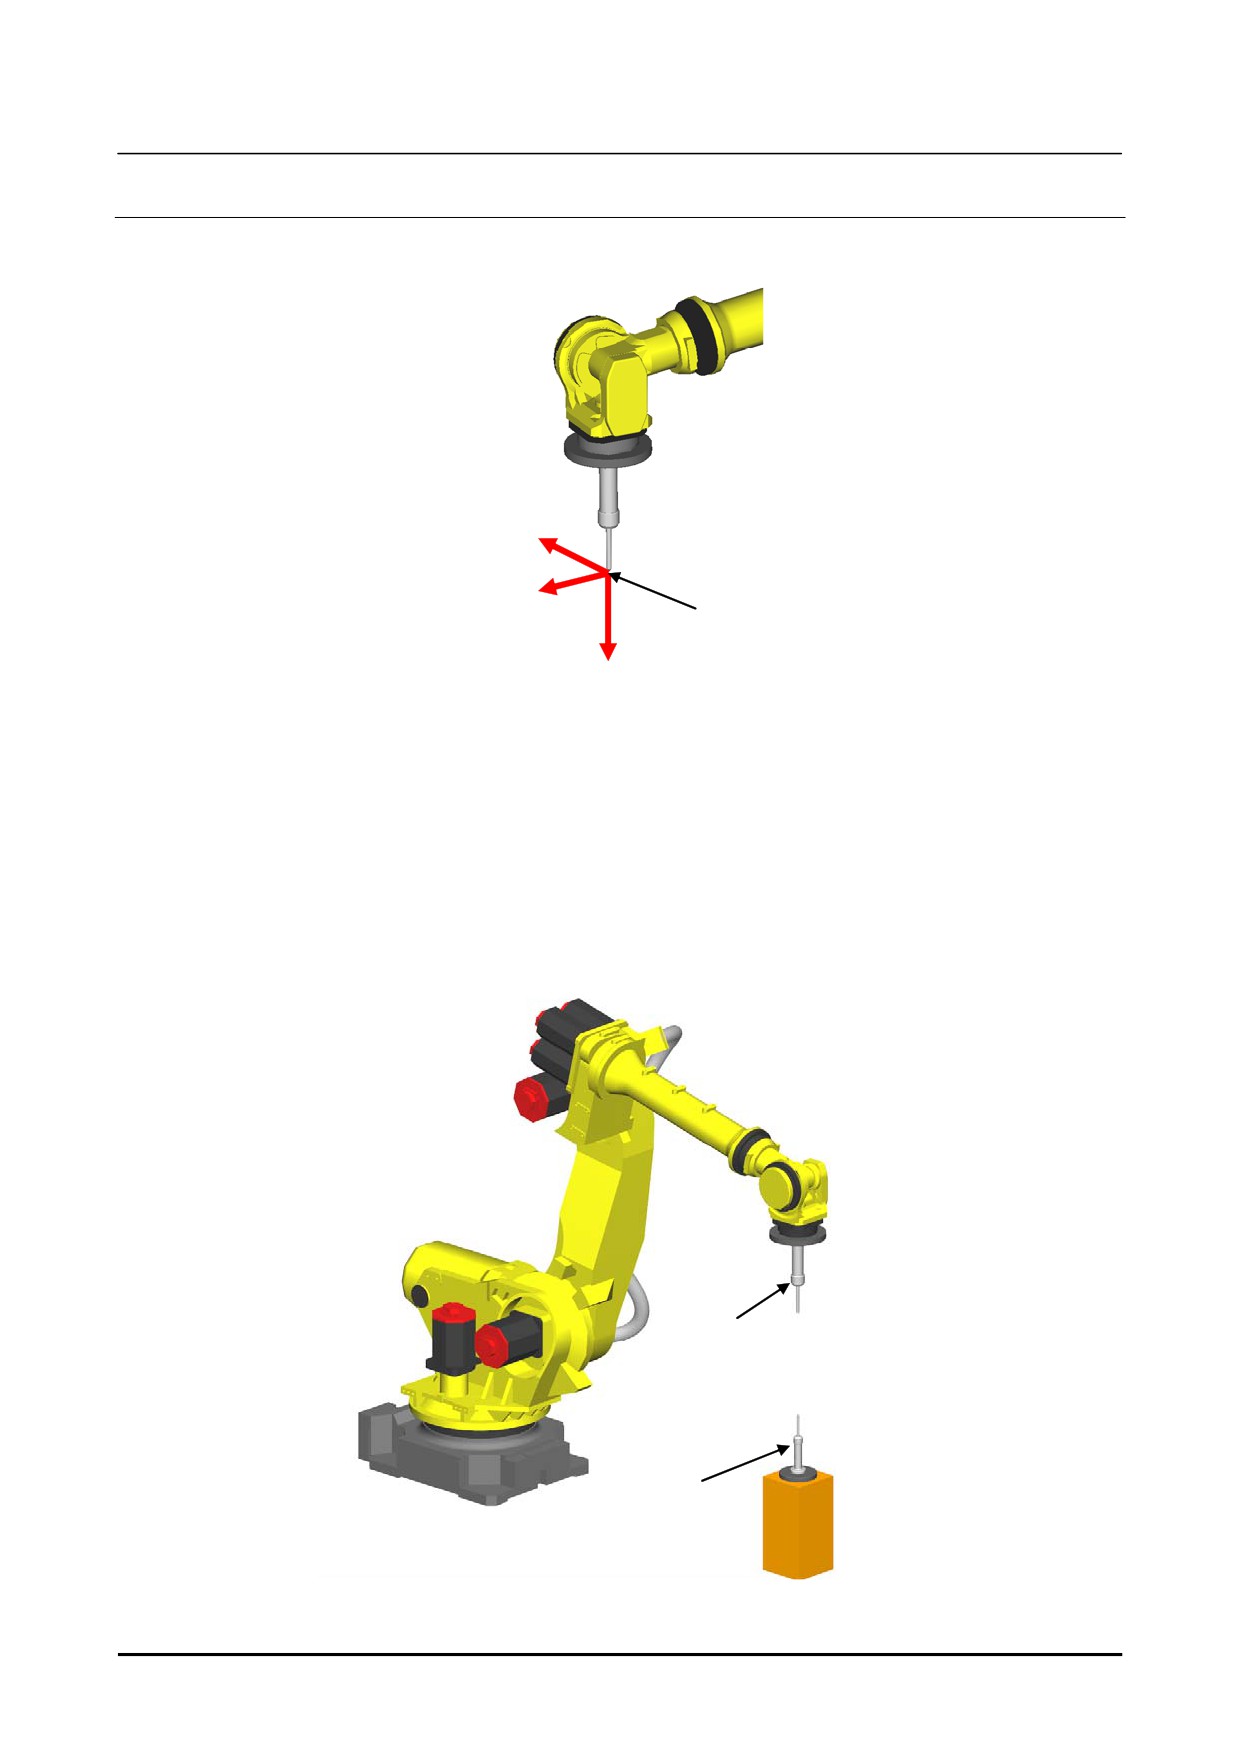
Attach a pointer tool on the robot end of the arm tooling, and set TCP to an arbitrary tool frame number.
Y
X
Tool frame
Z
Pointer tool and tool frame
Prepare a pointer tool with a sharp tip. Make sure that the pointer tool is fixed securely to the robot end
of arm tooling so that it remains in place while the robot moves. It is recommended that positioning pins
or other appropriate means may be used so that the pointer tool can be mounted at the same position.
Moreover, prepare another pointer with a sharp tip, and fixed on the table. The position of the fixed
pointer on the table is arbitrary. TCP is set up by touch-up the tip of the fixed pointer with the tip of the
pointer attached on the robot end of the arm tooling. Use the “Three point method” for setting a TCP.
Set the TCP accurately. If the accuracy of this TCP setting is low, the precision in handling of a
workpiece by the robot is also degraded.
Pointer tool
Fixed pointer tool
Example of a layout for pointer tool and fixed pointer tool
122
B-83914EN-2/01
Know-How
1. FRAME SETTING
Three Point Method
1
Use the three point method to define the tool center point (TCP). The three approach points must be
taught with the tool touching a common point from three different approach statuses.
As a result, the location of TCP is automatically calculated.
To set the TCP accurately, three approach directions had better differ from others as much as possible.
In the three point method, only the tool center point (x, y, z,) can be set. The setting value of tool
orientation (w, p, r) is the standard value (0, 0, 0). It is not necessary that change the (w, p, r) value.
1
On the teach pendant, after selecting the [MENU] key → [Setup], place the cursor over [Frame] and
press the [ENTER] key.
2
Press F3 [Frame].
3
Place the cursor over [Tool] and press the [ENTER] key.
The list screen for tool frames will appear.
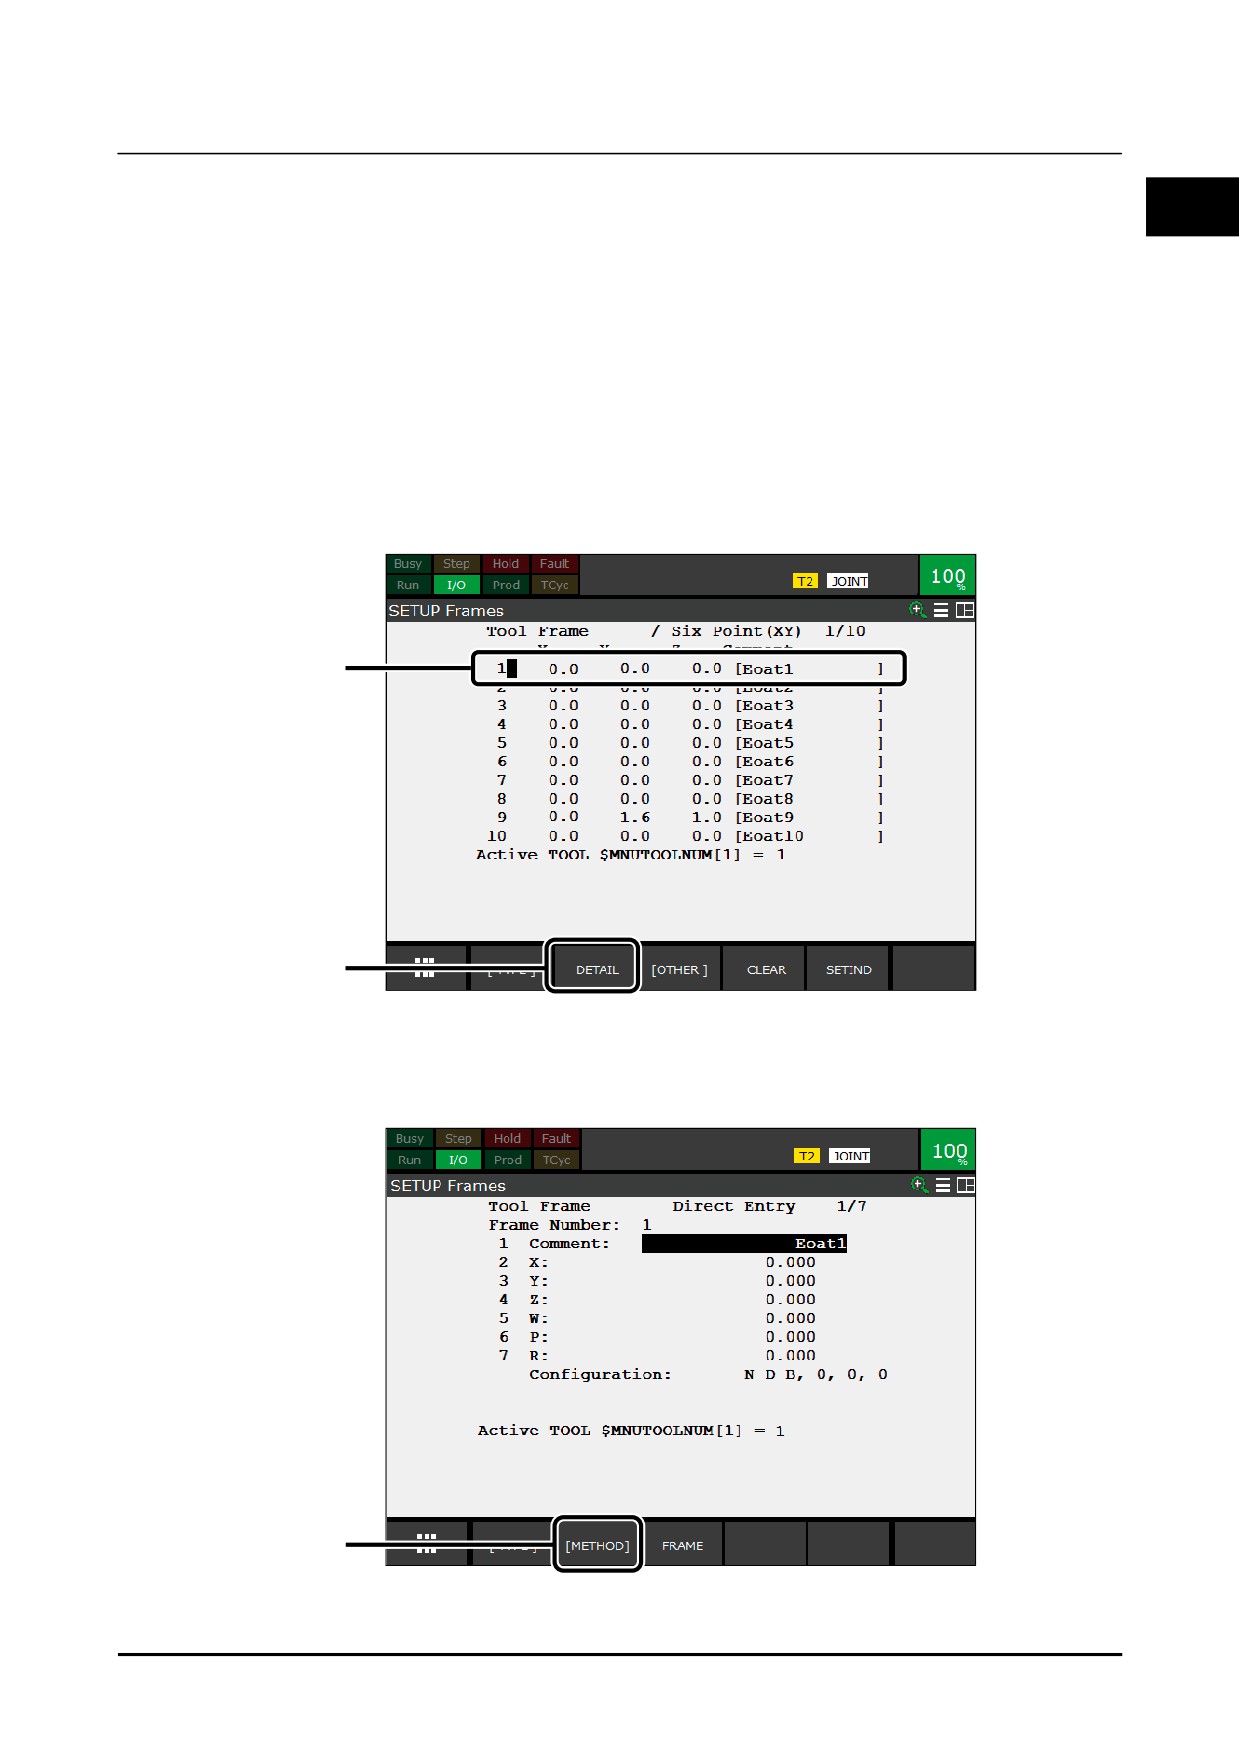
4
5
4
Place the cursor over the line of the tool frame number to set.
5
Press F2 [DETAIL].
The setup screen for the tool frame for the selected frame number will appear.
6
6
Press F2 [METHOD].
B-83914EN-2/01
123
1. FRAME SETTING
Know-How
7
Place the cursor over [Three Point] and press the [ENTER] key.
A screen for tool frame setting using the three point teaching method will appear.
8
9
8
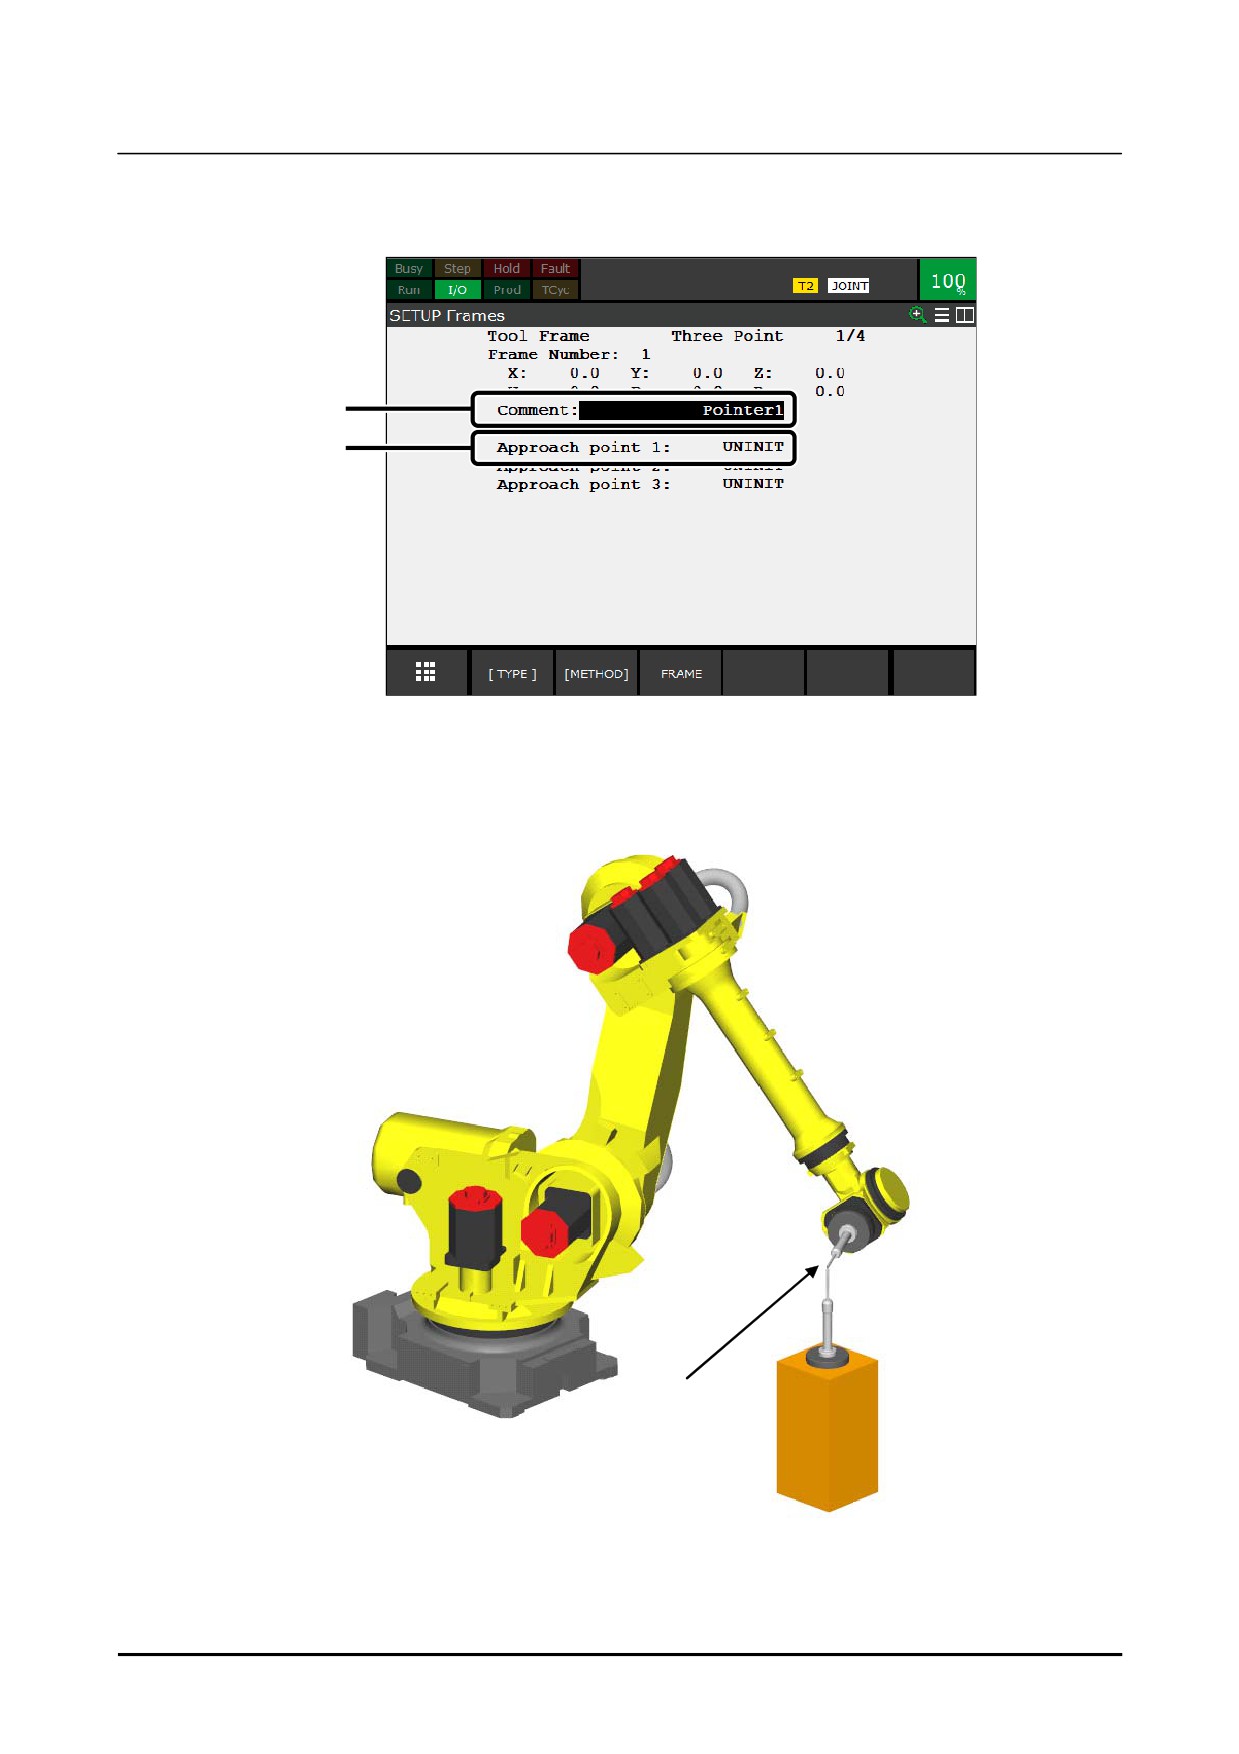
Enter a comment in the [Comment] field as required.
A comment to distinguish this frame from other frames is recommended.
9
Place the cursor over [Approach point 1].
10
Jog the robot and touch up the fixed pointer tool pin with the robot pointer tool pin.
Approach point 1
Touch-up of approach point 1
124
B-83914EN-2/01
Know-How
1. FRAME SETTING
1
12
11
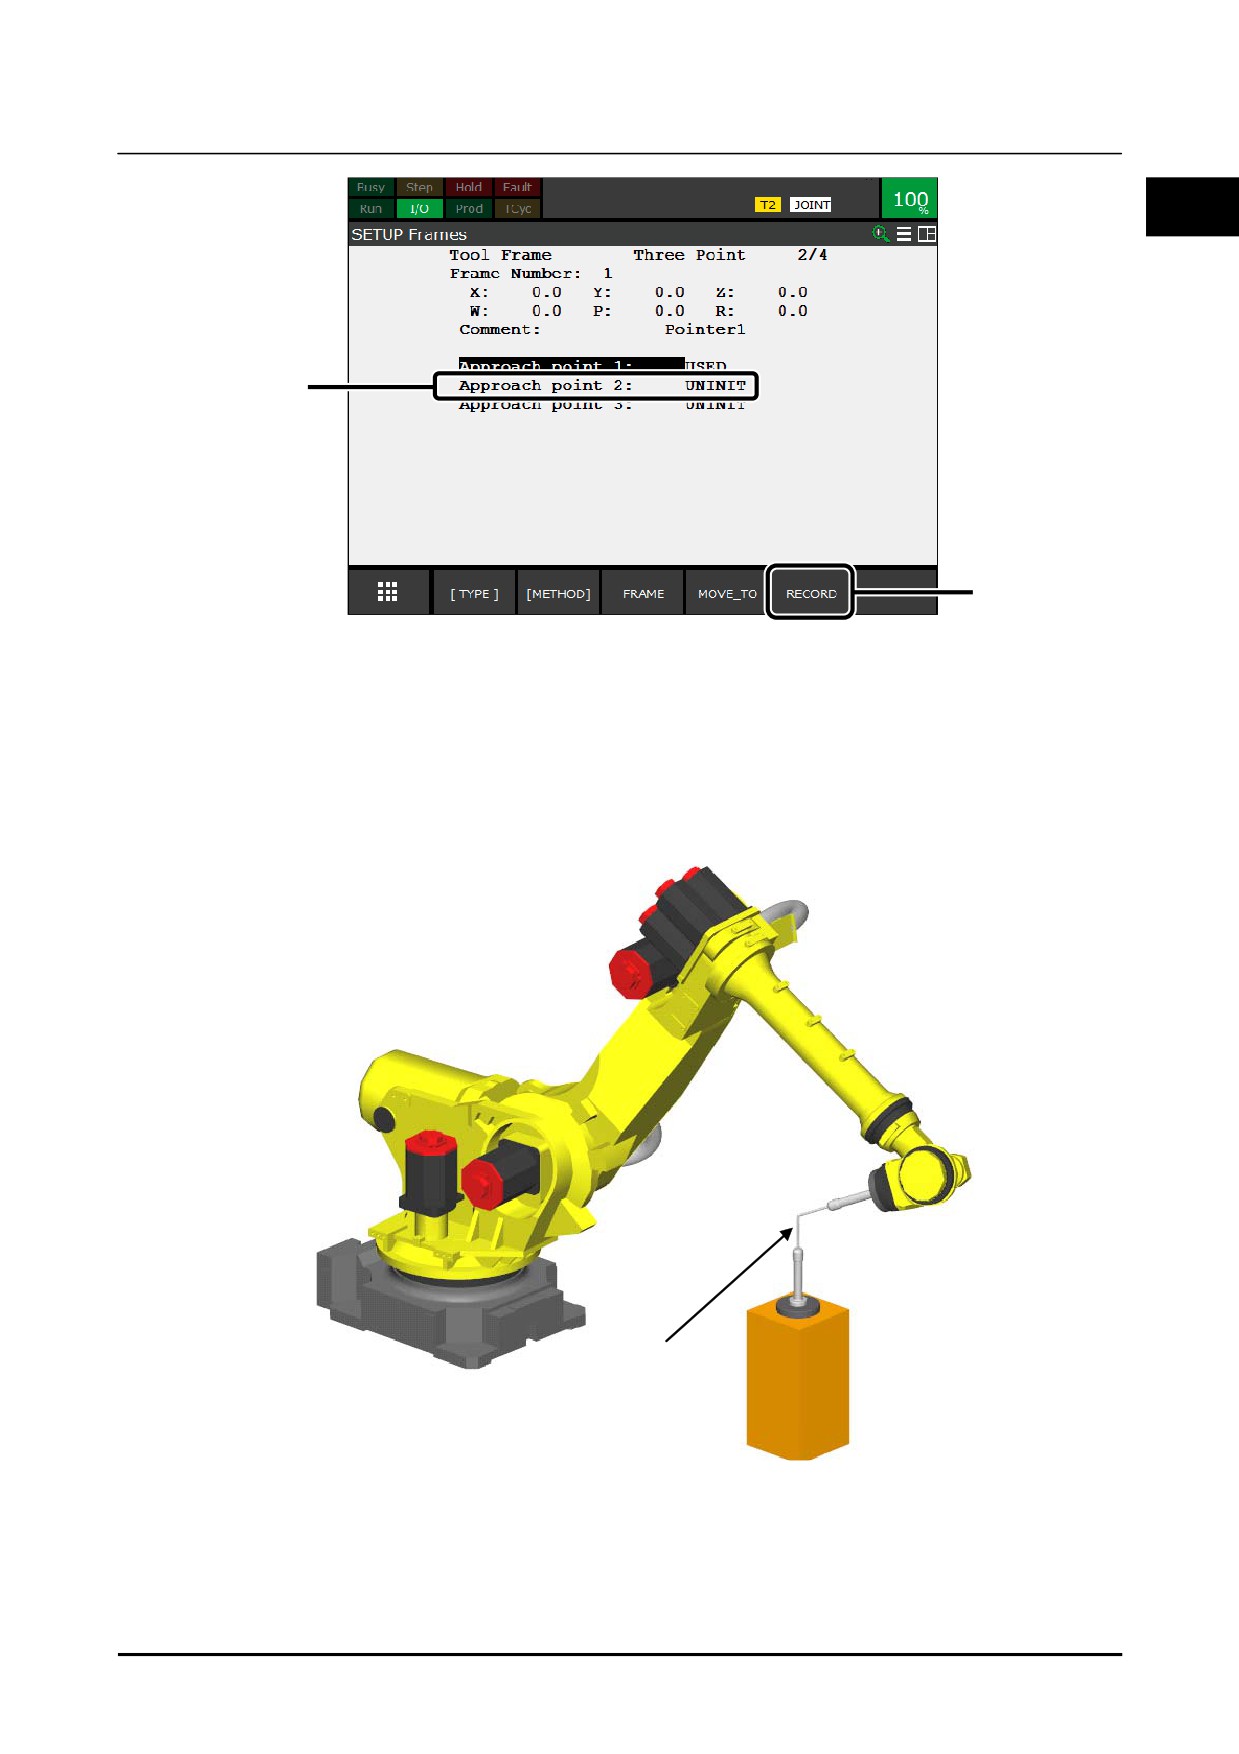
11 While holding down the [SHIFT] key, press F5 [RECORD].
The current value's data will be input as approach point 1.
For the taught [Approach point 1], [Used] will be displayed.
12 Place the cursor over [Approach point 2].
13 Jog the robot and touch up the fixed pointer tool pin with the robot pointer tool pin.
Touch up the same point as the reference point 1. However, change the robot attitude from that of
the reference point 1.
Approach point 2
Touch-up of approach point 2
B-83914EN-2/01
125
1. FRAME SETTING
Know-How
15
14
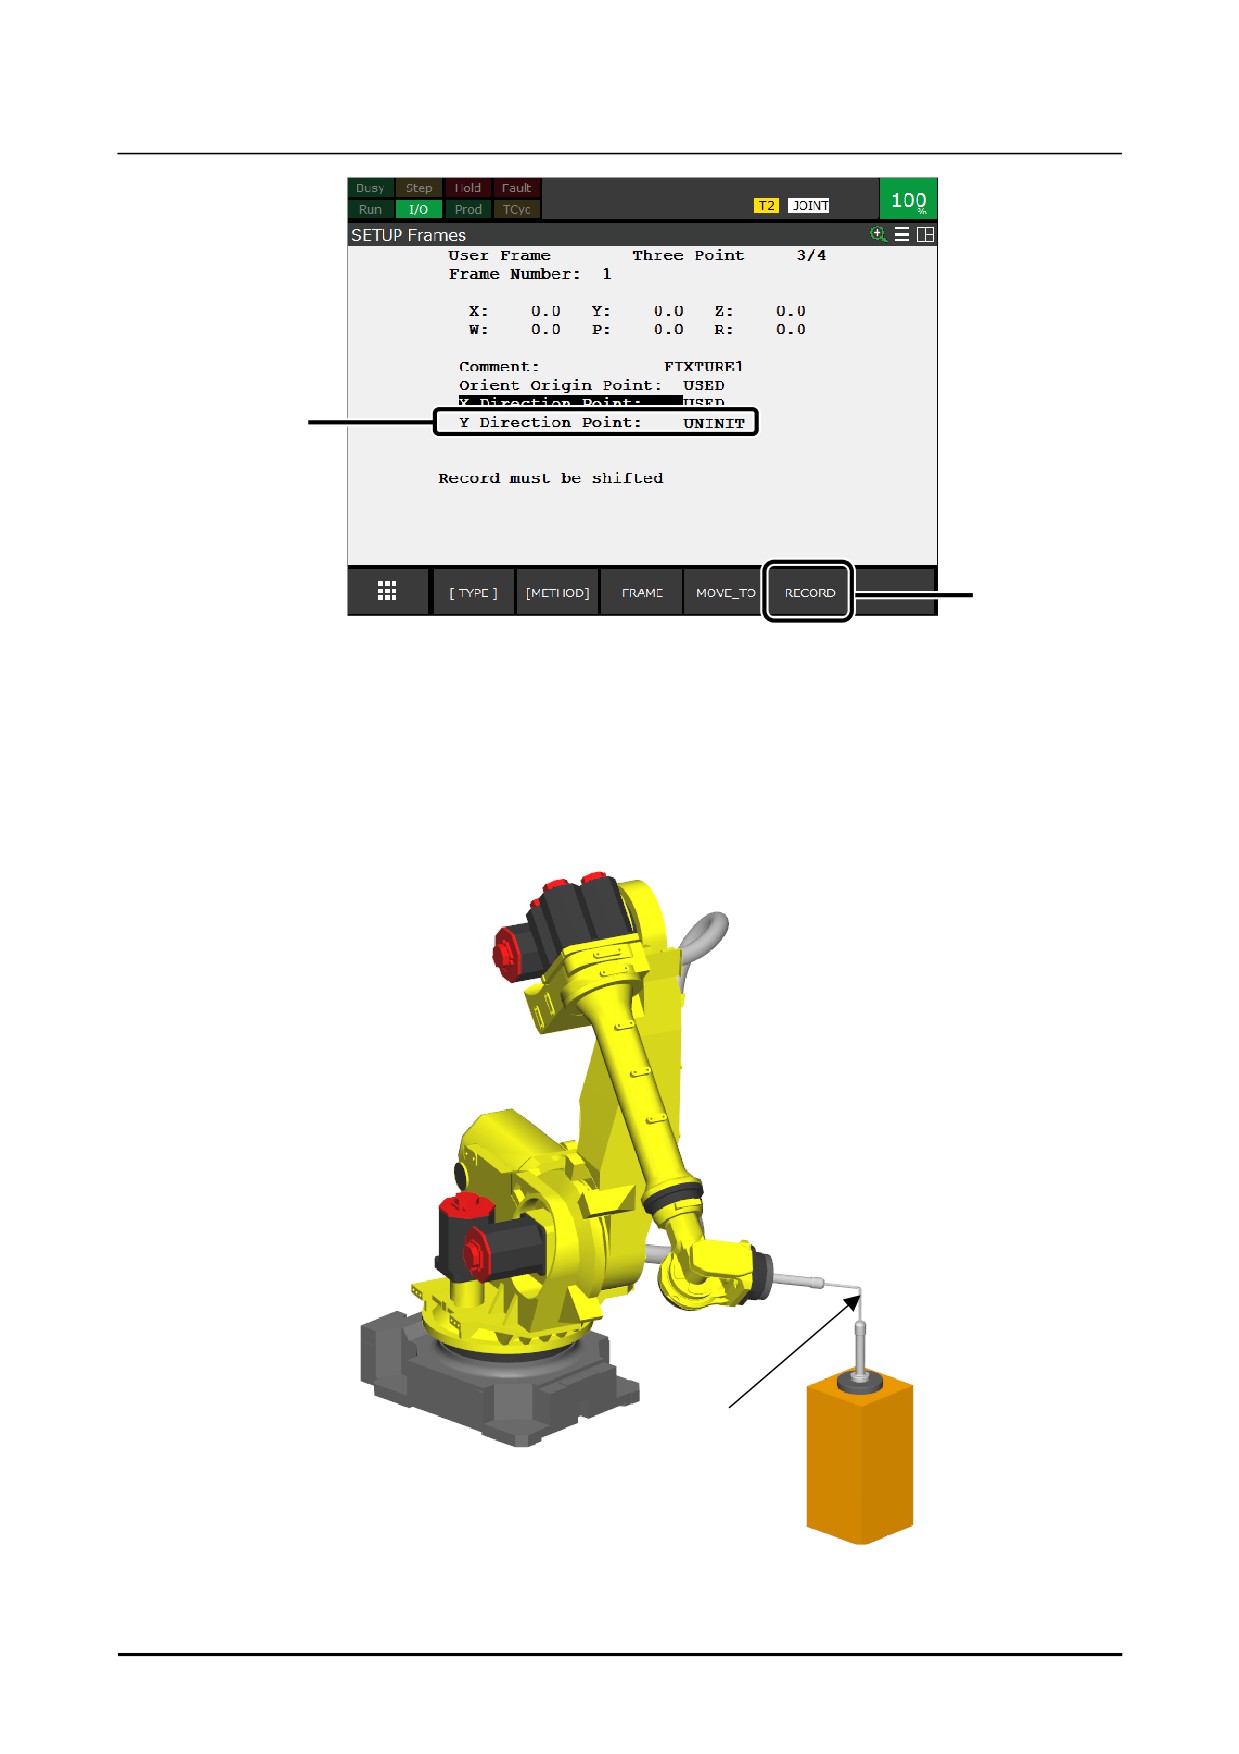
14 While holding down the [SHIFT] key, press F5 [RECORD].
The current value's data will be input as approach point 2.
For the taught [Approach point 2], [Used] will be displayed.
15 Place the cursor over [Approach point 3].
16 Jog the robot and perform touch-up of the fixed pointer tool with a pointer tool.
Perform touch-up of the same point as for [approach point 1]and [approach point 2]. However,
make the orientation of the robot different from that for approach point 1 and approach point 2.
Approach point 3
Touch-up of approach point 3
126
B-83914EN-2/01
Know-How
1. FRAME SETTING
1
17
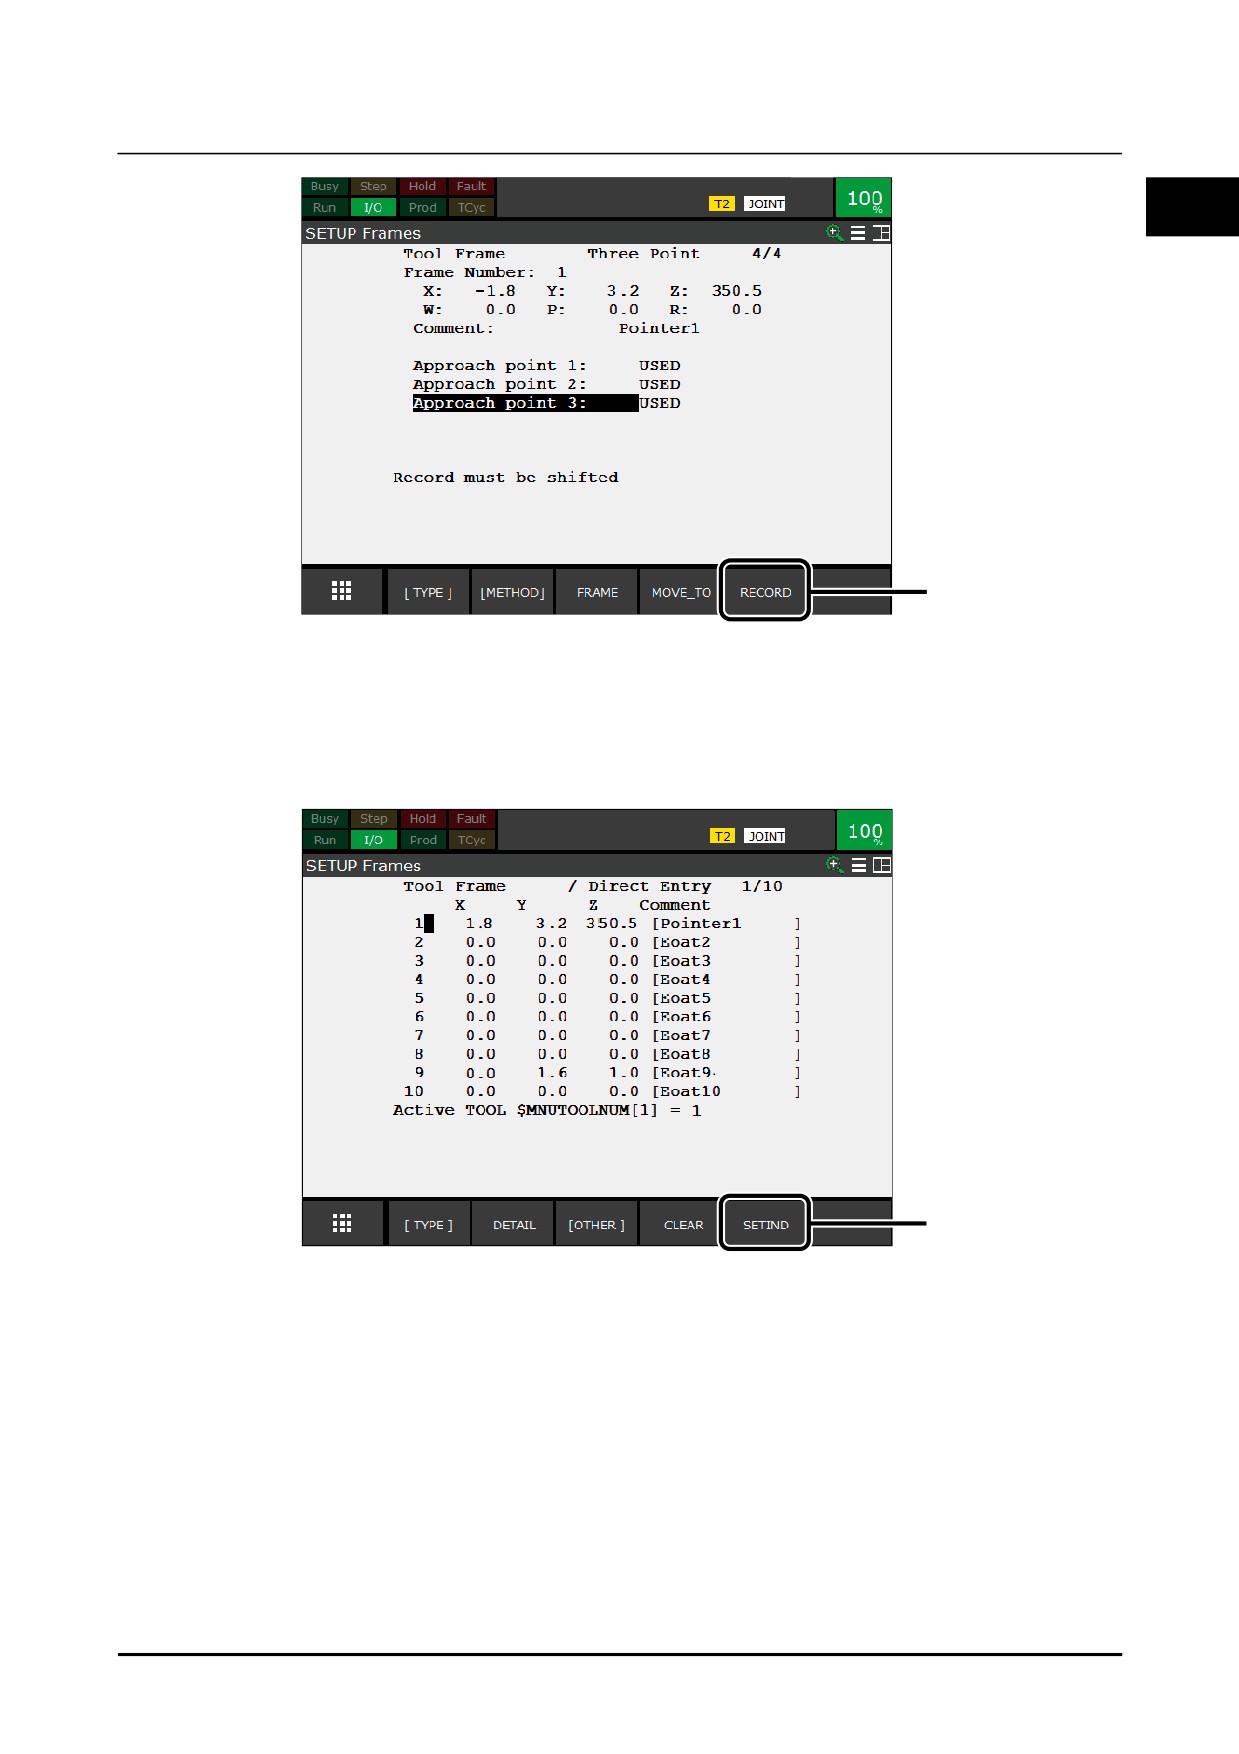
17 While holding down the [SHIFT] key, press F5 [RECORD].
The current value's data will be input as approach point 3.
When all the approach points are taught, [Used] will be displayed. The tool frame will be set.
18 Press the [PREV] key.
The list screen for tool frames will appear.
19
19 Check that the TCP has been set correctly. Press F5 [SETIND] and enter the tool frame number.
The tool frame that has been set will be set as the currently enabled tool frame.
20 Operate the robot by jog operation to move its pointer tool close to the tip of the fixed pointer tool.
B-83914EN-2/01
127
1. FRAME SETTING
Know-How
Center of rotation
Check by moving the pointer tool close to the tip of the fixed pointer tool
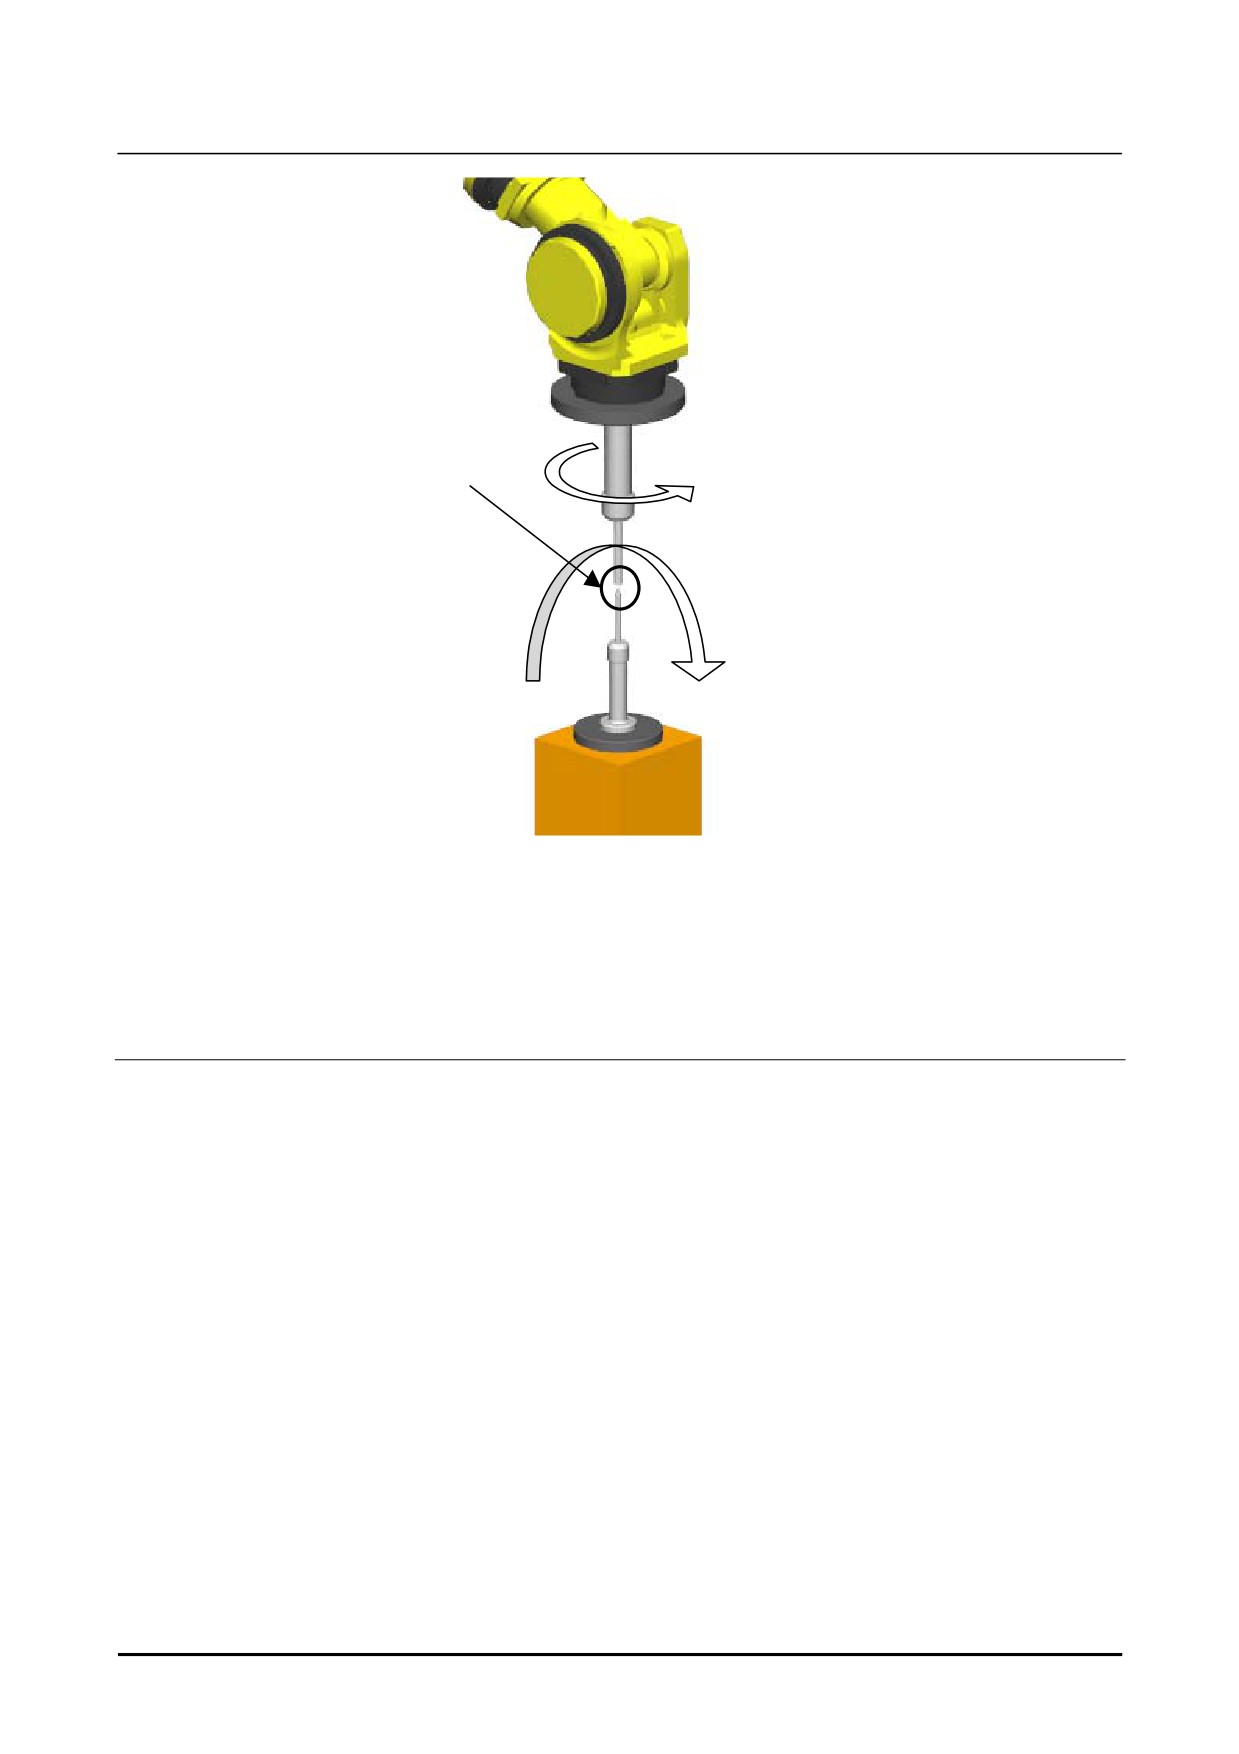
21 Operate the robot by jog operation around the tool frame, and change the orientation of the tool (w,
p, r). If the TCP is accurate, the tip of the pointer tool will always point toward the tip of the fixed
pointer tool.
1.1.1.2 Setting method types and procedures
To set an user frame, there are three methods that are “Three point method” , “Four point method” and
“Direct list method”. When use the “Three point method” or “Four point method” , use the pointer tool
that is set in the Setup Edition Subsection 1.1.1.1 “TCP set up”. Moreover, the accuracy of user frame
setting becomes better as the distance of each taught points is far. When set the calibration grid frame,
the distance of each taught points by using “Four point method” become longer than using the “Three
point method”. When set the calibration grid frame, the “Four point method” is recommended. The
“Three point method” and “Four point method” is explained as shown below.
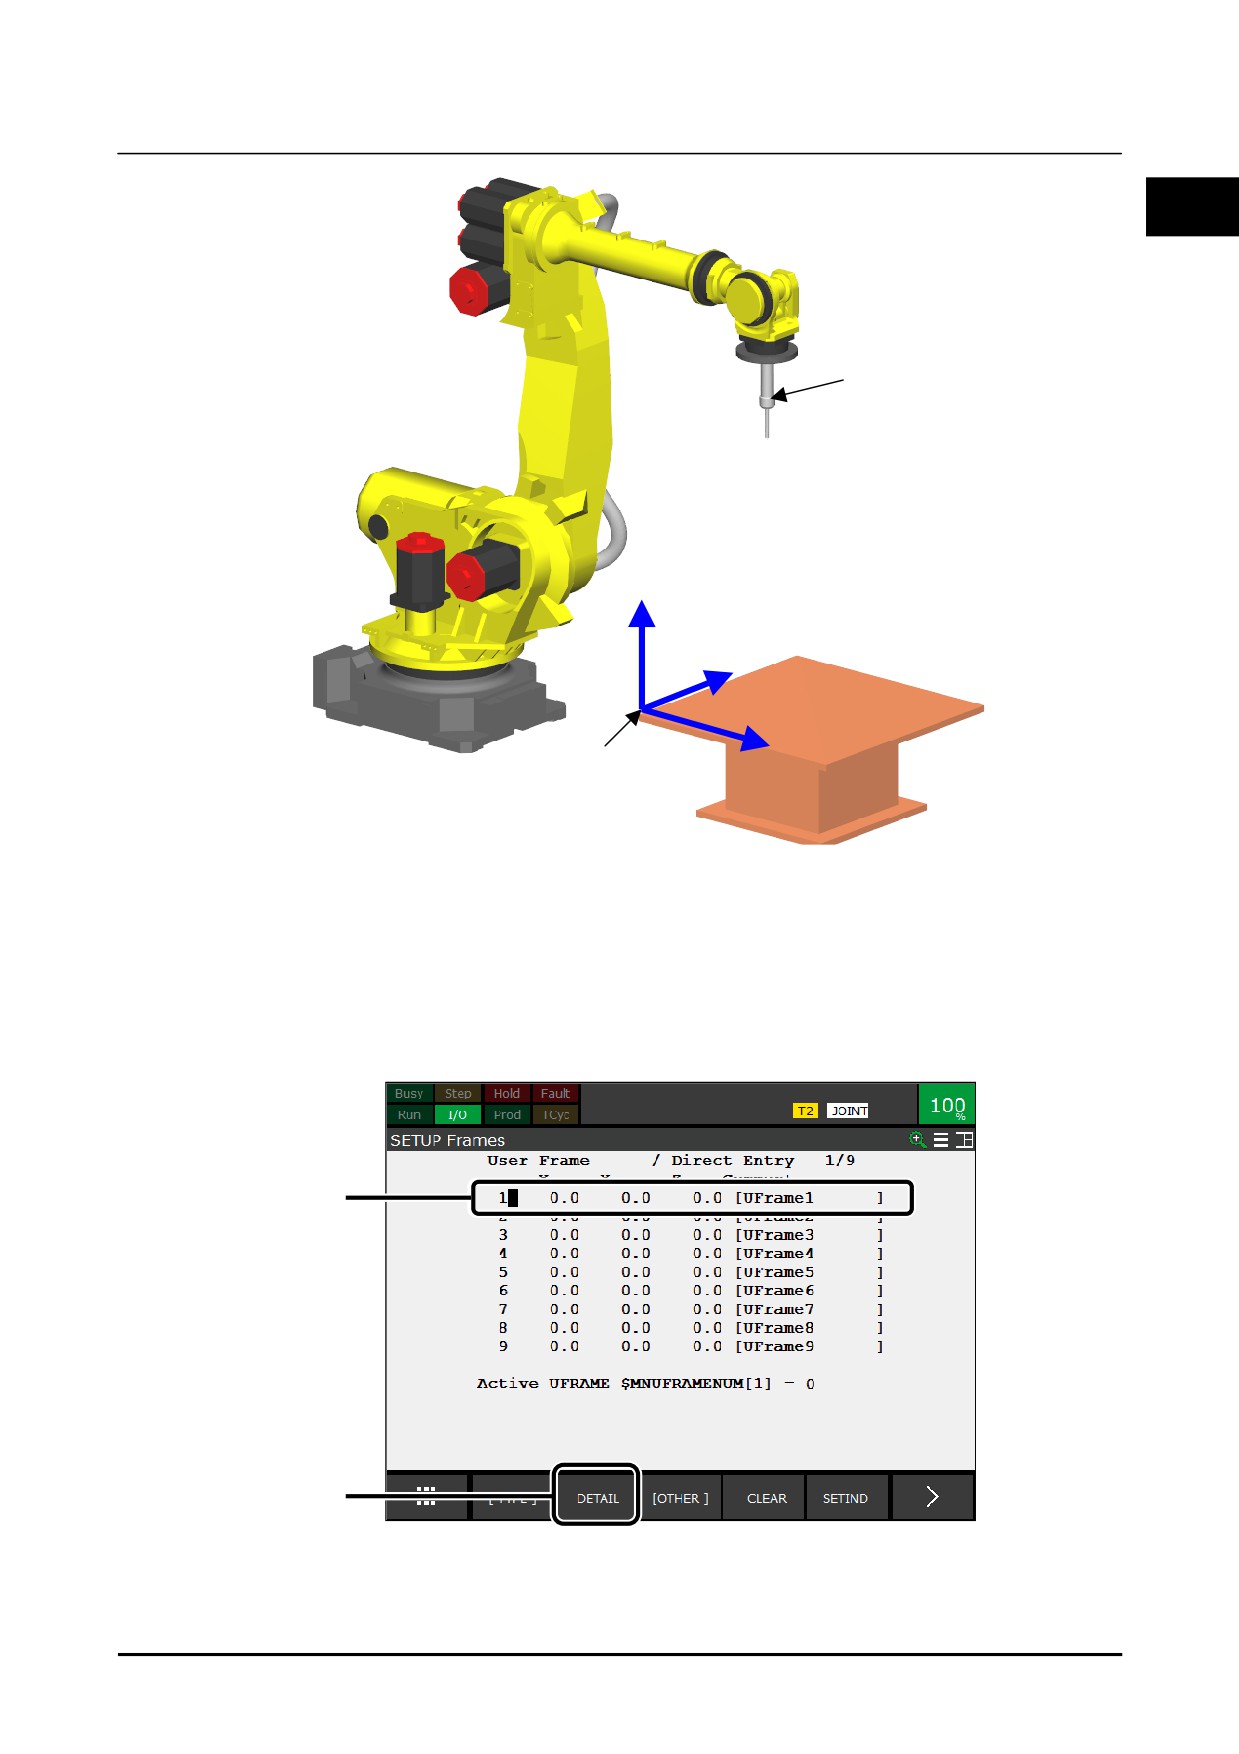
Three point method
Teach the following three points: the origin of the x-axis, the point which specifies the positive
direction of the x-axis, and the point on the x-y plane. In the example of the following figure, the user
frame is set on the table so that the XY plane of the user frame is parallel with the table plan.
128
B-83914EN-2/01
Know-How
1. FRAME SETTING
1
Pointer tool
Z
Y
X
User frame
Example for setting a user frame that is parallel with a work table plane
1
On the teach pendant, after selecting the [MENU] key → [Setup], place the cursor over [Frame] and
select pressing the [ENTER] key.
2
Select and press F3 [Frame].
3
Place the cursor over [User] and press the [ENTER] key.
The following list screen for user frames will appear.
4
5
4
Place the cursor over the line number of the frame to be set.
5
Press F2 [DETAIL].
SETUP Frames screen for the selected frame will appear.
B-83914EN-2/01
129
1. FRAME SETTING
Know-How
6
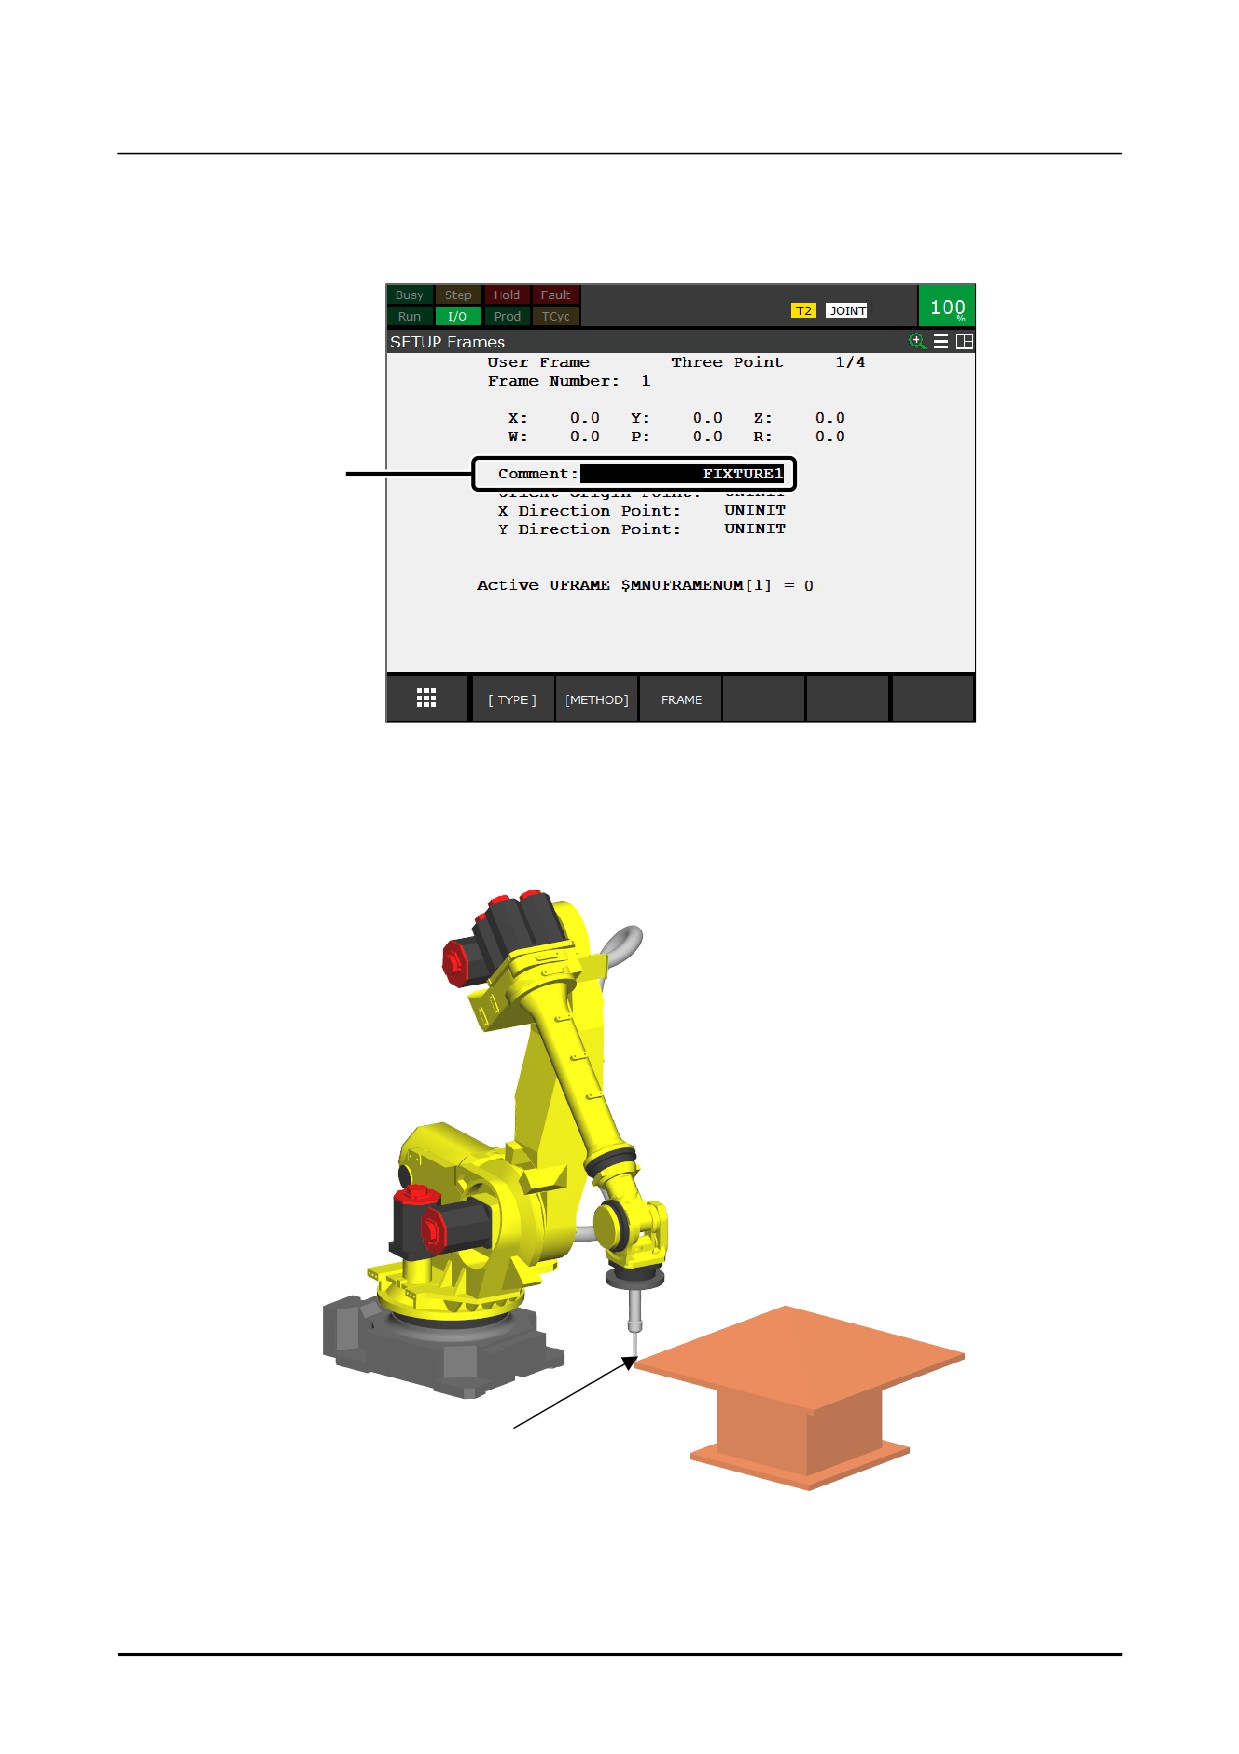
Press F2 [METHOD].
7
Place the cursor over [Three Point] and press the [ENTER] key.
A screen for user frame setting using the three point teaching method will appear.
8
8
Enter a comment in the [Comment] field as required.
A comment to distinguish this frame from other frames is recommended.
9
Place the cursor over [Orient Origin Point].
10
Jog the robot and touch up the origin of the frame with the pointer tool pin.
Orient Origin Point
Touch-up of orient origin point
130
B-83914EN-2/01
Know-How
1. FRAME SETTING
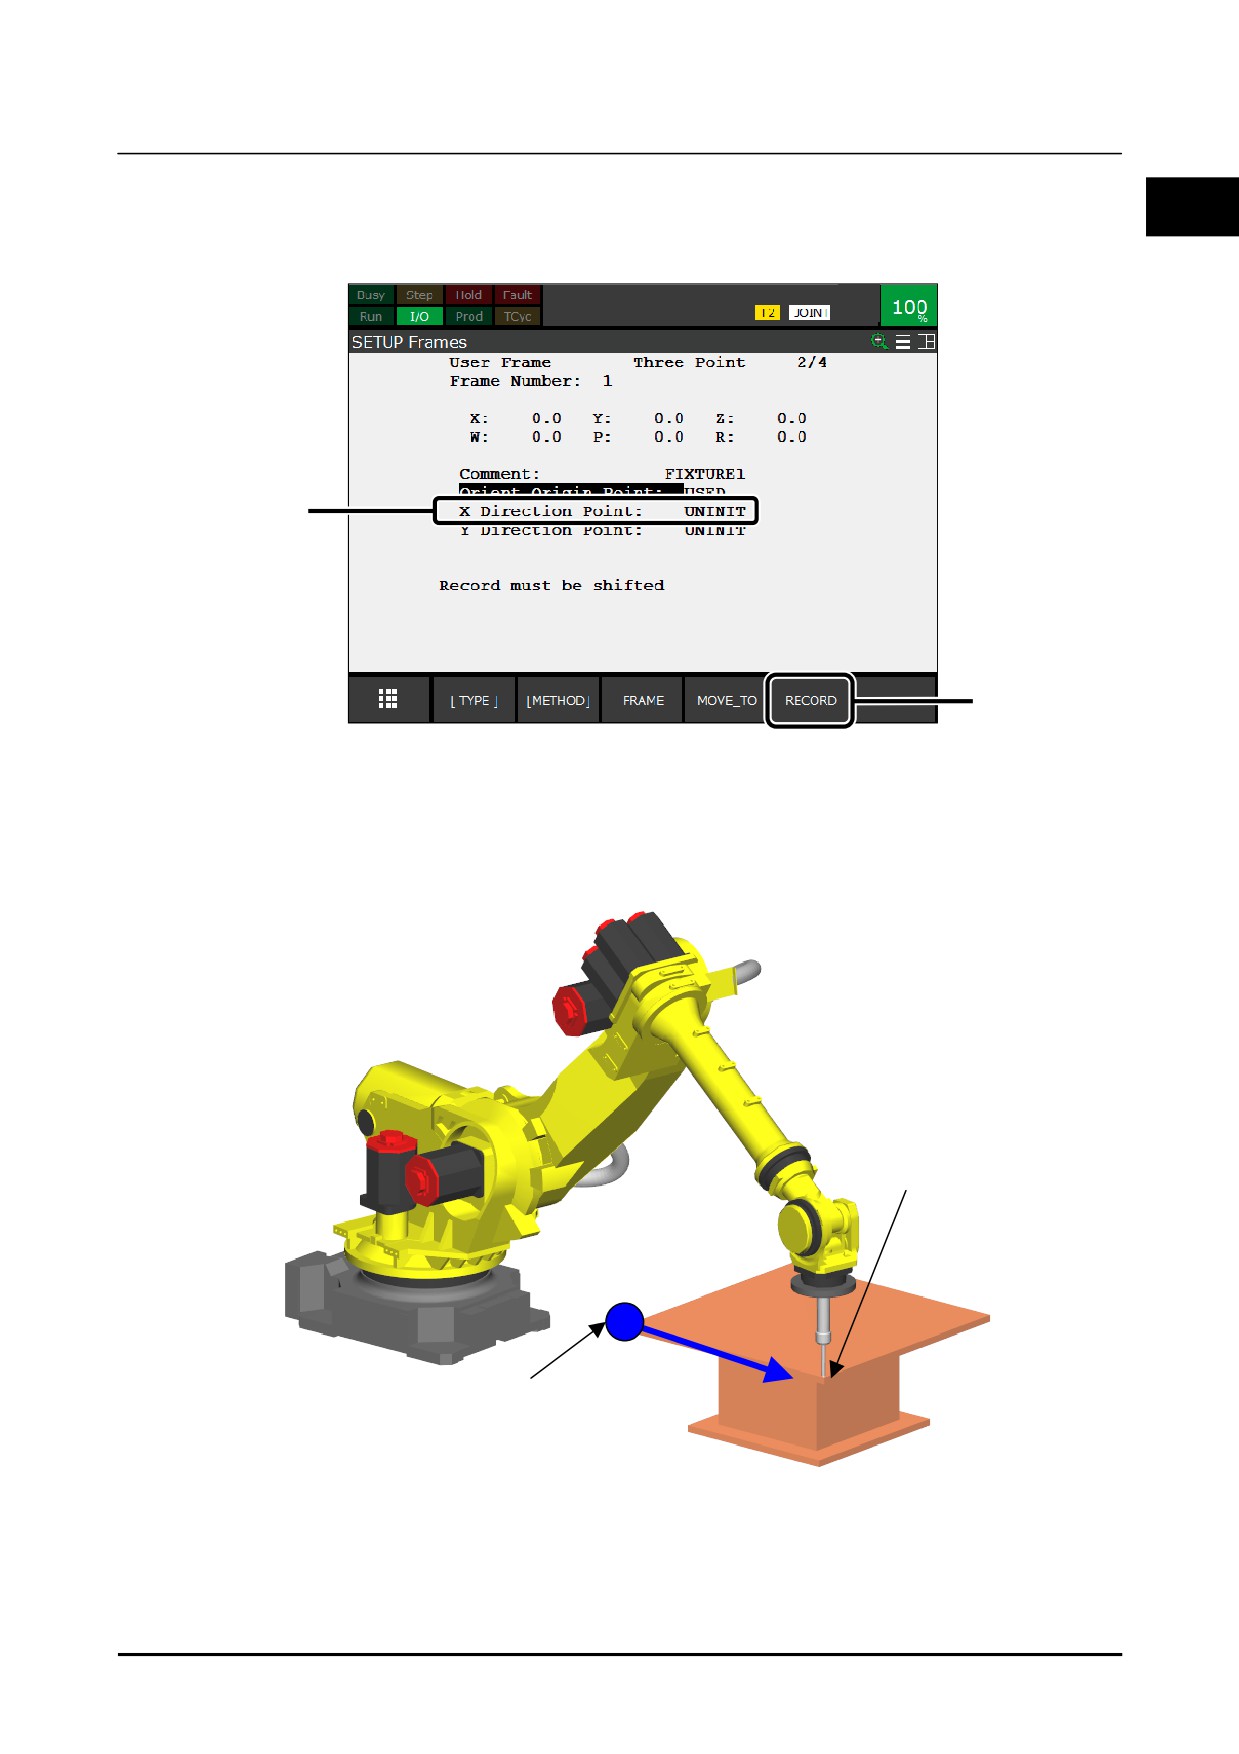
11 While holding down the [SHIFT] key, press F5 [RECORD].
1
The current position data will be recorded as the orient origin of the frame.
[USED] will be shown for the taught [Orient Origin Point].
12
11
12 Place the cursor over [X Direction Point].
13 Jog the robot and touch up the X direction point with the pointer tool.
A line drawn between the orient origin point and the touched up X direction point will be the X-axis
of the frame.
X Direction Point
X
Orient Origin Point
Touch-up of X direction point
B-83914EN-2/01
131
1. FRAME SETTING
Know-How
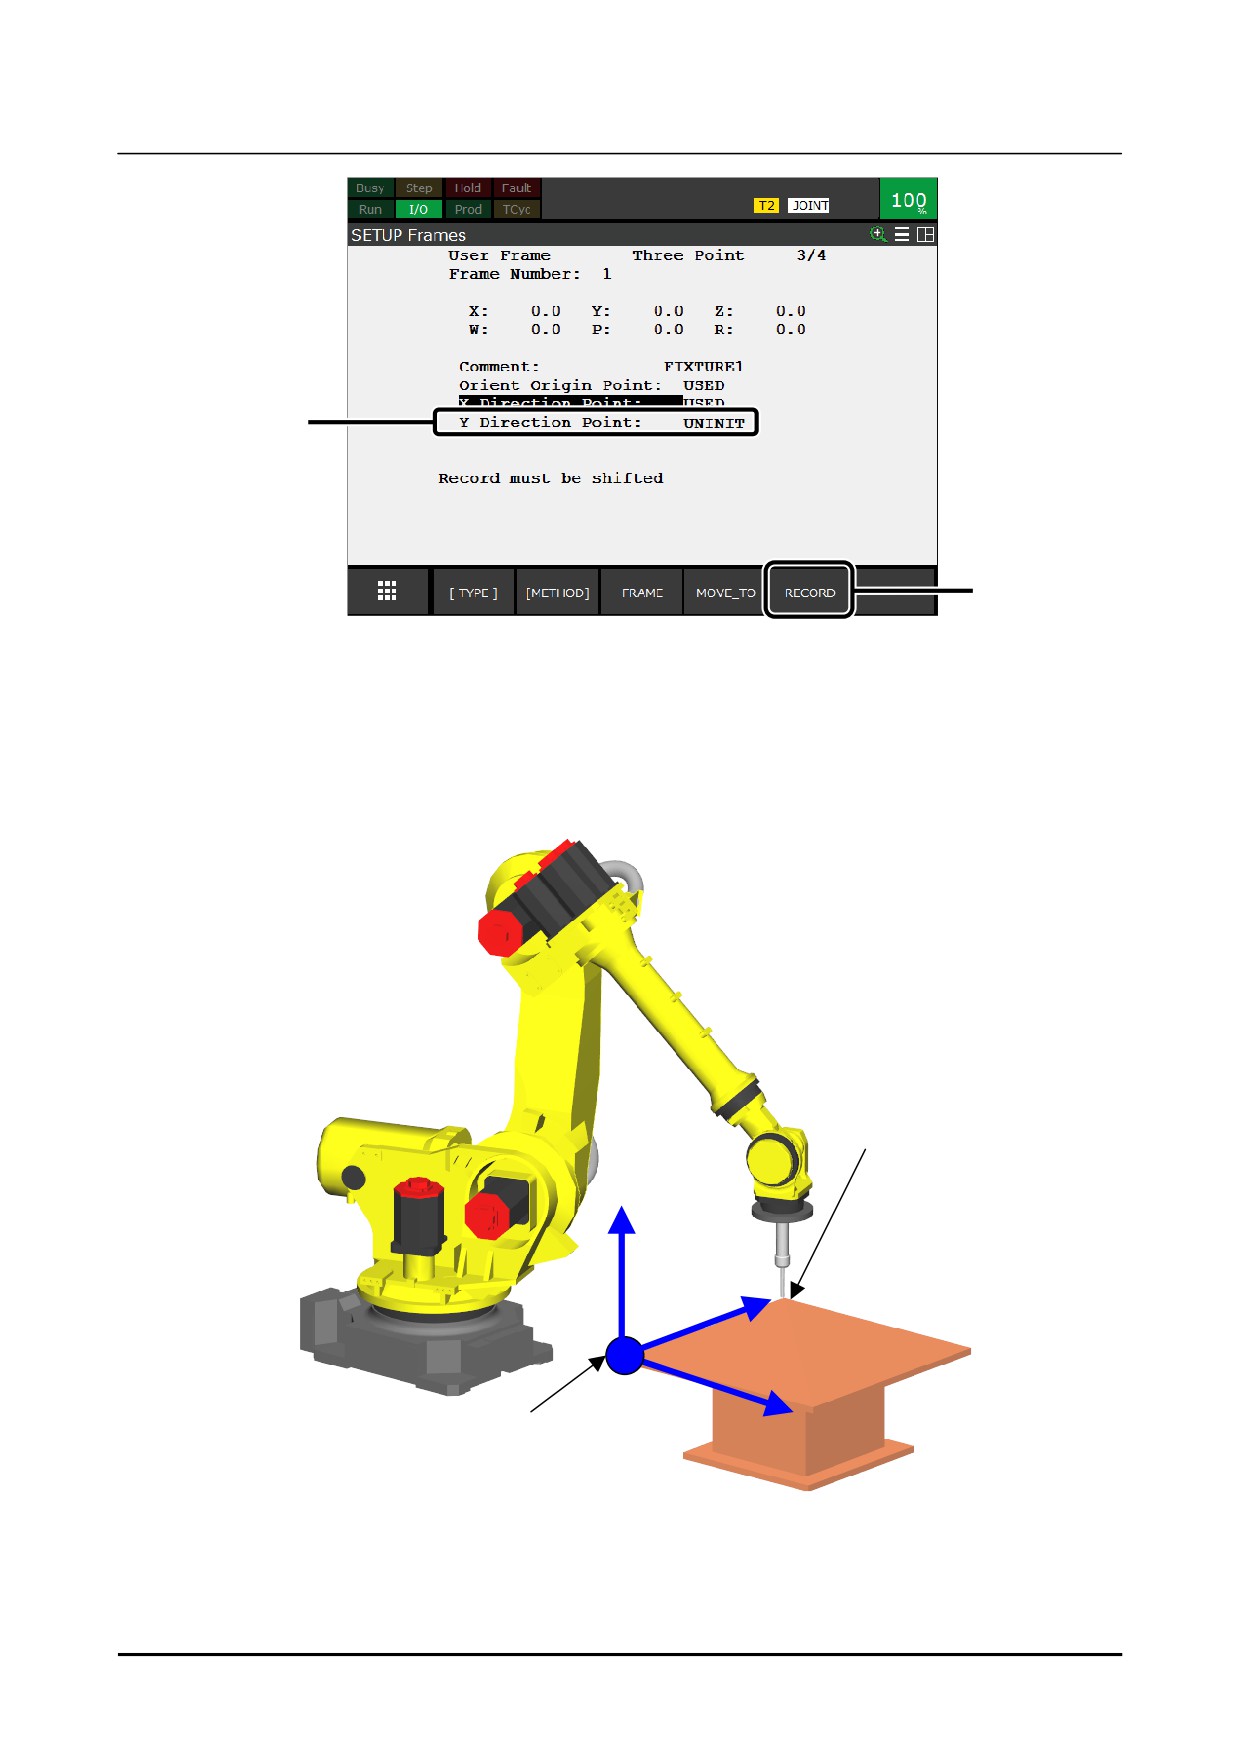
15
14
14 While holding down the [SHIFT] key, press F5 [RECORD].
The current position data will be recorded as the X direction point.
[USED] will be shown for the taught [X Direction Origin Point].
15 Place the cursor over [Y Direction Point].
16 Jog the robot and touch up the Y direction point with the pointer tool.
Touching up the Y-axis direction will determine the X and Y plane of the frame.
Y Direction Point
Z
Y
X
Orient Origin Point
Touch-up of Y direction point
132
B-83914EN-2/01