MG3. Touch User Manual - part 5


  Index      Manuals     MG3. Touch User Manual


Search            copyright infringement  


Content      ..     3      4      5      6     ..


MG3. Touch User Manual - part 5


MG Motor UK Ltd 

66 

4. 

You have the following options on this screen (for detailed instructions on how to use 
them, see the next chapter): 

x  Tap 

 to edit the route: to add or remove destinations or 

change their sequence. You can also set a route start point other than your 
current location. This can be useful to plan and save a future trip. 

x  Tap 

 to display the entire route on the map. 

x  Tap 

 to bypass a part of the route. 

x  Tap 

 to delete the active route. 

x  Tap 

 to open a list with more options like selecting from 

route alternatives, changing route parameters, simulating the route, saving the 
active route or loading a previously saved route. 

x  Tap 

 to return to the Navigation menu. 

3.4 Modifying the route 

When  navigation  is  already  started,  there  are  several  ways  to  modify  the  active  route.  The 
following sections show some of those options. 

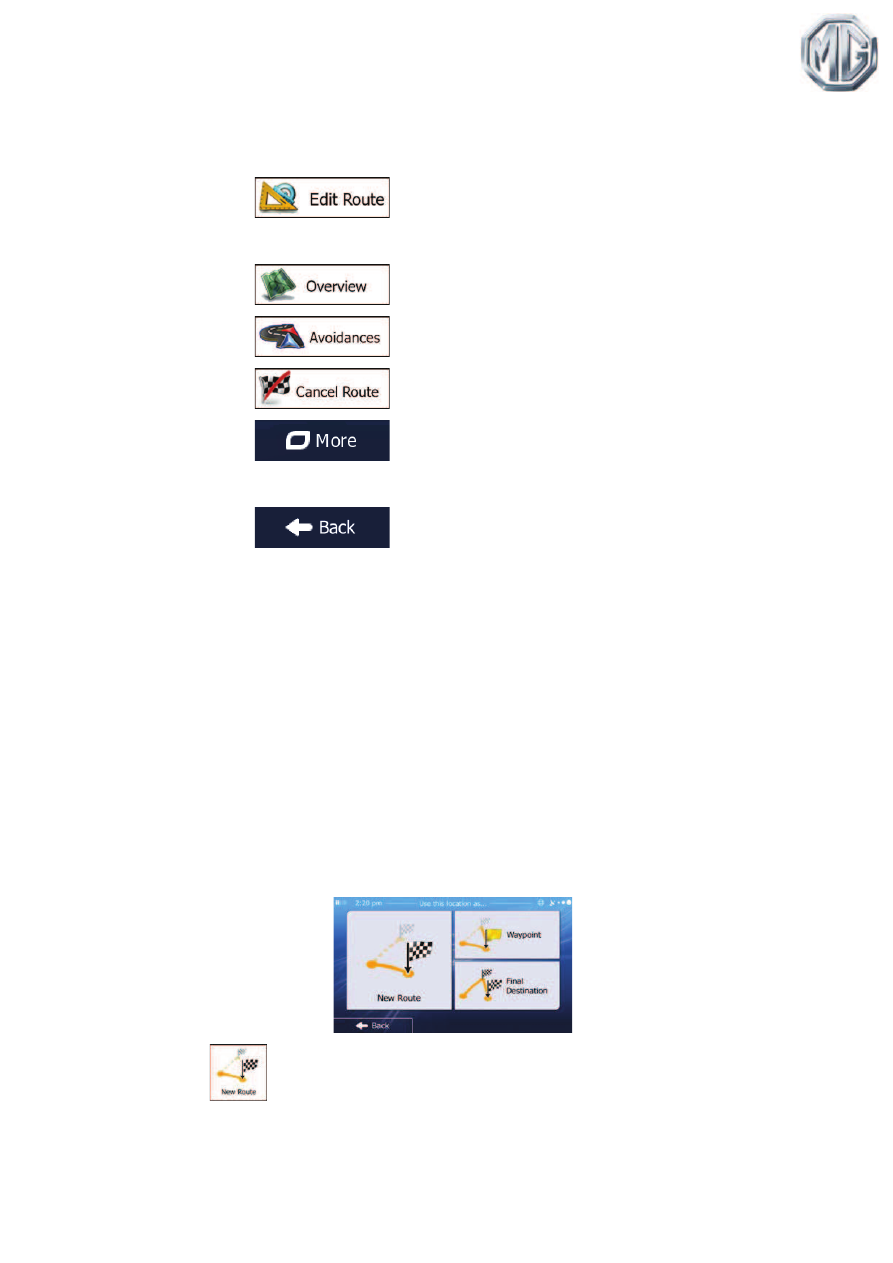
3.4.1 Selecting a new destination when already having a route: New Route, 

Waypoint or Final Destination 

If you already have a recommended route and you select a new destination as described in 
the  above  sections,  the  application  will  ask  you  whether  to  start  a  new  route,  add  a  new 
waypoint  (intermediate destination)  to  the route  or  append  the  newly  selected destination at 
the end of the current route. 

x  Tap 

 to plan a new route to the newly selected location. The previous 

destination and waypoint(s) are deleted. 

MG Motor UK Ltd 

67 

x  Tap 

 to add the newly selected location as an intermediate destination to your 

route. The other destinations of the route remain intact. Note: the new waypoint is 
placed among destinations to keep the route optimal. To decide where a waypoint to 
appear, use the Edit Route feature. 

x  Tap 

 to append the newly selected destination at the end of the route. The 

other destinations of the route remain intact. The previous final destination is now the 
last waypoint. 

3.4.2 Setting a new starting position for the route 

For  normal  navigation,  all  routes  are  planned  from  the  current  position.  In  order  to  check 
future routes, simulate them or see their length in time and distance, you can turn off the GPS 
receiver.  Then  you  can  set  the  starting  point  of  the  route  to  a  different  location  than  the 
current GPS position. 

1. 

If you are on the Map screen, tap 

 to return to the Navigation 

menu. 

2. 

In the Navigation menu, tap 

.

3. 

If you already have a route, tap 

. If you are starting a new route, 

tap

.

MG Motor UK Ltd 

68 

4. 

The first line is the start of the route, normally the current GPS position. Tap 

 and 

confirm your action at the warning message. 

5. 

The Destination menu appears and you can select the start point of the route the same 
way you select a destination. 

6. 

When the new start point is set, tap 

.

7. 

The map returns with a transparent Vehimarker (showing that there is no GPS 
reception). If an active route already existed, it is now recalculated starting from the 
selected location. 

8. 

To return to normal navigation, tap 

.

3.4.3 Editing the list of destinations (Edit Route) 

You  can  edit  the  route  by  modifying  the  list  of  destinations.  You  can  add  or  remove 
destinations, modify the start position or reorder the list. 

1. 

If you are on the Map screen, tap 

 to return to the Navigation 

menu. 

2. 

In the Navigation menu, tap 

.

3. 

Tap 

.

MG Motor UK Ltd 

69 

4. 

You have the following options: 

x  Tap 

 to add a new destination. 

x  Tap 

 to delete a destination. 

x  Tap 

 to modify the start point of the route. 

x  Tap 

 to reorder the list. You can do it manually or you can 

let the application optimise the route for you. 

3.4.4 Pausing the active route 

You do not need to pause the active route: when you start driving again, iGO primo restarts 
the voice instructions from your position. 

3.4.5 Cancelling the active route 

To cancel the navigated route, do one of the following: 

x  If you are on the Map screen, tap 

 and then tap 

. (If you have a route 

with waypoints, you need to tap 

 until all waypoints are deleted.) 

x  In the Navigation menu, tap 

 and then tap 

..

The active route is deleted with all its waypoints. 

MG Motor UK Ltd 

70 

3.4.6 Checking route alternatives when planning the route 

You can select from different route alternatives or change the route planning method after you 
have selected a new destination. Do as follows: 

1. 

Select a destination as explained earlier, and get to the route confirmation screen. 

2. 

Tap 

.

3. 

Tap 

.

4. 

You see the basic details of three route alternatives with the selected route planning 
method. Tap any of them to see it on the map. 

5. 

Or if you cannot find a good alternative, tap 

 and scroll down for 

routes with different routing methods. 

6. 

Select one of the route alternatives and tap 

 to return to the 

previous screen. iGO primo recalculates the route. The orange line now shows the new 
recommended route. 

MG Motor UK Ltd 

71 

3.4.7 Checking route alternatives for an existing route 

To  recalculate  the  active  route  with  a  different  route  planning  method,  you  can  modify  the 
Route  settings  (page  104).  There  is  another  way  to  do  this  and  to  compare  different  route 
alternatives with the same route planning method. Do as follows: 

1. 

If you are on the Map screen, tap 

 to return to the Navigation 

menu. 

2. 

In the Navigation menu, tap 

.

3. 

Tap 

.

4. 

Tap 

.

5. 

You see the basic details of three route alternatives with the selected route planning 
method. Tap any of them to see it on the map. 

6. 

Or if you cannot find a good alternative, tap 

 and scroll down for 

routes with different routing methods. 

MG Motor UK Ltd 

72 

7. 

Select one of the route alternatives then tap and hold 

 for a few 

seconds to return to the Map screen. iGO primo recalculates the route. The orange line 
now shows the new recommended route. 

3.4.8 Changing the vehicle used in route planning 

To recalculate the active route for a different vehicle, do as follows. These changes can also 
be made in Settings (page 104). 

1. 

On the Map screen, tap 

 and then tap 

.

2. 

Tap 

 and then tap one of the following: 

x

x

x

x

x

x

x

3. 

iGO primo recalculates the route optimised for the new vehicle type. The orange line 
now shows the new recommended route. 

Note! 

If you select 

 and you forget to change it back to a vehicle 

later, the software warns you when you travel with a speed that is too high for a 

pedestrian. You are allowed to switch back instantly to 

.

MG Motor UK Ltd 

73 

3.4.9 Changing the road types used in route planning 

To  recalculate  the  active  route  with  different  road  type  preferences,  do  as  follows.  These 
changes can also be made in Settings (page 104). 

1. 

On the Map screen, tap 

 and then tap 

.

2. 

Tap any of the listed road types to modify the route. If needed, scroll the list for all road 
types. You have the following options (their order depends on the selected vehicle 
type):

x

 - You might need to avoid motorways when you are driving 

a slow car or you are towing another vehicle. 

x

 - Charge roads are pay roads where you can purchase a 

pass or vignette to use the road for a longer period of time. They can be 
enabled or disabled separately from toll roads. 

x

 - iGO primo includes toll roads (pay roads where there is a 

per-use charge) in the routes by default. If you disable toll roads, iGO primo 
plans the best toll-free route. 

x

 - iGO primo includes ferries in a planned route by default. 

However, a map does not necessarily contain information about the accessibility 
of temporary ferries. You might also need to pay a fare on ferries. 

x

 - iGO primo excludes unpaved roads by default: unpaved 

roads can be in a bad condition and usually you cannot reach the speed limit on 
them.

3. 

The route has already been recalculated. Tap 

 to return to the Map 

screen. The orange line now shows the new recommended route. 

MG Motor UK Ltd 

74 

3.5 Saving a location as a Favourite destination 

You  can  add  any  location  to  Favourites,  the  list  of  frequently  used  destinations.  Planning  a 
route to one of the Favourite destinations is described on page 59. 

1. 

Select a destination as described before. It can be an address, a Place, any location 
on the map, a previously used destination from History, etc. 

2. 

When the full screen map appears with the selected location in the middle, tap 

.

3. 

Tap 

.

4. 

(optional) Using the keyboard, you can change the name offered for the Favourite. Tap 

 to enter numbers or symbols. 

5. 

Tap 

 to save the location as a new Favourite destination. 

MG Motor UK Ltd 

75 

3.5.1 Editing the details of a Favourite destination 

You  can  select  a  location  that  you  have  already  saved  as  a  Favourite  and  edit  its  details. 
Adding a location to the list of Favourite destinations is described on page 74. 

1. 

Access the list of Favourites: 

x  If you are on the Map screen, tap 

 and then tap 

.

x  If you are in the Navigation menu, tap 

 and then tap 

.

2. 

 The list of Favourite destinations is displayed. 

3. 

Tap the Favourite that you want to edit. If necessary, browse down to see more of the 

list or tap 

 and enter a few letters from the name of the Favourite 

destination. 

4. 

A full screen map appears with the selected point in the middle. 

5. 

Tap 

 to see the details of the selected Place. 

6. 

Tap any of the data fields and modify its content. 

7. 

(optional) If you have entered a telephone number, you can make a call to this number 
by tapping the green button at the bottom. 

8. 

Tap and hold 

 to return to the map. 

MG Motor UK Ltd 

76 

3.6 Saving a map location as an alert point 

You can save any map location as an alert point (for example a speed camera or a railway 
crossing). 

1. 

Browse the map and select a location. The red Cursor appears there. 

2. 

Tap 

.

3. 

Scroll down the list and tap 

.

4. 

On the newly opened screen, select the type of the alert point, the direction from which 
you expect the alert, and (if applicable) the speed limit for this alert point. 

5. 

Tap 

 to save the location as a new alert point. 

MG Motor UK Ltd 

77 

3.7 Saving the current location as an alert point 

It  is  even  easier  to  save  the  current  map  location  as  an  alert  point  (for  example  a  speed 
camera or a railway crossing). 

1. 

Tap the 

 button on the Map screen. 

2. 

On the newly opened screen, select the type of the alert point, the direction from which 
you expect the alert, and (if applicable) the speed limit for this alert point. 

3. 

Tap 

 to save the location as a new alert point. 

3.8 Editing an alert point 

You  can  edit  a  previously  saved  or  uploaded  alert  point  (for  example  a  speed  camera  or  a 
railway crossing). 

1. 

Browse the map and select the alert point to edit. The red circle appears around the 
alert point. 

2. 

Tap 

.

3. 

Scroll down the list and tap 

.

4. 

On the newly opened screen, modify the type of the alert point, the direction from 
which you expect the alert, or (if applicable) the speed limit for this alert point. 

MG Motor UK Ltd 

78 

5. 

Tap 

 to save the changes to the alert point. 

3.9 Watching the simulation of the route 

You can run a simulated navigation that demonstrates the active route. Do as follows: 

1. 

If you are on the Map screen, tap 

 to return to the Navigation 

menu. 

2. 

In the Navigation menu, tap 

.

3. 

Tap 

.

MG Motor UK Ltd 

79 

4. 

Scroll down the list and tap 

. The simulation starts from the starting 

point of the route, and using a realistic speed, it leads you through the whole 
recommended route. 

1. 

(optional) You have the following controls during the simulation (the control 
buttons disappear after a few seconds but you can open them again if you tap 
the map): 

x

: Jump to the next route event (manoeuvre). 

x

: Pause the simulation. 

x

: Jump to the previous route event (manoeuvre). 

x

: Tap to increase the speed of the simulation to 4, 8 or 16 times faster. 

Now tap again to return to the normal speed. 

2. 

Tap 

 to stop the simulation. 

MG Motor UK Ltd 

80 

4 Off-road navigation 

When  first  started,  iGO  primo  calculates  routes  using  the  road  network  of  the  high  quality 
vector  maps  provided  with  the  product.  You  can  switch  the  application  to  off-road  mode  in 
Navigation settings in one of the following ways: 

x  From the Main menu, tap 

,

,

 and 

then

.

x  From the Map screen, tap 

,

 and then 

.

Most  of  the  procedures  described  for  on-road  navigation  also  apply  to  off-road  navigation. 
However,  there  are  some  that  are  not  available  in  this  navigation  mode  (for  example  you 
cannot  open  the  itinerary  as  you  have  no  manoeuvres  just  route  points  and  straight  lines 
between them). 

4.1 Selecting the destination of the route 

Selecting  the  start  point  or  a  destination  (waypoint  or  final  destination)  is  the  same  as 
described at on-road navigation. The only difference is that route points are linked to form a 
route with straight lines regardless of the road network and traffic regulations. 

4.2 Navigating in off-road mode 

The  real  difference  between  the  on-road  and  off-road  modes  is  the  navigation  itself.  When 
you are on the Map screen with an off-road route: 

x  your position and heading is not aligned with the nearest road and 
x  there is no turn by turn navigation just a recommended direction. 

You see a orange line drawn between your current position and the next destination to reach. 
The  Turn  Preview  field  in  the  top  left  corner  shows  a  compass  with  your  bearing  and  the 
distance of the next destination. 

When  you  reach  a  waypoint,  the  orange  line  will  show  the  direction  to  the  next  destination. 
(Future legs of the route are shown with orange lines.) 

When you reach the final destination, navigation ends. 

MG Motor UK Ltd 

81 

5 Lorry navigation 

The navigation software gives more options for lorry drivers: 

x  You can enter the parameters of your vehicle and iGO primo calculates your routes 

with taking available weight, height, etc. restrictions into account (this feature is 
accurate only if restrictions are available for all roads between your position and the 
destination) 

x  Based on the dimensions and other entered parameters of your vehicle, iGO primo 

warns you when you are approaching a restricted road segment or such roads must be 
used in your route. 

x  You can set a waiting (loading) time for each destination of the route. This way the 

arrival time calculation can take into account the idle times at intermediate 
destinations. In addition, time dependent restrictions and statistical traffic information 
can also be considered for the whole route. 

x  When selecting lorry as the vehicle type, U-turns are disabled from routes as much as 

possible. 

x  By using the 

 button in the vehicle profile, you can even forbid 

turning back on divided roads. 

x  You can use countdown timers to alert you when compulsory breaks must be taken 

(timers can be set for one driver or two alternate drivers) 

Warnings are both visual and audible. There are different kinds of warnings: 

x  When approaching a restricted road segment without a route, you are warned that 

there is a restricted area ahead. 

x  Restricted road segments are excluded from your routes but in some cases some 

restricted roads need to be used to reach the given destination. In this case you 
receive a warning and you must accept that you have restricted roads in your route or 
you can stop the navigation and continue without an active route. 

Note! 

Please note that lorry navigation is only as accurate and comprehensive as the 
restrictions received with the map. Restrictions may not cover lower priority 
roads and in most cases the coverage changes as you move around your map 
region. You are obliged to always obey the restrictions displayed on the road. 

5.1 Setting up vehicle parameters 

When you use iGO primo with a lorry, you need to select a lorry type vehicle profile in Route 
settings  and  enter  the  parameters  of  your  vehicle.  These  parameters  are  used  in  route 
calculation to bypass roads that are restricted for your lorry. Do as follows: 

1. 

If you are on the Map screen, tap 

 to return to the Navigation 

menu. 

2. 

In the Navigation menu, tap 

, and then 

.

3. 

Tap 

.


Content      ..     3      4      5      6     ..