Pontiac Torrent (2006 year). Manual - part 7


  Index      Pontiac     Pontiac Torrent (2006 year) - manual in english


Search            copyright infringement  


Content      ..     5      6      7      8     ..


Pontiac Torrent (2006 year). Manual - part 7


Temperature and Compass Display

Press the on/off button, located in the center, to cycle
between °F, °C and off. If the display reads CAL,
the compass needs to be calibrated. For more
information, see “Compass Calibration” later in
this section.

If an abnormal temperature reading is displayed for an
extended period of time, please consult your dealer.
Under certain circumstances, a delay in updating
the temperature is normal.
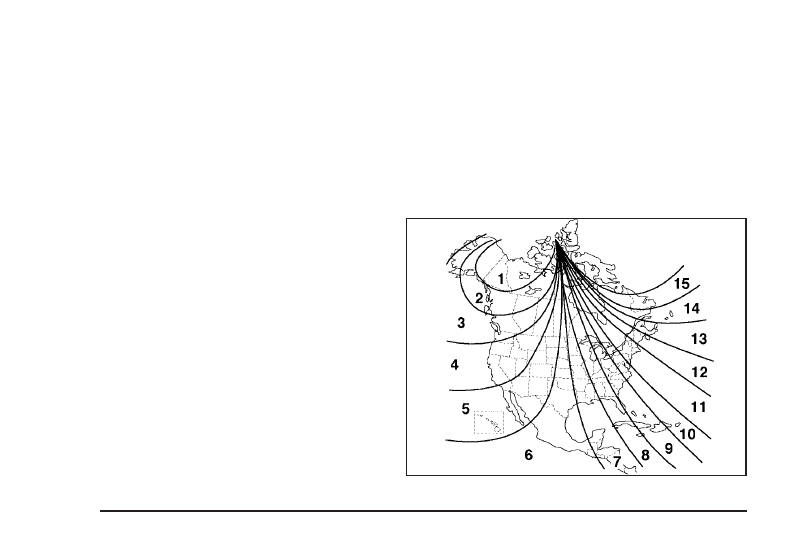
Compass Variance

Compass variance is the difference between earth’s
magnetic north and true geographic north. If not
adjusted to account for compass variance, the mirror’s
compass could give false readings. The mirror is
set in zone eight upon leaving the factory. It will be
necessary to adjust the compass to compensate
for compass variance if you live outside zone eight.
Under certain circumstances, as during a long distance
cross-country trip, it will be necessary to adjust for
compass variance.

To adjust for compass variance:

1. Find the current location and variance zone number

on the following zone map.

2. Press and hold the on/off button for five seconds

until the word ZONE appears in the display.
The compass is now in zone mode.

3. Press and release the on/off button within

five seconds until the new zone number appears
in the display. The display will show a compass
direction within a few seconds.

2-30

-------------------------------------------------------------------------------------------------------------------------------------------------------------

Compass Calibration

The compass may need calibration if one of the
following occurs:

If CAL is displayed while driving in the vehicle.

After approximately five seconds, the display does
not show a compass heading (N for North, for
example), there may be a strong magnetic field
interfering with the compass. Such interference may
be caused by a magnetic antenna mount, magnetic
note pad holder, or a similar magnetic item.

The compass does not display the correct heading
and the compass zone variance is set correctly.

In order to calibrate, CAL must be displayed in the
mirror compass windows. If CAL is not displayed, push
in the on/off button for approximately eight seconds
or until CAL is displayed.

The compass can be calibrated by driving the vehicle
in circles at 5 mph (8 km/h) or less until the display
reads a direction.

Cleaning the Mirror

When cleaning the mirror, use a paper towel or similar
material dampened with glass cleaner. Do not spray
glass cleaner directly on the mirror as that may cause
the liquid cleaner to enter the mirror housing.

Outside Power Mirrors

The controls for the
power mirrors are located
on the instrument panel.

To adjust the mirrors do the following:

1. Move the selector switch to the left or right to

choose the driver’s or passenger’s mirror.

2. Press the corresponding edges of the round control

pad to move each mirror to the desired direction.

Adjust each outside mirror so that you can see a little of
your vehicle, and the area behind your vehicle.

2-31

-------------------------------------------------------------------------------------------------------------------------------------------------------------

Outside Convex Mirrors

The passenger’s side mirror is convex. A convex
mirror’s surface is curved, creating a wider area of
vision for the driver.

{

CAUTION:

A convex mirror can make things (like other
vehicles) look farther away than they really are.
If you cut too sharply into the right lane, you
could hit a vehicle on your right. Check your
inside mirror or glance over your shoulder
before changing lanes.

OnStar

®

System

OnStar

®

uses global positioning system (GPS) satellite

technology, wireless communications, and live advisors
to provide you with a wide range of safety, security,
information, and convenience services. If your airbags
deploy, the system is designed to make an automatic call
to OnStar

®

Emergency where we can request emergency

services be sent to your location. If you lock your keys in
the car, call OnStar

®

at 1-888-4-ONSTAR and they can

send a signal to unlock your doors. If you need roadside
assistance, press the OnStar

®

button and they will get

you the help you need.

A complete OnStar

®

User’s Guide and the Terms

and Conditions of the OnStar

®

Subscription Service

Agreement are included in the vehicle’s glove box
literature. For more information, visit www.onstar.com or
www.onstar.ca. Contact OnStar

®

at 1-888-4-ONSTAR

(1-888-466-7827), or press the OnStar

®

button to speak

to an OnStar

®

advisor 24 hours a day, 7 days a week.

Terms and conditions of the Subscription Service
Agreement can be found at www.onstar.com or
www.onstar.ca.

2-32

-------------------------------------------------------------------------------------------------------------------------------------------------------------

OnStar

®

Services

For new vehicles equipped with OnStar

®

, the Safe

and Sound Plan is included for one year from the date
of purchase. You can extend this plan beyond the
first year, or upgrade to the Directions and Connections

®

Plan to meet your needs. For more information, press
the OnStar

®

button to speak to an advisor.

Safe and Sound Plan

Automatic Notification of Airbag Deployment

Emergency Services

Roadside Assistance

Stolen Vehicle Tracking

AccidentAssist

Remote Door Unlock/Vehicle Alert

Remote Diagnostics

Online Concierge

Directions and Connections

®

Plan

All Safe and Sound Plan Services

Driving Directions

RideAssist

Information and Convenience Services

OnStar

®

Personal Calling

As an OnStar

®

subscriber, the Personal Calling

capability allows you to make hands-free calls using a
wireless system that is integrated into the vehicle. Calls
can be placed nationwide using simple voice commands
with no additional contracts and no additional roaming
charges. To find out more about OnStar

®

Personal

Calling, refer to the OnStar

®

User’s Guide in the vehicle’s

glove box, visit www.onstar.com or www.onstar.ca, or
speak to an OnStar

®

advisor by pressing the OnStar

®

button or calling 1-888-4-ONSTAR (1-888-466-7827).

OnStar

®

Virtual Advisor

Your vehicle may have Virtual Advisor. It is a feature
of OnStar

®

Personal Calling that uses minutes to

access weather, local traffic reports, and stock quotes.
By pressing the phone button and giving a few simple
voice commands, you can browse through the
various topics. Customize your information profile at
www.myonstar.com. See the OnStar

®

User’s Guide

for more information.

2-33

-------------------------------------------------------------------------------------------------------------------------------------------------------------

OnStar

®

Steering Wheel Controls

0

For vehicles equipped with a Talk/Mute button,

it can be used to interact with OnStar

®

. See Radio

with CD (Base Level) on page 3-40 or Radio with CD
(MP3) 
on page 3-50 or Radio with Six-Disc CD on
page 3-65 
for more information.

When calling into voice mail systems, or to dial directory
numbers, press this button once, wait for the response,
say the number(s) to be dialed, wait for the number(s)
to be repeated and then say “dial”. See the OnStar

®

User’s Guide for more information.

Storage Areas

Glove Box

To open the glove box, pull the handle to the left
and pull the glove box door down until it stops and
is fully open.

Cupholder(s)

There are two cupholders located at the lower front of
the center console armrest and a molded cupholder
on the floor of the center console.

To use the cupholders on the armrest, pull the tray
forward.

There are two cupholders located at the rear of the
center console. Pull downward on the lid to use
the cupholders.

2-34

-------------------------------------------------------------------------------------------------------------------------------------------------------------

Center Console Storage Area

Your vehicle has a center console armrest with storage
area. Use the lever on the front of the console to
open it. There is a removable coinholder and tissue
holder inside. The coinholder can be removed by
pulling it up from the console.

Luggage Carrier

{

CAUTION:

If you try to carry something on top of your
vehicle that is longer or wider than the luggage
carrier — like paneling, plywood, a mattress
and so forth — the wind can catch it as you
drive along. This can cause you to lose
control. What you are carrying could be
violently torn off, and this could cause you or
other drivers to have a collision, and of course
damage your vehicle. You may be able to carry
something like this inside. But, never carry
something longer or wider than the luggage
carrier on top of your vehicle.

A luggage carrier allows you to load things on top of
your vehicle. The luggage carrier has side rails attached
to the roof, sliding crossrails (if equipped) and places
to use for tying things down. These let you load
some things on top of your vehicle, as long as they
are not wider or longer than the luggage carrier.

The roof rack crossrails lock in any position along the
straight section of the side rail.

Press the levers down until the locking mechanisms
fully engage to the side rail. Make sure each lever is
in the down position. The crossrail will not slide
when properly engaged.

2-35

-------------------------------------------------------------------------------------------------------------------------------------------------------------

To reposition the crossrail, pull up on the end levers
on each side of the crossrail to the upright position.
This will release the locking mechanism from the
siderail. Lift and place the crossrail into the new position.
Press the levers down until the locking mechanisms
fully engage to the side rail. Make sure each lever is
in the down position. The crossrail will not slide
when properly engaged.

Notice: Loading cargo on the luggage carrier
that weighs more than 220 lbs (100 kg) or
hangs over the rear or sides of the vehicle may
damage your vehicle. When loading cargo,
tie it to the crossrail and against the siderail.

Lock the crossrails to the far forward and backward
location to make sure the load is evenly distributed
on the luggage carrier.

Do not stand on the plastic lower body panel when
loading cargo on the luggage carrier.

Loading cargo on the luggage carrier will make the
center of vehicle gravity higher. Avoid high speeds,
sudden starts, sharp turns, sudden braking or abrupt
maneuvers. This could result in loss of control of
the vehicle.

Do not exceed the maximum vehicle capacity when
loading your vehicle. For more information on vehicle
capacity and loading, see Loading Your Vehicle on
page 4-31

To prevent damage or loss of cargo as you are driving,
check now and then to make sure the luggage carrier
crossrails are locked and cargo is still securely fastened.

When the luggage carrier is not in use, store the
crossrail inside the vehicle. If not possible, lock one
crossrail at the rear most position on the siderails and
lock the other crossrail above the opening of the
rear door to reduce wind noise.

2-36

-------------------------------------------------------------------------------------------------------------------------------------------------------------

Rear Compartment Storage
Panel/Cover

Your vehicle may be equipped with an adjustable
panel/cargo cover feature. The panel/cargo cover
can be adjusted into three positions.

There is a flip panel towards the front of the cargo
cover. You may have to flip this panel upward in
order to gain access to the cargo cover.

To use the panel in the lower position, do the following:

1. Insert the front corners of the panel into the

lower guides.

2. Slide the panel forward.

3. Press down on the back of the panel to lock it

in place.

The panel can be used in this position if you need
additional space above the panel. Place the cargo
on top of the panel in this position.

2-37

-------------------------------------------------------------------------------------------------------------------------------------------------------------

{

CAUTION:

If you were to carry things on the adjustable
panel when it is in the upper (cargo cover) or
center positions, during a sudden vehicle
movement or a crash, those things could be
thrown around in the vehicle. You or others
could be injured. When it is in the upper or
center position, always secure any cargo on
the floor beneath the panel/cover.

To use the panel in the center position, do the following:

1. Insert the front corners of the panel into the

middle guides.

2. Slide the panel forward.

3. Press down and pull rearward on the back of

the panel to lock it in place.

The panel can be used in this position when you have
to place a flat or spare tire in the rear cargo area.

To use the panel in the upper position, do the following:

1. Insert the front corners of the panel into the

top guides.

2. Slide the panel forward.

3. Press down and pull rearward on the back of

the panel to lock it in place.

This can be used as a cargo cover for the rear area.
The panel may be installed either carpet or plastic side
up. The panel may also be used as a table in this
position. See “Table” following for more information.

2-38

-------------------------------------------------------------------------------------------------------------------------------------------------------------

Table

Your vehicle may have an adjustable panel that also
functions as a table. The maximum load for the table
is 100 lbs. distributed (45 kg).

To set up the table, do the following:

1. With the adjustable panel in the upper position

pull rearward to position it for use as a table.
The plastic side should be up.

2. Rotate the knob to release the leg from the plastic

side of the table and rotate the leg outward.

3. Set the table leg onto the liftgate lock striker at

the rear edge of the vehicle.

Make sure to place the table leg securely onto the
liftgate lock striker.

Notice: Driving with the panel extended into
the table position could damage your vehicle.
Always have the panel in the stored position
while you are driving.

Notice: Placing hot items on the surface of the
table could damage it. Always be sure that the
items that are placed on the surface of the table
are of moderate temperature.

There are four hooks located on the table that can
be used for grocery bags.

2-39

-------------------------------------------------------------------------------------------------------------------------------------------------------------

Convenience Net

Your vehicle may have a rear compartment net
to prevent items from rolling under the rear seat.
There may also be four convenience net tie-downs.
Two tie-downs are located on the side trim just
behind the rear seat and the other two are located
on the floor at the rear of the cargo area.

Sunroof

If the vehicle has an express-open sunroof, the controls
to operate it are located on the headliner above the
rearview mirror. The ignition must be in RUN or ACC
to operate the sunroof.

To express-open the
sunroof glass panel and
sunshade, press the switch
rearward and release it.

To stop the sunroof before it is completely open, press
the switch rearward again. The sunshade cannot be
closed with the sunroof open. To close the sunroof,
press forward and hold the switch until the sunroof
stops, lifts and seals at the back of the sunroof glass.

To put the sunroof in the vent position, pull down on the
front of the switch. Push up on the front of the switch
to close it.

2-40

-------------------------------------------------------------------------------------------------------------------------------------------------------------

Instrument Panel Overview ...............................3-4

Hazard Warning Flashers ................................3-6
Other Warning Devices ...................................3-6
Horn .............................................................3-6
Tilt Wheel .....................................................3-7
Turn Signal/Multifunction Lever .........................3-7
Turn and Lane-Change Signals ........................3-8
Headlamp High/Low-Beam Changer ..................3-8
Flash-to-Pass .................................................3-8
Windshield Wipers ..........................................3-8
Windshield Washer .......................................3-10
Rear Window Wiper/Washer ...........................3-10
Cruise Control ..............................................3-11
Headlamps ..................................................3-14
Headlamps on Reminder ................................3-14
Daytime Running Lamps (DRL) .......................3-14
Automatic Headlamp System ..........................3-15
Fog Lamps ..................................................3-15
Instrument Panel Brightness ...........................3-16
Dome Lamp .................................................3-16
Entry Lighting ...............................................3-17
Map Lamps .................................................3-17
Cargo Lamp .................................................3-17
Battery Run-Down Protection ..........................3-18
Accessory Power Outlet(s) .............................3-18
Ashtray(s) and Cigarette Lighter ......................3-19

Climate Controls ............................................3-19

Climate Control System .................................3-19
Outlet Adjustment .........................................3-22
Passenger Compartment Air Filter ...................3-22

Warning Lights, Gages, and Indicators ............3-23

Instrument Panel Cluster ................................3-24
Speedometer and Odometer ...........................3-25
Trip Odometer ..............................................3-25
Tachometer .................................................3-25
Safety Belt Reminder Light .............................3-26
Airbag Readiness Light ..................................3-26
Battery Warning Light ....................................3-27
Brake System Warning Light ..........................3-28
Anti-Lock Brake System Warning Light .............3-29
Traction Control System (TCS) Warning Light ...3-30
Low Traction Light ........................................3-30
Engine Coolant Temperature Warning Light ......3-31
Engine Coolant Temperature Gage ..................3-31
Malfunction Indicator Lamp .............................3-32
Oil Pressure Light .........................................3-35
Change Engine Oil Light ................................3-36
Security Light ...............................................3-36
Reduced Engine Power Light .........................3-36
Highbeam On Light .......................................3-37
Daytime Running Lamps (DRL)

Indicator Light ...........................................3-37

Section 3

Instrument Panel

3-1

-------------------------------------------------------------------------------------------------------------------------------------------------------------

-------------------------------------------------------------------------------------------------------------------------------------------------------------

Instrument Panel Overview

3-4

-------------------------------------------------------------------------------------------------------------------------------------------------------------

The main components of your instrument panel are the following:

A. Power Mirror Control. See Outside Power Mirrors

on page 2-31

B. Turn Signal/Multifunction Lever. See Turn

Signal/Multifunction Lever on page 3-7.

C. Cruise Controls. See Cruise Control on page 3-11.

D. Instrument Panel Cluster. See Instrument Panel

Cluster on page 3-24.

E. Audio Steering Wheel Controls (If Equipped).

See Audio Steering Wheel Controls on page 3-79.

F. Windshield Wiper/Washer Lever. See Windshield

Wipers on page 3-8.

G. Traction Control System Button. See Traction

Control System (TCS) on page 4-9.

H. Outlets. See Outlet Adjustment on page 3-22.

I. Hazard Warning Flashers. See Hazard Warning

Flashers on page 3-6.

J. Fog Lamps Button. See Fog Lamps on page 3-15.

K. Audio System. See Audio System(s) on page 3-38.

L. Glove Box. See Glove Box on page 2-34.

M. Hood Release. See Hood Release on page 5-11.

N. Tilt Wheel. See Tilt Wheel on page 3-7.

O. Horn. See Horn on page 3-6.

P. Ignition Switch. See Ignition Positions on page 2-16.

Q. Climate Control System. See Climate Control

System on page 3-19.

R. Heated Seats Buttons. See Heated Seats

on page 1-4.

S. Shift Lever. See Shifting Into Park (P)

on page 2-23.

3-5

-------------------------------------------------------------------------------------------------------------------------------------------------------------

Hazard Warning Flashers

Your hazard warning flashers let you warn others.
They also let police know you have a problem. Your
front and rear turn signal lamps will flash on and off.

The hazard warning
flasher button is
located in the center
of the instrument panel.

Your hazard warning flashers work no matter what
position your key is in, and even if the key is not in
the ignition switch.

Press the button to make the front and rear turn signal
lamps flash on and off. Press the button again to
turn the flashers off.

When the hazard warning flashers are on, your turn
signals will not work.

Other Warning Devices

If you carry reflective triangles, you can set them up
at the side of the road about 300 feet (100 m) behind
your vehicle.

Horn

Press near or on the horn symbols on your steering
wheel pad to sound the horn.

3-6

-------------------------------------------------------------------------------------------------------------------------------------------------------------


Content      ..     5      6      7      8     ..