Iran Khodro Pars. Service Manual - part 4


  Index      Manuals     Iran Khodro Pars. Service Manual


Search            copyright infringement  


Content      ..     2      3      4      5     ..


Iran Khodro Pars. Service Manual - part 4


-------------------------------------------------------------------------------------------------------------------------------------------------------------

54

2

GENERAL INSTRUCTION

On/Off the device

- To turn on the device, press the PWR button.

- To turn off the device, press and hold the 

same key.

POINT:

When the vehicle is not running, by pressing 

the “PWR” button or inserting the CD the 

device could be turned on for 30 minutes. 

Pay attention the device is not turned on by 

entering USB/SD/AUX. After 30 minutes the 

device turns off and by pressing the “PWR” 

button you can turn on the device again.

MEDIA button

Press the “MEDIA” button, to switch the disc 

(when the disc is situated in the device), USB 

(when the USB is connected to the device), SD 

card (when the card is inside the device) and 

AUX IN (when AUX IN socket is connected). 

MUTE button

While the device is on, press the key for a 

moment. The mute mode is activated and 

output sound is disconnected. To exit, press 

again the same key.

VOLUME ADJUSTMENT

Turn the volume to adjust the sound . Turn  

the volume clock wise (right) to increase, and 

turn it counter clock wise (left) to decrease the 

sound level.

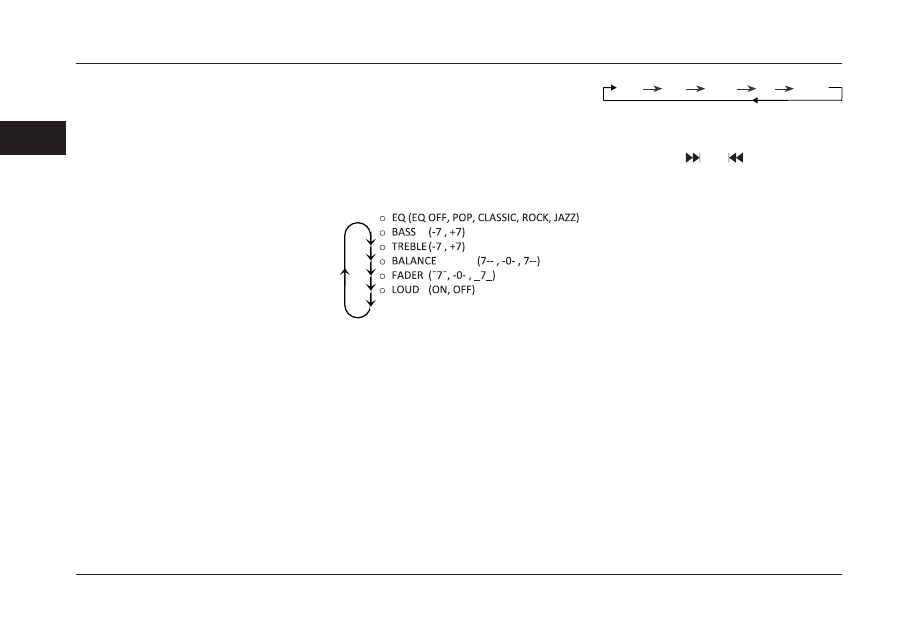
THE SOUND QUALITY ADJUSTMENT

To access the following, press AUDIO 

repeatedly:

To adjust each of these, turn the AUDIO 

volume.

While adjusting, there is no change for more 

than 5 seconds, the device automatically 

returns to its last mode. BASS and TREBLE 

are just adjustable in EQ OFF mode.

HOW TO USE THE RADIO

The band changing

To select the radio, press the same key.

By frequent pressing of the “RADIO” button 

when playing, you could choose one of the 

bands with following sequence:

 FM1   FM2   FMAS   AM 

 AMAS

AUTOMATIC SEARCHING OF THE RADIO 

STATIONS
By pressing the

   and  

  buttons, you could 

activate the automatic searching system to 

increase/decrease the radio frequencies. After 

receiving the desired radio station, you could 

save the station in one of the memories from 

1- 6.

To save the desired station, press and hold the 

related number for 2 seconds.

THE RADIO STATIONS MANUAL 

SEARCHING

To increase the radio frequency manually, turn 

the AUDIO key clock wise and to decrease 

counter clock wise.

AUDIO SYSTEM

-------------------------------------------------------------------------------------------------------------------------------------------------------------

-------------------------------------------------------------------------------------------------------------------------------------------------------------

55

2

AUDIO SYSTEM

AUTOMATIC SAVING OF THE RADIO 

STATIONS

To select automatically 6 powerful radio 

stations and saving them instead of the present 

stations, press the AST key. The present 

stations are replaced instead of the previous 

saved ones

The received stations in FM band are saved in 

memories 1- 6 of FMAS band and in AM band 

are saved in memories 1- 6 of AMAS band.

Tip: By using this order, the previous saved 

memories are erased and the new stations are 

replaced instead of them. By pressing the AST 

key for more than 2 seconds each accessible 

radio station  is played for 10 seconds and then 

shifts to the next station.

SAVING THE STATION ON THE MEMORY

To save the new radio stations on the memory 

of CD player, you should hold the number of 

desired memory for 2 seconds after receiving 

the radio station. After hearing the beep sound 

, current frequency is saved on the memory. 

RDS DATA

Disposal services through RDS system (Radio 

Data System) are as follow:

PS PROGRAM SERVICE NAME)

This service  displays the current station name 

on the panel in the case of forwarding by the 

forwarder.

ALARM MESSAGES (PTY ALARM)

In the case of sender the urgent warnings by 

the sender, the messages will be displayed on 

the panel.

TA (TRAFFIC ANNOUNCEMENTS)

By this the driver will receive the important 

traffic announcement. 

By short pressing on TA/AF key, TA service is 

activated or deactivated.

AF (ALTERNATIVE FREQUENCY)

By using this service the device automatically 

searches and receives the more power 

frequency of the current radio station. By 

pressing TA/AF key for more than 2 seconds, 

AF service is activated or deactivated.

Point: The abovementioned services should be 

forwarded by the central forwarder. At present, 

PS is the only active service in Iran.

HOW TO USE CD/USB/SD/AUX

Inserting the disc

While inserting, the disc labeled surface should 

be upwards. Insert the disc such an extent 

that the internal mechanism of the CD player 

automatically pull it inside. The first file on the 

disc is automatically played.

Note: The device has been designed just for 

playing the 5 inch (12 cm) standard discs.

Avoid using 3 inch (8 cm) discs. Inserting of 

such CDs by using/not using of the adaptor will 

damage the device or the disc.

PAUSE BUTTON
In CD/USB/SD switch, if press the  button 


for a moment pause switch is activated and 

the  audio  file  that  is  playing  will  be  stopped. 

Repressing the button, the system comes back 

to its normal playing. To play the first file of the 
disc, hold the button 


for 2 seconds.

-------------------------------------------------------------------------------------------------------------------------------------------------------------

-------------------------------------------------------------------------------------------------------------------------------------------------------------

56

2

SCN BUTTON

While playing CD/USB/SD, press “4SCN” to 

present  exiting  files.  By  pressing  of  this  key 

each  file  will  be  played  for  10  seconds.  By 

repressing of the key, the system comes back 

to the normal position of playing. 

RPT BUTTON

While playing CD/USB/SD switch, to repeat 

the playing file press “RPT1” button to select 

the “RPTFILE” mode. To repeat all of the files 

inside the current folder repress this key to 

select the “RPT DIR” mode. The playing is 

continued so long as the “RPT1” key is pressed 

to choose the “RPTOFF” mode.

RDM BUTTON

While the playing CD/USB/SD switch, press 

“RDM2” button to select the random playing 

of the files. To stop random playing mode and 

coming back to the normal position, repress 

the “RDM2” button.

SEARCHING OF THE FILE & FOLDER

Disc Playing Mode (TRACK/MP3):
To  select  previous/next  file,  press 

  and  

   keys. In case of pressing and holding the 

above keys, you could play the file forwards/

backwards.

MP3 playing file
To select previous/next folder, press


and  


keys. In case of pressing and holding the 

above buttons, you could choose 10 previous/

next file.

EJECT BUTTON

To eject the disc, press  button.

THE MONITOR DATA

While  the  files  MP3  and  WMA  are  playing, 

by pressing of the button “5DSP”, the panel 

displays the data related to the playing file as 

the following: FILE, FOLDER.

While  the  file/folder  name  is  displaying,  by 

repressing of the button, the panel displays 

the data related to the ID3 label like a movable 

tape which consists of: TITLE, ARTIST AND 

ALBUM. Then the device comes back to the 

normal position. 

PLAYING OF THE SD FILES

Open the USB/SD/AUX port cover. Insert 

SD memory card .After several seconds, the 

device automatically plays music.

FLASH MEMORY

Open the USB/SD/AUX port cover. Connect 

the flash memory to the USB connector. The 

device automatically plays the saved music in 

Flash Memory. 

POINTS ABOUT MP3 FILES

- The device could be able to display just 

English characters of

   “- , +, A, Z, 0-9”. 

- Maximum, 16 characters is used to display 

the name of an album or file.

-  In  case  of  recording  MP3  files  on  the  disc 

make sure the saving format is the data type 

not audio.

- In order to enjoy the best quality sound, it is 

recommended the files switched to MP3 files 

with sampling frequency of KHZ 44.1.

AUDIO SYSTEM

-------------------------------------------------------------------------------------------------------------------------------------------------------------

-------------------------------------------------------------------------------------------------------------------------------------------------------------

57

2

AUDIO SYSTEM

POINTS ABOUT USB/SD

-  The  files  with  *WMA,  *MP3,  *Mp3  are 

readable.

- Fat 16/Fat 32 is readable.

- The device maximum readable memory is 

32GB.

- Sampling frequency 8KHZ- 48KHZ

- Bit rate 8-320kbps

Points: While the playing in USB mode does 

not cut off the USB suddenly. This causes the 

USB to be damaged. First change the source 

and then cut off the USB. Or turn off the device 

and then cut off the USB.

THE SOUND AUXILIARY INPUT

Open the USB/SD/AUX port cover. Connect 

the sound auxiliary input socket. The device 

automatically plays AUX IN socket input file.

THE SYSTEM ADJUSTMENTS

By pressing of the “AUDIO” volume for more 

than 2 seconds you will enter the system 

adjustments as the following: Then, by each 

pressing of this button there is one of the 

following:

S-VOL->TIME->TIME AD->RDS->REG-

>NEWS->EON->L-OUT->LCD

To change each of the above adjustments turn 

the “AUDIO” volume. To exit the adjustments 

menu press the “AUDIO” volume for more than 

2 seconds.

Point:

The CD player is automatically exited from the 

system adjustments menu if there is no action 

after 5 seconds.

S-VOL

By this switch you could adjust the first sound 

volume such an extent that not to exceed the 

fixed  volume  when  the  device  turns  on.  The 

volume is adjustable from 5 to 25.

- If the sound volume is less than the above 

before the device turns off, the sound volume 

will be adjusted the last one when the device 

turns on again.

- If the sound volume is more than the above 

before the device turns off, the sound volume 

will be automatically like the adjusted one 

when the device turns on again.

- If the sound volume is less than 5 before 

the device turns off, the sound volume will be 

adjusted 5 when the device turns on again.

CLOCK (RDS/MAN) ADJUSTMENT

In case of selection the “RDS” from “RDS 

clock” and “MAN” it is possible to adjust the 

clock manually.

(TIME)DISPLAY ADJUSTMENT

This switch could be adjusted as one of the 

following: 12/24 hour.

-------------------------------------------------------------------------------------------------------------------------------------------------------------

-------------------------------------------------------------------------------------------------------------------------------------------------------------

58

2

RDS (ON/OFF) ADJUSTMENT

You could activate or deactivate RDS (Radio 

Data System).

REG (ON/AUTO/0FF) ADJUSTMENT

In case of selection of ON switch the regional 

stations is received. In case of selection of 

AUTO switch the power stations is searched. 

In case of selection of OFF switch the first radio 

station received by the system regardless input 

signal power is played. The REG switch is just 

adjustable in RDS ON mode.

NEWS (ON/0FF) ADJUSTMENT

The NEWS switch could be activated or 

deactivated. The NEWS switch is just 

adjustable in RDS ON mode.

EON (DX/LO) ADJUSTMENT

In case of selection of LO switch the power 

stations is just received. In selection of DX 

switch  the  first  radio  station  received  by  the 

system regardless input signal power is played. 

The REG switch is just adjustable in RDS ON 

mode.

L-OUT (ON/OFF) ADJUSTMENT

You could activate/deactivate the Line-out 

output.

LCD (0 ~7) ADJUSTMENT

By selecting of this switch you could change 

the LCD lighting intensity.

MAINTENANCE

- Avoid any liquids inside the device. If so, 

dry it rapidly. Because the liquids will cause 

malfunction or electrical shock.

- Keep the device out of dust and pollution. 

These will cause external disadvantages.

- Precaution to carry the device. Strike or falling 

down could likely cause damages.

- To clean the dirty panel/monitor use silk tissue 

and natural substances.

AUDIO SYSTEM

-------------------------------------------------------------------------------------------------------------------------------------------------------------

-------------------------------------------------------------------------------------------------------------------------------------------------------------

59

2

AUDIO SYSTEM

ELECTRIC CONNECTORS

Diagram of bases of the CD player connector 

as follow:

Connector


C

Connector A

Performance

Position

Performance

Position

LINE OUT LEFT OUTPUT

C1

-

A1

LINE OUT RIGHT OUTPUT

C2

-

A2

LINE OUT EARTH

C3

INTENSITY CONTROL INPUT

A3

-

C4

BATTRY

A4

-

C5

ANTENA CONTROL

(ANT)

A5

Amplifier steering output

C6

LIGHTING (ILL)

A6

-

C7

ACC VOLTAGE 

A7

 Control Input on the Steering

C8

EARTH

A8

-

C9

CONNECTOR B

-

C10

 Control circuit earth on the

 steering

C11

Performance

Position

-

C12

REAR RIGHT SPEAKER +

B1

-

C13

REAR RIGHT SPEAKER

 -

B2

-

C14

FRONT RIGHT SPEAKER +

B3

-

C15

FRONT RIGHT SPEAKER -

B4

-

C16

FRONT LEFT SPEAKER +

B5

-

C17

FRONT LEFT SPEAKER -

B6

-

C18

REAR LEFT SPEAKER +

B7

-

C19

REAR LEFT SPEAKER -

B8

-

C20

-------------------------------------------------------------------------------------------------------------------------------------------------------------

-------------------------------------------------------------------------------------------------------------------------------------------------------------

60

2

AUDIO SYSTEM

DEFECT FINDER

The following controlled list could help you to solve some problems that may be occurred at the time of using the device. Before using, control all the 

connectors and the manual. Do never use the device at unusual conditions such as when the device is mute, at the time of fume or singe that may cause 

fire or electric shock. Here, you should turn it off immediately and contact to after sales agencies (Refer to the guarantee manual).

THE PROBLEM

DEFECT

SOLUTION

The device is not turned on

The switch off

On the switch

Not correct connection of the cables

Control the cables connection

The fuse is burned

Change the fuse with the same fuse

The disc is not inserted

There is another disc inside the device

Eject the previous disc

The disc is not readable

The disc is in reverse position

Insert the disc in correct position

The disc is dirty or damaged

Clean the disc or use another disc

High temperature inside the vehicle

Wait the cabin temperature decreases

The file format is not readable

 Check the disc format with the formats mentioned in

the manual

Mute

Minimum adjusting the sound volume or Mute mode

Control the sound volume or deactivate the mute

Incorrect connection of the cables

Control the cables connection

 While running the vehicle, vibration

causes the sound cut on/off

The device installation place is not firm

Install the device firmly with side parts

 It does not receive the radio

stations or with low quality

Install the antenna correctly

Incorrect installation of the antenna

 Open the antenna completely or in case of broking


change to a new one

 The memory saved stations

have been erased

The antenna is not completely opened or broken

 Connect the device battery power input to the vehicle

battery

Incorrect connection of the battery cable

-------------------------------------------------------------------------------------------------------------------------------------------------------------

-------------------------------------------------------------------------------------------------------------------------------------------------------------

61

2

HEATING / VENTILATION

Heating and Ventilation

The heating and ventilation system 

provides fresh or heated air to the interior 

of the car from the intake grille in front of 

the windshield.

NOTE: Keep the air grille in the rear 

window shelf uncovered to enable air flow 

through the whole of the interior.

CAUTION 

Heating and Air Conditioning System 

- To prevent the probable damage, use the distilled water in radiator.

- To help maintain optimum performance and durability of your air conditioner (even in winter), 

it needs to be operated at least once for about 10 minuets each 15 days .

- It is recommended the A/C system should be turned off before the engine. Charging of 

A/C gas  will be harmful to your A/C system.(except R-134a gas which is compatible with 

environment and non-destructive of Ozone layer)

WARNING

Do not open the coolant fluid circuit. 

This fluid is dangerous to the eyes 

and skin.

-------------------------------------------------------------------------------------------------------------------------------------------------------------

-------------------------------------------------------------------------------------------------------------------------------------------------------------

62

2

HEATING / VENTILATION

The following procedures will enable you 

to gain maximum benefit from the heating 

and ventilation system.

Maximizing Heating System

- Set all air vents 

towards foot wells.

- Slide temperature control lever to the 

red section.

- Slide blower speed control level to the 

right as needed.

Maximizing Cooling and Air Flow 

System

- Set the airflow-adjusting key on 

"face ward" position and be sure that the 

grilles are open.

- Slide temperature control lever to the 

blue section.

- Slide blower speed control lever to the 

right as needed.

- Turn on air conditioning. 

Center and Side Vents

Rotate the thumbwheel down to close 

the grill, and rotate up to open the grille.

Move the grille button to sides, up or 

down to adjust air flow.

-------------------------------------------------------------------------------------------------------------------------------------------------------------

-------------------------------------------------------------------------------------------------------------------------------------------------------------

63

2

HEATING AND AUTOMATIC VENTILATION

Automatic ventilation system

Turn on the engine and activate the 

keys.

1- Automatic functioning mode (Auto ) :

Cooling or heating along with demisting 

(Automatic)

This mode can be used through entire year 
and the temperature can be controlled 
according to the passenger wish.

- Setting the fan speed current are 

automatically done.

1 - Press the automatic (AUTO) button.

CAUTION

- Cooler functions only when the engine is on .

- Don't keep the children , old people and animals alone in the vehicle.

- The temperature goes on fast in n the hot and sunny days. The severe heat can 

harm or even cause to the death of the passengers.

- The circulation mode should not be used for a long time ;otherwise it causes the 

suffocation and the glasses to be vapory .

-  Avoid switching the heating and ventilation system buttons while driving to for 

complete attention to driving .

2. Set the desired temperature. (Red arrows 
temperature increase and Blue arrows 
temperature decrease)
- Adjust the normal temperature on  25 ° C .
- The temperature of the cabin will be 
automatically fixed. Air vents and fan speed 
are also controlled automatically.
2- Heater (ECON) 

use ECON mode in winter and in cooler 
silent mode (minimum fuel consumption).
1. Press the ECON button. Switch to the 
desired temperature.
ECON sign on the screen will be shown.
-The temperature inside the cabin will be 
automatically kept constant.
Air vents and fan speed will be also 
controlled automatically.

-------------------------------------------------------------------------------------------------------------------------------------------------------------

-------------------------------------------------------------------------------------------------------------------------------------------------------------

64

2

- Do not set the temperature lower than 

the temperature outside,

otherwise, the system may not work 

properly

- If the windows get vapory ,it's not 

recommended.

3- demisting, defrost the 

windshield 

1- Press the windshield air valves 

(DEF) button and turn it on .

indicator on the LCD (display) will light 

on .

2- Switch to the desired temperature 

(select the high temperature to 

accelerate the demisting).

- Soon after the windshield gets cleared 

of vapor and ice, press the  automatic 

button (AUTO) so that  the system 

returns to the automatic mode.

Demisting  and rear window 
defrosting mode

Press the button 

 (the symbol will 

appear on the screen) rear glass will be 

activated  by electric heating elements 

for a certain

4- Non-automatic function of  fan 

speed control 

* Press the fan control button to get 

fans as usual (Non-automatic) control.

Press the AUTO button to control the 

fan speed  automatically .

- Press the AUTO button so that  the 

system goes on to automatic mode.

5-Air flow control button

press the cabin air control 

button. The air circulation 

is adjustable to the fresh air (AIR 

FRESH) 

  or    flow  cabin 

according to the passenger selection. 

Press the AUTO button to switch the 

system to automatic mode. When the 

temperature in the cabin is high. to cool 

the cabin faster in AUTO mode select 

the air flow of cabin key.

6- Control of outlet vent


By pressing the MODE 

button control standard 

(non-automatic) vents (word MANUAL 

will be displayed) conducts the air into 

5 cases

Exhaust air from the front (face) is 

blown.

Exhaust air from the front (face) 

and the leg is blown.

The main stream of air is blown 

through the outlet side of the legs.

The air is blown beneath of the 

glass and foot.

The air is blown out of the glass.

7-Outside temperature (OUT 
TEMP button)

press the outside air temperature OUT 

TEMP button. The weather outside is 

visible on screen about 5 seconds .

8- Air Condition Service (Cooler)

Cooler system in your car 

has been with a cooling  gas which 

is meeting the environment principle 

rules .

"The cooling gas will not harm the 

ozone layer around the earth," though it 

may have little influence on the Earth's 

warmth. Special tools are required to 

charge and lubrication at the time of 

charging and  service.

Using inappropriate oil or gas will harm 

air conditioning system. Authorized 

representative is allowed to service or 

repair the air conditioners.

9- Rear window heater


It's used to demisting and 

HEATING AND AUTOMATIC VENTILATION

-------------------------------------------------------------------------------------------------------------------------------------------------------------

-------------------------------------------------------------------------------------------------------------------------------------------------------------

65

2

HEATING AND AUTOMATIC VENTILATION

defrosting of rear window and side 

mirrors 

10-Power off

Automatic air conditioning 

system gets off by this key off.

11- Temperature regulation

Press the temperature setting button 

to get the temperature controlled (non-

automatic)  If you press the AUTO 

button, the temperature is automatically 

controlled.

Automatic air condition system 

sensor

The system is equipped with sensors that 
controls the ventilation automatically. 
1. The light intensity sensor
- Location: Beneath of the windshield on the 
dashboard

Note:

 Avoid placing objects on the sensor.

2-Sensor for inside the cabin:
Location: under the steering wheel frame
-Don't create a barrier for the air flow to the 
sensor .
3. Defrosting Sensor
Location: Inside the HVAC ventilation 
system.
4. The outside temperature sensor
- Location: on the front bumper
5. Sensor for temperature of Engine water.

Note :

In the winter, when the engine and 

the outside temperature is low ; 

ventilation system fan will not work 

for  3 minutes until the engine 

temperature reaches to the desired 

limitation.

Automatic ventilation system is 

equipped with an air filter to prevent 

the entry of contaminated air and 

dust and smoke. Note to replace it 

according to the manual on its own 

proper time.

If the fan speed is poor or bad 

odor or incomplete demisting is 

observed; replace the filter.

Press the OFF button to turn off the 

ventilation system and then turn off 

the engine. prevent the blocking of 

the windshield valves.

Avoid placing the objects on light 

intensity sensor in the middle of the 

dashboard beneath the windshield; 

and the outside temperature sensor 

on front bumper.

-------------------------------------------------------------------------------------------------------------------------------------------------------------

-------------------------------------------------------------------------------------------------------------------------------------------------------------

66

2

CNG PARTS

CNG System: Engine Compartment 

Overview *

1. Regulator: Reduces the gas pressure 

from a maximum of 200 bar to 2 bar.

2. Hose (transferring gas to gas filter): 

Transfers the reduced pressure 

gas from the regulator to the fuel filter*.

3. Hose (transferring gas to fuel rail): 

Transfers the reduced pressure gas 

from the regulator to the fuel rail.

4. Fuel Rail: Gas entering the manifold 

passes through the fuel rail, and enters 

the manifold when the gas injectors 

open in the indicated times.

5. PT( Pressure- Temperature) Sensor: 

This sensor is mounted on the fuel rail 

and transfer the data to the ECU*.

6. Gas Hoses (Fuel Rail to Injector 

Nozzel): These flexible tubes allow gas 

to enter the intake manifold*.

7. Gas Filter: A device for screening the 

gasoline to remove the impurities from 

the fuel rail*.

8- Service manual Tap  :

The input gas track to engine 

compartment is opened and closed 

through this tap.

9. Electrical Control Unit (ECU): Adjusts 

the moment and time length of injector 

sprinkling and the timing of sparking in 

different engine conditions.

10. Input / Output Hot Water Hoses 

(Regulator): Transfers the heater water to 

the regulator to warm up and to prevent 

the regulator from freezing when operating 

on gas mode.

-------------------------------------------------------------------------------------------------------------------------------------------------------------

-------------------------------------------------------------------------------------------------------------------------------------------------------------

67

2

*If equipped

CNG FUEL SYSTEM

Introducing CNG Fuel syatem placed in 

trunk lid* 

1. Tank (Tanks): CNG is contained by 

200 bar pressure at highest.

2.Tank Valve: Limits and opens the gas 

passage at the end of the tank, and 

includes equipment which evacuate 

the gas tank when gas pressure and 

temperature exceeds the standard limit. 

If the pipes are cut, it limits the gas 

escape from the tank. 

3. Pipes & Gas Ventilation System: 

It transfers the High Tension Pipe of 

CNG to the regulator through outlet of 

reservoir valve with the pressure of 200 

bar.

Ventilation system transfer the gas 

outside the trunk if any leakages happen 

in connections. 

4. Filler: It is a part installed on the 

automobile for fueling the gas tank and 

it is connected to the fuel nozzle in the 

gas station.

CAUTION 

- Avoid keeping any object on the 

tank beside the tap or on the high 

tension pipe.

- Avoid keeping any sharp objects 

beside the tank ,which cause the 

damage to the CNG equipment in 

the boots. 

-ensure that tank tap is closed before 

ant repair process. 

-------------------------------------------------------------------------------------------------------------------------------------------------------------

-------------------------------------------------------------------------------------------------------------------------------------------------------------

68

2

Anti-Lock Braking System (ABS)

Anti-lock braking system is one of the car 

new and control systems preventing the 

wheels from locking on slippery roads, or 

by intense braking on dry roads. Therefore, 

it reduces the brake distance, steer ability, 

improves stability, and increases car safety 

in general.

When using a car equipped with anti 

lock brake system always consider the 

following points:
−Since the anti lock braking system is only 

for balancing the brake force, therefore 

when braking sufficiently press the brake 

pedal.
− Feeling brake pedal vibrations under the 

foot while braking over unstable roads or 

sudden braking is normal and caused by the 

operation of the anti-lock braking system.
In this situation press sufficiently the brake 

pedal  with  confidence  making  sure  of 

proper function of braking system.

−Hearing  beating  wise  noise  from  front 

and rear wheels when braking over 

slippery roads or sudden braking is normal 

and due to the correct operation of the anti-

lock braking system.
−Anti-lock braking system is equipped with 

an automatic defect finding system that will 

light the anti-lock braking system warning 

indicator, on  displaying instrument panel 

in case of a problem.
−When  the  car  is  turned  on,  the  anti-

lock braking system warning indicator on 

displaying instrument panel gets on and 

will turn off after a few seconds. If the 

warning indicator does not light when the 

car is turned on or remains lit, it's a sign of 

problem in the anti-lock braking system. In 

this situation the car should be directed to 

an authorized workshop for diagnosis by 

computerized system of defect finder.
It's good to bring to your notice in case of 

damage or presence of any problem in anti-

lock braking system, your vehicle has just 

the capability of an ordinary braking system.

−If the handbrake is completely released 

and both the handbrake indicator and anti- 

lock braking system warning indicator are 

lit, on displaying instrument panel, stop the 

car with precaution and contact a nearest 

authorized workshop.
The brake dragging distance will be more 

while you're driving on sloppy surfaces.

Make sure of proper functioning of the 

brake after washing the vehicle or while 

you're passing from the puddles.

ANTI - LOCK BRAKING SYSTEM

-------------------------------------------------------------------------------------------------------------------------------------------------------------

-------------------------------------------------------------------------------------------------------------------------------------------------------------

69

2

ANTI - LOCK BRAKING SYSTEM

CAUTION
-Operation of  ABS brake system is independent of pressure imposed to the brake 
pedal. Therefore in emergency situations, it is recommended  to use a strong and 
continuous pressure on the brake pedal. It is not necessary to apply pressures one after 
another. (Filling or pressurizing the brake pump).
-For  trouble  shooting  and  servicing  of  Anti  Brake  System,  definitely  approach  
authorized workshops and strictly avoid attending in sundry places.

WARNINGS

-This system shall never be considered as a factor to encourage sudden acceleration 

and driving with more speed.

Therefore it can not substitute the accuracy, precautions and responsibilities during 

driving .

This operation is an auxiliary aid which during driving in emergency situations, controls 

it’s behavior proportional to the existing conditions of driving.

-Seriously Avoid driving with unpermitted speed in passage ways, specially in slippery 

loads with reliance to the Anti Brake System and always follow the safety factors.

-------------------------------------------------------------------------------------------------------------------------------------------------------------


Content      ..     2      3      4      5     ..