Iran Khodro Pars. Service Manual - part 2


  Index      Manuals     Iran Khodro Pars. Service Manual


Search            copyright infringement  


Content      ..      1      2      3      ..


Iran Khodro Pars. Service Manual - part 2


-------------------------------------------------------------------------------------------------------------------------------------------------------------

21

1

PARS AT A GLANCE

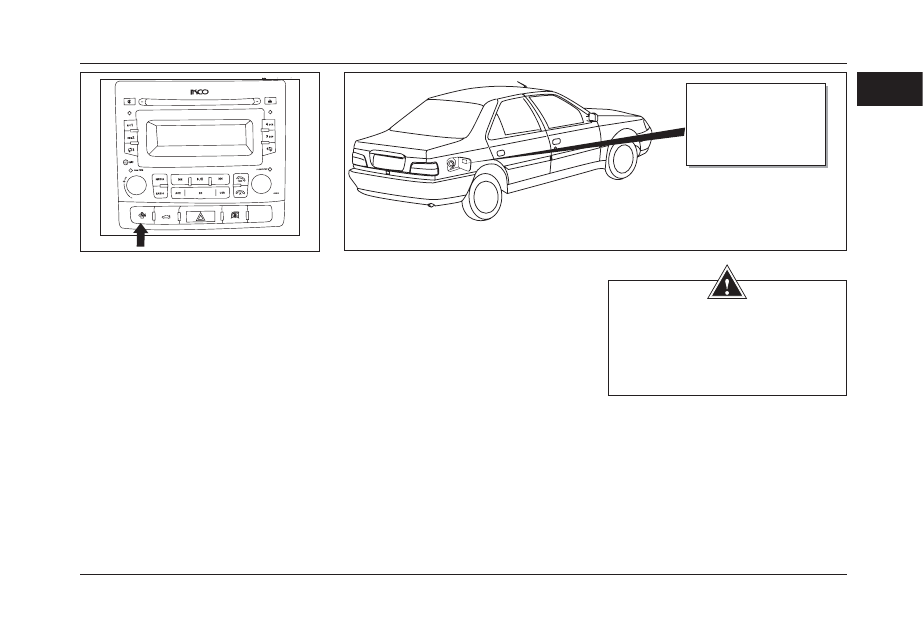
Ignition and driving on CNG fuel mode*

The engine is always ignited on gasoline. 

The fuel conversion is carried out by the 

conversion key on the middle console. 

The CNG fuel selection is possible in the 

following situation:

a) Before starting

b) While driving

c) Igniting the car on the gas mode directly

Fuel type

The fuel used on your car unleaded 

premium gasoline with octane number 

(RON) of 95. In the event a fuel other than 

that specified above is used, the internal 

parts may get damaged because of the 

auto-ignition and knocking.

A premium petrol with octan(RON) 
95 must be used. Avoid entering 
the nozzle into the tank completely. 
Applying the fuel additives aren't 
permitted for this vehicle.

WARNING

The failure to use non-leaded premium 

gasoline will damage the catalytic 

converter. Avoid strictly of combining 

any liquid with the standard fuel.

*If equipped

-------------------------------------------------------------------------------------------------------------------------------------------------------------

-------------------------------------------------------------------------------------------------------------------------------------------------------------

22

1

PARS AT A GLANCE

Audio system control panel 

1- Off/ On

- volume  turning :Sound adjustment .

2- Mute

3- Disc Input

4- Disply screen

5- Eject button.

6- Manual adjustment of frequency  .

- Selecting previous/next music.

7-Response to received call.

8- rejection.

9- Automatic search for stations by 

increase of frequency.

- Selecting next music.

10- play/stop

11-Automatic search for stations by 

decrease of frequency..

- Selecting previous music.

12- USB/SC/AUX cap

13- Exchange of radio bands.

14- Selecting of player(CD/USB/SD/

AUXIN)

-------------------------------------------------------------------------------------------------------------------------------------------------------------

-------------------------------------------------------------------------------------------------------------------------------------------------------------

23

BEFORE DRIVING

2

LOCKING/UNLOCKING ...................................................24

IMMOBILIZER ...................................................................28

ELECTRIC SIDEGLASS LIFTER ....................................29

INTELLIGENT WINDSCREEN* .......................................31

SEATS ............................................................................... 33

SAFETY BELTS ................................................................36

CHILD SAFETY  ............................................................... 38

MIRRORS  ......................................................................... 40

FOLDING EXTERIOR MIRROR(ELECTRICAL)* ...........41

FIRE EXSTINGUISHER *  ............................................... 42

LIGHTS AND INDICATORS  ........................................... 44

GLASS CLEANERS AND WINDSHIELD WIPER ..........46

REVERSE GEAR WARNING SYSTEM  .........................47

HANDSFREE CELL PHONE ...........................................48

AUDIO SYSTEM  ...............................................................50

AUTOMATIC AIR CONDITIONING  .................................63

CNG PARTS *  ...................................................................66

ANTI-LOCK BRAKING SYSTEM ....................................68

INTERIOR EQUIPMENT ...................................................70

AIR BAG ........................................................................... 73

*If equipped

-------------------------------------------------------------------------------------------------------------------------------------------------------------

-------------------------------------------------------------------------------------------------------------------------------------------------------------

24

2

LOCKING / UNLOCKING

Locking and unlocking of the doors:

Side doors, rear trunk door, fuel tank 

cap cover:

1- With the use of key: 

For opening the door, pull up the external 

handle.

From inside:

Push down the interior locking button, 

door will be locked. For opening the lock, 

pull up the same button and for opening 

the door, pull the interior handle.

NOTE

Frequent pressing of the keys in 

short intervals will cause the keys 

functioning cessation for 20 seconds.

2- With the use of key (switch) and 

central locking system:

All doors, rear trunk and fuel tank cap cover, 

can be opened or closed simultaneously with 

the help of switch key from outside and the 

locking buttons on front doors from inside.

Vehicle: after locking doors by central 

locking system , the rear trunk door can 

be opened  by the use of main switch key 

and it’s turning anti clockwise (from A to 

B).

3-With the use of remote control: *

Keep the remote control key towards the 

car:

- Press the key no.1 to open the door. 

(anti theft system will be turned off)

- Press the key no.2 to luck the door.   

(anti theft system will be turned on)

- The boot will get open by two successive 

pressing or in some models holding the key 

for 5 seconds.

4- Children safety lock:

To avoid opening of rear doors from 

inside, push down the safety lock button.

-------------------------------------------------------------------------------------------------------------------------------------------------------------

-------------------------------------------------------------------------------------------------------------------------------------------------------------

25

2

LOCKING / UNLOCKING

Battery Replacement of the Remote 

Control Switch

If the indicator light on switch is not blinked 

or the key is not functioned correctly, it is 

necessary the battery be replaced.

1- Separate the part 1 and 2 with the help 

of hand pressing  from the described line. 

2- Then separate the upper  and  Lower part 

of the section 2 by hand pressing  (fig B). 

3- Remove the discharged battery and 

replace the new one. Ensure the battery 

has been inserted properly(fig C).Use the 

battery of CR 2032.

4- Put the upper and lower part on each 

other and insert it by hand pressing. 

5- Put part 1 and 2 on each other and 

insert it by hand pressing.

WARNING

Never discard used batteries in nature. 

Give them to organizations responsible for 

collecting and recycling this kind of batteries.

WARNING

Avoid keeping the battery or remote controller 

in infants' access, because swallowing of 

the battery can cause death. In case of 

swallowing the battery, refer to health care 

centers immediately.

Battery replacement of the remote 

control*

If the key is not functioned correctly, it is 

necessary the battery be replaced. For 

replacement  of  the  battery,  first  open 

the buckle and separate the switch 

back frame with proper pressure to gap 

between  up/down  frame.  Confirmed 

battery is CR2032.

Remember, even, when the remote 

control batteries have been discharged, 

central key system operates by the key. 

If it's possible, don't utilize used batteries.

-------------------------------------------------------------------------------------------------------------------------------------------------------------

-------------------------------------------------------------------------------------------------------------------------------------------------------------

26

2

LOCKING / UNLOCKING

Locking and unlocking of the engine 

cover door:

1- From inside: Pull the interior handle 

below the dashboard until the lock is 

released. 

2- From outside: pull the safety holder 

beneath the engine cover door towards 

yourself until the safety lock is released.

To keep the engine door open, use the 

leaning rod. To close the engine door, 

bring down the leaning rod and 

leave the 

door to drop by itself from  a distance 

about 20 centimeters. Make sure that 

the door is completely locked.

-------------------------------------------------------------------------------------------------------------------------------------------------------------

-------------------------------------------------------------------------------------------------------------------------------------------------------------

27

2

LOCKING / UNLOCKING

Fuel Filler Flap 

3- To open Fuel Filler Flap press the 

frontal flap of tank valve. There is a place 

on internal side wall of valve to keep the lid 

to prevent being lost.

(Before completely removing of tank lid 

wait for a few moments until the present 

gases in the tank gets out.)

Fuel filler flap has been joint to the Tank 

vent to prevent to be lost.

Opening the fuel filler flap in emergency 

situations

4- If the central locking system does not 

operate, you can open the flap from inside 

the trunk.

- Remove the upholstery of the inner right 

wall of the trunk.

- Pull back the tongue of the fuel filler-flap lock. 

CAUTION 

The utilizable gasoline in engines is 

unleaded gasoline octane 95. If any 

other fuel is consumed, it is possible to 

damage internal parts due auto-ignition 

phenomenon and impact.

Avoid entering the nozzle into the tank 

completely. Applying the fuel additives 

aren't permitted for this vehicle.

WARNING

Since the gasoline in the fuel tank 

maybe under pressure, never open the 

fuel cap suddenly in order to prevent 

danger. Loose the cap slowly and 

carefully till the HISS sound stops, and 

then open tthe cap fully. Considering 

the danger of gas mist, never fill the fuel 

tank while the engine is running. Please 

keep away of any sparkles, flames…

near the spilt gas.

3

-------------------------------------------------------------------------------------------------------------------------------------------------------------

-------------------------------------------------------------------------------------------------------------------------------------------------------------

28

2

*If equipped

ANTI-THEFT SECURITY SYSTEM (IMMOBILIZER)

Anti-Theft SecuritySystem (Immobilizer) 

The vehicle with immobilizer system, 

can only start up with two keys which is 

delivered to customer with the vehicle. 

NOTICE: 

- Copying key is not enough for start up. It is 

possible to have more keys if the customer 

requests and only in IRAN KHODRO dealers 

with the DIAG tool. 

- A number  has been carved on the key 

plate for replacing the key. Therefore keep 

the plate in a safe place an never inside the 

car.

To maintain better and usage of your 

vehicle, it is necessary to pay attention to 

the following tips: 

1. Keys have electronic chip inside which 

contains information of key codes, so avoid 

putting them near powerful electro magnetic 

and electrical scopes. 

2.When delivery the vehicle, there is a card 

which is shown in left picture with the keys. 

Existence of this card is necessary in cases 

like multiplying the key (from 2 up 5 at max) 

or replacement of lost key, replacement of 

electronic unit ofAnti-theftsecurity system 

(immobilizer) or replacement of ECU with 

ownership document of vehicle. Above 

functions are impossible if the card is lost and 

leads to replace whole security system. All 

costs due to careless keeping must be paid 

by owner.

ATTENTION 

This system will check the engine's 

electronic system, a little after the 

engine is turned off and thus prevent 

anyone without the main key from 

turning on the engine.

NOTE

There is possibility of breakage for 

internal parts of the remote controller in 

case of sever impact and subsequently 

not functioning of the immobilizer.

CAUTION 

-The anti-theft system your vehicle is equipped with is one of the soundest security systems, 

increasing the vehicle's security ratio, without need of doing any special functions. Naturally 

this should not make the vehicle owner careless regarding proper and adequate protection of 

his car.

-If when starting the vehicle, the engine's flashing fault light or special immoblizer light get 

activated by blinking, close the switch and remove it first and start again after 10 seconds. In 

case of not being get on, avoid frequent starting and refer to authorized representatives for 

advice and correction of the system's defect.

-Any repairs or changes in the ant burglary system (electronic box, wiring, etc.) are strictly 

forbidden. 

-------------------------------------------------------------------------------------------------------------------------------------------------------------

-------------------------------------------------------------------------------------------------------------------------------------------------------------

29

2

ELECTRIC WINDOW

Electric side glass lifter 

1- Electric Side glass lifter of driver 

Manual mode : Press or pull the key gently; 

the glass stops moving soon after realizing 

the key.

Auto mode : Press or pull the key severely 

and continuously ; the glass gets opened 

or closed completely .

It's possible for the glasses to be opened 

automatically, while the ignition switch is on .

2- Electric side glass lifter of passenger.

3-left and rear side Electric glass lifter.

4- Right and rear Electric glass lifter.

3

1

7

2

4

*If equipped

5- locking key of rear glass lifter :

This key prevent the function of rear glass

lifter keys .

Rear and front electric side glass lifters will

function, 30 seconds after deactivating 

ignition switch or while it is on.

-------------------------------------------------------------------------------------------------------------------------------------------------------------

-------------------------------------------------------------------------------------------------------------------------------------------------------------

31

2

*If equipped

INTELLIGENT WINDSCREEN SWITCHES

Intelligent windscreen Switches* 

The new intelligent windscreen switch 

installed in your vehicle is endowed 

with an electronic board providing the 

following advantages: 

1- Anti-Pinch safety system

2- Automatic closing the windscreens 

while leaving the vehicle 

3- Automatic shift command of the four 

windscreens 

4-Slow coming to a halt of the windscreen 

at the end of the course. 

Anti-pinch safety system

This is a safety system which prevents 

the body parts from getting caught while 

the windscreen switch is on its upward 

course. In this system if the windscreen 

gets in contact with an obstacle while 

in its upward course, it comes to a halt 

immediately and moves in the reverse 

direction, thus it will prevent the inflicting of 

heavy injuries to the infant. Furthermore, 

the above system will insure the longer 

useful life of the windscreen switches.

Automatic window closing

When the vehicle is turned off and its 

doors locked using remote control, this 

system will check the car windows one 

by one and raise the windows that are not 

closed properly. This security system will 

take care of security risks of forgetting to 

close all the car windows and will let the 

driver leave his car with peace of mind.

WARNING 

Despite the anti pinch safety system, 

the electrical windscreen switches 

can only prevent the inflicting of heavy 

injuries caused by the application of the 

undue force. Therefore, it is advisable 

to respect the necessary precautions in 

this regard.

CAUTION 

Always make sure all four windows are 

automatically closed, before leaving 

car's parking place.

-------------------------------------------------------------------------------------------------------------------------------------------------------------

-------------------------------------------------------------------------------------------------------------------------------------------------------------

32

2

*If equipped

INTELLIGENT WINDSCREEN SWITCHES

Automatic order for movement of the 

four windows

This system will provide the option to lower 

or raise the windows, both manually and 

automatically for each window. In ordinary 

vehicles only raising of the driver's window 

is automatic. 

- Manual mode: 

Press the button of the respective windscreen 

and press it consecutively. As soon as the 

application of pressure on the button ceases, 

the windscreen will stop. 

-Automatic mode:

By pressing the button once, the windscreen 

will open or close completely. The new 

windscreen switches will make you able 

to open or close manually/ automatically 

the four windscreens simultaneously. In 

the event the button is pushed once, the 

windscreen will automatically go upward or 

downward course.If the button is pressed 

consecutively (for a longer time), the 

windscreen is operated in the upward or 

downward direction till the pressure exerts 

on the button; in that case the movement 

come to a standstill immediately. 

NOTE

While adjusting the system, the 

anti-pinch system is deactivated.

Slow coming to a half of the windscreen 

at the end of the course* 

In this system the pace of the window 

screen will automatically reduce at the end 

of the course till it stops gradually at the end. 

In this case, there will be no or less impact 

on the door. This system eliminates the 

unpleasant noise arising from the sudden 

stoppage of the switch at its final course and 

increases the useful life of the internal door 

parts. (Obviously the anti-pinch system is 

both operated manually and automatically 

and in the event the windscreen gets in 

contact with an obstacle while in its upward 

course, it comes to a halt immediately and 

moves in the reverse direction). 

note: The intelligent windscreen switch 

is equipped with a sensor which precisely 

registers the windscreen position at any 

moment. To distinguish the starting and 

finishing points of the windscreen movement 

domain, the preliminary readjustments of 

the windscreen electronic system are made 

in the factory. If for any reason such the 

opening of the battery leads the permanent 

energizing of the window switch ceases,the 

preliminary adjustments are wiped from 

the memory and the new abilities of the 

intelligent window switch cease to operate. 

Following the permanent re-energizing of 

the system, the preliminary readjustments 

and start-up of the windscreen switch have 

to be made again. 

This includes the following stages and 

could be easily done by the owner in the 

following manner:

1- Lower the windscreen to the end of the 

course. 

2- Raise the windscreen manually to the 

end of the course (In automatic mode, it 

will be deactivated). 

3- Upon the movement of the windscreen 

to the end of the course, hold the button 

just for a second.

-------------------------------------------------------------------------------------------------------------------------------------------------------------

-------------------------------------------------------------------------------------------------------------------------------------------------------------

33

2

*If equipped

For Driver Seat

SEATS

Forwards and backwards of the seat 

1- Pull the control lever upwards.

2- Take the seat to the favorite position  

with the help of your body.

3- Release the lever until it gets locked. 

ensure the seat is tighten on its own 

 position firmly before moving

Adjustment of seat back

1-Turn the control lever upwards.

2- Take the seat to the favorite position  

    with the help of your body.

3- Release the lever until it gets locked. 

Ensure the seat is tighten on its own 

position firmly before moving.

Seat height adjustment * 

To adjust the seat ;pull the lever upwards 

(for increase of height) and press  the 

lever downwards (for decrease of height) 

while you're sitting on the seat.

WARNING

- Seatbacks should always be in upright position when vehicle is moving. Seat belts are 

designed to offer maximum protection when seatbacks angle with vertical line is about 25 

degrees.

- Do not adjust the seat when vehicle  is moving.

- In order to install the seat cover for the second time, be careful that the seat cover clamps are 

not being hindering of the action of the driver's seat regulation rods.

- Open and close the chair must be performed in accordance with procedures and safety tips. If 

necessary to open and close the seat, must certainly refer to authorized repair shops.

For Front Seats*

-------------------------------------------------------------------------------------------------------------------------------------------------------------

-------------------------------------------------------------------------------------------------------------------------------------------------------------

34

2

*If equipped

WARNING

Make sure the leg of the rear passenger 

is not under the seat when you lower 

your seat.

Do not adjust the seat while driving. 

Since the head restraint is a safety 

device, make sure it is properly secured 

in its place.

WARNING

It is necessary to adjust the height of the 

head restraint with the head position, 

as per the above illustrations, in order 

to reduce safety hazards to driver and 

front passenger.

Electrical adjustment of Seat back

Press the electrical adjusting key for seat 

back adjustment after you turning on the 

ignition switch; so that the seat back is 

located in your favorite position.

Adjusting head restraints

Pull head restraint upward to be level 

with the head. To lower the restraint, push 

down on the restraint.

(Press the lock latch towards the 

inside  first;  and  then  pull  the  seat  back 

downwards or upwards)*

Note: since removing of the head restraint 

is very difficult and may damage the seat. 

Except in emergency cases do not remove 

head restraint.

Head position 

Head restraints are designed to protect 

the head from being thrown back  in case 

of an accident or sudden stops. Its proper 

adjustment reduces the risk of head and 

neck injuries. 

Meanwhile the head restraint is movable 

forwards and backwards in its position 

(see above figure)

SEATS

-------------------------------------------------------------------------------------------------------------------------------------------------------------

-------------------------------------------------------------------------------------------------------------------------------------------------------------

35

2

SEATS

*If equipped

Side Hooks

Rear Seats:

In  PEUGEOT PARS, the back seat is in 

one piece. To take the seat out, pull up 

the middle front edge of the seat a little 

bit until the peaks of the hooks on sides 

of the seat comes out. Then take out the 

seat away from leaning part. To take out 

the leaning part, from the rear trunk , bring 

the carpet to a side, with the help of an 

especial hook, dislocate the peaks of the 

hooks on leaning part and simultaneously 

pull up the leaning part, so that the upper 

hooks are also released.

CAUTION

Do not put extra or thick matt under the 

Driver’s feet, because none standard 

matt restricts the complete course of 

clutch and  smooth changing of gears.

WARNING

Make sure that during lowering the 

seat, the foot of the back passenger 

dose not come under the seat.

-In spite of the fact that the headrest is 

a safety device, make sure about it’s 

presence, correct location and correct 

position.

-There should not be any device placed 

on the floor ( In front of Driver side), 

because in case of intense braking, 

these devices can be shifted beneath 

thePedals and restrict using of them.

- Do not adjust the seat when vehicle 

  is moving.

-------------------------------------------------------------------------------------------------------------------------------------------------------------

-------------------------------------------------------------------------------------------------------------------------------------------------------------

36

2

Fastening the belt :

Pass the seat belt across the shoulder and 

the chest and assure not to be twisted. 

Insert the metal latch  in the special lock 

so that you can hear the sound of clop 

after insertion .By doing this the relevant 

warning light of seat belt gets off on 

instrument cluster.

Release of the seat belt :

Press the red knob on the belt lock.

Belt are designed in such a manner to 

include the whole body and are useful 

only while they're in vertical position.

WARNING

Seat belt are useful only while they're 

near to the vertical position .Don't 

allow the front passengers to use the 

seat with declined position. By doing 

this the relevant warning light of seat 

belt gets off on instrument cluster.

WARNINGS

To not reduce the effectiveness of 

safety belts and to prevent injury, place 

belt shoulder pad on the shoulder. 

Make sure that the backrest is placed 

in the proper location.

Avoid any external or sticky material to 

enter the lock slit; causing the improper 

function of the lock .

Height adjustment of front seat belt :

Pull out the adjusting knob and take it up or 

down for a few scale.

It's better for the children to use only from rear 

seat belts.

The belt equipped with power restricting 

system

At the time of accident the safety will be 

increased via this system and the impact result 

in accident will be decreased on the chest by  

utilizing the system. 

the belt equipped with power restricting system 

functions only once at the time of air bag being 

activated and after one function ,it must be 

changed by authorized IKCO representatives.

SAFETY BELTS

-------------------------------------------------------------------------------------------------------------------------------------------------------------

-------------------------------------------------------------------------------------------------------------------------------------------------------------

37

2

SAFETY BELTS

Seat Belts Safety Tips 

Seat belts are designed for people of adult 

size, and they must be used by only one 

person at a time. Always make sure that all 

passengers' belts are fastened (properly), 

and consider the following. 

Precautions: 

- Do not let passengers recline the seats 

extremely rearwards. The complete 

performance is gained when backrest angle 

is about 25 ° from vertical axis. 

- Adjust safety belts to eliminate any slacks. 

Do not pull the belt away from the body 

while running. To operate properly, safety 

belts should be worn as tightly as possible. 

- The lap part of the belt should not go over 

the abdomen but pelvic bones. The shoulder 

belt should go over the shoulder and across 

the chest without any pressure to the neck. 

- Remove hard, sharp or fragile objects 

as keys, pens, glasses and etc. from your 

clothes. The belt should not be twisted, and 

there would be no obstacle in between. 

- Replace seat belts if they are worn, lost 

their sensitivity or damaged.

- Use the seat belts to fix luggage carried 

on the seats. Throwing loose packages 

in passengers’ compartment during an 

accident can cause serious injuries. 

- In most countries, all passengers are 

legally obligated to wear safety belts 

unless be exempted on medical certificate. 

- Pregnant women should pass the shoulder 

portion across the shoulder, breast cleavage 

and from one side of the fetus. If in doubt, 

consult your physician.

-The belt is equipped with power restricting 

system to control the impact incurred to the 

passenger chest in any probable accidents.

-------------------------------------------------------------------------------------------------------------------------------------------------------------


Content      ..      1      2      3      ..