CFMoto ATV CF800-2 4x4. Service Manual - part 7


  Index      Manuals     CFMoto ATV CF800-2 4x4. Service Manual


Search            copyright infringement  


Content      ..     5      6      7      8     ..


CFMoto ATV CF800-2 4x4. Service Manual - part 7


Engine oil check 

7.


If the engine oil is at or below the lower limit mark

,

add sufficient oil of the recommended type to


raise


it


to


the


correct level.

8. Insert the dipstick into the oil filler hole, and then tighten it.

9. Install plastic cover 

①。

To change engine oil

1. 

Start the engine, warm it up for 2~3 minutes, and then stop the engine.

2. 

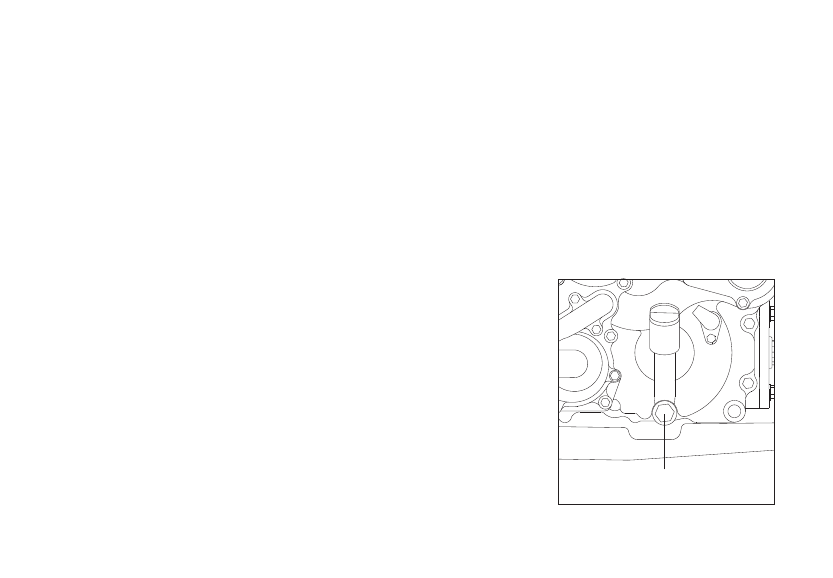
Place an oil pan under the engine to collect the used oil, 

and then remove the engine oil dipstick.

3. 

① 

Remove the engine oil drain bolt

to drain the oil from the

 crankcase.

-99-

Maintenance & Lubrication

-------------------------------------------------------------------------------------------------------------------------------------------------------------

Oil filter replacement

1. Use wrench to unscrew 3 pcs of bolts 

① 

as right picture shows.

Then remove cover 

② 

of


oil


filter and remove oil filter 

③. 

2. Install new oil filter on it.

Attention

Confirm


if


O

-

ring

 ④ 

is good and then install it into


groove of crankcase correctively.


3. Install new oil filter 

③ ,

and use wrench to tighten 3 pcs of bolts

 ① 

on


cover

 ②

by specified torque.

NOTE

Tightening torque of bolt 

①:

10 N

·

m


4. Use new washer to assemble and tighten oil drain bolt as specified torque.

NOTE

Tightening torque of drain bolt: 30 N

·

m

5. 

Add the specified amount of recommended engine oil, and then insert

 the engine oil dipstick and tighten it.

NOTE

In case of engine overhaul, oil should be added

3.5 L

Without oil filter cartridge replacement, oil should be added: 3.3 L


With oil filter cartridge replacement, oil should be added: 3.4L

:

:

:

6.


Start the engine and warm it up for several minutes. While warming up,check for oil leakage. If oil


leakage


is found, turn the engine off immediately and check for the cause.

7.


Turn the engine off, and then check the oil level and correct it if necessary

.

-100-

-------------------------------------------------------------------------------------------------------------------------------------------------------------

Rear gear case oil

The rear gear case must be checked for oil leakage before each


ride

.

If


any leakage is found

,

have your dealer check and repair


the


ATV

.

Rear gear oil change

1. Place the machine on a level place.
2. Place a container under the rear gear case to collect the used oil.

3. Remove oil drain bolt

 ① 

as


right


picture


shows and drain used oil.

4. Add recommended gear oil into rear gear case.

5. Install and tighten drain bolt as specified torque after adding new gear oil.

NOTE

Tightening torque of drain bolt: 23N.m

NOTE

Periodic oil change

0.25 L


Oil capacity of rear gear case

0.30 L

-101-

Maintenance & Lubrication

-------------------------------------------------------------------------------------------------------------------------------------------------------------

6

Check if any oil leakage. In case of leakage, please find causes and remove it

.

Attention:

 Be sure foreign material enters the

 rear gear case.

Front gear case oil measurement

1.


Place the machine on a level place.

2.


② 

Remove the oil filler bolt


and check the oil level.


It should be up to the brim of the hole.If the level is


low,


add sufficient oil to raise it to the specified level.

3. 

Install the oil filler bolt and tighten it to the specified


torque

.

NOTE

Oil filler bolt tightening torque

23 N

·

m

Front gear case oil change

1. Place the machine on a level place.

2. Place a container under the front gear case to catch the oil.

3. Remove oil filler bolt and drain bolt 

① 

at


the bottom of front


gear case, and drain used oil.

-102-

Maintenance & Lubrication

-------------------------------------------------------------------------------------------------------------------------------------------------------------

Front gear case oil change

4. 

Install the drain bolt and tighten it to the specified torque.

NOTE

Drain bolt tightening torque:


10 N

.

5.


Fill the front gear case with oil

NOTE

Periodic oil change

0.28 L

Oil capacity

0.33 L


6. Install the filler bolt ② as page 102 shows 

and tighten it to the specified torque.

7. Check for oil leakage. If oil leakage is found, check for the cause.

NOTE

Be sure no foreign material enters the front gear case

.

-103-

Maintenance & Lubrication

-------------------------------------------------------------------------------------------------------------------------------------------------------------

Cooling system

1. Place the ATV on a level surface.
2. Check the coolant level in the coolant reservoir when the engine is cold as the coolant level will 
vary with engine temperature.

NOTE

The coolant should be between the upper 

② 

and lower

 ③ 

limit marks

.

Cooling system

3. If the coolant is at or below the lower limit mark, remove the reservoir


cap

,

add


coolant to the upper


limit mark, install the reservoir cap, and then install the panel.

NOTE

Lowest capacity of coolant reservoir

: 

0.38


L

CAUTION

Hard water or salt water is harmful to the


engine.You may use soft water if you can not get


distilled 

water.

Attention

If water is added

,

have your dealer check the antifreeze content of the coolant as soon as possible. 

The radiator fan operation is completely automatic. It is switched on or off according to the coolant 

temperature in the radiator

-104-

Maintenance & Lubrication

-------------------------------------------------------------------------------------------------------------------------------------------------------------

Changing the coolant

1. Place the ATV on a level surface.

2

.

Place a container under the engine, and then remove the coolant drain bolt

①. (

Use a trough or

 a similar object as shown page 107 to prevent coolant from spilling on the footrest.)

3

.

Remove the radiator cap.

4

.

Remove the coolant reservoir cap.

DANGER

After stop the engine, you cannot remove cap of radiator immediately

Wait


for a while to cool down the coolant


and


then remove radiator cap

.


Otherwise hot coolant will goes out to hurt people nearby

.

5

.

Disconnect the hose on the coolant reservoir side, and then drain the

coolant from the coolant reservoir.

6

.

After draining the coolant, thoroughly flush the cooling system with 

clean tap water.

7

.

Replace the coolant drain bolt washer if it is damaged, and then tighten the coolant drain bolt to

 the specified torque.

-105-

Maintenance & Lubrication

-------------------------------------------------------------------------------------------------------------------------------------------------------------

Coolant drain bolt tightening torque

10 N

·

NOTE

8

.

Install the coolant reservoir hose.

9

.

Fill the recommended coolant into the radiator until it is full.

When filling coolant, at the same time to loosen tapping screw 

as right picture 

① 

shows


in order to drain potential air bubbles


inside the coolant hose, until coolant goes out, then tighten the


screw

.

NOTE

Recommended antifreeze:
High quality ethylene glycol antifreeze containing corrosion inhibitors

 for aluminum engines. Antifreeze and water mixing ratio:1:1

Coolant capacity: 3.0


L

.

Coolant change

2.9


L

.

Coolant reservoir capacity:0.38~0.6L

-106-

Maintenance & Lubrication

-------------------------------------------------------------------------------------------------------------------------------------------------------------

CAUTION

Hard water or salt water is harmful to the engine. 

Please use CFMOTO recommended coolant.

10

.

Install the radiator cap.

11

.

Start the engine and let it idle for several minutes

.

Stop the engine

,

and then check the

 coolant level in the radiator. If it is low, add more coolant until it reaches the top of the radiator.

12

.

Fill the coolant reservoir with coolant up to the upper limit.

13

.

Install the coolant reservoir cap and check for coolant leakage.

NOTE

If any leakage is found

,

have your dealer check the cooling system. 

14

Install the panels and the front rack.

-107-

Maintenance & Lubrication

-------------------------------------------------------------------------------------------------------------------------------------------------------------

Axle dust boots

Check the protective boots for holes or wears.
If any damage is found, have them replaced by your dealer.

Spark plug inspection

Removal

1. Remove the panel.

2. Remove the spark plug cap

①.

3. Use the spark plug wrench in the tool kit to remove the

 spark plug as shown.

-108-

Maintenance & Lubrication

-------------------------------------------------------------------------------------------------------------------------------------------------------------

Inspection

The spark plug is an important engine component and is easy 

 to inspect. The condition of the spark plug can indicate the 

condition of the engine. The ideal color on the white insulator

 around the center electrode is a medium-to-light tan color for

  a  ATV that is being ridden normally. Do not attempt to

 diagnose such problems yourself. Instead, take the ATV to 

your dealer. You should periodically remove and inspect the 

spark plug because heat and deposits will cause


the spark

 plug to slowly break down and erode. If electrode erosion

 becomes excessive, or if carbon and other deposits are 

excessive, you should replace the spark plug with the 

specified plug. 

NOTE

Specified spark plug

DCPR8E (NGK)


Installation

Measure the electrode gap with a wire thickness gauge and,


if 

necessary, adjust the gap to


specifications.

NOTE

:

:

Spark plug gap: 0.8

0.9 mm

2. Clean the gasket surface. Wipe off any grime from the threads.
3. Install spark plug and tighten to specified torque.

-109-

Maintenance & Lubrication

-------------------------------------------------------------------------------------------------------------------------------------------------------------

NOTE

Tightening torque of spark plug: 20N·m

:

If a torque wrench is not available when you are installing a spark plug, a good estimate of the correct

 torque is 1/4 to 1/2 turn past finger tight. Have the spark plug tightened to the specified torque as 

soon as possible.

4. Install the spark plug cap.

5. Install the panel.

Air filter element cleaning

There


is a check hose 

at


the


bottom of the


air


filter case.

① 

 If dust or water collects in this hose

,

empty the hose and clean


the air filter element and air filter case. If there

'

s a lot for water, 

please contact your local dealer to check if any water inside 

crankcase

.

1.  Remove seat and disassemble cover of air filter.
2.  Remove spring 

① 

and remove upper cover of air filter 

②.

3

Remove bolt of pipe clamp

③.

4

Remove air filter element

 ④.

5

Remove polyurethane foam of filter element

, 

Wash the air filter element gently but thoroughly in solvent

.  

Squeeze the excess solvent out of the air filter element and 
let it dry.

-110-

Maintenance & Lubrication

-------------------------------------------------------------------------------------------------------------------------------------------------------------

6

Softly clean dust on filter element.

7

If necessary, use new filter element to replace.

CAUTION

Don

'

t use liquid to wash paper filter element.

8.  Inspect the air filter element and replace it if damaged.

9

Install air filter element and connect to hose

.

10.  Install the air filter case cover and be sure to seal ring installed well.

NOTE

The air filter element should be cleaned every 50 hours, It should be cleaned and lubricate more 

 often if the machine is operated in extremely dusty areas. Each time air filter element maintenance 

 is performed, check the air inlet to the air filter box


for


obstructions

.

Check


the


air


filter


element


rubber joint to the throttle body and manifold fittings for an airtight seal

.

Tighten all fittings securely 

to avoid the possibility of unfiltered air entering the engine.

-111-

Maintenance & Lubrication

-------------------------------------------------------------------------------------------------------------------------------------------------------------

DANGER

Do not start engine without air filter element. Not filtered air will entre into the engine and cause

 engine wearing and damage. In addition, driving without air filter will also decrease performance 

and engine overheating.

Clean spark plug:

Clean spark plug while muffler and exhaust are in normal temperature.
1. Remove nut 

① 。

2. Remove spark plug arrester 

② 

from


muffler

;

3. Tap the tailpipe lightly, and then use a wire brush to remove any carbon deposits 

③ 

from the spark

arrester


portion of the tailpipe.

4. Insert the tailpipe into the muffler and align the bolt holes

;

5. Install and tighten the bolts

 ①.

-112-

Maintenance & Lubrication

-------------------------------------------------------------------------------------------------------------------------------------------------------------

DANGER

When cleaning the spark arrester: Always


let


the


exhaust

system cool prior to touching exhaust components. Do

not start the engine when cleaning the exhaust system.

CVT air-inlet hose cleaning

If dust or water collects in the V-belt cooling duct check.
hose, remove the hose

 ① 

and clean it

.

CVT cover drain bolt

After riding in water deep enough to allow it to enter the

V-belt case, remove this bolt to drain the water from the
case

WARNING

f water drains from the V-belt case after
removing the bolt, have your dealer inspect

the ATV as the water may affect other engine

parts.

-113-

Maintenance & Lubrication

-------------------------------------------------------------------------------------------------------------------------------------------------------------

Throttle body adjustment

The throttle body is a vital part of the engine and requires very sophisticated adjustment

.

Most adj-

usting should be left to your dealer who has the professional knowledge and experience to do so.

 However, the idling speed may


be performed by the owner as a part of the usual maintenance routine.

The throttle body was set at the factory after many tests

.

If the settings are disturbed by someone


without sufficient technical knowledge, poor engine performance and damage may result. Check

 idle for stability and contact your dealer for service if necessary. 

Engine idel adjustment:

WARNING

this vehicle is equipment with EFI system, and no need to adjust idle, or performance will be affected. 
Contact your dealer in case abnormal idle.


NOTE

Engine idle: 1,300±100r/min(Heated engine)

Engine airinlet/outlet valve clearance adjustment

The correct valve clearance changes with use, resulting in improper fuel/air supply or engine noise. 

To prevent


this, the valve clearance must be adjusted regularly. This adjustment however, should be 

left to a professional


service technician.

-114-

Maintenance & Lubrication

-------------------------------------------------------------------------------------------------------------------------------------------------------------


Content      ..     5      6      7      8     ..